SEARCH FINESCALE.COM

Enter keywords or a search phrase below:

Supermarine/Vickers GB

54848 views
671 replies
1 rating 2 rating 3 rating 4 rating 5 rating
  • Member since
    September 2018
  • From: Vancouver, Washington USA
Posted by Sergeant on Sunday, December 26, 2021 11:46 AM

Bish

Thats a cracking looking Spit harold ( not often i say that Wink ). Been a pleasure following the build and all the great info being shared.

I am going to spend some time tomorrow catching up on the GB's and getting rosters/final pics updated.


Thank you Bish... May I display a Supermarine GB badge?

  • Member since
    December 2002
  • From: Bury St Edmunds, Suffolk, England
Posted by Bish on Sunday, December 26, 2021 11:30 AM

Thats a cracking looking Spit harold ( not often i say that Wink ). Been a pleasure following the build and all the great info being shared.

I am going to spend some time tomorrow catching up on the GB's and getting rosters/final pics updated.

I am a Norfolk man and i glory in being so


On the bench: Airfix 1/72nd Harrier GR.3/Fujimi 1/72nd Ju 87D-3

  • Member since
    September 2018
  • From: Vancouver, Washington USA
Posted by Sergeant on Sunday, December 26, 2021 11:09 AM

jgeratic

Harold, I like how the your Spitfire turned out, excellent paint.Yes

It is good to see that the fine surface details did not disappear with the repaint.


---------------


Merry Christmas everyone!


regards,

Jack


Thank you, Jack, I learned a lot of new techniques on this model; if it had not been for the help, you and other members gave me along the way it would not have turned out as well as it has for me. I honestly did not realize how much work aircraft models require, but they are fun to build.

Harold

  • Member since
    April 2006
  • From: ON, Canada
Posted by jgeratic on Sunday, December 26, 2021 10:55 AM

Harold, I like how your Spitfire turned out, excellent paint.Yes

It is good to see that the fine surface details did not disappear with the repaint.


---------------


Merry Christmas everyone!


regards,

Jack


  • Member since
    September 2018
  • From: Vancouver, Washington USA
Posted by Sergeant on Sunday, December 26, 2021 9:51 AM

Ready for Inspection.


  • Member since
    November 2009
  • From: SW Virginia
Posted by Gamera on Saturday, December 25, 2021 7:56 AM

Merry Christmas to you Harold, Bish, and all my friends here!

"I dream in fire but work in clay." -Arthur Machen


  • Member since
    December 2002
  • From: Bury St Edmunds, Suffolk, England
Posted by Bish on Saturday, December 25, 2021 6:33 AM

And the same back to you Harold and to all the great members on here.

I am a Norfolk man and i glory in being so


On the bench: Airfix 1/72nd Harrier GR.3/Fujimi 1/72nd Ju 87D-3

  • Member since
    September 2018
  • From: Vancouver, Washington USA
Posted by Sergeant on Friday, December 24, 2021 7:25 PM

Merry Christmas & Happy New Year from Vancouver, Washington.

  • Member since
    September 2018
  • From: Vancouver, Washington USA
Posted by Sergeant on Wednesday, December 22, 2021 11:36 PM

Thank you Robert, Bish and Cliff. Today I finished the decals and tomorrow I will give the model a clear coat of satin varnish. After that I can glue down the canopy, landing gear and propeller nose cone. If all goes well I should be able to submit my first successful camouflage aircraft model to Bish for final inspection.

Who knew aircraft models require so much work? But this has been great fun and I learned so much more about scale modeling.

Harold

  • Member since
    November 2009
  • From: SW Virginia
Posted by Gamera on Sunday, December 19, 2021 6:58 PM

Robert & Harold: Looking good guys!!! Yes

"I dream in fire but work in clay." -Arthur Machen


  • Member since
    December 2002
  • From: Bury St Edmunds, Suffolk, England
Posted by Bish on Saturday, December 18, 2021 12:55 PM

That is very nice Robert, i am really impressed with that deck.

I am a Norfolk man and i glory in being so


On the bench: Airfix 1/72nd Harrier GR.3/Fujimi 1/72nd Ju 87D-3

  • Member since
    December 2002
  • From: Bury St Edmunds, Suffolk, England
Posted by Bish on Saturday, December 18, 2021 12:55 PM

Thats looks great with the deals Harold, they have gone down really well.

I am a Norfolk man and i glory in being so


On the bench: Airfix 1/72nd Harrier GR.3/Fujimi 1/72nd Ju 87D-3

  • Member since
    February 2005
  • From: Nashotah, WI
Posted by Glamdring on Saturday, December 18, 2021 12:37 PM

There has been fantastic progress going on here since my last update, bravo Harold, JB, and LostAgain!

As for the Invicible, decals have been affixed and the rudders and screws installed.  I can call finallt the ship itself done, even if the entire project isn't.


All that is left is filling out the deck with a few Harriers and choppers.  With the itty bitty roundel decals for them, I keep procrastinating though...  

I am hoping to get a photo booth for Christmas, so I can give a decent finished photo too.  Smile

Robert 

"I can't get ahead no matter how hard I try, I'm gettin' really good at barely gettin' by"

  • Member since
    September 2018
  • From: Vancouver, Washington USA
Posted by Sergeant on Friday, December 17, 2021 9:04 PM

GAF

That looks great, Harold!  I had problems with those raised areas under the wings, but a bit of Microsol will snug them down.

Gary


Thank you, Gary, I used a product like Microsol, it's called Decal Set & Soften 2 in 1 by VMS in Poland Supplies https://www.vms-supplies.com/. Even with this product I managed to mess up a little as you can see below. I cut the decal to make it look more like it would if the roundel were painted on the wing.

After I get the stenciling decals on, I will wait 24-hours and give the entire model a seal coat of Vallejo #70.522 Satin Varnish. It will change that bumpy orange-peel appearance you see below into a smooth uniform finish that is not to dull and has just enough shine to look almost real like the photograph below of my AEC Matador.

Harold

GAF
  • Member since
    June 2012
  • From: Anniston, AL
Posted by GAF on Friday, December 17, 2021 8:53 PM

That looks great, Harold!  I had problems with those raised areas under the wings, but a bit of Microsol will snug them down.

Gary

  • Member since
    September 2018
  • From: Vancouver, Washington USA
Posted by Sergeant on Friday, December 17, 2021 8:33 PM

taxtp
Harold, I usually try to prime the canopy with whatever colour the inside of the framing was, so it represents that when seen through the canopy. Often it's flat blacky, and if it's not, you can often get away with flat black. I think your Spitfire looks excellent to date. I should also note that the Israeli Sptfire rings all of my bells, I love the post war use of wartime types. My Mk 1a Spitfire is ready to have the canopy masked now.

Thank you, Tony. I agree with your method on the canopy primer. I will be watching to see how your canopy turns out.

To cover the light grey primer on mine I used the dark green and very carefully painted over any exposed primer. I needed a magnifying glass to see what I was doing, and the touch up helped. From a distance you can't tell that I got a little dark green on the clear plastic.

Harold

  • Member since
    September 2018
  • From: Vancouver, Washington USA
Posted by Sergeant on Friday, December 17, 2021 8:21 PM

I got the major decals on today, but still need to add the stenciling decals. The roundel decals under the wing were a challenge because of the vents.

  • Member since
    April 2005
  • From: Australia
Posted by taxtp on Friday, December 17, 2021 8:12 PM

Harold, I usually try to prime the canopy with whatever colour the inside of the framing was, so it represents that when seen through the canopy. Often it's flat blacky, and if it's not, you can often get away with flat black. I think your Spitfire looks excellent to date.

I should also note that the Israeli Sptfire rings all of my bells, I love the post war use of wartime types.

My Mk 1a Spitfire is ready to have the canopy masked now.

Cheers

Tony

I'm just taking it one GB at a time.

  • Member since
    September 2018
  • From: Vancouver, Washington USA
Posted by Sergeant on Tuesday, December 14, 2021 12:22 PM

Gamera

She looks good to me Harold! Yes


Thank you, Cliff. I learned a lesson about painting the canopy. In the future I will use a dark primer instead of light grey, so when I remove the masking if the primer is exposed it will be harder to see. The canopy on my Spitfire looks fine from a distance, but up close its a little rough.

Harold

  • Member since
    November 2009
  • From: SW Virginia
Posted by Gamera on Monday, December 13, 2021 8:01 PM

She looks good to me Harold! Yes

"I dream in fire but work in clay." -Arthur Machen


  • Member since
    September 2018
  • From: Vancouver, Washington USA
Posted by Sergeant on Sunday, December 12, 2021 8:51 PM

jgeratic

Looking good Harold. 


 A sharp scalpel scored along the window frame followed by some burnishing with a wooden cocktail stick might clean up that canopy hood.


regards

Jack


Thank you, Bish. And Jack my friend, you have been a great help to me all the way through this project. The canopy cleaned up well, but as you can see I took a little dark green paint off in the process; no problem though I can touch that up. In the future I will use olive drab or black surface primer instead of lighter colours.

I started on the propeller tonight, it still needs the yellow tips painted. The cockpit canopy is just sitting on the fuselage in these pictures, I am not sure if I should glue it down now, so I can touch up the paint, or wait until the I get the decals on and sealed with a clear coat of satin varnish?

Harold

  • Member since
    April 2006
  • From: ON, Canada
Posted by jgeratic on Sunday, December 12, 2021 4:26 PM

Looking good Harold. 


 A sharp scalpel scored along the window frame followed by some burnishing with a wooden cocktail stick might clean up that canopy hood.


regards

Jack

  • Member since
    September 2018
  • From: Vancouver, Washington USA
Posted by Sergeant on Sunday, December 12, 2021 2:03 PM

JBRaider
Looking good Harold, the hard part is behind you now.

Thank you, JB. I don't know why the camouflage painting is so stressful for me. I basically know what to do and I enjoy doing it, but I get very anxious about messing it up. It helped having John, Cliff and Jack giving me the benefit of their experience.

I took the masking off the cockpit canopy because the instructions said not to leave the liquid masking on more than 24-hours. The movable part of the canopy had a combination of Eduard's mask and liquid mask. The second coat of paint was not completely dry and between the edge of the paint lifting a little and the adhesive from the Eduard mask the clear part of the canopy looks a little ragged. I will give the canopy paint a few hours to dry and then try to clean it up later today.

Harold

  • Member since
    December 2002
  • From: Bury St Edmunds, Suffolk, England
Posted by Bish on Sunday, December 12, 2021 1:36 PM

Lovely work there Harold, colours look great.

I am a Norfolk man and i glory in being so


On the bench: Airfix 1/72nd Harrier GR.3/Fujimi 1/72nd Ju 87D-3

  • Member since
    April 2020
  • From: West Texas
Posted by JBRaider on Saturday, December 11, 2021 4:24 PM

Coming togerther nicely Tony, that is a fun little kit.

Looking good Harold, the hard part is behind you now.

  • Member since
    September 2018
  • From: Vancouver, Washington USA
Posted by Sergeant on Saturday, December 11, 2021 11:30 AM

I finished the Sky colour underneath the wings and fuselage this morning and I'm pleased with the results. There is just a hint of Sky colour overspray on the leading edge of the wings and I believe that is what John recommended to softening the demarcation from dark camouflage colour to the lighter Sky colour.

The landing gear, cockpit door and canopy are just sitting on the fuselage as is the propeller and nose. My next step is to paint the canopy, the Sky coloured tail band, exhaust pipes, and the propeller. Then I can start on the decals. I will leave the propeller, landing gear and antenna off until the decals are finished so I don't break anything. If all goes well, I might even finish this model before Christmas.

PS. Jack I checked the lighting and that is what makes the dark earth brown look more sand colour. I recently added a large L.E.D. light fixture to my paint booth where I take my photographs and it changes some of the colours, but it takes the strain off my eyes, so I will live with the colour issue.

Harold

  • Member since
    September 2018
  • From: Vancouver, Washington USA
Posted by Sergeant on Friday, December 10, 2021 8:42 PM

Gamera

Tony: She's coming along beautifully!

Harold: I think you've got it- that looks great!


Tony, it looks like you're ready to seal-the-deal and glue the fuselage together. Nice work, looking forward to seeing the finished model.

JB, I don't know anything about colours for your Spitfire, but you did a nice job on the paint and decals.

Cliff, thank you my friend. I am waiting for the Sky colour to dry a little before I remove the masking to see what trouble I may have got myself into. Not really, John has guided me carefully through this major painting step and I feel good about how it will look when all is revealed.

In the meantime, I popped the protective canopy off my cockpit and behold no major problems. When does that ever happen? Next step is to paint the canopy and that should be fun since I have never done that before either.

Harold


  • Member since
    November 2009
  • From: SW Virginia
Posted by Gamera on Friday, December 10, 2021 9:07 AM

Tony: She's coming along beautifully!

Harold: I think you've got it- that looks great!

"I dream in fire but work in clay." -Arthur Machen


  • Member since
    April 2005
  • From: Australia
Posted by taxtp on Thursday, December 9, 2021 11:39 PM

I think your camo looks pretty good Harold. Neatly done.

Here's a progress update on my Airfix Spitfire. I really like the office in this kit.

Cheers

Tony

I'm just taking it one GB at a time.

  • Member since
    September 2018
  • From: Vancouver, Washington USA
Posted by Sergeant on Thursday, December 9, 2021 9:16 PM

jeaton01

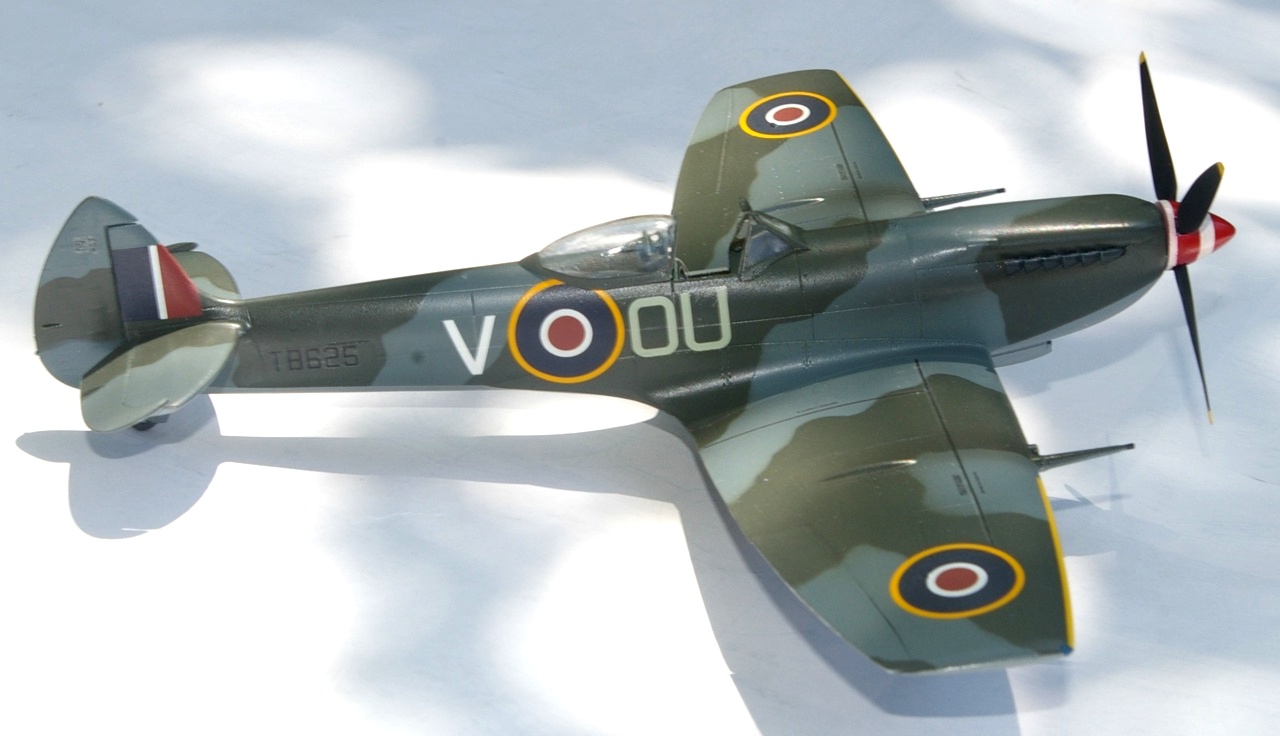
That's right Harold.  And I only do that when the paper wants to rest too close to the surface.  Most of the time the paper rests up 1/32 or so and that seems to be about right.  The paint wants to be pretty well thinned, and low air pressure is also good.  One other thing I do is spray the edges first, aiming straight down or a little toward the center, and then fill in the center areas staying away from the edges.  The British used mats to paint the camouflage pattern so you want an indefinite demarcation, but not a real loose one like you would see on a USN tri-color scheme.  Here's a 1/48 ICM Mk XVI I did some time back.  I did a pretty hard line on the bottom, not sure if that is right on the fuselage except for the cowling, which is usually not blended because the belly part is a separate removable panel.


John I really like the way you do your camouflage. It has that soft transition between colours in the camouflage pattern and between the lighter colour underneath and the darker camouflage colour on top at the edge of wings. It is a great example of what you have been talking about.

Thank you,

Harold

JOIN OUR COMMUNITY!

Our community is FREE to join. To participate you must either login or register for an account.

SEARCH FORUMS
FREE NEWSLETTER
By signing up you may also receive reader surveys and occasional special offers. We do not sell, rent or trade our email lists. View our Privacy Policy.