SEARCH FINESCALE.COM

Enter keywords or a search phrase below:

Artillery and Field guns GB 06

11316 views
84 replies
1 rating 2 rating 3 rating 4 rating 5 rating
  • Member since
    March 2006
  • From: Drummondville, Quebec, Canada
Posted by Yann Solo on Monday, November 20, 2006 7:15 AM
Most impressive Dwight.  You did a lot of work on that one.  Congratulation, you nailed it.  It looks awesome.
No matter where you go ....... there you are.
  • Member since
    July 2003
  • From: Philippines
Posted by Dwight Ta-ala on Sunday, November 19, 2006 6:12 PM

stik: That looks like is has seen some heavy-duty action. Great job!

Anyway...I have finally finished my entry for this GB and here it is...supposedly a diorama of a Russian recon team accidentally stumbling upon a newly set flak 36 emplacement. The Russians have been losing a lot of armor from these higly mobile guns that finding them is a must.

Comments are welcome.

  • Member since
    July 2004
  • From: Sonora Desert
Posted by stikpusher on Saturday, November 18, 2006 3:26 PM
OK, not sure what I am doing here and slightly off topic, but... How the heck do you add the GB image???


F is for FIRE, That burns down the whole town!

U is for URANIUM... BOMBS!

N is for NO SURVIVORS...

       - Plankton

LSM


  • Member since
    July 2004
  • From: Sonora Desert
Posted by stikpusher on Thursday, November 2, 2006 2:28 AM
Thanks for fixing the GB badge! And thank you for the kind words. It was a great kit to build that I really enjoyed,  in spite of the delays. No, I must admit that I did not do any dry brushing on this one. The effect I wanted was a vehicle recently out of overhall (hence the slightly different paint patches behind the vehicle numbers) that was sent out to the firing line. There actually was not a whole lot of texture to dry brush out. Maybe on my next creation... ;-)


F is for FIRE, That burns down the whole town!

U is for URANIUM... BOMBS!

N is for NO SURVIVORS...

       - Plankton

LSM


  • Member since
    March 2006
  • From: Drummondville, Quebec, Canada
Posted by Yann Solo on Wednesday, November 1, 2006 1:03 PM

Sorry about the badge, it is now corrected.

 That skif model looks mighty sharp.  We don't see that one often.  I think you did well, it looks dusty enough.  One question though!  Have you done some drybrushing on the raised details?  It doesn't show very well on the pictures but a good drybrush would make all those details to come up.

No matter where you go ....... there you are.
  • Member since
    July 2004
  • From: Sonora Desert
Posted by stikpusher on Wednesday, November 1, 2006 12:46 PM
She's all done Yann.... However there seems to be a problem with the GB badge???


F is for FIRE, That burns down the whole town!

U is for URANIUM... BOMBS!

N is for NO SURVIVORS...

       - Plankton

LSM


  • Member since
    July 2004
  • From: Sonora Desert
Posted by stikpusher on Tuesday, October 31, 2006 4:15 PM

OK... after many delays, diversions and days of wondering if I would ever be able to have the time to complete this thing...

In living color, the 1/35 SKIF 2S1 SP 122mm Howitzer joins the ranks of a completed group build...


F is for FIRE, That burns down the whole town!

U is for URANIUM... BOMBS!

N is for NO SURVIVORS...

       - Plankton

LSM


  • Member since
    July 2004
  • From: Sonora Desert
Posted by stikpusher on Monday, October 2, 2006 3:57 PM
Sir, yes Sir! Okay, I passed a major obstacle to my hobbywork time so this weekend actually saw some progress on the2S1. Decals are on, and now all that is pretty much left is tracks and weathering...


F is for FIRE, That burns down the whole town!

U is for URANIUM... BOMBS!

N is for NO SURVIVORS...

       - Plankton

LSM


  • Member since
    March 2006
  • From: Drummondville, Quebec, Canada
Posted by Yann Solo on Friday, September 1, 2006 2:03 PM
The building period of that group build is extended until december.  Come on guys, lets do this before christmas.
No matter where you go ....... there you are.
  • Member since
    July 2004
  • From: Northern KY
Posted by mucker on Friday, August 18, 2006 2:29 PM

I'm guilty as charged. I've been stuck on the ammo trailer for the 25 pounder. Yann, I'll swap you for your CF-18!

Just kidding.

I'll get it in gear...

  • Member since
    March 2006
  • From: Drummondville, Quebec, Canada
Posted by Yann Solo on Friday, August 18, 2006 2:05 PM

Ha Ha!  Don't worry I was just trying to wake up everyone.  Can't wait to see your monster finished.

No matter where you go ....... there you are.
  • Member since
    July 2004
  • From: Sonora Desert
Posted by stikpusher on Friday, August 18, 2006 2:03 PM

Sorry Man...Sleepy [|)]

I have the basic painting on my 2S1 finished and have begun wethering but have not done any photos. And them a Trumpeter SA-2 drew my attention away...  But this build is certainly not abandoned by me...


F is for FIRE, That burns down the whole town!

U is for URANIUM... BOMBS!

N is for NO SURVIVORS...

       - Plankton

LSM


  • Member since
    March 2006
  • From: Drummondville, Quebec, Canada
Posted by Yann Solo on Thursday, August 17, 2006 9:25 AM
What's happening guys?  Where are you at right now?  That group build is coming to an end and you did'nt made any progress since July!!!!!!!  Come on get to work and show your stuff.Big Smile [:D]  I've made 5 models after my Flak 36.
No matter where you go ....... there you are.
  • Member since
    December 2005
  • From: Goteborg / Sverige
Posted by Svenne Duva on Friday, July 7, 2006 2:16 PM

Thx Dwight.
Meanwhile can you tell me if i need B27 or B20 for the loading tray?
Progress so far: Main gun sub assy built and primed,  leg sub assys built and primed, front and rear boogey's 70% done.
Wont post any pictures of the black primed parts since my camera cant pick up any detail.

Svenne


sic transit gloria mundi

  • Member since
    March 2006
  • From: Drummondville, Quebec, Canada
Posted by Yann Solo on Thursday, July 6, 2006 10:58 AM

Dwight, that dio is coming along nicely.

Svenne, do you still need help about the shield?

No matter where you go ....... there you are.
  • Member since
    July 2003
  • From: Philippines
Posted by Dwight Ta-ala on Wednesday, July 5, 2006 7:09 PM

Svenne,

I'll try to scan the instructions on my kit when I get home and try to send to you probably by tomorrow. (Don't have internet connection at home yet.). As for the Tamiya kit, you are right. The shield is basically the same as what is supplied in my kit. I built the Tamiya kit some years back.

As for my progress, all I can say is that it is definitely moving at a snail's pace. Big Smile [:D]

Here is the latest pic so far.


Hope to show more progress next time. Shy [8)]Smile [:)]

  • Member since
    December 2005
  • From: Goteborg / Sverige
Posted by Svenne Duva on Tuesday, July 4, 2006 1:55 PM

1. For unknown reasons the assembly of the loading bay is not explained in the 6287 kit. The main part is supplied, B30 on the sprue, but the drawings suggests that it should be omitted.
Would You be able to send me some detail on the assembly Dwight?

2. The kit actually allows you to build both the 18, 36 and 37 but there is no refernce as to which shield should be used for the specific versions. The shields supplied are a normal shield, an extended shield and a pressed shield.
Are all combinations possible, the Painting and markings section mixes them freely?
I think the Tamy is equipped with the normail shield, same as Yann and Dwight have used for there builds.

Looking forward to your advice and any future updates :)

Svenne   

sic transit gloria mundi

  • Member since
    March 2006
  • From: Drummondville, Quebec, Canada
Posted by Yann Solo on Monday, July 3, 2006 6:55 AM
Yeah!  That is the problem with the Dragons kit.  The instructions for their Tiger I late are even worst.
No matter where you go ....... there you are.
  • Member since
    December 2005
  • From: Goteborg / Sverige
Posted by Svenne Duva on Sunday, July 2, 2006 12:36 PM
Jezez how they over complicate the instructions, isn't there a "How to lay out a drawing" course that Tamiya could conduct?

sic transit gloria mundi

  • Member since
    December 2005
  • From: Goteborg / Sverige
Posted by Svenne Duva on Sunday, July 2, 2006 12:16 PM


Hannants where stocked out on the 36 so I went home with the 37 (DN6287)
Which turned out to be just as good since it can be built into a 36!
The kit looks first class at first glance, I mean hey, I have in all 4 barrels and 3 shields to chose from, all bursting with detail!
Decissions taken so far.
It is going to be a 36 with shield.
It is going to be in action and not in transport.
Not sure about all German Grey any longer...

CG on great lloking builds so far everyone.
Your Dio looks just awesome Yann!
Your great looking camo has made me gett into second thaughts Dwight :)
BTW, the tanxheaven link is not working for me, has it moved?

Svenne

sic transit gloria mundi

  • Member since
    July 2003
  • From: Philippines
Posted by Dwight Ta-ala on Wednesday, June 28, 2006 6:54 PM

Johan: Thanks for the pics. I can still incorporate those details to my build.

Stick: She looks really good at this stage.

As for me I am still stuck with the diorama. Hope to get more progress this weekend.


  • Member since
    March 2006
  • From: Drummondville, Quebec, Canada
Posted by Yann Solo on Wednesday, June 28, 2006 3:11 PM

Well!  It's still scary!  Good job so far.Thumbs Up [tup]

No matter where you go ....... there you are.
  • Member since
    July 2004
  • From: Sonora Desert
Posted by stikpusher on Wednesday, June 28, 2006 3:09 PM
About the same size as a T-72 or Panther... It has a narrow hull


F is for FIRE, That burns down the whole town!

U is for URANIUM... BOMBS!

N is for NO SURVIVORS...

       - Plankton

LSM


  • Member since
    March 2006
  • From: Drummondville, Quebec, Canada
Posted by Yann Solo on Wednesday, June 28, 2006 3:07 PM
Man!  How long is that beast.  It looks so big!
No matter where you go ....... there you are.
  • Member since
    July 2004
  • From: Sonora Desert
Posted by stikpusher on Wednesday, June 28, 2006 2:50 PM

Here are a few pics of my latest progress on my 2S1. Hopefully on my days off this week I will make more significant progress. Just the base coat of paint so far...


F is for FIRE, That burns down the whole town!

U is for URANIUM... BOMBS!

N is for NO SURVIVORS...

       - Plankton

LSM


  • Member since
    April 2005
  • From: Gothenburg
Posted by JohanT on Tuesday, June 27, 2006 2:37 PM

Here are some pics that could be off reference use, posted before in the Armor forum:
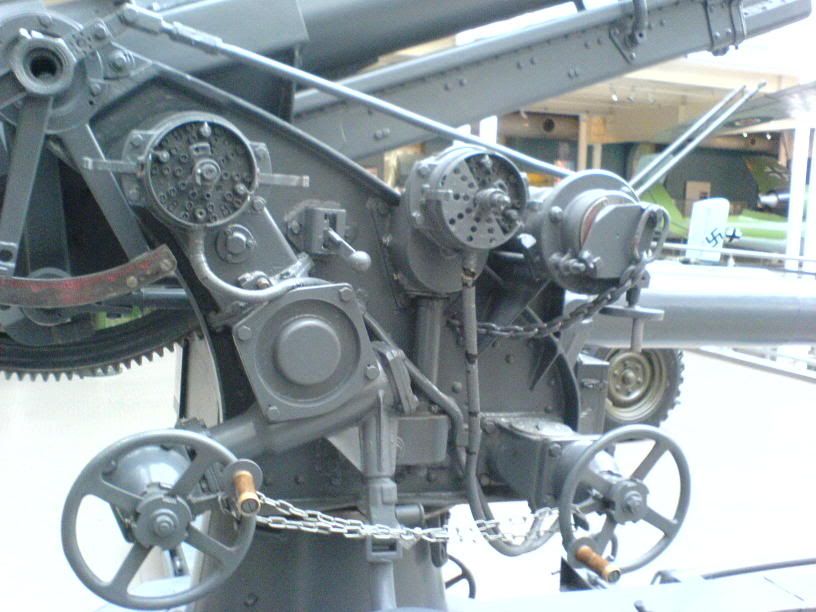

Elevation scale in polished steal, red dials, elevation control handles in wood with brass fairing.
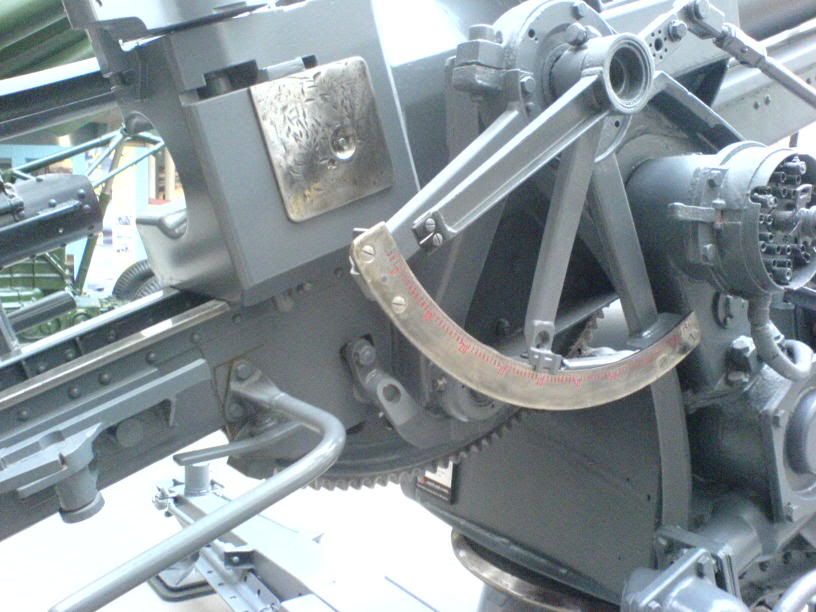

Breach, sliding rail and elevation scale, polished steel.
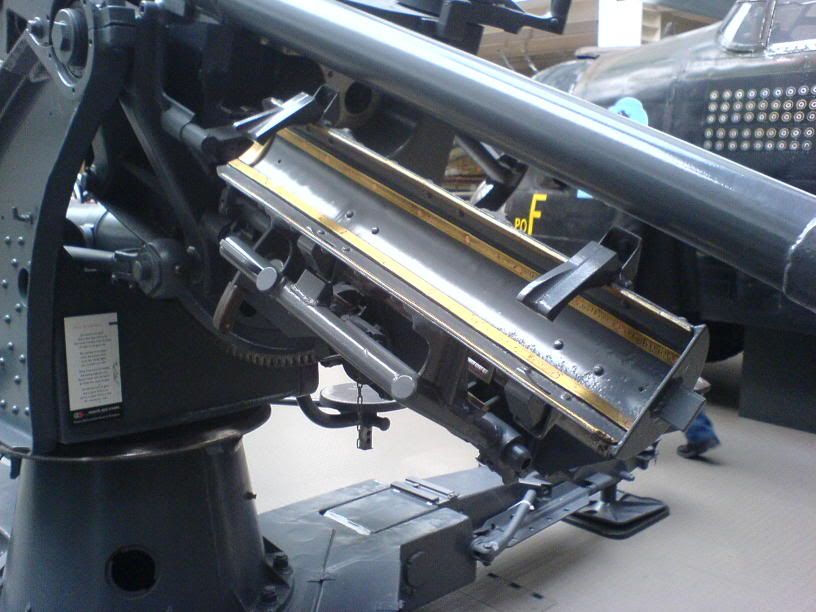

Loading bay, brass fairing, please also note 360' scale in poished steel, red dials.

All pictures where taken at the Imperial War Museum in London, November 2005.

VBR
Johan

  • Member since
    December 2002
  • From: United Kingdom / Belgium
Posted by djmodels1999 on Tuesday, June 27, 2006 2:48 AM
Nice work, Dwight!
  • Member since
    July 2003
  • From: Philippines
Posted by Dwight Ta-ala on Sunday, June 18, 2006 6:22 PM

Work on my diorama has been very slow. So far I have only managed to assemble the fibures and some accessories. I have also started with the ruins.

Here are some pics:

The Flak crew:

The ruins:

I'll update you with the progress regularly.

  • Member since
    July 2004
  • From: Northern KY
Posted by mucker on Thursday, June 15, 2006 3:42 PM
That's a pretty neat kit, DJ. She'll look awesome once primed and painted.

JOIN OUR COMMUNITY!

Our community is FREE to join. To participate you must either login or register for an account.

SEARCH FORUMS
FREE NEWSLETTER
By signing up you may also receive reader surveys and occasional special offers. We do not sell, rent or trade our email lists. View our Privacy Policy.