SEARCH FINESCALE.COM

Enter keywords or a search phrase below:

Winter Warriors GB 2008

82731 views
855 replies
1 rating 2 rating 3 rating 4 rating 5 rating
  • Member since
    December 2003
  • From: Los Angeles
Posted by dostacos on Wednesday, January 9, 2008 7:58 PM

WIP My M 8 howitzer primed I think I will need to steal a hedgerow cutter for th front {either that or fill in the HUGE hole in the hull where it goes Sigh [sigh]


Dan support your 2nd amendment rights to keep and arm bears!
  • Member since
    November 2006
  • From: Coastal Maine
Posted by dupes on Thursday, January 10, 2008 6:17 AM

Wow! I see what you mean about that big gap...surprising from a Tamiya kit.

Were the M8's equipped with hedgerow devices?

Good luck filling that hole if you can't find one. Shock [:O]

  • Member since
    November 2006
  • From: Coastal Maine
Posted by dupes on Thursday, January 10, 2008 8:04 AM
 arki30 wrote:

Interesting that they mention the lower surfaces being RLM 76, but it doesn't look like it in the picture? Maybe it's just me being colorblind, but it all looks whitewashed to me.

So it looks like you need to do the whole "regular" upper scheme and then coat with a thin layer of white to get the original stuff to just show through. Should be very interesting! Big Smile [:D]

  • Member since
    February 2004
  • From: Second City
Posted by arki30 on Thursday, January 10, 2008 8:54 AM

Dupes, agreed on the picture not representing the underside color callout correctly.  And yep, I will have to paint the "regular" scheme before applying the whitewash so it will slightly show through.  You'll notice I'll also have to apply some or all of the markings as well since it appears that there is some overcoverage from the whitewash.  But that will be a pain in the Censored [censored] to get right.  Not looking forward to it. 

I'll have to spend some time doing more research before I start the painting.  For now I've started assembling the engine.  Nice detail, too bad none of it will be visible.

Building Now:

1/48 Academy Bf-109G6 - 100%

1/48 Tamiya F4U-1A - 5%

Upcoming:

1/48 Revell F-14D

  • Member since
    December 2002
  • From: Reno, NV
Posted by espins1 on Thursday, January 10, 2008 12:07 PM

I do believe the underside should be RLM 76.  I did a similar scheme last year on a Hasegawa 1/32 Bf 109G-14 flown by Erich Hartmann.

First I free handed the upper camo, mostly for free hand airbrushing practice, but also to add to the realism of a slightly worn winter camo scheme.  I then deliberately sprayed it kinda patchy, yet with decent coverage at the same time. 

I have a few decent photos of various white washed schemes that I'd be more than happy to scan and post when I get home from work this evening.


Scott Espin - IPMS Reno High Rollers  Geeked My Reviews 

  • Member since
    February 2004
  • From: Second City
Posted by arki30 on Thursday, January 10, 2008 1:12 PM

Yep, Scott, that's essentially the same path I'll attempt to take.  Did you apply the decals after the whitewash? 

Post any reference pic you have!  I can use whatever I can get my grubby mitts on! Big Smile [:D]

Building Now:

1/48 Academy Bf-109G6 - 100%

1/48 Tamiya F4U-1A - 5%

Upcoming:

1/48 Revell F-14D

  • Member since
    November 2006
  • From: Coastal Maine
Posted by dupes on Thursday, January 10, 2008 3:11 PM

Wow Scott, that 109 looks great. You managed to achieve almost EXACTLY the opacity with the whitewash coat that they were showing in Arki's markings scan. Thumbs Up [tup]Thumbs Up [tup]

Was that one coat of white over the top of the "usual" camo, or did you have to go with multiple passes? 

  • Member since
    December 2002
  • From: Reno, NV
Posted by espins1 on Thursday, January 10, 2008 3:54 PM

Thanks!  Smile [:)]

I made a thinned mix of Tamiya Flat White XF-2 and basically ran the airbrush all over the plane in random, spaghetti noodle patterns holding the airbrush fairly close to the surface.  These are some of the references photos/profiles that I used for inspiration:

The decals went on after the whitewash.  Normally, on most schemes that you see, there should be areas where no whitewash was applied, especially around and on the numbers, balkenkreuz etc.  The references I had for Erich Hartmann's aircraft appeared to have had the markings applied after the whitewash.  He used this aircraft only temporarily while commanding JG54 (if I remember correctly).  The references show his aircraft was very well maintained and very clean. 

When I originally put the decals on, the balkenkreuz decalss on the fuselage sides and upper wings and the yellow fuselage tail band wrinkled up something fierce when I applied some decal setting solution solution..... I ended up having to sand the decals off, which you can see in these pictures:

And then re-apply the whitewash in those areas, being very careful to replicate the same look and feel from the original, non-sanded areas around them.  It was tricky, but the gods must have been smiling down upon me that day.....

Scott Espin - IPMS Reno High Rollers  Geeked My Reviews 

  • Member since
    December 2003
  • From: Los Angeles
Posted by dostacos on Thursday, January 10, 2008 5:14 PM
 dupes wrote:

Wow! I see what you mean about that big gap...surprising from a Tamiya kit.

Were the M8's equipped with hedgerow devices?

Good luck filling that hole if you can't find one. Shock [:O]

eek! the top is not attached yet the gap is smaller, where the hedgerow cutter sitsWhistling [:-^]Ashamed [*^_^*]

EDIT: yes the Self propelled guns {squadron book} back cover shows one, I don't like the look so I plan on filling the hole. Most of the pictures also show it without the side fenders so they are GONESmile,Wink, & Grin [swg]

Dan support your 2nd amendment rights to keep and arm bears!
  • Member since
    February 2004
  • From: Second City
Posted by arki30 on Thursday, January 10, 2008 7:21 PM
 espins1 wrote:

Thanks!  Smile [:)]

I made a thinned mix of Tamiya Flat White XF-2 and basically ran the airbrush all over the plane in random, spaghetti noodle patterns holding the airbrush fairly close to the surface.  These are some of the references photos/profiles that I used for inspiration:

The decals went on after the whitewash.  Normally, on most schemes that you see, there should be areas where no whitewash was applied, especially around and on the numbers, balkenkreuz etc.  The references I had for Erich Hartmann's aircraft appeared to have had the markings applied after the whitewash.  He used this aircraft only temporarily while commanding JG54 (if I remember correctly).  The references show his aircraft was very well maintained and very clean. 

Woohoo!  Thanks for the pics, Scott.  I'm rethinking the whole decal sequencing now.  Because 1) it may be more accurate to place after the whitewash, and 2) it'll be soooo much easier. Smile [:)]


Building Now:

1/48 Academy Bf-109G6 - 100%

1/48 Tamiya F4U-1A - 5%

Upcoming:

1/48 Revell F-14D

  • Member since
    February 2004
  • From: Second City
Posted by arki30 on Thursday, January 10, 2008 9:09 PM

And like a total doofus I completely forgot I own Osprey's Bf109 Aces of the Russian Front.  There is good reference material in there for whitewash schemes. 

Excuse while I go read for awhile Big Smile [:D]

Building Now:

1/48 Academy Bf-109G6 - 100%

1/48 Tamiya F4U-1A - 5%

Upcoming:

1/48 Revell F-14D

  • Member since
    December 2002
  • From: Reno, NV
Posted by espins1 on Thursday, January 10, 2008 9:43 PM
 arki30 wrote:

And like a total doofus I completely forgot I own Osprey's Bf109 Aces of the Russian Front.  There is good reference material in there for whitewash schemes. 

Excuse while I go read for awhile Big Smile [:D]

Laugh [(-D]Laugh [(-D]Laugh [(-D]

I was just about to start scanning some goodies out of that one for you!

Laugh [(-D]Laugh [(-D]Laugh [(-D]

Scott Espin - IPMS Reno High Rollers  Geeked My Reviews 

  • Member since
    April 2007
  • From: Schroon Lake, NY
Posted by SMJmodeler on Friday, January 11, 2008 12:31 AM

Guys:

WIP-SU122.  I'm just about ready to start painting:

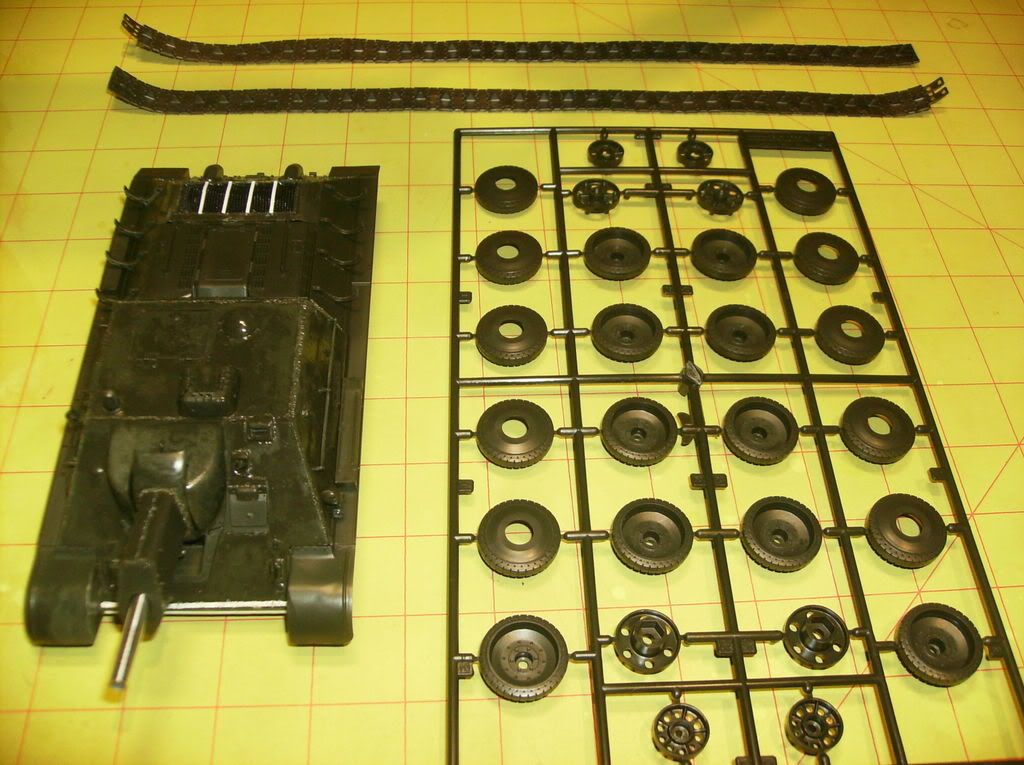
The assembly was a piece of cake on this kit.  The two areas of concern, which I knew were coming because I just built the T34 (SU122 is based on that kit), were the rear deck grill and the gap below the fenders.  Instead of spending the $ to buy the PE grill (mistake) I cut out the plastic and fashioned my own:

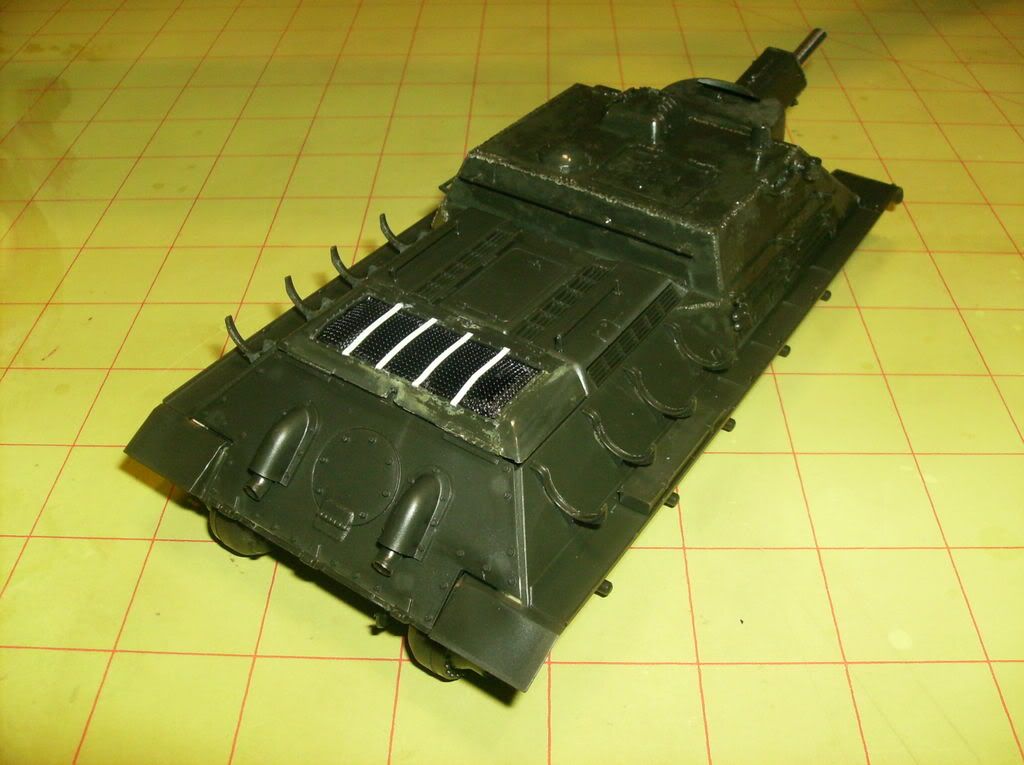
I am not real happy with the results, but from past experience I learned it's best to sometimes leave well enough alone and see if an idea comes along as I build to "improve" the situation.  I fixed the fender problem by adding styrene strips:

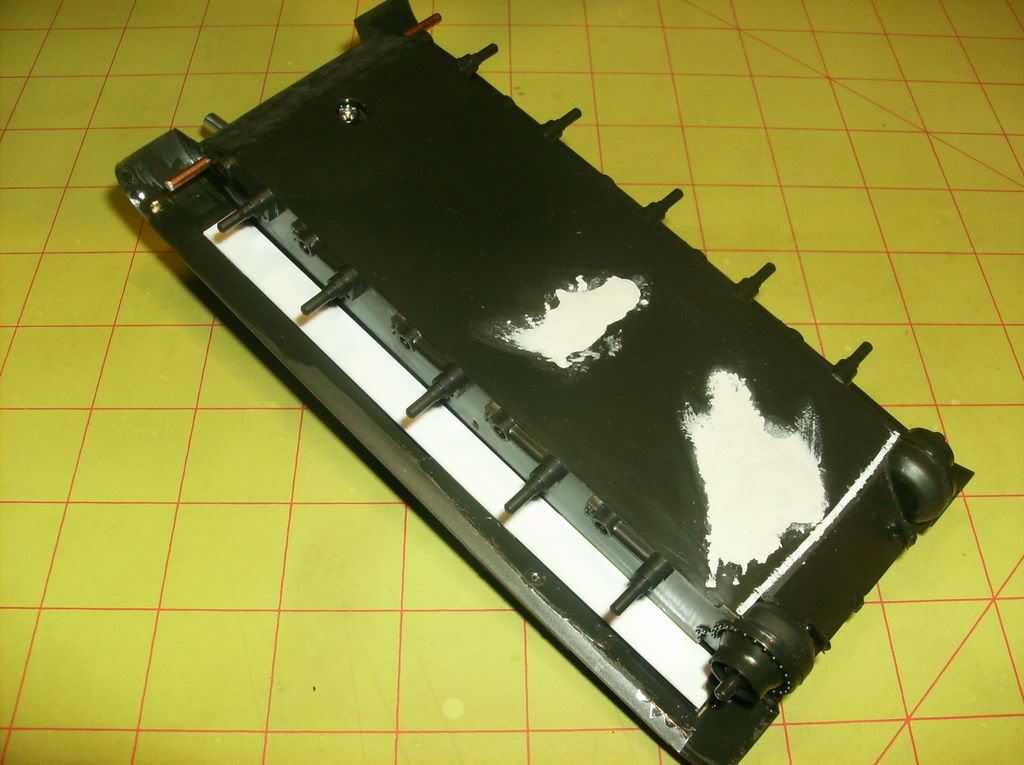
I'm not worried about small gaps or seam lines because they will get mud and/or snow later.   The putty will be sanded and the screw and hole, which adjusts track tension,  will get filled later too.

I added a strip of styrene at the front of the lower hull for some relief.  The kit had some weld seams molded in the plastic, but again from the experience with the T34, I found these were lost in the all the paint and weathering layers.  To accentuate those seams I added a styrene strip where I felt a seam was missing and then used a hot-tipped wood burning tool and burned the "welds" where appropriate:

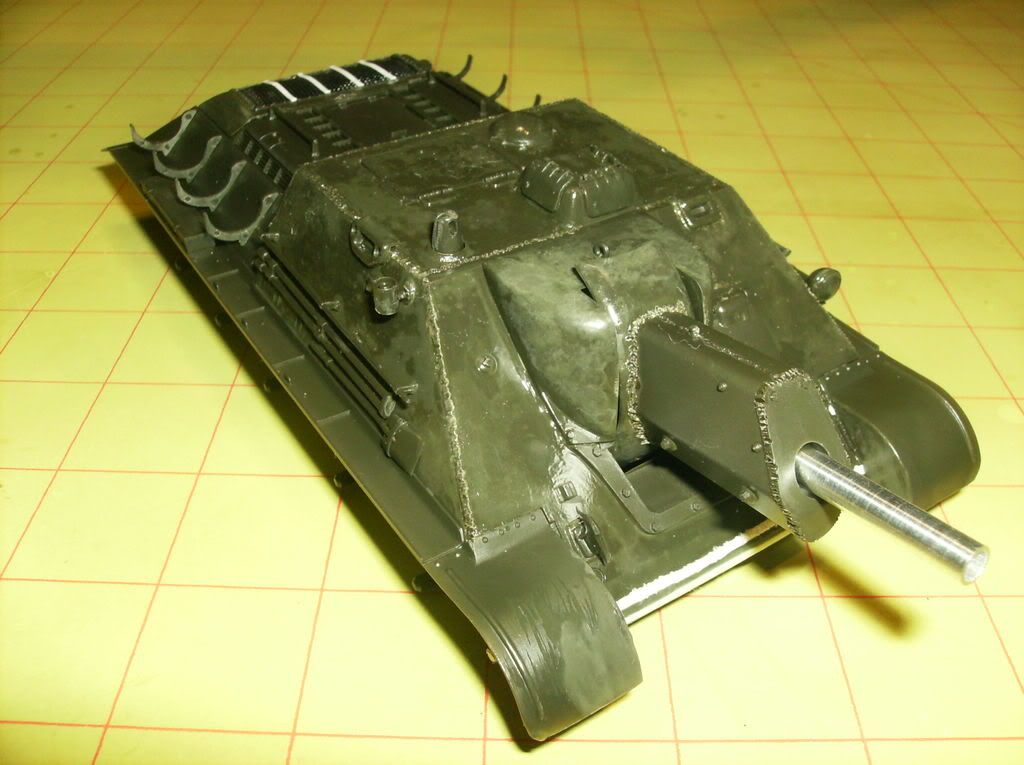
Also note how shiny the model is.  What I did was take the liquid plastic glue straight from the bottle and cover all the armor, small sections at a time.  The glue "burns" some texture on each panel.  I used 4-5 layers of glue on the parts that would be sandcast.  This technique is a substitute to Mr. Surfacer and sanding.

O.K....time to paint!!!

Question?: Does anybody know if the SU122 ever had the "box" type versus the "drum" type, reserve fuel tanks added to it?  I think the back of this beast would look good with this addition. (I'm leaving the drums off either way)  I may add the "boxes" anyway...it's a hobby for fun...afterall.

  • Member since
    November 2006
  • From: Coastal Maine
Posted by dupes on Friday, January 11, 2008 8:34 AM

Good progress SMJ! Glad to see you're about to hit the painting...that's where it gets fun. Big Smile [:D]

Scott, thanks for posting those WIP shots - very interesting to see how you managed to achieve that great scheme. Are you going to go the same route on the Pz.III? 

  • Member since
    December 2002
  • From: Reno, NV
Posted by espins1 on Friday, January 11, 2008 12:17 PM
 dupes wrote:

Scott, thanks for posting those WIP shots - very interesting to see how you managed to achieve that great scheme. Are you going to go the same route on the Pz.III? 

I'm going to do something similar, but as to application of the white wash I haven't decided whether to brush or paint on the whitewash.  I need to find some reference photos of the scheme I'm doing so it will depend on the "look and feel" of the whitewash in the photos.  Burger [BG]

Scott Espin - IPMS Reno High Rollers  Geeked My Reviews 

  • Member since
    January 2007
  • From: Glue and paint smeared bench, in La La Land
Posted by dahut on Friday, January 11, 2008 7:08 PM
Still waiting on the Jaguar...
Cheers, David
  • Member since
    November 2006
  • From: Coastal Maine
Posted by dupes on Friday, January 11, 2008 8:19 PM

Dahut, didn't you order that back in November?

Another big NFL weekend...looks like I'm going to be assembling the traveling workbench and heading downstairs for at least 4 games worth of coffee-table Panther building. Wink [;)]

  • Member since
    October 2005
  • From: Castro Valley, CA
Posted by 1trickpony on Friday, January 11, 2008 8:54 PM

Getting back into this, I found a website that I thought was very helpful for the 109s. You all probabilily have a link, but just in case.....

 http://www.ipmsstockholm.org/magazine/2000/02/stuff_eng_profile_bf109.htm

There was also an interesting article on using laundry soap for doing the whitewash finish.

So for what it's worth.

T.S. 


  • Member since
    February 2004
  • From: Second City
Posted by arki30 on Saturday, January 12, 2008 11:31 AM

I've shot the RLM 66 in the interior portions, and the engine is assembled and primed.  The cockpit is okay, but the IP is pathetic.  Just some stamped circles with no raised or relief detail, and not even a decal to indicate instruments.  Thankfully, this will be closed canopy anyway. 

Building Now:

1/48 Academy Bf-109G6 - 100%

1/48 Tamiya F4U-1A - 5%

Upcoming:

1/48 Revell F-14D

  • Member since
    April 2007
  • From: Schroon Lake, NY
Posted by SMJmodeler on Saturday, January 12, 2008 11:39 AM

WIP-SU122.  The painting is completed.  The shininess on the "turret" is where I apllied "future" expecting to add white numeral decals; but after further review of the instructions I found out that the white camo' should be applied before the markings, the numerals will be black. I did some research to help answer my question about the reserve fuel tanks, and although I couldn't CONFIRM the "box" type were ever used, the manufacture dates of the T34 variants with the "boxes" coincided with the SU122...I like how they look too!

***IF YOU PLAN TO FOLLOW ALONG WITH MY WINTER CAMO' TUTORIAL THIS IS THE "OFFICIAL" STARTING POINT.  BE LOOKING FOR MY POSTS IN ARMOR***

  • Member since
    November 2006
  • From: Coastal Maine
Posted by dupes on Saturday, January 12, 2008 1:10 PM

Ho ho! Looking real good, SMJ. Those box tanks look fine to me, I swear I've seen pics of an SU122 with those on them in one of my "T34's and Variants" books at home. Thumbs Up [tup]

I'll have to ask (as usual with Sov armor) whose green you used?

  • Member since
    April 2007
  • From: Schroon Lake, NY
Posted by SMJmodeler on Saturday, January 12, 2008 2:13 PM

dupes,

The green is Tamiya XF-67 Nato Green. 

WIP-"clouding" of straight white added:

  • Member since
    November 2006
  • From: Coastal Maine
Posted by dupes on Saturday, January 12, 2008 2:36 PM
Zing! SMJ, you just won the award for First White Paint Fired in this GB! Laugh [(-D]
  • Member since
    February 2004
  • From: Second City
Posted by arki30 on Saturday, January 12, 2008 2:40 PM
SMJ, looks great!  The weld beads look particularly realistic.  Thumbs Up [tup]

Building Now:

1/48 Academy Bf-109G6 - 100%

1/48 Tamiya F4U-1A - 5%

Upcoming:

1/48 Revell F-14D

  • Member since
    January 2005
  • From: in the tank factory in my basement
Posted by biffa on Saturday, January 12, 2008 4:16 PM

Finally decided on my entry Dupes and hopefully get a start on it the beginning of next week and i will look forward to catching up on everyone else's build Smile [:)]

Ron g.
  • Member since
    April 2007
  • From: Schroon Lake, NY
Posted by SMJmodeler on Saturday, January 12, 2008 4:41 PM

biffa,

Nice choice!!!  I saw a color drawing of that tank in "T34 in Action" and liked it.  I'll be curious to see how you do that pattern that goes up the hull and over the turret.  Hey, by the way, SPECTACTULAR work you did there in that Kursk GBThumbs Up [tup]!!!

  • Member since
    November 2006
  • From: Coastal Maine
Posted by dupes on Saturday, January 12, 2008 6:50 PM

Biffa - nice choice! As usual, you've picked a kit right from the heart of my stash. Wink [;)] I swear they must be nearly identical!

Can't wait to see how this guy turns out...do you plan on using the decals for that funky mesh pattern, or shooting it freehand? 

  • Member since
    May 2006
  • From: Queensbury,NY
Posted by panzer88 on Saturday, January 12, 2008 9:54 PM
I think I 've finally decided what to build , Tamiya's 251/9, seeing as that it's the only one that I've started out of my choices. It'll be a straight OOB build.


  • Member since
    July 2006
  • From: Rochester NY
Posted by mg42gunner on Saturday, January 12, 2008 9:54 PM
SMJ, that whitewash looks really good so far! And biffa, that scheme is going to be really impressive when its done, I always liked the tire track pattern on the t34's.

I made some progress on the 103c today. Hers some pics:

(I also figured out how to make sure my webcams pics dont get mirrored, so these pics arent backwards anymore)

Upper hull shot. theres gonna be a ton of little detail parts on this when its done, so far its not cluttered yet


My bucket of wheels. There are only 8 on the tank, but I somehow misplaced the entire row of vinyl poly caps that go inside them, so I cant assemble them yet.


Heres a mock up of the upper and lower hull together. Its one mean looking tank:


I should be able to build more tomorrow (Hopefully while watching the Giants beat the Cowboys!)
  • Member since
    April 2007
  • From: Schroon Lake, NY
Posted by SMJmodeler on Saturday, January 12, 2008 9:58 PM

WIP-SU122, making good progress today!!!

JOIN OUR COMMUNITY!

Our community is FREE to join. To participate you must either login or register for an account.

SEARCH FORUMS
FREE NEWSLETTER
By signing up you may also receive reader surveys and occasional special offers. We do not sell, rent or trade our email lists. View our Privacy Policy.