SEARCH FINESCALE.COM

Enter keywords or a search phrase below:

1:35 M728 CEV Patton-Mover! WIP

26461 views
164 replies
1 rating 2 rating 3 rating 4 rating 5 rating
  • Member since
    January 2007
Posted by the doog on Wednesday, July 22, 2015 1:24 PM

I don't understand the reason that these companies make these tracks sets so darned complex and difficult. Seems to me it would cut down on the marketability of them? I've generally sworn off "moveable" track sets because of the complexity and troubles with them.

You're a brave man for delving into those, Pawel, lol. Good luck with them!

  • Member since
    May 2009
  • From: Poland
Posted by Pawel on Wednesday, July 22, 2015 3:54 PM

Hello!

Stik, Gino, Gamera, Dave, Russ - thanks a lot for your comments and for your kind words! This kit is really nice. I know it would probably p1ss good old Hans von Hammer off, but now that the new AFV offering is there, it's probably not worth it anymore to try to rectify all the problems with the older Tamiya, Academy or ESCI/Italeri kits - you get a much more accurate model OOB with this one.

Karl - thanks a lot! I don't understand it neither! Maybe you have to be Asian to understand - not as spoiled as us, the western civilization guys... I say it's not possible to glue those tracks to be fully movable - every link where you make a mistake will get stuck - and with hundreds of glue joints per side you have an ample room for mistakes.

So I diverted from the Bronco's instructions, changed the procedure a little and I'm glueing those tracks together. Soon we'll see what comes out of it.

Thanks again, good luck with your projects and have a nice day

Paweł

All comments and critique welcomed. Thanks for your honest opinions!

www.vietnam.net.pl

  • Member since
    June 2015
Posted by OldGoat on Wednesday, July 22, 2015 4:41 PM
Why didn't you use AFV Clubs own aftermarket track set? Set 35005 is much easier to assemble and looks the part.
  • Member since
    May 2009
  • From: Poland
Posted by Pawel on Wednesday, July 22, 2015 5:12 PM

OldGoat - to tell you the truth, I bought the Bronco track to try it and now I kinda have to use it up. It looks a little nicer than the AFV Club track - it's probably not worth the extra work, but it does. AFV Club's track, which is a nice product, also has it's problem - it's those ejector pin marks on every link, that you have to fill and sand. Probably less work, than on the Bronco track, but al least you don't have to fill anything with the Bronco.

Thanks a lot for your comment, and have a nice day!

Paweł

All comments and critique welcomed. Thanks for your honest opinions!

www.vietnam.net.pl

  • Member since
    January 2006
  • From: California
Posted by SprueOne on Saturday, July 25, 2015 9:52 AM

That interior alone is causing me to consider buying the AFV Club model. I've been slowly gathering kits and ref for this same project. I was going the route that HeavyArty did after reading the FSM build article. 

Your progress looks good and I'll be watching this thread closely Yes 

Anyone with a good car don't need to be justified - Hazel Motes


Iron Rails 2015 by Wayne Cassell Weekend Madness sprueone

  • Member since
    May 2009
  • From: Poland
Posted by Pawel on Sunday, July 26, 2015 1:54 PM

SprueOne - thanks a lot for your comment!

So you want to scratchbuild the boom and the winch? I'd love to see how it turns out for you. As for the AFV Club kit, it has two major advantages over the ESCI/Italeri one - the first is the interior, but the real difference for me was the suspension.

As for my build I have a little update here - I finished painting two nice parts, the driver's instruments and the fire extinguisher. Here's how they turned out:

After the white Tamiya primer dried, I used a sponge to put on some mixture of Humbrol gun metal 53 with Brown 113 for some paint chipping. Then I painted the instrument faces gloss black 21. After it dried I scratched in some scales and pointers. The instructions have you paint the switches tire black, but the photos show them to be OD, so I used Humbrol 66 to show that. The red switches and the fire extinguisher are Humbrol 60. I also used an acrylic black wash and a dry brush with Humbrol 106 - gray - to do some shading. the brass on the fire extinguisher is Humbrol 54.

Now to paint more of the interior details - I hope you liked it, thanks for reading and have a nice day

Paweł

All comments and critique welcomed. Thanks for your honest opinions!

www.vietnam.net.pl

  • Member since
    November 2009
  • From: SW Virginia
Posted by Gamera on Monday, July 27, 2015 10:13 AM

Looks great Pawel, please keep the updates coming!

"I dream in fire but work in clay." -Arthur Machen


  • Member since
    January 2006
  • From: California
Posted by SprueOne on Monday, July 27, 2015 9:03 PM

Pawel

SprueOne - thanks a lot for your comment!

So you want to scratchbuild the boom and the winch? I'd love to see how it turns out for you. As for the AFV Club kit, it has two major advantages over the ESCI/Italeri one - the first is the interior, but the real difference for me was the suspension.. . .

Paweł

Yes, I WANT (also: intend, try, thinking about,  attempt - not necessarily successfully) to scratchbuild the boom and the winch.

I will def Blog here in Armor when I do though Wink

Your sponge method looks pretty realistic. 

Anyone with a good car don't need to be justified - Hazel Motes


Iron Rails 2015 by Wayne Cassell Weekend Madness sprueone

  • Member since
    September 2006
  • From: Dripping Springs, TX, USA
Posted by RBaer on Tuesday, July 28, 2015 10:16 AM

Looking very good Pawel, very good.

I'm of the same mind as most here, the Bronco tracks (and most others that assemble that the same way) look extraordinarily tedious to me. I like the AFV Club tracks, and spend about 20 minutes sanding all the inside pads to remove the push-pin marks, which still puts me way ahead vs the Bronco tracks.

I recently picked up a couple sets of the Dragon DS tracks, and have one fitted to an in-progress (read: shelf queen) Tamiya M48, and I think they look pretty good. I'm also curious about what the AFV Club kit tracks look like.....

Apprentice rivet counter.

  • Member since
    September 2012
Posted by GMorrison on Tuesday, July 28, 2015 11:28 AM

Recent history.

AFV tracks for my Egypterman (built on M4A4 hull). Too short. This really ticked me off as it would have just meant tossing in an extra sprue (came with 7, why not 8?). Glued together ok.

Dragon Magic Tracks for my ISU-152. Loved them.

Friul tracks for my Tiran 5. Died and went to tread heaven.

Monogram rubber bands on the M 48 A2. Gonna look at those Bronco tracks like Pawel showed.

Let me know if you get AFV ones.

 Modeling is an excuse to buy books.


  • Member since
    December 2002
  • From: Valrico, FL
Posted by HeavyArty on Tuesday, July 28, 2015 12:12 PM

The AFV Club M48/M60 T97/T142 plastic indi-links are really nice and go together really easy.  I highly recommend them.  The rubber AFV Club T97s in their M88s are really nice as well.  I assume thir new  M60A1 uses the same tracks.

Gino P. Quintiliani - Field Artillery - The KING of BATTLE!!!

Check out my Gallery: https://app.photobucket.com/u/HeavyArty

"People sleep peaceably in their beds at night only because rough men stand ready to do violence on their behalf." -- George Orwell

  • Member since
    May 2009
  • From: Poland
Posted by Pawel on Tuesday, July 28, 2015 3:17 PM

Hello!

Gentlemen - thanks a lot for your comments! Looks like we got ourselves a nice, lively discussion - that's what I like!

Gamera - thanks a lot, I will!

SprueOne - with enough patience and time, I don't see why you shouldn't be succesful - good luck with your project. I look forward to your WIP. That sponge thing is easy to do - give it a try using some electronics packing material, or similar stuff you'd otherwise throw away anyhow!

Russ - thanks for your kind words. Like I said, I agree about the AFV Club tracks, it's just that I want to use up what I bought.

GMorrison - nice output when it comes to tracks - that's the way to model AFVs!

Gino - In my M88 kit I have their plastic, individual link tracks. I'll try to photograph the M60's vinyls for you later

As for now I'm working on weathering the hull tub and the emergency escape hatch. Here's what I have so far:

I still want to add some red clay stains here.

Thanks again for your comments and have a nice day

Paweł

All comments and critique welcomed. Thanks for your honest opinions!

www.vietnam.net.pl

  • Member since
    January 2007
Posted by the doog on Wednesday, July 29, 2015 6:24 PM

You're on pace to make another stunner, Pawel, You never disappoint in your attention to detail and skill in executing the most minute details! Looking great!

  • Member since
    May 2009
  • From: Poland
Posted by Pawel on Friday, July 31, 2015 8:25 AM

Karl - you are just too kind! Thank you for the compliments - I'll try my best. Thanks again and have a nice day

Paweł

All comments and critique welcomed. Thanks for your honest opinions!

www.vietnam.net.pl

  • Member since
    May 2009
  • From: Poland
Posted by Pawel on Sunday, August 2, 2015 4:03 PM

Hello!

I've got another update - the interior is almost complete. Here's how the hull tub looks like:

The red arrow points to a length of stretched sprue, that I attached to the driver's seat post to help to attach it to the upper hull. And the view from the other side:

And here's the upper hull:

The red arrow points to the hole that I drilled to accept the rod mentioned above. The yellow arrow points to the driver's hatch hinge installed as per the instructions - for the hatch in closed position.

On the photo above the yellow arrow points to the driver's hatch hinge installed for the hatch in open position - something the kit's instructions don't show you! To open, the hatch goes up a bit and is then slid to the right of the tank, and not rotated as in the M48. You can make this part movable in the model and have a working hatch if you like stuff like that.

The next shot shows how it would look like after closing the hull up:

You can also see the driver's seat posts rod poking through the hole. After closing the hull up I'll trim the rod and fill the place. I also took the middle periscope out - I heard from a friend (Thanks again Rob!) that this scope was often taken out for driving with an open hatch, because it was blocking the view.

Next thing I want to do is to glue the hull halves together and work on the seam. Hope you liked it - thanks for reading and have a nice day

Paweł

All comments and critique welcomed. Thanks for your honest opinions!

www.vietnam.net.pl

  • Member since
    December 2002
  • From: Valrico, FL
Posted by HeavyArty on Sunday, August 2, 2015 4:43 PM

Looks great.  Good idea on the rod to help secure the seat.  Keep up  the good work.

Gino P. Quintiliani - Field Artillery - The KING of BATTLE!!!

Check out my Gallery: https://app.photobucket.com/u/HeavyArty

"People sleep peaceably in their beds at night only because rough men stand ready to do violence on their behalf." -- George Orwell

  • Member since
    May 2009
  • From: Poland
Posted by Pawel on Monday, August 3, 2015 2:07 AM

Hello Gino!

Thanks a lot for your comment and for your kind words! Have a nice day!

Paweł

All comments and critique welcomed. Thanks for your honest opinions!

www.vietnam.net.pl

  • Member since
    September 2006
  • From: Dripping Springs, TX, USA
Posted by RBaer on Tuesday, August 4, 2015 10:45 AM

Excellent progress Pawel. Looks very good.

Apprentice rivet counter.

  • Member since
    September 2012
Posted by GMorrison on Tuesday, August 4, 2015 12:11 PM

Awesome!

 Modeling is an excuse to buy books.


  • Member since
    May 2009
  • From: Poland
Posted by Pawel on Thursday, August 13, 2015 3:26 PM

Russ, GMorrison - thanks a lot for your comments and for your kind words. Sorry for the late reply, but I was in the mountains on vacation - so offline, as hard as it is to believe nowadays! Now I'm back and off to close up the hull. Thanks again and have a nice day

Paweł

All comments and critique welcomed. Thanks for your honest opinions!

www.vietnam.net.pl

  • Member since
    January 2015
  • From: Tumwater, WA.
Posted by M. Brindos on Thursday, August 13, 2015 6:33 PM

Excellent Pawel! Now I have a benchmark and a few things made note of for my build. Looks like that suspension is going to be interesting lol. Also, its nice to see that the driver's compartment looks so dang good after it's built and painted. You've given me something to shoot for  :)

- Mike Brindos "Lost Boy"

  • Member since
    May 2009
  • From: Poland
Posted by Pawel on Sunday, August 16, 2015 3:18 PM

Hello!

Mike - I'm glad I could help you in some way. Good luck with your build!

I for myself closed up the hull. The fit of the hull halves is OK, but they need some gentle prying to snap into place. I cleaned up the seam and re-created the cast surface wetting it up with lacquer thinner and stipling with a stiff brush:

1/35 CEV (AFV Club) by Pawel

1:35 CEV (AFV Club) by Pawel

The place where the rod was, fixing the driver's seat's post to the top hull, is also sanded and cleaned up, using also Mr Surfacer 500.

I have also built up the rear hull. The engine deck consists of main eleven parts! It will later be dressed up further with the lifting rings and such. All the engine bay doors could be posed open, and their inside surfaces are detailed, too! I also added the final drive housings and all the parts that should be there before weathering the lower hull:

1:35 CEV (AFV Club) by Pawel

1:35 CEV (AFV Club) by Pawel

1:35 CEV (AFV Club) by Pawel

Now my plan is to pre-paint the suspension and wheels some, and to put the tracks on. My plan is to weather the chassis from the fenders down, and then build the rest of it, upwards from the fenders. Let's see how this goes. Thanks for reading and I hope you liked it - good luck with your modelling projects, and have a nice day

Paweł

All comments and critique welcomed. Thanks for your honest opinions!

www.vietnam.net.pl

  • Member since
    May 2009
  • From: Poland
Posted by Pawel on Saturday, August 29, 2015 5:23 PM

Hello everybody! Update time!

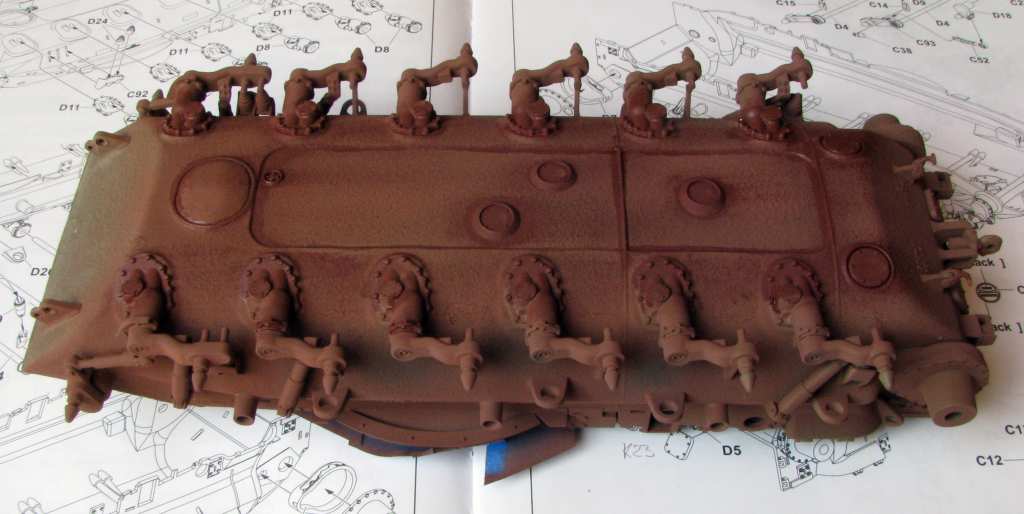
Like I wrote before, I went on to paint the lower hull red clay dust color - Humbrol 113:

1/35 AFV Club M728 CEV by Pawel

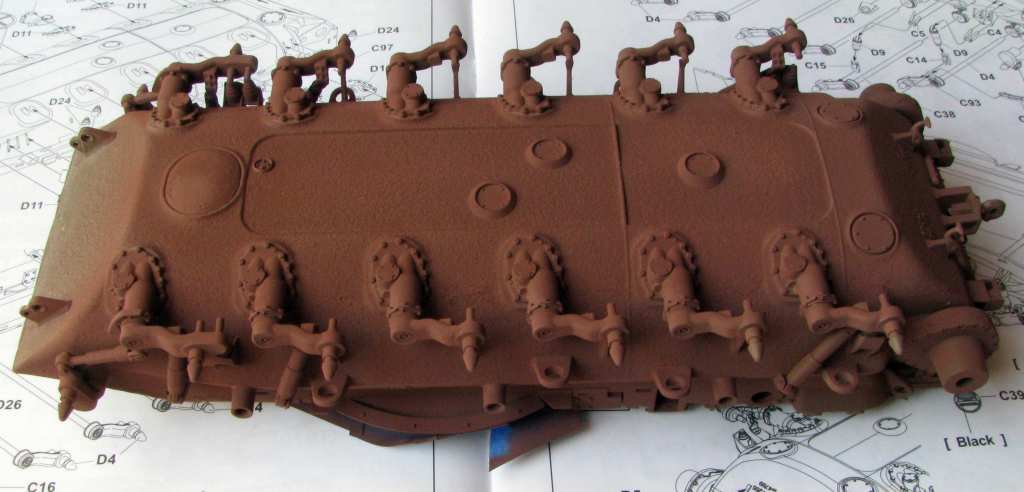
To give it a little variation and simulate some moisture, I shaded it with Gunze H47, which is a gloss paint. I like how it came out:

1/35 AFV Club M728 CEV by Pawel

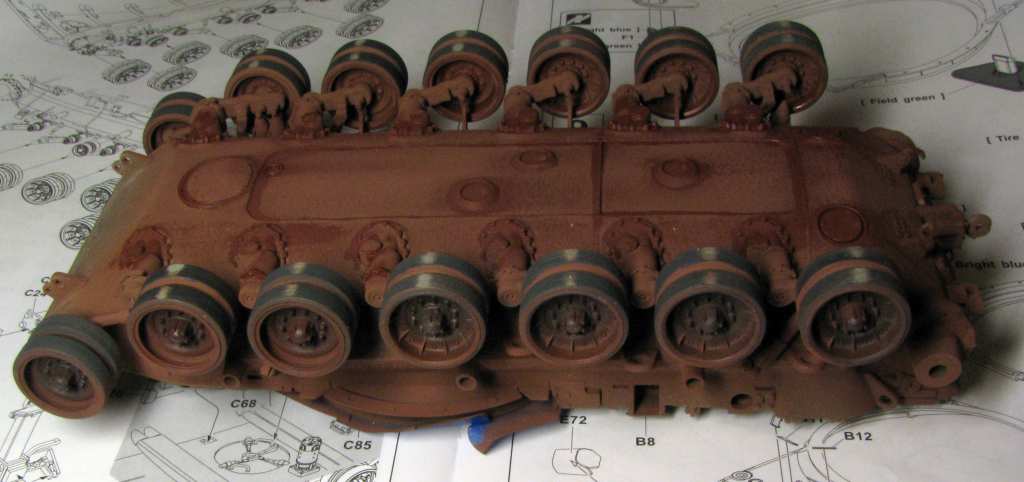
I also painted the wheels with Huimbrol 113:

1/35 AFV Club M728 CEV by Pawel

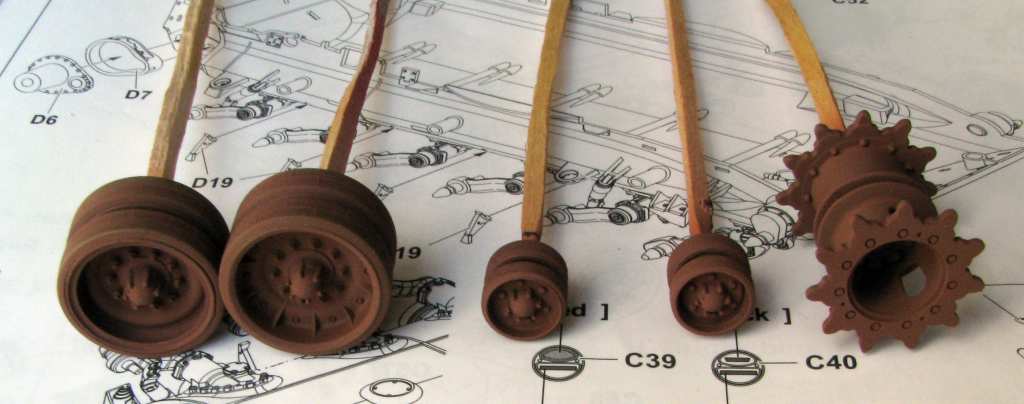
To show the OD paint showing through, I painted the centres of the wheel with Humbrol 66:

1/35 AFV Club M728 CEV by Pawel

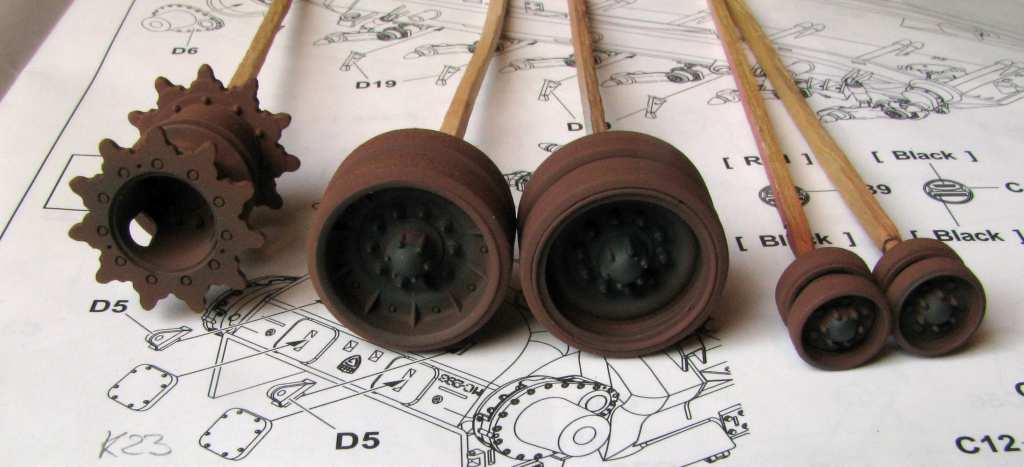
Then I took that brown Gunze paint, H47 and made a wash out of it, that I applied to the wheels once they were throughly dry. Finally I painted the running surfaces of the wheels with Humbrol 32 to simulate rubber. Here is a photo of the wheels glued to the hull:

1/35 AFV Club M728 CEV by Pawel

The spots on the wheels were sanded off to prepare for glueing on the tracks:

1/35 AFV Club M728 CEV by

1/35 AFV Club M728 CEV by Pawel

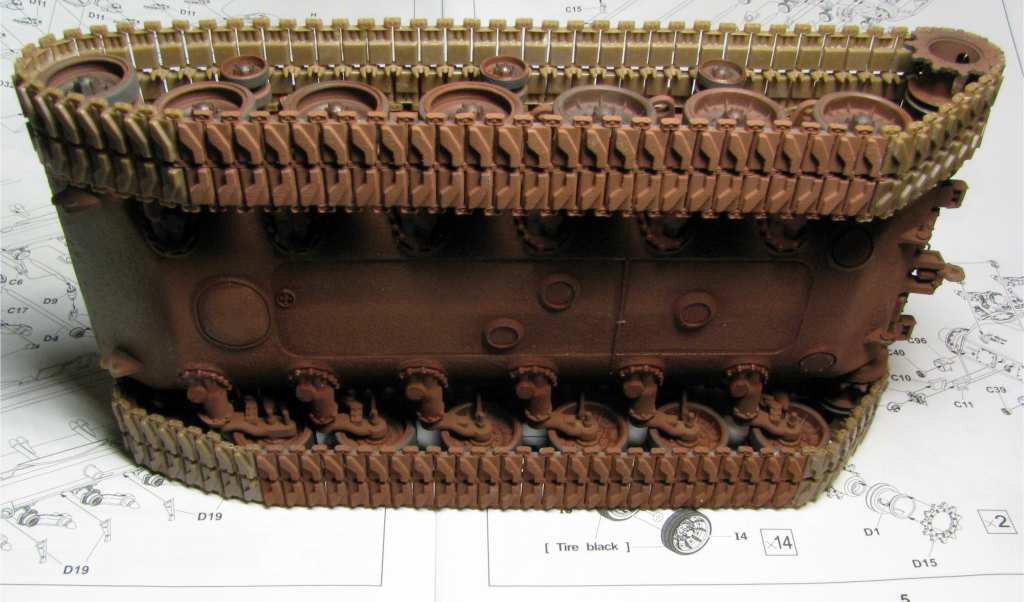
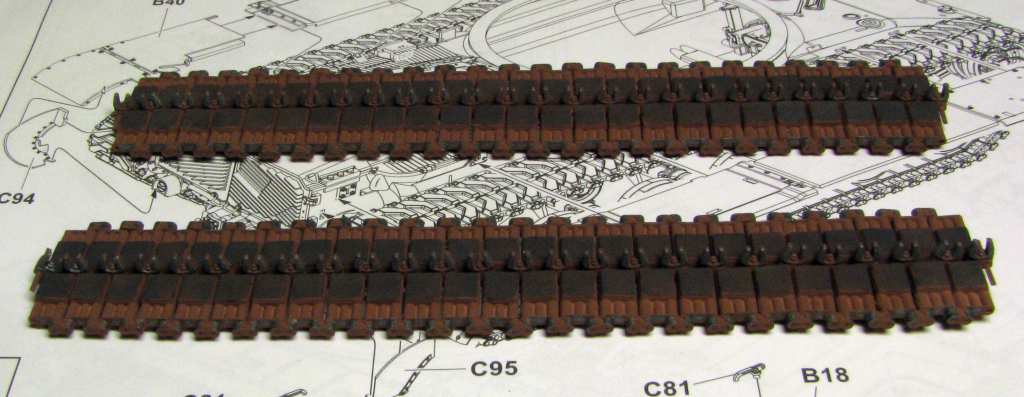
First I have painted the track with Humbrol 113. Then the rubber pads were painted with Humbrol 32. Finally the metal surfaces that should be worn were picked up with Humbrol 53 - Gun metal. I will paint the outside surface of the track once the complete runs are glued in place.

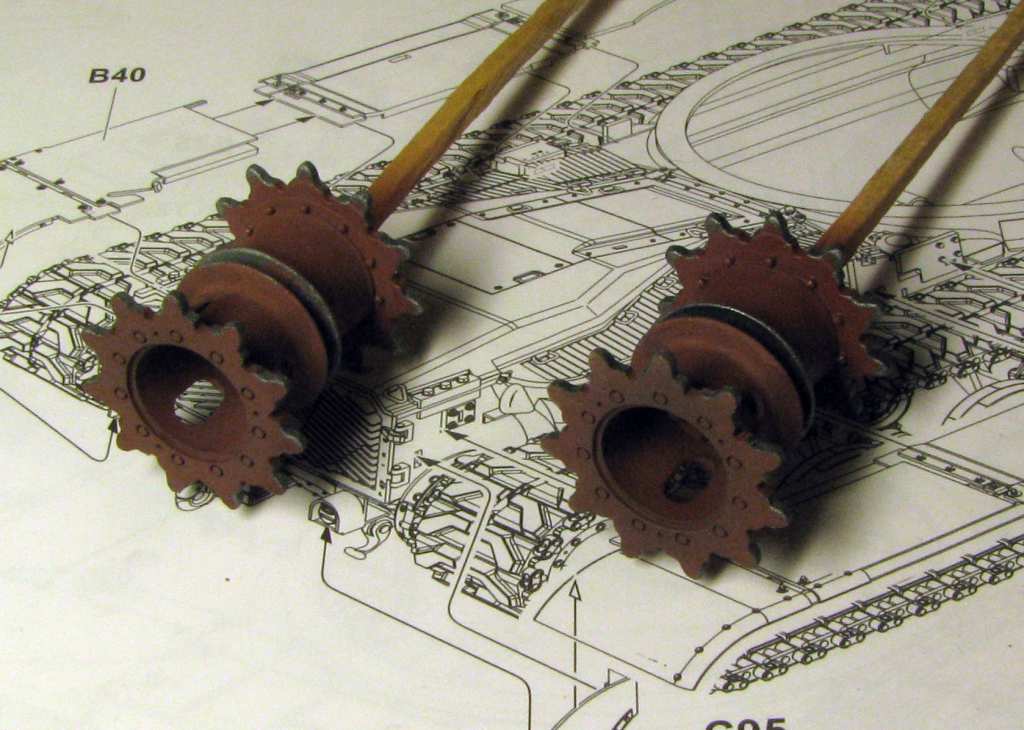
I also painted the worn metal surfaces on the sprockets:

1/35 AFV Club M728 CEV by Pawel

Next I'm going to keep on working on the track and also on the bulldozer blade by Academy. I hope you liked it, thanks for reading and have a nice day

Paweł

All comments and critique welcomed. Thanks for your honest opinions!

www.vietnam.net.pl

  • Member since
    January 2015
  • From: Tumwater, WA.
Posted by M. Brindos on Saturday, August 29, 2015 7:49 PM

I really like what you've got going on with the paint thus far Pawel. I think I can see where you're taking this and I like it a lot.

The addition of the gloss for that wet look is smart, very smart. :)

I'm looking forward to your next update!

- Mike Brindos "Lost Boy"

  • Member since
    May 2009
  • From: Poland
Posted by Pawel on Sunday, August 30, 2015 8:19 AM

Hello Mike!

Thanks a lot for your comment and for your kind words! As for the next update - let's see when I have something worth reporting again. Thanks again and have a nice day

Paweł

All comments and critique welcomed. Thanks for your honest opinions!

www.vietnam.net.pl

  • Member since
    November 2009
  • From: SW Virginia
Posted by Gamera on Sunday, August 30, 2015 5:50 PM

Looks great Pawel, I really like the mud.

"I dream in fire but work in clay." -Arthur Machen


  • Member since
    December 2002
  • From: Bury St Edmunds, Suffolk, England
Posted by Bish on Sunday, August 30, 2015 6:04 PM
Nice to see your still plugging away at this.

I am a Norfolk man and i glory in being so


On the bench: Airfix 1/72nd Harrier GR.3/Fujimi 1/72nd Ju 87D-3

  • Member since
    May 2009
  • From: Poland
Posted by Pawel on Monday, August 31, 2015 2:07 PM

Gamera - thanks a lot, I'm glad you like it!

Bish - I'm not givin' up that easy!

Thanks a lot for your comments, have a nice day

Paweł

All comments and critique welcomed. Thanks for your honest opinions!

www.vietnam.net.pl

  • Member since
    September 2006
  • From: Dripping Springs, TX, USA
Posted by RBaer on Monday, August 31, 2015 2:27 PM

Very nice work Pawel!

Apprentice rivet counter.

  • Member since
    May 2009
  • From: Poland
Posted by Pawel on Tuesday, September 22, 2015 3:41 PM

RBaer - sorry it took so long! Thanks a lot for your comment and your kind words - they mean a lot to me!

An update is long overdue here - it's been three weeks since I last posted. A significant part of that ime was spent on those tedious tracks. Six parts per link! But now the hardest part is done. Please take a look at his photo:

1:35 AFV Club M728 CEV by Pawel

In the end I crammed 81 links per side (should be 80 or 79 depending on the sources). The unpainted portions are not glued to the wheels yet, so I'll take them off for some painting and then I'll put them back on. They also aren't glued in all possible places, so they remain somewhat movable to show minimal sag. The tracks are also pretty tight. If I put an extra link per side, the tracks become wery loose and sloppy. The amount of work to pull them tight made me happy I didn't ever have to work on the real ones - when I think about the weight of all that metal and rubber, I don't envy the poor souls having to do that 1:1.

I also started to work on the dozer blade. Let's just say the Academy mini-kit looked like a drop-in at first, but some research quickly proved there's a LOT more fun in it!

Here's how the blade looked in the beginning - with the seams already filled and sanded:

1:35 AFV Club M728 CEV by Pawel

Then I cut out the center rib, that wasn't there in the TM - although the blades came in many different variations, so maybe it could have stayed there. I also added the fittings for the emergency lifting ropes (wire, white styrene) and lifting eyes (wire, top). The fittings Academy designed to operate on plastic "warts" were drilled out and I made axes for them out of 1,5mm wire - that made them nice, solid and operating smoothly (although I don't plan the blade to be operable). Here's how it looks now:1:35 AFV Club M728 CEV by Pawel

Now I'm working on the fenders and the hull attachment points for the blade - especially that needs a lot of work. Thanks for reading - I hope you liked it and have a nice day

Paweł

All comments and critique welcomed. Thanks for your honest opinions!

www.vietnam.net.pl

JOIN OUR COMMUNITY!

Our community is FREE to join. To participate you must either login or register for an account.

SEARCH FORUMS
FREE NEWSLETTER
By signing up you may also receive reader surveys and occasional special offers. We do not sell, rent or trade our email lists. View our Privacy Policy.