SEARCH FINESCALE.COM

Enter keywords or a search phrase below:

1:35 M728 CEV Patton-Mover! WIP

27351 views
164 replies
1 rating 2 rating 3 rating 4 rating 5 rating
  • Member since
    December 2002
  • From: Valrico, FL
Posted by HeavyArty on Monday, February 8, 2016 9:24 AM

Looking great so far.  If you are putting that much detail into the interior, I would not add any figures to the hatches.  Open them all up and show it off.  If you put a figure into the hatch, you will not be able to see any of the interior at all.  It is really a figure or the detailed interior, but both are pointless.  At most, with a figure in the TC's cupola, you would only be able to see a small amount of the cupola sights in front of the figure, but nothing below the turret roof line.  Same for the loader's hatch, nothing below the roof line is visible.  Same-same for the driver's hatch too.

Gino P. Quintiliani - Field Artillery - The KING of BATTLE!!!

Check out my Gallery: https://app.photobucket.com/u/HeavyArty

"People sleep peaceably in their beds at night only because rough men stand ready to do violence on their behalf." -- George Orwell

  • Member since
    May 2009
  • From: Poland
Posted by Pawel on Tuesday, February 9, 2016 3:46 PM

Gamera - thanks a lot for your comment and for your kind words!

Gino - I'm still thinking about your comment from like two pages ago. You're right - that's a kind of contradiction here, but my concept is the following:

Because there is so much nice kit supplied detail in the driver's compartment, there will be no driver there. But this leaves a big, empty hole behind the driver - where the turret platform would be. That's what I'm building now.

But then I like the tankers I have too much to leave them out - so they stay there. I'll try to put them on so that they don't block all the light. This way what I build should be partially visible. I want to give an impression of busy interior, but I don't thing I have enough references to build something really accurate here. What do you say?

Thanks again for your comments and have a nice day

Paweł

All comments and critique welcomed. Thanks for your honest opinions!

www.vietnam.net.pl

  • Member since
    December 2002
  • From: Valrico, FL
Posted by HeavyArty on Tuesday, February 9, 2016 7:04 PM

I would only add the turret basket base ring front section and anything that can be seen on/around it through the driver's hatch.  Probably the round storage tubes next to the driver as well.  With the figures in the turret hatches, you won't be able to see anything below/around them in the turret.

Gino P. Quintiliani - Field Artillery - The KING of BATTLE!!!

Check out my Gallery: https://app.photobucket.com/u/HeavyArty

"People sleep peaceably in their beds at night only because rough men stand ready to do violence on their behalf." -- George Orwell

  • Member since
    January 2015
  • From: Tumwater, WA.
Posted by M. Brindos on Sunday, February 14, 2016 4:57 PM

I've just got my hands on the new Valkyrie Late 70's early 80's tank crew and (yes, they are amazing) you can see quite a bit of the details in the hatches around the figures still! Even though they are wearing jackets they fit wonderfully and still leave room around them to show off some of that detail. I am VERY  impressed with Valkyries latest release.

I admit I had my misgivings about the use of the jackets on those figures, but they are not bulky at all.

Pawel, my friend, go ahead and stick your figures in there, you'll love the results.  :D

OH! Phenominal work on this build! I'm loving every bit of it!! Your build is going to far surpass mine by a long-shot lol.  ;)

- Mike Brindos "Lost Boy"

  • Member since
    May 2009
  • From: Poland
Posted by Pawel on Monday, February 15, 2016 1:41 AM

Hello Mike!

It's been a long time!

You're being much too modest! Your M60 is almost done, and I'm dragin' my tail with mine - but I'll get there, eventually.

While I respect the opinion of Gino, I still want to add somedetail to the turret interior to avoid the impression of an empty hole there, then again I don't want to put many hours in detail that won't be visible at all, so it's a compromise, as always.

Thanks for your comment and for your kind words - and have a nice day

Paweł

All comments and critique welcomed. Thanks for your honest opinions!

www.vietnam.net.pl

  • Member since
    May 2009
  • From: Poland
Posted by Pawel on Sunday, February 28, 2016 3:31 PM

Hello!

Another small update here. I've built the breech for my 165mm gun:

1:35 AFV Club M728 CEV by Pawel

Also, thanks to a friend, I've got some 165 mm projos - printed on a 3D printer:

1:35 AFV Club M728 CEV by Pawel

They still need a lot of work, because they have that distinctive 3D printer "grain", but at least I have the basic dimensions taken care of.

Thanks for looking and have a nice day

Paweł

All comments and critique welcomed. Thanks for your honest opinions!

www.vietnam.net.pl

  • Member since
    December 2002
  • From: Valrico, FL
Posted by HeavyArty on Sunday, February 28, 2016 4:01 PM

Nice, the breech and rounds will look good in it.

Gino P. Quintiliani - Field Artillery - The KING of BATTLE!!!

Check out my Gallery: https://app.photobucket.com/u/HeavyArty

"People sleep peaceably in their beds at night only because rough men stand ready to do violence on their behalf." -- George Orwell

  • Member since
    November 2009
  • From: SW Virginia
Posted by Gamera on Sunday, February 28, 2016 6:52 PM

Hey Pawel, even with the grain those look really good!

"I dream in fire but work in clay." -Arthur Machen


  • Member since
    May 2009
  • From: Poland
Posted by Pawel on Monday, February 29, 2016 4:10 PM

Gino, Gamera - thanks a lot for your comments and for your kind words!

Have a nice day

Paweł

All comments and critique welcomed. Thanks for your honest opinions!

www.vietnam.net.pl

  • Member since
    September 2006
  • From: Dripping Springs, TX, USA
Posted by RBaer on Thursday, March 3, 2016 1:25 PM

Excellent work, and interesting!

Apprentice rivet counter.

  • Member since
    January 2015
  • From: Tumwater, WA.
Posted by M. Brindos on Tuesday, March 8, 2016 10:10 AM

Oh, this just keeps getting better, and better still! I can't even tell that we started with the same kit anymore.

Phenomenal work, Pawel!! :D

- Mike Brindos "Lost Boy"

  • Member since
    May 2009
  • From: Poland
Posted by Pawel on Tuesday, March 8, 2016 3:57 PM

RBaer - Thanks a lot for your kind words!

Mike - You're just being too kind for me!

Just a little bit and I'll have those rounds done. Also, I have some progress on the crew:

http://cs.finescale.com/fsm/modeling_subjects/f/5/t/169376.aspx

Thanks a lot for your comments and have a nice day

Paweł

All comments and critique welcomed. Thanks for your honest opinions!

www.vietnam.net.pl

  • Member since
    May 2009
  • From: Poland
Posted by Pawel on Thursday, March 17, 2016 3:49 PM

Hello!

I've finished the shells for the gun of my CEV! Just for practice I've designed the decals for it and let them be printed at the Polish MeliusManu company. Shells are OD (Humbrol 66) with Brass (Humbrol 16) propellant baskets and handles made from copper wire. I had to drill the holes in the propellant baskets:
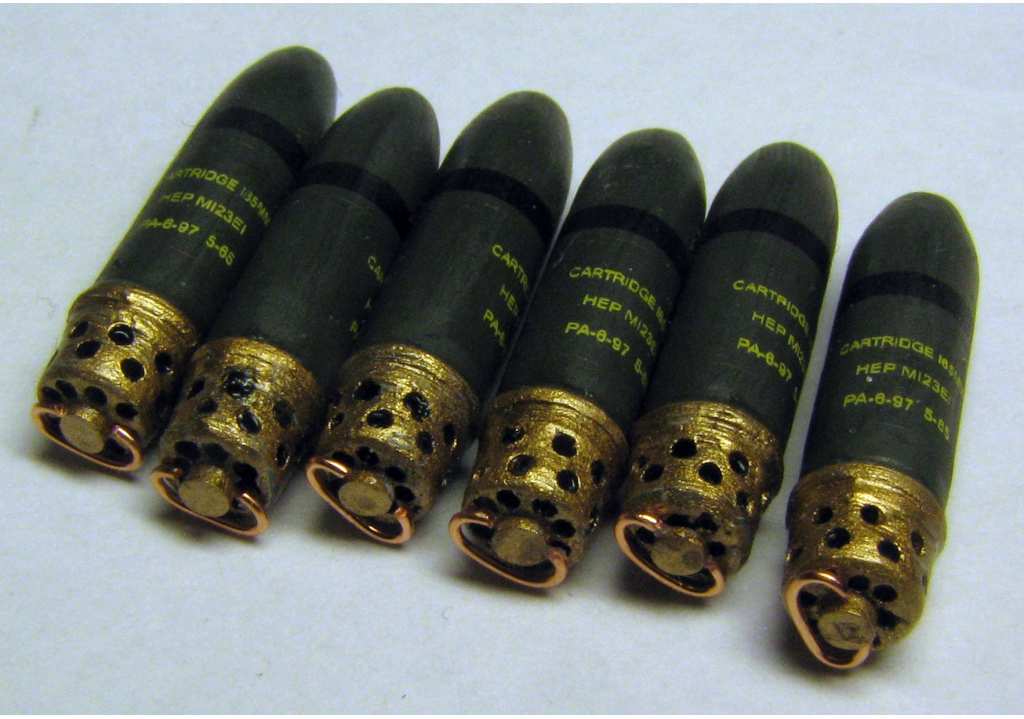
1:35 M728 CEV 165mm ammo by Pawel

I hope you like 'em - thanks for looking and have a nice day

Paweł

All comments and critique welcomed. Thanks for your honest opinions!

www.vietnam.net.pl

  • Member since
    January 2007
Posted by the doog on Monday, March 28, 2016 7:34 PM

Been a while since I checked in, Pawel, but wow----between the work that Gino just finished up with his Bradley and the detailing you're doing here, wow....I've got my work cut out for me just to measure up! Superb work!!

  • Member since
    May 2009
  • From: Poland
Posted by Pawel on Wednesday, March 30, 2016 4:10 PM

Thanks a lot for your kind words, Karl - they mean a lot to me! Good luck with your projects and have a nice day

Paweł

All comments and critique welcomed. Thanks for your honest opinions!

www.vietnam.net.pl

  • Member since
    November 2009
  • From: SW Virginia
Posted by Gamera on Thursday, March 31, 2016 7:51 AM

Pawel

Hello!

I've finished the shells for the gun of my CEV! Just for practice I've designed the decals for it and let them be printed at the Polish MeliusManu company. Shells are OD (Humbrol 66) with Brass (Humbrol 16) propellant baskets and handles made from copper wire. I had to drill the holes in the propellant baskets:

1:35 M728 CEV 165mm ammo by Pawel

I hope you like 'em - thanks for looking and have a nice day

Paweł


Ouch, I saw these when you posted them on my cell phone and intended to compliment you how good they look when I was back to something with a real keyboard on it and forgot. Well,a little late but I love how they turned out. 

"I dream in fire but work in clay." -Arthur Machen


  • Member since
    May 2009
  • From: Poland
Posted by Pawel on Saturday, May 21, 2016 3:38 PM

Hello!

The progress here has been slow, due to many reasons, but wanted to let you know I'm still working on this one, so here are some photos.

First, the gun - I got some really nice TM drawings on this part and I didn't want my research to waste so here's what I did so far - still have to paint it white and add the guards (shown separately):

1:35 AFV Club M728 CEV by Pawel

1:35 AFV Club M728 CEV by Pawel

1:35 AFV Club M728 CEV by Pawel

I also have the 165mm ready rack, and I'm building the bustle ammo stowage:

1:35 AFV Club M728 CEV by Pawel

So the work continues - I already see I should have left the interior alone - but now there's no turning back! Thanks for reading and have a nice day

Paweł

All comments and critique welcomed. Thanks for your honest opinions!

www.vietnam.net.pl

  • Member since
    January 2006
  • From: California
Posted by SprueOne on Sunday, May 22, 2016 10:52 AM

Going all the way with the interior. Looking great! Maybe you can produce your own interior sets from these masters and sell them on e-bay Idea 

Anyone with a good car don't need to be justified - Hazel Motes


Iron Rails 2015 by Wayne Cassell Weekend Madness sprueone

  • Member since
    January 2015
  • From: Tumwater, WA.
Posted by M. Brindos on Sunday, May 22, 2016 11:20 AM

Impressive as always, my friend. Incredible detailing!

- Mike Brindos "Lost Boy"

  • Member since
    November 2009
  • From: SW Virginia
Posted by Gamera on Monday, May 23, 2016 7:23 AM

Nice to see this continuing to come along Pawel, again nice work! 

"I dream in fire but work in clay." -Arthur Machen


  • Member since
    May 2009
  • From: Poland
Posted by Pawel on Monday, May 23, 2016 3:04 PM

Hello everybody!

SprueOne - I guess I do! Thanks a lot! But the resin copies aren't going to happen - I don't have enough experience with things like that... But it sure is strange, that there's no interior kit for the M60 yet... I guess it's goint to get released when I finish my model!

Mike, Gamera - thanks a lot for your kind words!

Thanks for reading and have a nice day

Paweł

All comments and critique welcomed. Thanks for your honest opinions!

www.vietnam.net.pl

  • Member since
    May 2009
  • From: Poland
Posted by Pawel on Saturday, March 18, 2017 4:39 PM

Hello everybody!

This build has effectively been dead for a long time, but I didn't give up on it. My biggest mistake was to start messing with the interior - but now I intend to pull it through.

Last year I have finished the ammo rack in the turret bustle. Here's how it looks like:

1:35 AFV Club M728 CEV by Pawel

But then it turned out, that I'll also need the ammo rack beside the driver, or else the spacce there will look very empty... So here's what I have recently done:

1:35 AFV Club M728 CEV by Pawel

The biggest lesson learned here is that the decals I have put on the rear of the casings look a lot better than actual holes that I would have to drill there.

Now I'm working on the hydraulis reservoir that is located on the other side of the driver's station in the front hull.

Thanks for looking and have a nice day

Paweł

All comments and critique welcomed. Thanks for your honest opinions!

www.vietnam.net.pl

  • Member since
    July 2004
  • From: Sonora Desert
Posted by stikpusher on Saturday, March 18, 2017 5:28 PM

very nice work on that ammo rack! Of course you know that when you finish this build, the newly announced AFV Club kit of the M728 will probably be released Wink That's how it always works for me...


F is for FIRE, That burns down the whole town!

U is for URANIUM... BOMBS!

N is for NO SURVIVORS...

       - Plankton

LSM


  • Member since
    May 2009
  • From: Poland
Posted by Pawel on Saturday, March 18, 2017 7:29 PM

Hello!

Yeah, I know, they announced that CEV. That was obvious from the moment on, where I didn't have to measure where to put certain fixtures on the glacis plate, because the model already had the holes marked for those from inside. Then again their Duster was announced 2003 and came out 2010 or so. At least theirs won't have the interior - or maybe somebody comes up with a resin kit. Anyhow, I'm movin' on with my build - slowly but surely! Thanks for your comment and have a nice day

Paweł

All comments and critique welcomed. Thanks for your honest opinions!

www.vietnam.net.pl

  • Member since
    November 2009
  • From: SW Virginia
Posted by Gamera on Tuesday, March 21, 2017 10:30 AM

Great to see you back at this Pawel and nice work there. 

And frankly, you still move faster than me! 

"I dream in fire but work in clay." -Arthur Machen


  • Member since
    May 2009
  • From: Poland
Posted by Pawel on Tuesday, March 21, 2017 3:25 PM

Gamera - thanks a lot and good luck with your builds!

Paweł

All comments and critique welcomed. Thanks for your honest opinions!

www.vietnam.net.pl

  • Member since
    January 2006
  • From: California
Posted by SprueOne on Tuesday, March 21, 2017 9:28 PM

Gamera

Great to see you back at this Pawel and nice work there. 

And frankly, you still move faster than me! 


^ What he said and I'm glad I clicked 'subscribe' to this thread.

Anyone with a good car don't need to be justified - Hazel Motes


Iron Rails 2015 by Wayne Cassell Weekend Madness sprueone

  • Member since
    May 2009
  • From: Poland
Posted by Pawel on Friday, May 19, 2017 2:55 PM

Hello!

I have another slow-moving update here - I've just finished building a part that at the beginning scared me really bad. But I have saved a small stash of those man-up pills and here it is - the hydraulic reservoir with all its plumbing and valves, that sits on the left side of the driver, in place, where on a regular M60 there is the ammo storage. Here's the part:

1:35 AFV Club M728 CEV by Pawel

1:35 AFV Club M728 CEV by Pawel

Now I'm working on the fuel tanks and the rear bulkhead - they will be very visible with the turret removable. Let's see how this turns out. Thanks for looking and have a nice day

Paweł

All comments and critique welcomed. Thanks for your honest opinions!

www.vietnam.net.pl

  • Member since
    January 2006
  • From: California
Posted by SprueOne on Sunday, May 21, 2017 7:27 PM

Nice work on that part and all that plumbing Yes


Anyone with a good car don't need to be justified - Hazel Motes


Iron Rails 2015 by Wayne Cassell Weekend Madness sprueone

  • Member since
    November 2009
  • From: SW Virginia
Posted by Gamera on Tuesday, May 23, 2017 11:26 AM

Wow, looks great Pawel! 

Is that scratchbuilt or did you super-detail the kit part? 

"I dream in fire but work in clay." -Arthur Machen


JOIN OUR COMMUNITY!

Our community is FREE to join. To participate you must either login or register for an account.

SEARCH FORUMS
FREE NEWSLETTER
By signing up you may also receive reader surveys and occasional special offers. We do not sell, rent or trade our email lists. View our Privacy Policy.