SEARCH FINESCALE.COM

Enter keywords or a search phrase below:

AFV M1128 MGS Stryker *WIP*Pg 5, 01-19-09 Finished w Figs

49520 views
109 replies
1 rating 2 rating 3 rating 4 rating 5 rating
  • Member since
    July 2006
  • From: New Jersey
Posted by redleg12 on Sunday, December 28, 2008 5:12 PM
 padakr wrote:
 redleg12 wrote:

When the Army upgunned the Abrams to 120 mm the had all these 105 mm guns and ammo left. Good use of leftovers.

The vehicle gives some punch to light scout units they did not have before.

Is it utilized as a direct or an in-direct fire system?


Think of it this way, the M1128 is everything they could have wanted from the M8. Most AFVs of WWII and after lacked punch from their gun. Later when the V-100 series was developed, they all but gave up on a gun.

The M1128 is a direct fire weapon. Where Mech units have scout units which include Abrams tanks, Stryker scout units have the M1128. It is an autoloading gun and has the same fire controls as the Abrams. It's not a tank but its gun could be leathal to a tank.

As part of the Stryker series, they also were going to develop a Stryker 105 mm artillery platform. I think that plan was scraped. The did develop and deploy a Mortar carrier with the new 120 mm mortar.

Hope that explains it.

Rounds Complete!!

"The Moral High Ground....A Great Place to Emplace Artillery."

  • Member since
    October 2008
  • From: SE Pennsylvania
Posted by padakr on Sunday, December 28, 2008 6:24 PM

Thanks redleg, I remember seeing seeing the MGS Stryker on the Military Channel sometime, but I didn't remember how it was used.  Saw the picture you posted and it looked like it was utilizing direct fire.  Can the gun be fired on the move?


  • Member since
    October 2007
  • From: N.H.
Posted by panzerguy on Sunday, December 28, 2008 6:44 PM


 Man thats a mean looking gun platform. Looks like it could get itself out of trouble as fast as it got into it.

   Great work Mike especially the anti-skid paint.


"Happiness is a belt fed weapon"

  • Member since
    July 2006
  • From: New Jersey
Posted by redleg12 on Monday, December 29, 2008 5:57 AM

Padakr - Yep, it can shoot while scooting

Panzerguy - Thanks for looking and for the comments.

Yeah, I'm sure it's trouble but fun in forward or reverse!! Where were these when we were in, all I got was a Gamma GoatSad [:(]

Rounds Complete!!

"The Moral High Ground....A Great Place to Emplace Artillery."

  • Member since
    October 2008
  • From: SE Pennsylvania
Posted by padakr on Tuesday, December 30, 2008 8:56 AM

redleg12,

The drivers hatch has a rubber/vinyl cover over the hinges, which is a black rubber piece in the kit.  I am trying to figure out if that should be painted field green or black.  I can't tell from your pictures what you did. 

Thanks, Paul

  • Member since
    January 2007
Posted by the doog on Tuesday, December 30, 2008 9:08 AM

Mike, this came out great!

Wicked cool, it is! A very nice job on a mean-looking vehicle!

  • Member since
    July 2006
  • From: New Jersey
Posted by redleg12 on Tuesday, December 30, 2008 1:48 PM

Padakr - The edges of the cover, where the bolts are showing is a bracket holding the cover on. I painted that NATO Green. The rest of it I left it's natural black. I will post a picture shortly to give you a better view.

Karl -Thanks.....Wicked....yep

Rounds Complete!!

"The Moral High Ground....A Great Place to Emplace Artillery."

  • Member since
    July 2006
  • From: New Jersey
Posted by redleg12 on Wednesday, December 31, 2008 7:05 PM

OK....I give....I'm not going to finish by New Years.

First, I worked on the decals. I wanted to use as much as I could from the kit to give it a fair evaluation. One area that falls off is the decals. Though AFV gives you a choice of 4 vehicle markings, 3 of them were the experimental markings. I used the only markings for a production vehicle. The decals have good detail but are TOO THICK. What a nightmare trying to get the edges not to show and to keep them from silvering. This is the one area of the kit that su#%$. You would be MUCH better off to use the set as a template to make your own.

Next, I worked on the stowage. Most of it comes from Real Model Molle Stryker Stowage. This kit of resin parts is fantastic. It is the ONLY set that is correct to what gear is being used today. Everyone else is just recycling the old ALICE packs. Since the MOLLE system came in around 04 and the MGS was released in 06, the only gear that will work is the MOLLE gear. The set includes enough to do 2 Strykers.

On the right side front I made some scratch straps for the tool kit using good old painters tape....painted with Model Masters OD Green.

In the rear I substituted the Real Model gas cans for the kit supplied which I painted Model Master Acrylic OD Green and the kit PE supplied strap painted with MM Field Green. In the rack is the Real Model water cans Painted MM Acrylic Desert Storm Sand, and Real Model 50 cal ammunition cans painted MM Dark Green. The straps were are the same as above and the bundle hung on the side is a camouflage net system from Real Model which has been painted with MM Dark Green, straps painted with MM OD Green then it was washed with a mix of Green and Black oils

The driver's side front has the camouflage poles. This was painted and washed the same as the net system bag.

Padakr, you can see what I did with the driver's hatch rear cover.

In the rear on the drivers side is two more water cans and two boxes of MREs. Straps also done the same as before.

Here is the current overall view

On the drivers side I still have to finish the MOLLE packs. I'm waiting for some things to do the digital camo on them. Also, even if they were done, they hang far enough down to interfere with the weathering in the tire wells. Here is what the MOLLE packs look like.

Lastly, I am trying Manny & Doog. I will see how these turn out but here is the start to Joe & Gino.

I'm off to washes and weathering of the model. Happy New Year to all.  

All comments are welcome, thanks for looking.

Rounds Complete!!

"The Moral High Ground....A Great Place to Emplace Artillery."

  • Member since
    October 2008
  • From: SE Pennsylvania
Posted by padakr on Wednesday, December 31, 2008 9:39 PM

Looks great.

Thanks for the look at the hatch cover.  I thought that was what you were talking about.

For the straps, did you paint the back side of the tape, cut it into strips and then just stick them in place?


  • Member since
    September 2005
  • From: beacon falls , Ct.
Posted by treadwell on Wednesday, December 31, 2008 10:01 PM

hey MikeBig Smile [:D]

A most striking stryker!! you have out done yourself with this one--of all your builds, this is my favorite!!Thumbs Up [tup]Thumbs Up [tup]--it is to bad they don't let us give 'stars' anymore--first class man!!--crap--happy new year man-- five stars---I wish I could put 'em up----treadCool [8D]


  • Member since
    December 2003
  • From: Colorado
Posted by psstoff995 on Wednesday, December 31, 2008 11:31 PM
Sign - Ditto [#ditto] The figures are looking nice too! I'll be interested in seeing the digital camo, ACU I'm assuming? What kind of technique are you going to use for that?

-Chris

US Army Infantryman

  • Member since
    July 2006
  • From: New Jersey
Posted by redleg12 on Thursday, January 1, 2009 8:02 AM
 treadwell wrote:

hey MikeBig Smile [:D]

A most striking stryker!! you have out done yourself with this one--of all your builds, this is my favorite!!Thumbs Up [tup]Thumbs Up [tup]--it is to bad they don't let us give 'stars' anymore--first class man!!--crap--happy new year man-- five stars---I wish I could put 'em up----treadCool [8D]

Tread - Coming from a great builder like you I am humbled. Thanks.

Padakr - Yep, paint the tape both sides. The cut into strips whic are ~.035" wide. I use a thin layer of Gator Glue to hold the tape in place on the model.

Psstoff - Well....I have two possible ideas in mind. One is pure paint which I have, I think, just about accumulated what I need to mix the colors. The other involves decals, which I will try first....just waiting for some things to arrive for that option. If I use paint... it will involve the salt method. Not to fear...I will post even if it is a failure.

Rounds Complete!!

"The Moral High Ground....A Great Place to Emplace Artillery."

  • Member since
    January 2007
Posted by the doog on Thursday, January 1, 2009 10:17 AM

Mike, those figures are looking terrific!! Seriously! They look great!

"Gino and Joe"--LOL! It's "Hans and Franz" reincarnated! Smile,Wink, & Grin [swg]

The rest of the build just looks terrific too--if you get that digital camo decal to work out, it would just cap off this build and tutorial as one of the best Modern Armor builds here! Cool [8D]Thumbs Up [tup]

  • Member since
    February 2005
  • From: Nashotah, WI
Posted by Glamdring on Thursday, January 1, 2009 11:07 AM
 redleg12 wrote:

It is the newest in the Stryker series for the US Army. It was deployed in 2006. The gun is a 105 mm. The "same" gun as on the original M1 Abrams tank. When the Army upgunned the Abrams to 120 mm the had all these 105 mm guns and ammo left. Good use of leftovers.

Waste not, want not.  Laugh [(-D]

This is a fantastic build, can't believe I missed it until this morning.  I can't wait to see how the digital camo will turn out on the backpacks.

Robert 

"I can't get ahead no matter how hard I try, I'm gettin' really good at barely gettin' by"

  • Member since
    July 2006
  • From: New Jersey
Posted by redleg12 on Thursday, January 1, 2009 11:30 AM

Karl - Thanks for the vote of confidence. Figs is my weak spot. Can't improve unless you try. But....I would not want to put crappy figs on an otherwise nice build. Glad to know I am at least headed in the right direction.

Glamdring - Thanks, better late than never! Happy you like it so far. I can't wait to try the camo either...coming soon.

Rounds Complete!!

"The Moral High Ground....A Great Place to Emplace Artillery."

  • Member since
    December 2003
  • From: Colorado
Posted by psstoff995 on Thursday, January 1, 2009 7:04 PM
Oh very cool! Way to be thinking outside the box, I've never heard of a decal method being used for ACU pattern. I'm sure you'll get them looking good which ever way you decide to move forward with

-Chris

US Army Infantryman

  • Member since
    July 2006
  • From: New Jersey
Posted by redleg12 on Sunday, January 4, 2009 9:06 PM

It's the end of my vacation and I'm still not finished. But, I have made good progress. I started the weathering process. I used 3 different MIG pigments, Industrial Dirt, Vietnam Earth and Dry Mud.

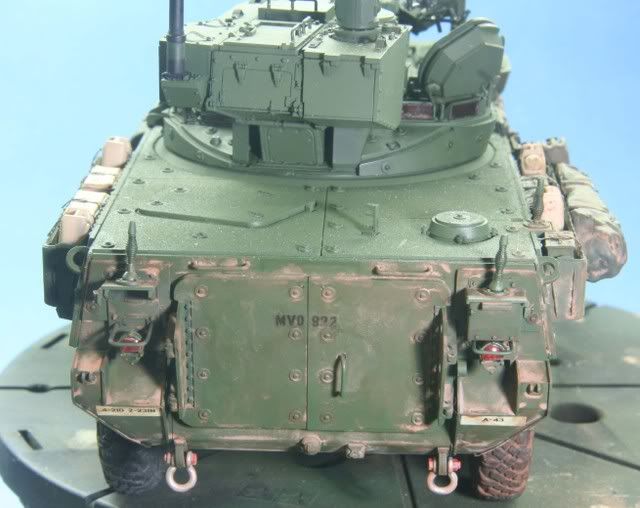
In the tire wells I used the Industrial City Dirt with water as the carrier to go around the edges and deep areas. I then stippled in a small amount of Vietnam Earth also with water carrier. Before it all dried I blended in a Dry Mud in the central areas. After the mix dried I wiped the excess away and with a damp cotton swab did some more blending and fading.

I used the Dry Mud and Vietnam Earth to create a wash which I applied to the tires and to the side of the vehicle. Where I wanted to accent the dirt I would stipple in some Dry Mud. Once this dried I would clean off the excess and also blend and fade using a damp cotton swab

Here is the right side of the vehicle completed

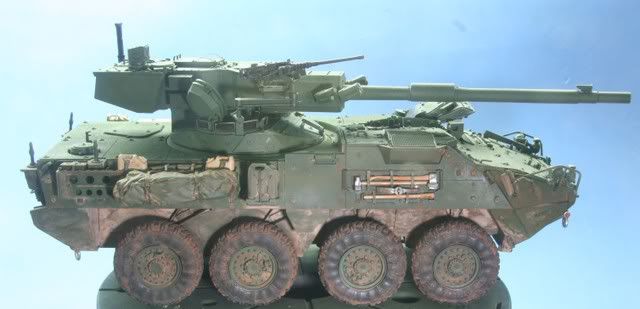
I used the same wash as above to weather the vehicle rear

Before I could continue the decal material I was waiting for arrived and my suspense could not wait any longer so.

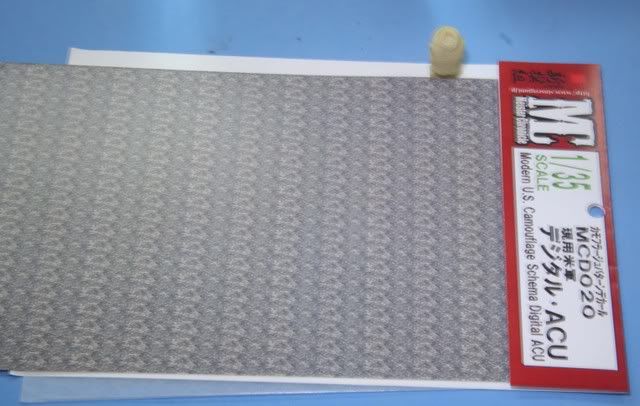
Here is the Sinsengumi Digital ACU decal MCD020 and the driver's chest. I figured I would learn by doing the driver since not much of him would be in plain view and thus hide my learning errors.

Before I attached the arms I wanted to apply the decal to the chest/ body armor. As per the directions I first coated the chest with clear future (gloss coat). To apply the decal you have to think like a seamstress. The decal needs to be cut, for the large sections in the same areas where seams in the material would occur. The main body armor would be two decals with the seams under the arms.

Since this was the first time dealing with these, the first I applied to the back. The decal is on thick paper, but the decal itself is VERY THIN. As I learned after the first one, you need to soak it in water and wait a good 30 seconds. Once it is loose it will move almost on its own. If you try to rush it, the decal will break into a number of small decals!!

Once it is loose, center it and begin applying decal set. You will need cotton swabs as you slowly move from the center to the edges, pressing down, apply more decal set, press some more, and so on until you have pushed down both the edges.

I did the same for the front, then cut some small strips and applied them to cover the collar.

Because it is so thin, it will bend, form to shape and with decal set is easy to apply. Because they are so thin, DO NOT RUB when applying as this again will break the decal. Use the cotton swab to press and push into shapes.

Here is the body armor complete and the arms then applied.

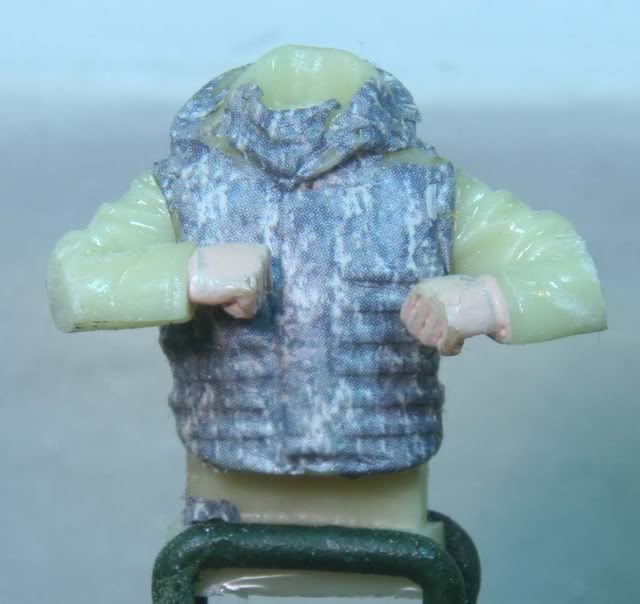
With the arms in place, I cut small strips to cover the upper and then lower arm. Here is a view of a completed arm and an arm in progress.

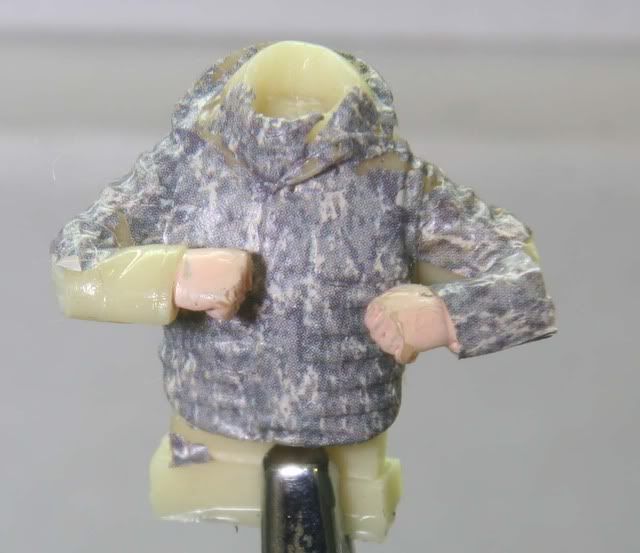
Once the arms were complete, I touched up some bare spots with small strips. The good thing is the decal is so thin, it sucks down real well and overlapping is not a problem. You can't find the overlap with the naked eye, and it is rough even with opti-grab goggles!

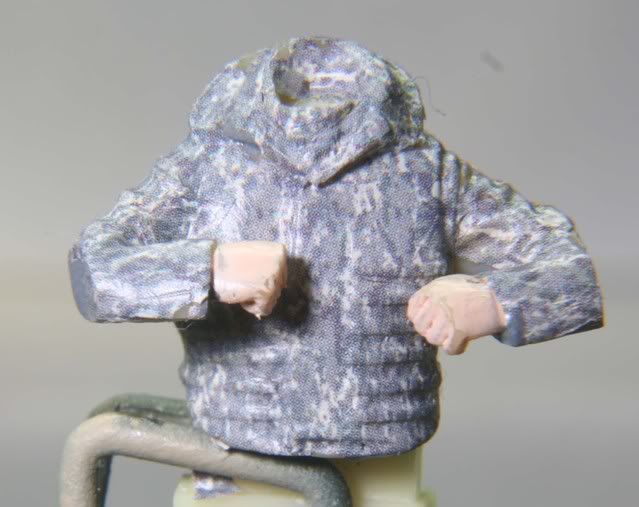
Here is the finished torso. I touched up some areas with Poly Scale British Ocean Grey F505256. it's not perfect but was good for learning.
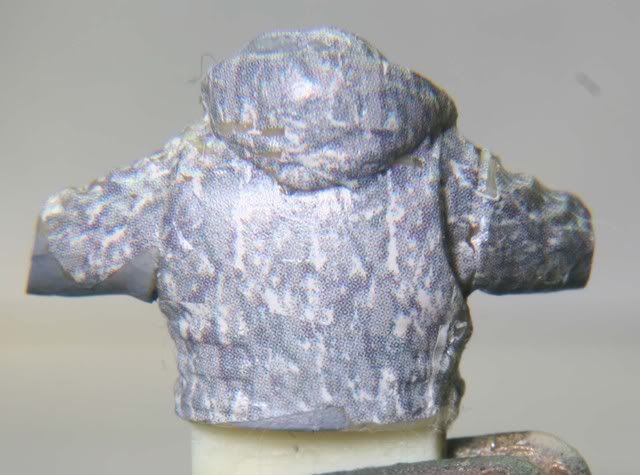
And the back view

Notes of learning....and teaching

The decal is very thin and it take time to learn to use it. This first torso took me 5 hours of which 2/3 of the work was in the last 2 hours. The TC who has a half body should only take the 2 hours.

Besides having a gloss surface to apply to, you need an undercoat of the predominant color of the decal. If you have some minor cracking, this will blend in the problem. I will be undercoating with the British Ocean Grey and may mix to lighten it with some sand for a better match.

You need plenty of decal set but it will suck down and take on shapes.

Have plenty of cotton swabs and a dental pick to push down or push in the decal

Keep track of the camouflage pattern. Be aware how the pattern would change direction on sleeves or on the collar.

Well I will head back to the MGS to finish weathering before I finish the TC and the packs.

All comments are welcome, thanks for looking.

Rounds Complete!!

"The Moral High Ground....A Great Place to Emplace Artillery."

  • Member since
    December 2003
  • From: Colorado
Posted by psstoff995 on Sunday, January 4, 2009 10:06 PM

WOW!! Well, the weathering is looking great so far, once you get the the rest blended in I think it'll really be an eye popper- but thouse ACU decals are pretty cool! Looks pretty nice for a trial run, I'd have to agree with you about the base coat prior to applying them, also I'm not sure if I'm correct but it looks like on your macro pictures you can actually see the individual marks made by the printer the decals came out of. Obviously this isn't really an issue as there's no way this would be visible without the camera zoom, just something to point out for anyone who's keen on wanting a close up of a finished figure- the printed marks appear to be about the same size as the digital pattern. Other than that let me say you did a great job on keeping the pattern mixed up (as on the overall sheet the repeated pattern is obvious) and also in line with the folds/bends of the arms etc! Bow [bow]

Not sure that it matters as you said most of his this wont be visible, but some of the touch ups of the Ocean Gray are prominent, but they're in places like the underarms/elbow and probably wont be seen on the finished model. I think the big problem is the super zoom on your camera is way better than my eyes are, I think you should cut yourself a break and take a shot from a little farther off on the next update so we can all see how they appear when you can't see each individual pixel on the pattern! They look like a pretty useful tool though, thanks for sharing Smile [:)]

-Chris

US Army Infantryman

  • Member since
    July 2006
  • From: New Jersey
Posted by redleg12 on Monday, January 5, 2009 5:35 AM

G - The decals came from; http://www.hlj.com/product/SSGMCD020

I wanted to give them a try as opposed to trying to paint the digital pattern. Thanks for looking

Psstoff - Thanks for the comments on the weathering. As far as the figure, first for all the detail freaks I wanted to give the macro shots but I agree with you. The perspective of these photos to our eye is a 20 ft tall man. IMHO, especially for the first shot with these decals, it looks great.

As far as the touch up and the British Grey, I was about 3/4 thru when I decided to use the grey for some of the "unseen" areas. If I was going to paint the pattern, I was going to mix the Grey with Desert Storm Sand to lighten the color. Since it was unseen, I wanted to see how close the color was to the decal prominent color.

Thanks for looking guys and your comments.

Rounds Complete!!

"The Moral High Ground....A Great Place to Emplace Artillery."

  • Member since
    December 2003
  • From: Colorado
Posted by psstoff995 on Monday, January 5, 2009 11:40 AM

That makes sense redleg, good points

But hey even on a 20 foot man they still look great! And yeah I didn't even take into account that this was your first time around with them, that's really impressive!

Looks like you picked the right Grey, as far as I can tell they match up pretty nice

-Chris

US Army Infantryman

  • Member since
    July 2004
  • From: Texas
Posted by wbill76 on Monday, January 5, 2009 1:38 PM
Coming along nicely Mike, the mini-SBS on the digi-camo is interesting as well. I've always wondered how those would work on figures and the way you've done it makes perfect sense.
  • Member since
    November 2005
Posted by Anonymous on Monday, January 5, 2009 5:17 PM
Awesome! I have seen all types of camo available for figgies---I think the decals are Tamiya? They even have armor camo decals!!! I'm hoping that soon they will come out with face decals!!!
  • Member since
    January 2007
Posted by the doog on Monday, January 5, 2009 5:19 PM

WOW, Mike--that looks outstanding!!!

The figure looks waaaay cool with that camo!!!

The weathering looks pretty cool too! Soldier on!!

  • Member since
    July 2006
  • From: New Jersey
Posted by redleg12 on Monday, January 5, 2009 6:58 PM

Manny - Thanks for looking. Nope, not Tamiya, they are Shinsengumi. Here is there complete list in 1/35:

http://www.hlj.com/hljlist2/?word2=&series2=All&maker2=SSG&btnSearch=Narrow+Search&Dis=-2&GenreCode=All&MacroType=Dcl&Scale=35&SeriTxt1=

They have all differnt items and I'm sure some that will interest you. Your fig comments mean a lot....thanks

Bill - I had to try something different....you know me! Thanks for popping in.

Karl - Thanks for the comments. Glad you liked the fig.

Rounds Complete!!

"The Moral High Ground....A Great Place to Emplace Artillery."

  • Member since
    October 2008
  • From: SE Pennsylvania
Posted by padakr on Monday, January 5, 2009 8:23 PM
Outstanding.  I look forward to seeing the figures in place.  I expect that the detail of the camo will really sell the finished build.
  • Member since
    July 2006
  • From: New Jersey
Posted by redleg12 on Sunday, January 11, 2009 7:26 PM

This week I started to close up the ends. First I completed the figures. After decaling both I figures, they were given a coat of flat future. Once the future was dry, I mixed a medium grey oil wash and washed to bring out the folds and highlights. The TC received a set of gloves via Poly Scale OD Green and the washed to bring out detail.

I began work on the pack arrangement which is the last thing to mount and weather on the vehicle. Yep.....I am using the camo. decals, one down, two more to go.

On the vehicle, I fabricated the antennas, and for two made the "idiot" ball for the end. After the antennas were mounted, I made some repairs of incorrect kit directions, thanks to Rich Cody from Armorama. First was the gunner's sight cover which direction say to mount as a top opening but is actually a bottom opening.

Then the gun sight compartment hatch needs to sit flat. I removed the hatch and filed it to get it as flat as I could.

Finally, I finished weathering the model except for the packs which I am still working on.

Hopefully, the next update should be the mounted and completed model.

All comments are welcome, thanks for looking.

Rounds Complete!!

"The Moral High Ground....A Great Place to Emplace Artillery."

  • Member since
    June 2003
  • From: East of Cleveland, along the Amish Frontier
Posted by cameraflage on Sunday, January 11, 2009 8:41 PM

Impressive...most impressive!

A quick question on the MOLLE packs...would they have the woodland pattern or the ACU pattern? I'm asking because I'm in the process of doing packs for my ICV, and I have the Legend set, which has ALICE packs instead of MOLLE. I'm cheap, and dont want to have to buy another gear set, so I figured I'll make do with what I got. The woodland decals look great, and might be an option for me instead of trying to paint all that. Some of the reference photos I have show Strykers with some sort of gear with a woodland pattern, but I can't tell what they are exactly. 

Anyhoo, the MGS looks great!

Ranger Joe, Defender of Bunnies

Ranger Joe, Defender of Bunnies "Feed the rangers, not the bears" www.nls.net/mp/cameraflage

  • Member since
    July 2006
  • From: New Jersey
Posted by redleg12 on Monday, January 12, 2009 5:37 AM

Wayne - Thanks for looking and your comment. For the amount of time I spent on the figs....it appears to be worth it. Thanks again....(Gino & Joe thank you too)

Cameraflage - Thanks for the comment. Don't worry about being cheap, we all are!!! 99% of the people think ALICE and MOLLE are 60s rock band members!! Only a big old retired soldier like me finds them in between counting bolts from the TM (technical manual).

Use the alice packs, and go with the camo. I have also looked at a bunch of photos. I have yet to see one with the digital ACU patteren on the packs. They are the old BDU camo. Even the picture on the Real Model box with the MOLLE gear has the MOLLE packs in BDU camo.

SO.....embrace ALICE (I did for many years), cover her in woodland camo and as you stated with it in the bird cage....weathered....no one is going to look for MOLLE.....ALICE will do you fine.

Thanks again.....The emperor awaits us!!!

Rounds Complete!! 

"The Moral High Ground....A Great Place to Emplace Artillery."

  • Member since
    July 2004
  • From: Texas
Posted by wbill76 on Monday, January 12, 2009 1:21 PM
Getting closer to the finish line Mike...and looking better with each new update! Thumbs Up [tup] Nice save on the gunner's sight and the hatch modification.
  • Member since
    December 2003
  • From: Colorado
Posted by psstoff995 on Monday, January 12, 2009 2:48 PM

This is looking really good! Are the driver's hands going to be in the hatch so only his head is visible? If this is so I understand why you'd leave his hands so bright so they'd at least be visible through the hatch (and it's not like hands really tan), but if not I feel like his hands are way too pale compared to his face and could use at least a little tan wash for shadow between fingers. Other than that this project has really been moving along- the deacals look great on everything! Definitly helpful from what I can see having tryed to paint cammo in 1/35.

The final weathering on the MGS looks great, nice work with the antennas too, did you use guitar string or wire or..?

-Chris

US Army Infantryman

JOIN OUR COMMUNITY!

Our community is FREE to join. To participate you must either login or register for an account.

SEARCH FORUMS
FREE NEWSLETTER
By signing up you may also receive reader surveys and occasional special offers. We do not sell, rent or trade our email lists. View our Privacy Policy.