SEARCH FINESCALE.COM

Enter keywords or a search phrase below:

FINISHED! Page 7-the doog's BEST? Sdkfz 251/17 Ausf. D w/2cm Schwebelafette

98061 views
181 replies
1 rating 2 rating 3 rating 4 rating 5 rating
  • Member since
    April 2008
  • From: Kristiansund, Norway
Posted by Huxy on Sunday, February 1, 2009 12:25 PM

Wow... That's... great.. I want, it is... interior like.... map, panels. the can.. like, you... wow..  awsome

*Gasp* 

"Every War Starts And Ends With An Invasion".

  • Member since
    October 2007
  • From: N.H.
Posted by panzerguy on Sunday, February 1, 2009 12:29 PM

    Doog slow down and smell the plastic, lol.

  The interior looks great. Again one of the first things that draw's my attention on one of your builds is the ammo racks. Glad to see that the dash decals didn't get the best of you like mine did.

   Just one thing, did they use kids as gunners on these things? That is one tight fit!

"Happiness is a belt fed weapon"

  • Member since
    January 2012
Posted by I make stuff on Sunday, February 1, 2009 3:27 PM

Wow, Karl.

 I need to get a thesauraus, I've used all the good adjectives, and you haven't painted the exterior yet.

Very nice, well-thought out as usual.  I find myself thinking more about building than actually building these days, I think it's making me better just to watch you work.

Bill   

  • Member since
    July 2006
  • From: New Jersey
Posted by redleg12 on Sunday, February 1, 2009 4:20 PM

Love the dash board....nice shading. The usual DOOG good modelkeeping seal!!

Rounds Complete!!

"The Moral High Ground....A Great Place to Emplace Artillery."

  • Member since
    January 2005
  • From: in the tank factory in my basement
Posted by biffa on Monday, February 2, 2009 12:13 PM
Good call on the gun Doog it looks like i imagine it should, also i agree on the dash decals they are sweet man, the interior as a whole looks perfect very nicely done.
Ron g.
  • Member since
    December 2005
  • From: Syracuse, NY
Posted by lexesbenz on Tuesday, February 3, 2009 2:07 AM
Would any of these 251's have had a heavy whitewash for winter?
The flying hamster of doom rains coconuts on your pitiful city!!!!
  • Member since
    June 2008
  • From: Iowa
Posted by Hans von Hammer on Tuesday, February 3, 2009 7:27 AM


Would any of these 251's have had a heavy whitewash for winter?

Probably...

The usual excellent work, Doog! Gonna add some baking soda mud?Big Smile [:D]


  • Member since
    March 2004
  • From: Kincheloe Michigan
Posted by Mikeym_us on Tuesday, February 3, 2009 9:26 AM
 Hans von Hammer wrote:


Would any of these 251's have had a heavy whitewash for winter?

Probably...

The usual excellent work, Doog! Gonna add some baking soda mud?Big Smile [:D]


Run for the hills!Tongue [:P]  He said the dreaded BS word hopefully Doog won't foam at the mouth at this one.Tongue [:P]

I figured out one thing with the fuel tank and transmission if you were going to do a maintenance diorama you can remove the floor plates to access them.

On the workbench: Dragon 1/350 scale Ticonderoga class USS BunkerHill 1/720 scale Italeri USS Harry S. Truman 1/72 scale Encore Yak-6

The 71st Tactical Fighter Squadron the only Squadron to get an Air to Air kill and an Air to Ground kill in the same week with only a F-15   http://photobucket.com/albums/v332/Mikeym_us/

  • Member since
    January 2007
Posted by the doog on Tuesday, February 3, 2009 10:36 AM

Thanks, stick man, Huxy, panzerguy, Mike, and Bill! I appreciate your kind comments!

Panzerguy--you gotta get some Solvaset for your decals! It's a miraculous porduct for laying down decals!

Ron, thanks, too--you know, I'm still unsure about the gun color. It does seem to figger that the gun would be all bare gunmetal, but I'm still unsure; looking at Manny's version there, I kinda am second-guessing it now? I may repaint the gun and see what I like best?

Tony--the short answer; sure--why not? Who really knows? Go for it!

Hans--you know whatthey say--"Once burned...." You're playing with fire, my friend! LOL!

Mike--that's a good thought; however, you'd be in for a whole lot of conjecture and scratching if you went that route. I'll wait to see yours, to decide how it loooks first! Wink [;)]

Thanks again, guys--I'm painting the exterior today; more pics later, I hope! 


  • Member since
    March 2004
  • From: Kincheloe Michigan
Posted by Mikeym_us on Tuesday, February 3, 2009 11:25 AM
 the doog wrote:

Thanks, stick man, Huxy, panzerguy, Mike, and Bill! I appreciate your kind comments!

Panzerguy--you gotta get some Solvaset for your decals! It's a miraculous porduct for laying down decals!

Ron, thanks, too--you know, I'm still unsure about the gun color. It does seem to figger that the gun would be all bare gunmetal, but I'm still unsure; looking at Manny's version there, I kinda am second-guessing it now? I may repaint the gun and see what I like best?

Tony--the short answer; sure--why not? Who really knows? Go for it!

Hans--you know whatthey say--"Once burned...." You're playing with fire, my friend! LOL!

Mike--that's a good thought; however, you'd be in for a whole lot of conjecture and scratching if you went that route. I'll wait to see yours, to decide how it loooks first! Wink [;)]

Thanks again, guys--I'm painting the exterior today; more pics later, I hope! 


What I'm thinking about the gun is that the paint would have came off due to the extreme heat generated by the gun firing. Guns with a high rate of fire like the Kwk38 would have the barrel going red hot to white hot so paint couldn't stay on.

On the workbench: Dragon 1/350 scale Ticonderoga class USS BunkerHill 1/720 scale Italeri USS Harry S. Truman 1/72 scale Encore Yak-6

The 71st Tactical Fighter Squadron the only Squadron to get an Air to Air kill and an Air to Ground kill in the same week with only a F-15   http://photobucket.com/albums/v332/Mikeym_us/

  • Member since
    January 2007
Posted by the doog on Wednesday, February 4, 2009 8:26 PM

Hi guys,

Well, here we go with another update--finishing the exterior, and painting camo.

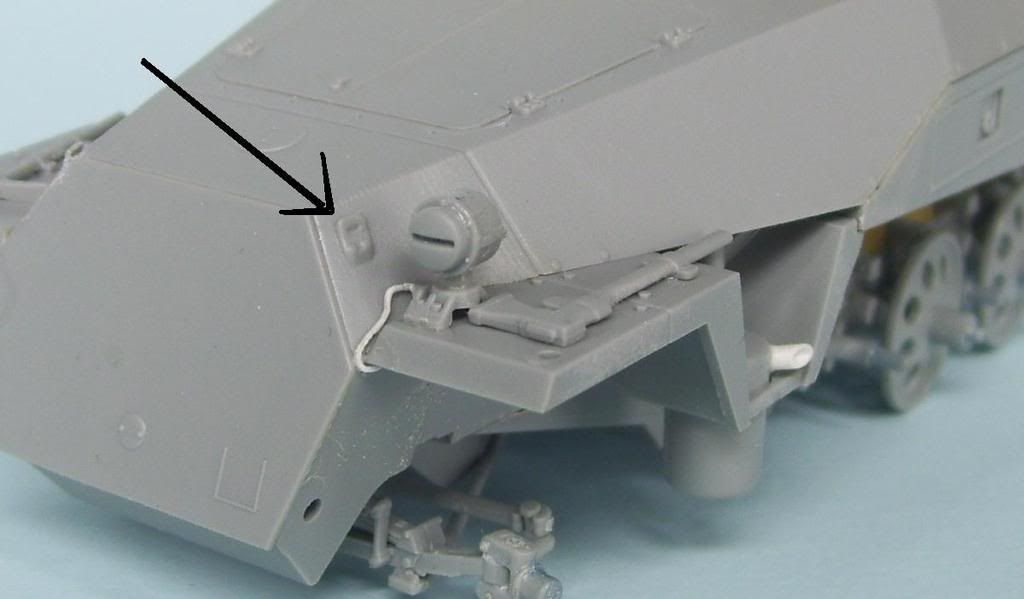
First of all--boy, you guys weren't kidding about test-fitting! The side panels are really a pain to get sitting correctly. I had to do a lot of scraping and testing. I also added a wire to the light here, and also want to point out the front lifting lugs here--they are only "2-D", so I wanted to open them up, because they're going to be of use to me later. Wink [;)]

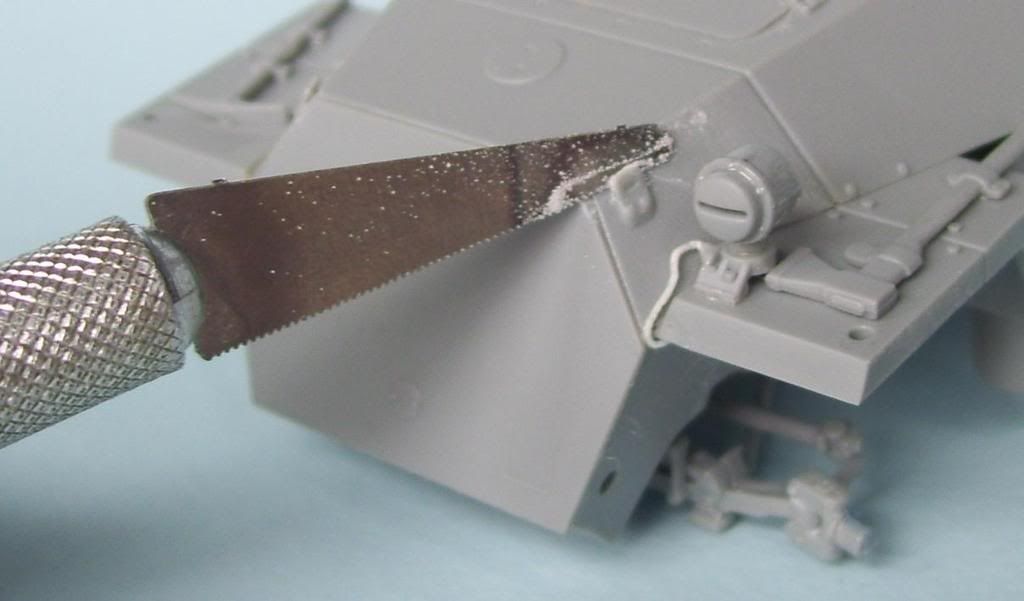
I carefully cut under them with a photo-etched microsaw...
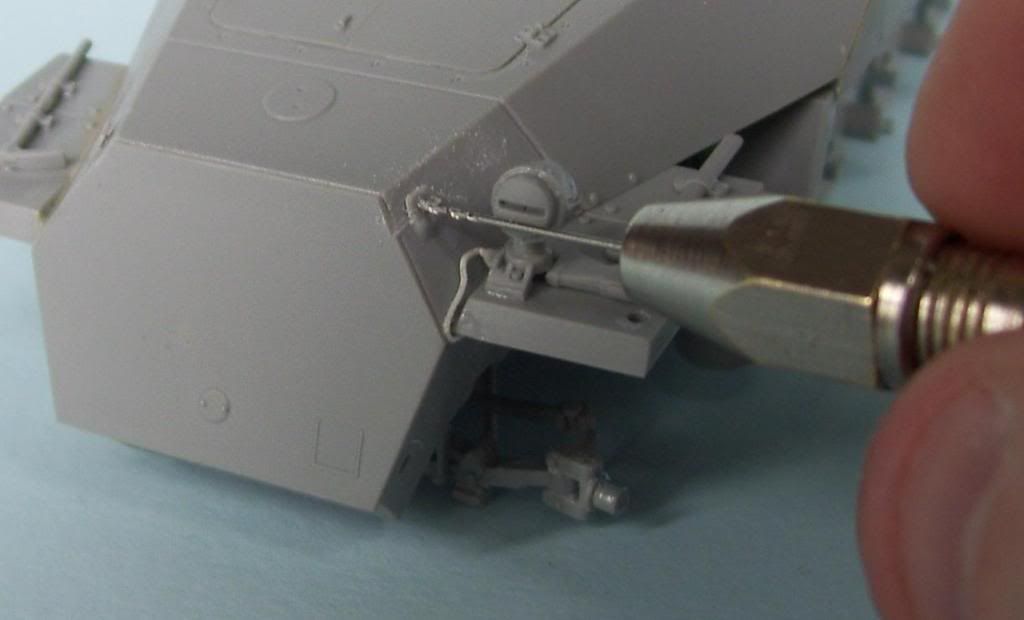
Drilled them out...

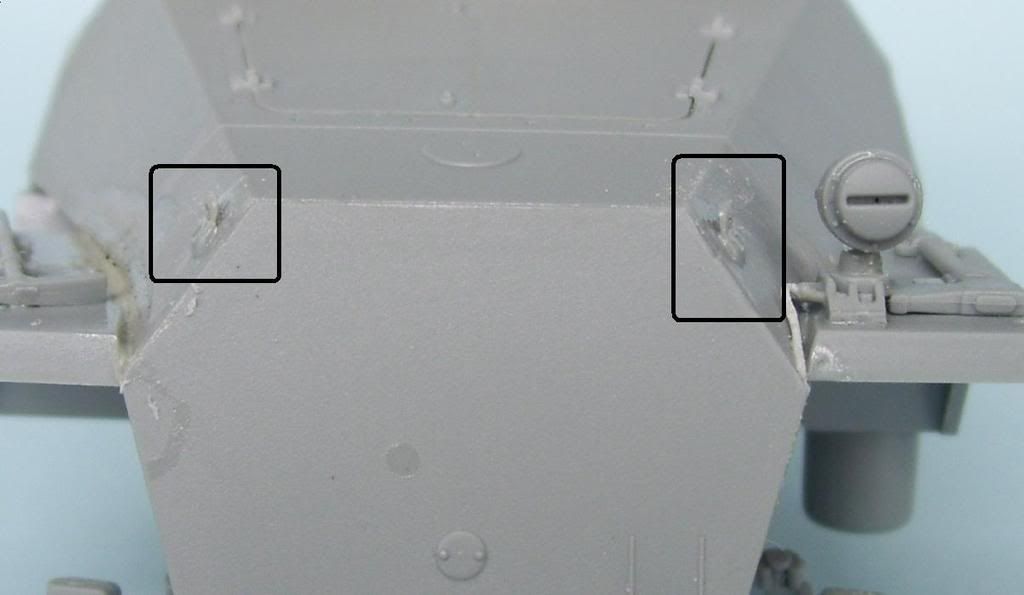
...and then bent them carefully, away from the body.

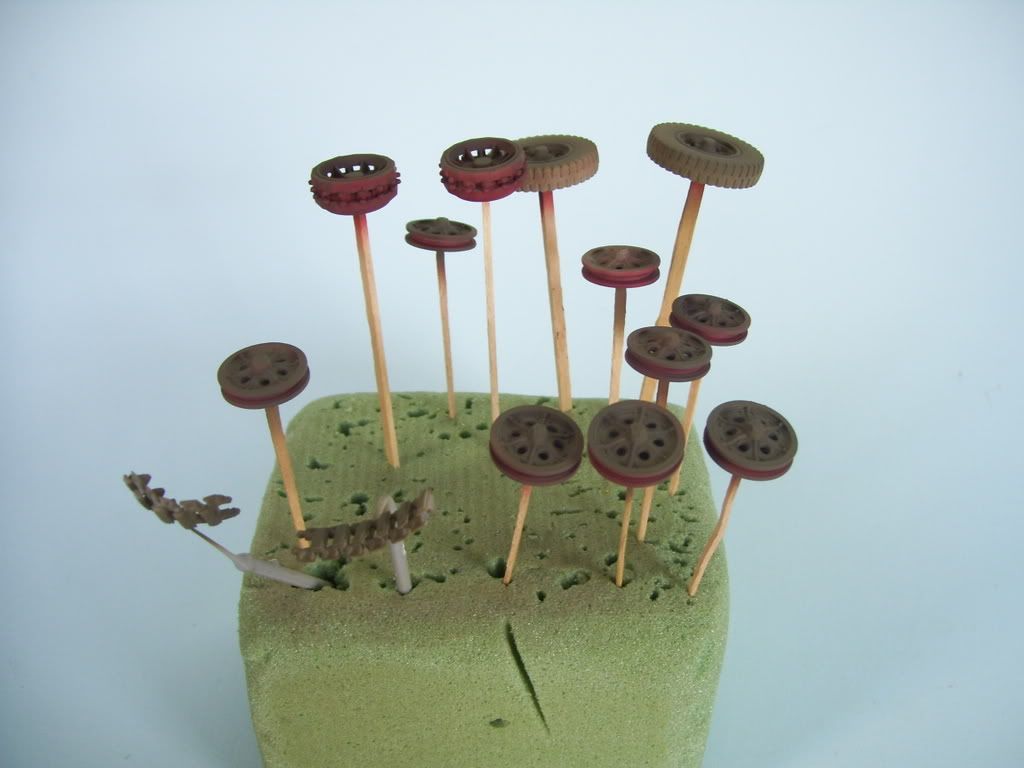
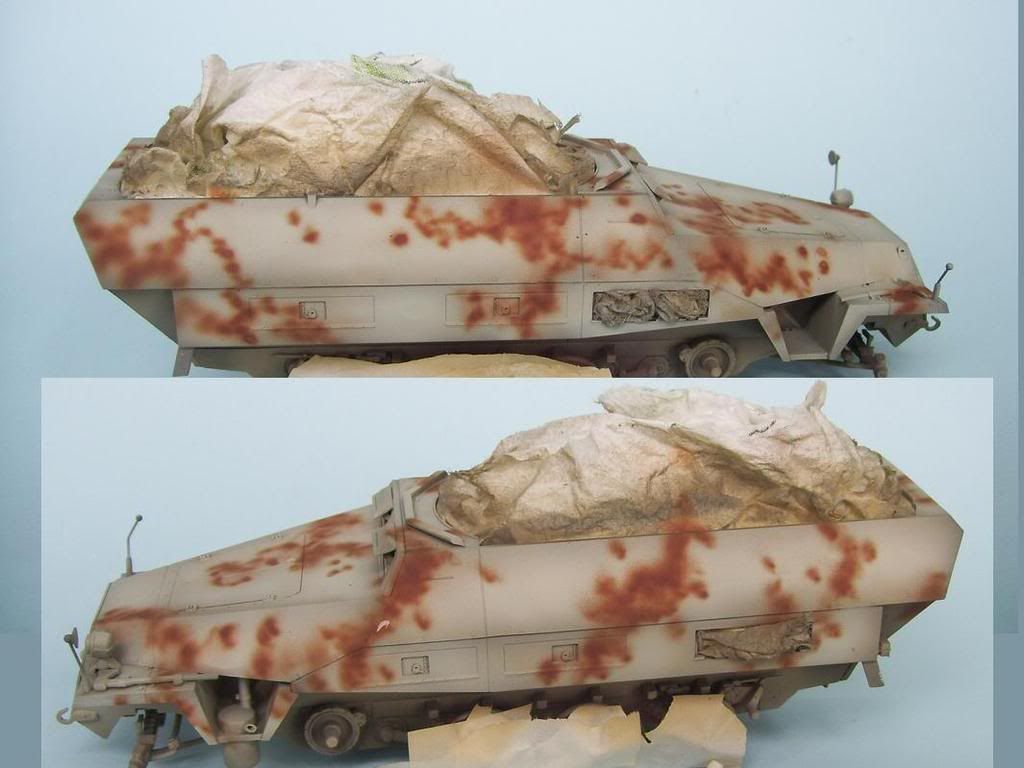
Satisfied with that, I then painted some preliminary stuff--the insides of the wheels and the body panels got a coat of primer red. This is Tamiya Hull Red + Red.

The body and wheels then got masked, and the base coat of Dark Yellow + Black added...

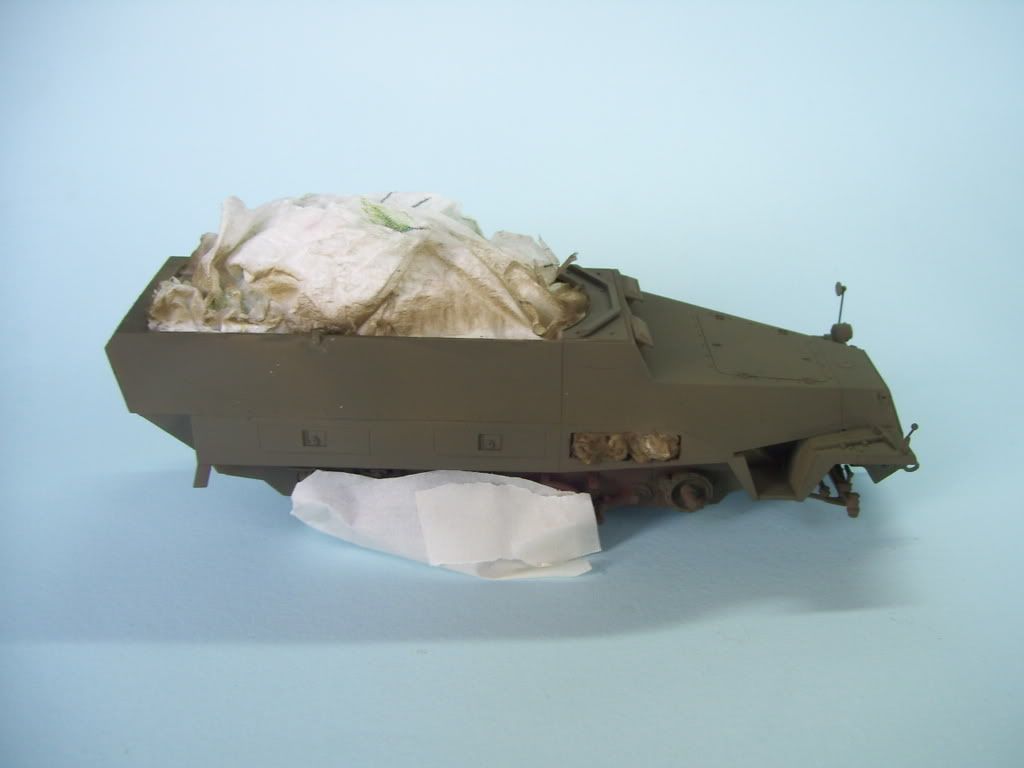
Next, the body was given a coat of regular DY, then a greatlyy lightened coat of it (about 85% White added) was sprayed on the insides of the panels.

Note how the insides of the wheels show primer. This mayor may not be correct, but I got an idea from a pic of a PZ IV in coor that I have where the drive sprockets were Primer red inside .

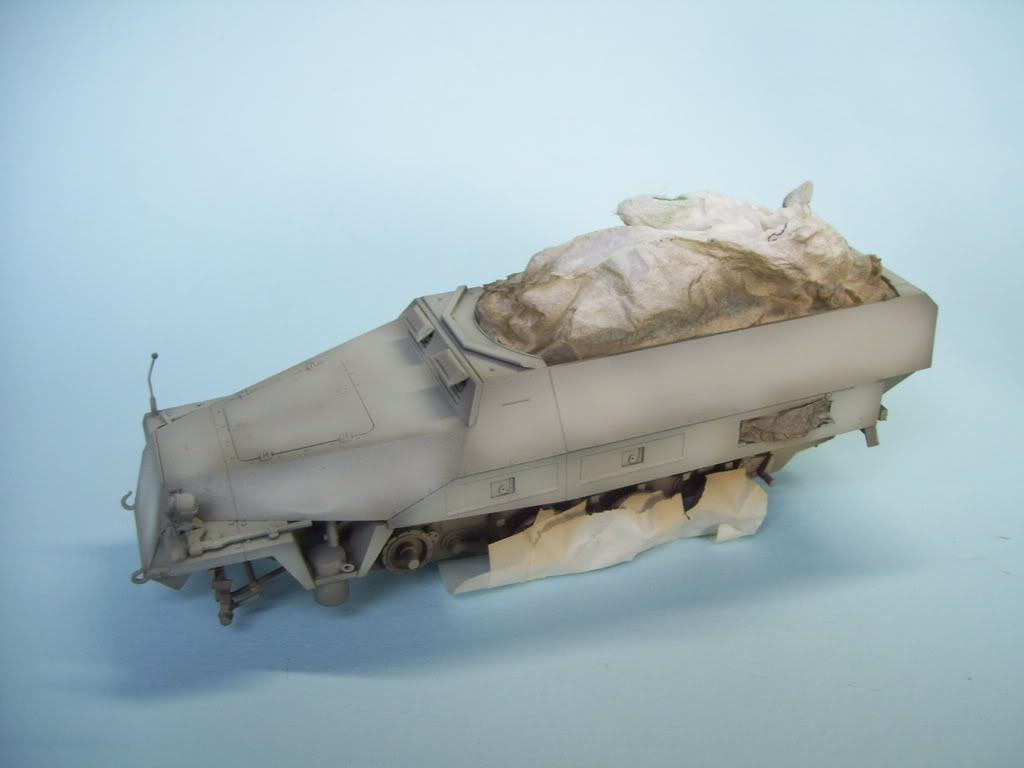
I also repainted the framework of this pesky little bugger after finding some more close. clear photos in a Concord publication.

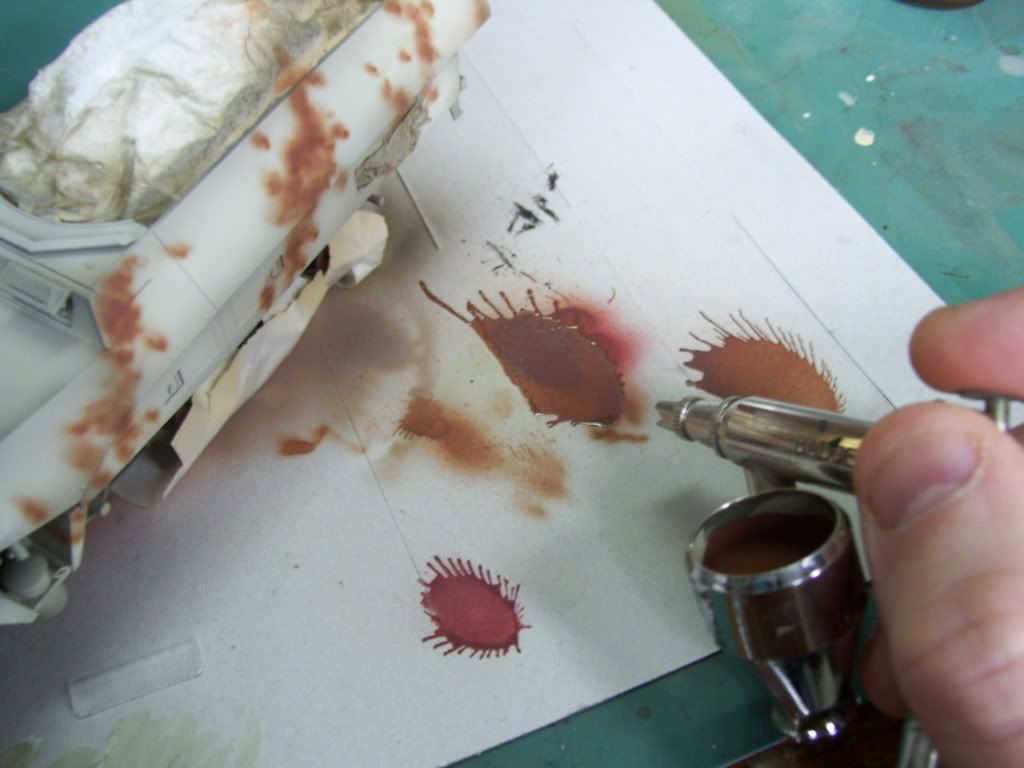
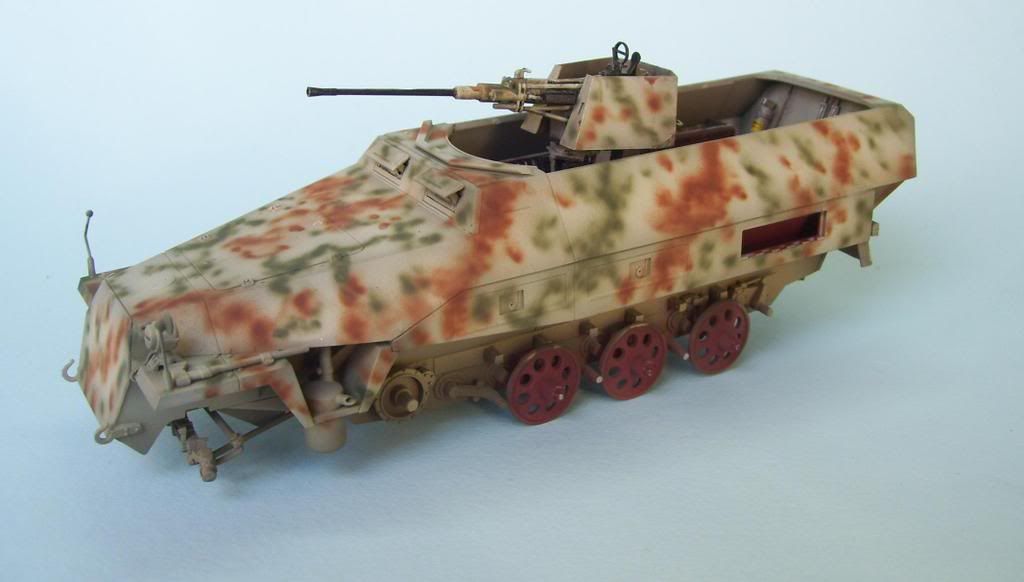
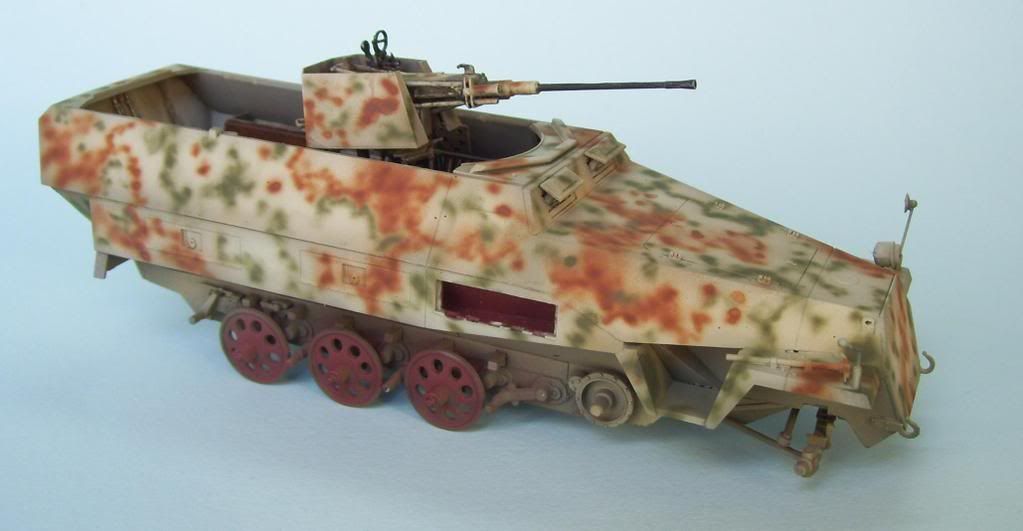
Rare, battle camera shots of a doog in action! Tongue [:P] Here I am actually airbrushing the camo. I went with a spotty tri-color camo; here you can see how close I'm actually spraying the paint. I simply regulatethe air with my finger; the paint is not excessively thin; actually, it's a little on the thicker side...

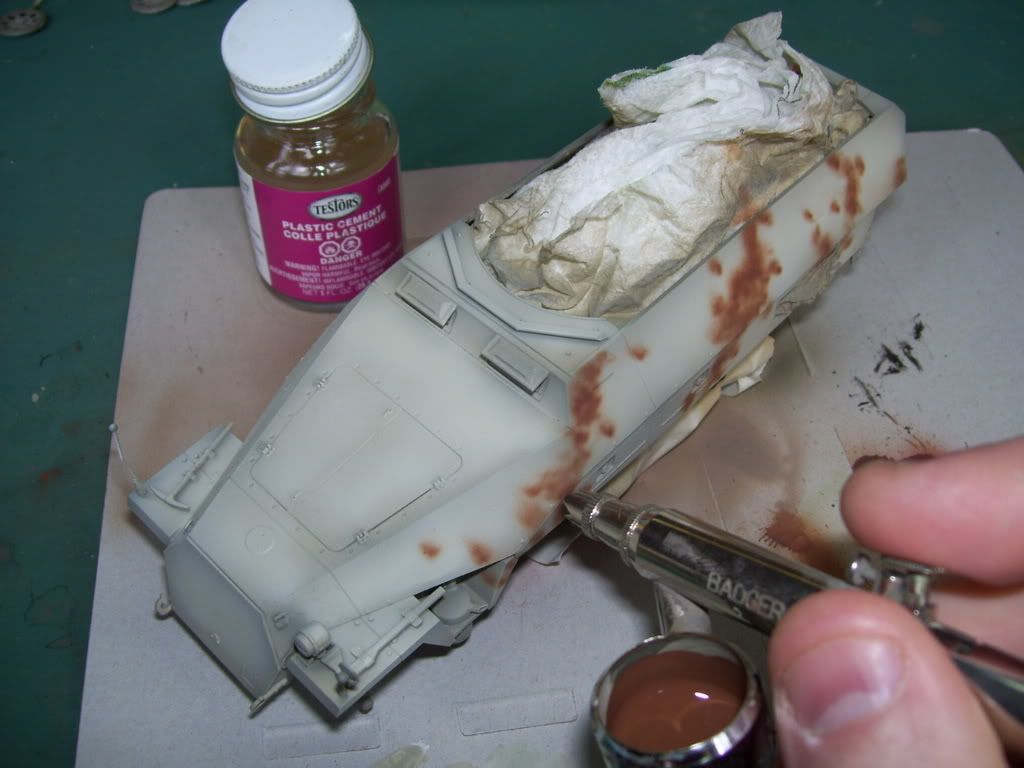
EVery 20 seconds or so, I spray full-bore to clean the nozzle; every minuteor so, I clean the tip of the airbrush with TEstor's model cement.

whistle while you work,....Whistling [:-^]

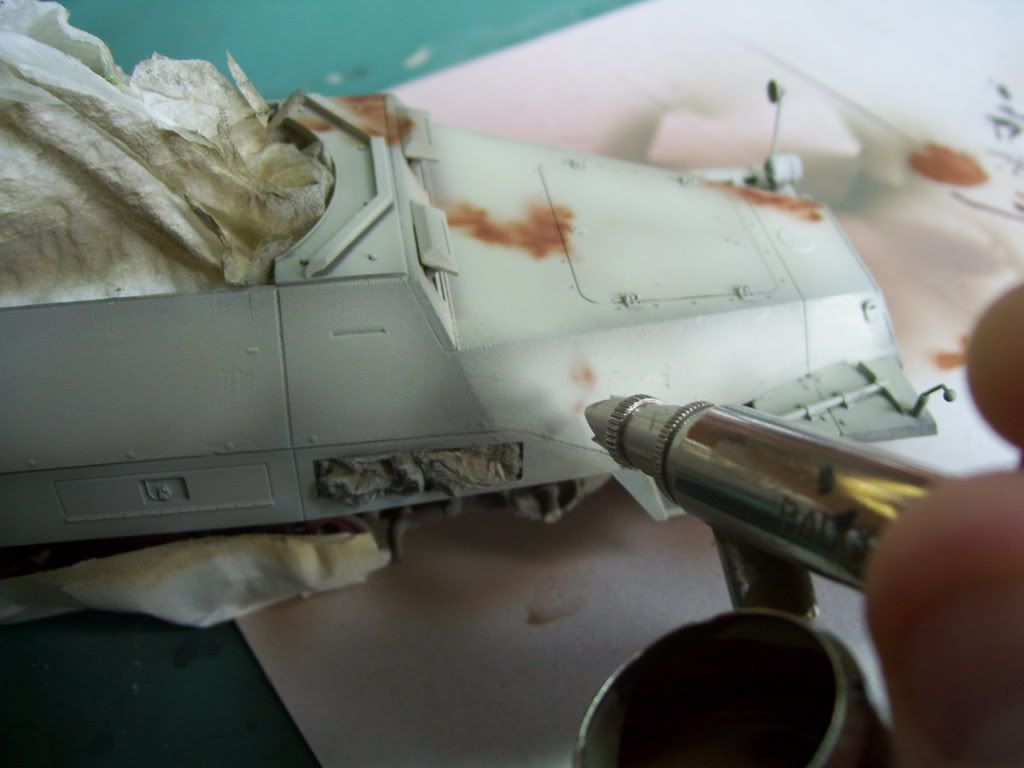
And here's the red camo coat completed! 

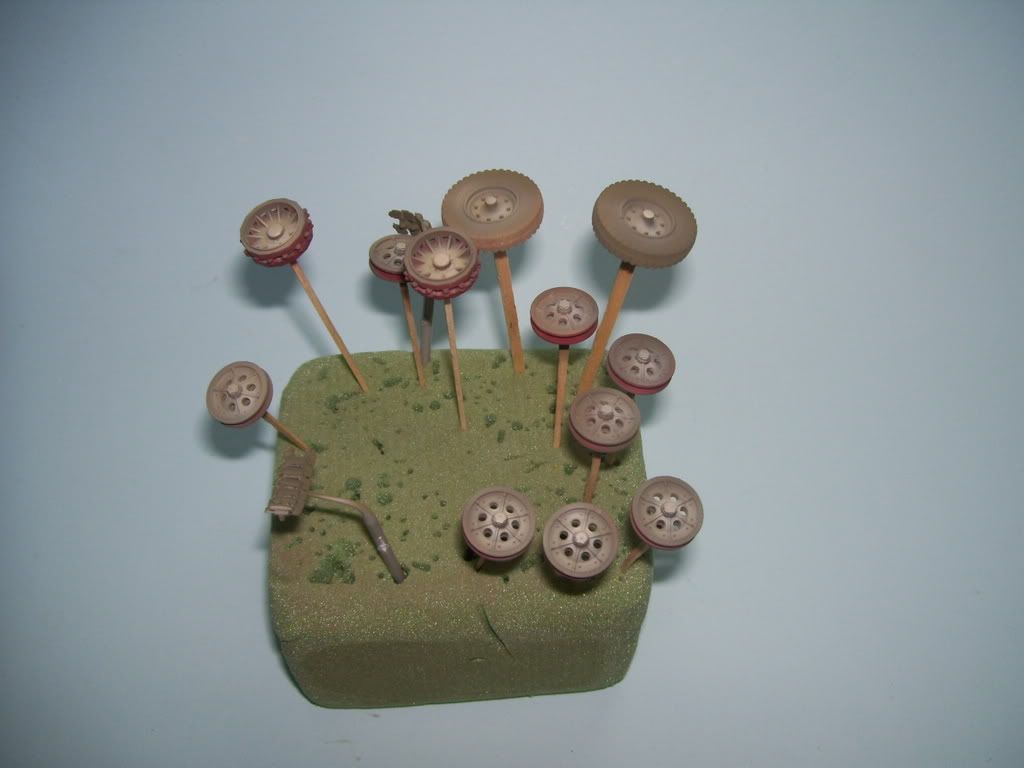
So I do the same thing with the green--Tamiya Field Gray once again, (weird, that they put their arguably only real "accurate" Panzer Green color in this label, but it really IS "panzer Green"!) and here's my result so far!

So, onward to the weathering phase--I'll try to remember to photograph that a little more, if I can....I'm off! Tongue [:P] 

  • Member since
    December 2003
  • From: Colorado
Posted by psstoff995 on Wednesday, February 4, 2009 9:53 PM

Holy dunkelgelb Batman! It started out brownish, then went to a muddy white/gray and then add some kickCensored [censored] camo spray and and... it looks like dunkelgelb! Very cool. Love the camo technique- looks like you took your Hornisse and just sprinted with it!!

Looks awesome, can't wait for some mud!

-Chris

US Army Infantryman

  • Member since
    December 2005
  • From: Syracuse, NY
Posted by lexesbenz on Wednesday, February 4, 2009 11:05 PM
Karl that looks outstanding so far!!! excellent WIP!
The flying hamster of doom rains coconuts on your pitiful city!!!!
  • Member since
    April 2008
  • From: Kristiansund, Norway
Posted by Huxy on Wednesday, February 4, 2009 11:52 PM

Beautiful! I like that camo scheme.. I wasn't too sure when I just saw parts of the brown-red Laugh [(-D]   But that looks awsome!!


-Huxy 

"Every War Starts And Ends With An Invasion".

  • Member since
    January 2004
  • From: Peru, IN
Posted by leadsled on Thursday, February 5, 2009 12:08 AM
Absolutely awesome! I have a couple 251's in stash. Thanks to everyone for the heads up on the fit prob's
  • Member since
    July 2006
  • From: New Jersey
Posted by redleg12 on Thursday, February 5, 2009 1:19 AM

Love the "on the job" photos of the Doog hands. Nice camo job

Rounds Complete!! 

"The Moral High Ground....A Great Place to Emplace Artillery."

  • Member since
    July 2004
  • From: Texas
Posted by wbill76 on Thursday, February 5, 2009 9:36 AM

Coming right along Karl! This is just my observer opinion but I would suggest perhaps tinkering a bit with some of the patterns a little more, particularly on the right side and the right side half of the nose top-deck? The left side of the vehicle looks like it has more continuity (if that makes sense) in terms of the squiggly-type pattern hastily sprayed on in the field vs. that on the right side. The right side seems to have more discrete "dots" vs. squiggles and doesn't "match" the pattern/method applied to the left...to my eye the pattern on the left side makes more visual sense vs. that on the right as the near-perfect "roundness" and distribution of the spots that appears on the right sides seems more uniform like you just sprayed, well, dots, instead of a pattern. My 2 cents [2c] 

Great idea and execution on opening up the lifting eyes on the nose...they look substantially better as 3-D parts and you'd never know by looking at them that they weren't parts added vs. molded-on modified. Thumbs Up [tup]

  • Member since
    November 2006
  • From: Coastal Maine
Posted by dupes on Thursday, February 5, 2009 10:37 AM

Doog - don't know HOW I missed this thread until page 4...that paintjob is spectacular.

I know you're not a big fan of GB's, but MAN do I wish I had been able to get you in on the 251's build! Smile,Wink, & Grin [swg]

  • Member since
    January 2007
Posted by the doog on Thursday, February 5, 2009 12:01 PM
 wbill76 wrote:

Coming right along Karl! This is just my observer opinion but I would suggest perhaps tinkering a bit with some of the patterns a little more, particularly on the right side and the right side half of the nose top-deck? The left side of the vehicle looks like it has more continuity (if that makes sense) in terms of the squiggly-type pattern hastily sprayed on in the field vs. that on the right side. The right side seems to have more discrete "dots" vs. squiggles and doesn't "match" the pattern/method applied to the left...to my eye the pattern on the left side makes more visual sense vs. that on the right as the near-perfect "roundness" and distribution of the spots that appears on the right sides seems more uniform like you just sprayed, well, dots, instead of a pattern. My 2 cents [2c] 

Great idea and execution on opening up the lifting eyes on the nose...they look substantially better as 3-D parts and you'd never know by looking at them that they weren't parts added vs. molded-on modified. Thumbs Up [tup]

Thanks, Bill, for your observations and recommendations! Smile [:)]

You know, I'm actually "behind" on painting this vehicle, as I wanted to do a scheme that was both eye-catching, but realistic as well. I was honestly torn between several ideas. To help me decide, I took every volume of Concord, Squadron, Osprey, and other publications books that I have (quite the large collection!) and carefully perused them with my trusty reading glasses, carefully looking at camo schemes on halftracks and support vehicles.

I was surprised somewhat by many of the really crappy camo schemes and some of the downright unattractive renditions of some of them; truly, a lot of these guys would never have made it as modelers! LOL! Some vehicles hadgenuinely unattractive patterns; some had schemes that, if you modeled them accurately, would unquestonably bring howls of derision or questions of your grasp of painting skill! Whistling [:-^]

However, it convinced me that too much uniformity can sometimes NOT be the best thing for a camo coat. If you notice, I did this scheme free-hand, going strictly with a visual balance of color. I will say this--I seriously went over to the bench and looked it over, and "in person", it doens't look uneven or unbalanced, color-wise. A lot of this is going to be faded down pretty seriously, so you won't be able to see the colors in such sharp relief as it is now.

I do apppreciate your opnion on it, however; please continue to pick out anything you see as needing a redress! Smile [:)] And thanks for the Thumbs Up [tup]'s on the lift eyes--I''m gonna string some tracks from them on the front there! 

Thanks too, to all who've sent "props"! Big Smile [:D]

dupes--thanks; I appreciate the thought, but again, we come back to that issue of how much exposure that would get this WIP tutorial? The MAIN reason I don't do GB's is because I want to reach the widest possible audience. not for the "ego reinforcement", honestly, (get enough of that in my job, LOL!) but for the didactive aims and goal of "giving back" to this forum and reaching new members, many of whom probably never set foot in the GB forums?

I appreciate the thought though, honestly! Wink [;)]

  • Member since
    January 2012
Posted by I make stuff on Thursday, February 5, 2009 12:37 PM

I like it very much.

I know this is out of character for me, but I have a question:  Why clean the tip of the AB with modeling cement, and not thinner, a rag wiped in there, a q tip, etc?  I've never heard of this.  Don't get me wrong, it's simple curiosity.  If you told me the E100 tracks would turn out how they did using the recipe you gave me, I'd laugh, but I am now converted.  I just would like to know the "why" of the cleaning technique. 

  • Member since
    September 2008
  • From: Colorado
Posted by Panzer_Blitz on Thursday, February 5, 2009 1:23 PM

WOW !!!......I agree with Karl on this one.....you really need to update your workspace Tony...or at least get a bigger desk !....and I thought my workbench was bad Tongue [:P]

Looking forward to seeing more Karl....Always learn something new from your posts !

  • Member since
    January 2007
Posted by the doog on Thursday, February 5, 2009 1:32 PM

 Citadelgrad87 wrote:

I like it very much.

I know this is out of character for me, but I have a question:  Why clean the tip of the AB with modeling cement, and not thinner, a rag wiped in there, a q tip, etc?  I've never heard of this.  Don't get me wrong, it's simple curiosity.  If you told me the E100 tracks would turn out how they did using the recipe you gave me, I'd laugh, but I am now converted.  I just would like to know the "why" of the cleaning technique. 

Bill, the Testor's cement quickly cleans out dried-on paint that can accumulate in the nozzle, as it sometimes happens when your paint mixture is a little on the thick side. If I didn;t clean that out, it would eventually clog, affect my airflow, or worse--spit on the model!


The cement makes it disappear, even if it is dried--the Tamiya thinner wouldn't do that--and plus, the thinner is more expensive, to be sure.

  • Member since
    November 2005
Posted by Anonymous on Thursday, February 5, 2009 1:34 PM
Very nice work---very cool and unusual scheme, but very believable as well...variation is nice...
  • Member since
    July 2004
  • From: Texas
Posted by wbill76 on Thursday, February 5, 2009 1:36 PM
Karl, sent you a PM. Wink [;)]
  • Member since
    April 2003
  • From: 41 Degrees 52.4 minutes North; 72 Degrees 7.3 minutes West
Posted by bbrowniii on Thursday, February 5, 2009 3:22 PM

 Mikeym_us wrote:

What I'm thinking about the gun is that the paint would have came off due to the extreme heat generated by the gun firing. Guns with a high rate of fire like the Kwk38 would have the barrel going red hot to white hot so paint couldn't stay on.

Yup...Sign - Ditto [#ditto]


Great looking build, doog.  I am doing a /4-C and your work has given me a host of ideas and inspiration.  Thanks man!

'All that is necessary for the triumph of evil is for good men to do nothing' - Edmund Burke (1770 ??)


  • Member since
    April 2005
  • From: Piscataway, NJ!
Posted by wing_nut on Thursday, February 5, 2009 3:55 PM
DOOOOOG.  Sorry for shouting but wanted to make sure you heard me over the well deserved accoladesBig Smile [:D]  I dig that crazy scheme.  And I love what you did the those latches on the front of the vehicle. Nice work.

Marc  

  • Member since
    December 2002
  • From: Bury St Edmunds, Suffolk, England
Posted by Bish on Friday, February 6, 2009 4:52 AM

the doog I'll second those comment on the gun, think it took me about an hour and in the end i had to fix it so it doesn't elevate. That interior is amazing, almost makes me wanna throw mine in the gardage. But not quite.

I had a first look at mine on Wed after getting back. I had used Tamiya XF-61 for the green, but am not very happy with it, way to dark. After seeing yours, think i might go over it trying 65 instead.


Brillant work there, and to some respect i understand your reluctance to do GB's. While i do enjoy them, individuals work can get lost in the crowd, and WiP's really allow us to concentrate on one persons methods and build.

I am a Norfolk man and i glory in being so


On the bench: Airfix 1/72nd Harrier GR.3/Fujimi 1/72nd Ju 87D-3

  • Member since
    December 2004
  • From: ohio
Posted by vonryan on Friday, February 6, 2009 5:38 AM
Hey Doog, your work make's me glad i look in here from time to time. as always outstanding!
  • Member since
    January 2007
Posted by the doog on Friday, February 6, 2009 10:07 AM
Thanks guys! I'm working on getting the wheels and tracks on today; I shold have an update later tonight! Big Smile [:D]
  • Member since
    November 2006
  • From: Coastal Maine
Posted by dupes on Saturday, February 7, 2009 1:52 PM
 the doog wrote:

dupes--thanks; I appreciate the thought, but again, we come back to that issue of how much exposure that would get this WIP tutorial? The MAIN reason I don't do GB's is because I want to reach the widest possible audience. not for the "ego reinforcement", honestly, (get enough of that in my job, LOL!) but for the didactive aims and goal of "giving back" to this forum and reaching new members, many of whom probably never set foot in the GB forums?

I appreciate the thought though, honestly! Wink [;)]

I fully understand...although no reason you can't do a GB and have the corresponding WIP thread going in the armor forum. At least the way I look at it!

JOIN OUR COMMUNITY!

Our community is FREE to join. To participate you must either login or register for an account.

SEARCH FORUMS
FREE NEWSLETTER
By signing up you may also receive reader surveys and occasional special offers. We do not sell, rent or trade our email lists. View our Privacy Policy.