SEARCH FINESCALE.COM

Enter keywords or a search phrase below:

#6 Polish Artillery Tractor C7P-WIP 4/18--More Weathering Pics Page 12

43093 views
170 replies
1 rating 2 rating 3 rating 4 rating 5 rating
  • Member since
    January 2012
#6 Polish Artillery Tractor C7P-WIP 4/18--More Weathering Pics Page 12
Posted by I make stuff on Friday, November 13, 2009 12:21 AM

In my quest for different subjects, I found this C7P Polish Artillery Tractor at a hobby shop on a recent business trip.  It's a German captured example, my research tells me that the Poles, the RUssians, and the Germans all used these vehicles to clear the battlefields of Polish tanks.

Ironically, this will be my first Panzer Grey subject, hmmm.  Without delay, then, I have washed the sprues, and here is a cover shot:

Here is a group shot of the sprues and the Fruils I believe I determined are the correct replacements:

Here is my first order of business, see this "mesh"?  Totally unsat!

The plan is to cut out the mesh and replace it with this:

Well, that's it for tonight, hopefully I can get some progress done this weekend, it's a European style, there is no hull "tub", and it's actually a conversion of a similar tank, so the hull sides need to be trimmed at an odd angle.  I will take my time and keep you posted.

Wish me luck!

Bill


  • Member since
    May 2009
  • From: Poland
Posted by Pawel on Friday, November 13, 2009 2:41 AM

Hello Bill!

Good luck with your project. It's always good to see a Polish accent. For those who would like to find out more about the machine, here's the link:http://en.wikipedia.org/wiki/C7P

So, good luck again and have a nice day

Pawel

All comments and critique welcomed. Thanks for your honest opinions!

www.vietnam.net.pl

  • Member since
    January 2009
  • From: Everett, WA
Posted by Schnobs on Friday, November 13, 2009 3:37 AM

Awesome Bill I was hoping I would see this hit the Forum soon!

I will be watching this one closely!

"There is a principle which is a bar against all information, which is proof against all arguments and which cannot fail to keep a man in everlasting ignorance. That principle is contempt prior to investigation." Herbert Spencer
  • Member since
    May 2009
Posted by F Matthews on Friday, November 13, 2009 10:46 AM
Those are the correct tracks for the Vickers/T-26/7TP series. Nice tracks-I've built and finished five kits this year and three were T-26 variants with Friuls. This is one of the few versions of this chassis that I don't have yet, but I think this whole family of kits are fun to build whether Zvezda/Italeri origin or Mirage/RPM/TOM/Spojnia, etc (the same base molds).
I'll be watching this one with keen interest!
  • Member since
    January 2012
Posted by I make stuff on Friday, November 13, 2009 11:55 AM

Thanks, Pawel!  I just got an urge to build different, and this one fit the bill, so to speak.  No surviving examples, though, so that's a shame.

Ed, welcome, sorry it took so long to declare the BA-20 completed so i could cut the plastic on this one and get a look at it.

F Matthews, thanks for the confirmation, I noticed that the T-26 lower chassis was identical, so I took a chance.  Later I learned that both derived from the Vickers, but Fruil doesn't mention Vickers, that I could find, on their T-26 box.  They certainly are tiny tracks.

I'll try to get some progress posted this weekend, it has a transmission (no motor) and a full interior, so it should be a handful for me.

Bill     

  • Member since
    July 2004
  • From: Texas
Posted by wbill76 on Friday, November 13, 2009 2:48 PM

Bill,

I asked in the BA-6 thread what was next and here's the answer! Looking forward to seeing what you do with this one. Thumbs Up [tup]

  • Member since
    January 2012
Posted by I make stuff on Friday, November 13, 2009 11:48 PM

Tonight, I got a little tricky, and decided to take the one side of the mesh off, leaving the other intact just so it would photograph better.  I used the trusty Dremel with a cutting bit, it looks a bit like a drill bit made out of a rough file.  It works very quickly, so take it easy adn plan on doing the final trimming with a file.  I'm pretty happy with the edges of the removed panel, a bit more trimming, sanding, and scraping, and it will look like it was made this way.

Here is what it looks like with just one side finished:

Here it is with the pe mesh behind it

Sorry for the baby update, tomorrow I will finish this part.

Bill

  • Member since
    May 2005
  • From: Dublin Rep Of Ireland
Posted by terry35 on Saturday, November 14, 2009 7:42 PM

Hi, Bill I done this one a few years ago and its truely enjoyable, good luck.

Terry

  • Member since
    January 2012
Posted by I make stuff on Saturday, November 28, 2009 10:48 PM

I have had a busy weekend, but finally got a chance to make some progress on this one.  WHen we last left off, I was soliciting advice on how to best cut these side pieces , and settled on clamping a straightedge on adn scribing it with a #11 blade.

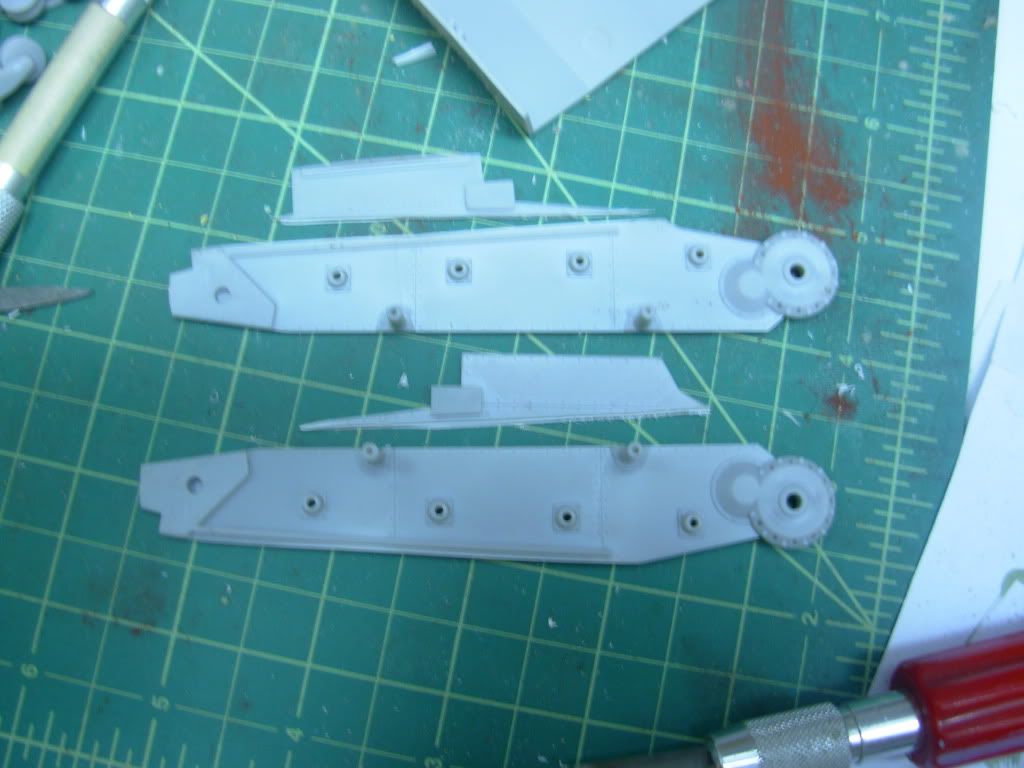
The discard pieces are above.

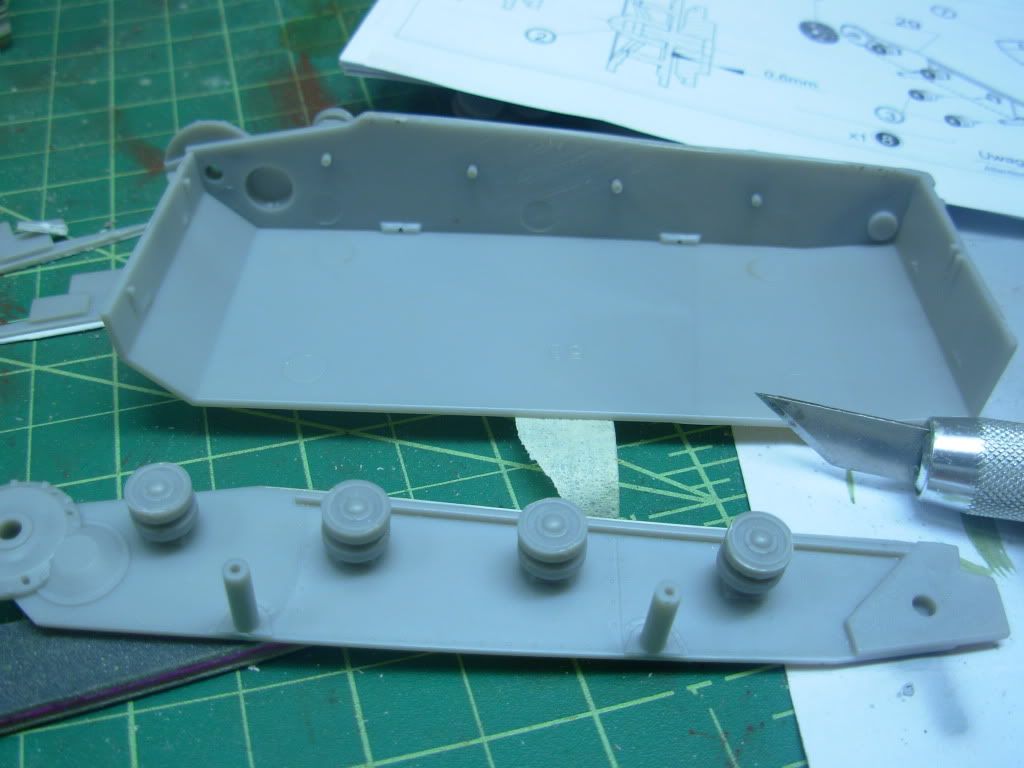
Then I put together the bogies, these are 12 piece units, Dragon has nothing on Mirage in this department:

Then, this being a Euro style kit, I assembled the hull from basically flat pieces:

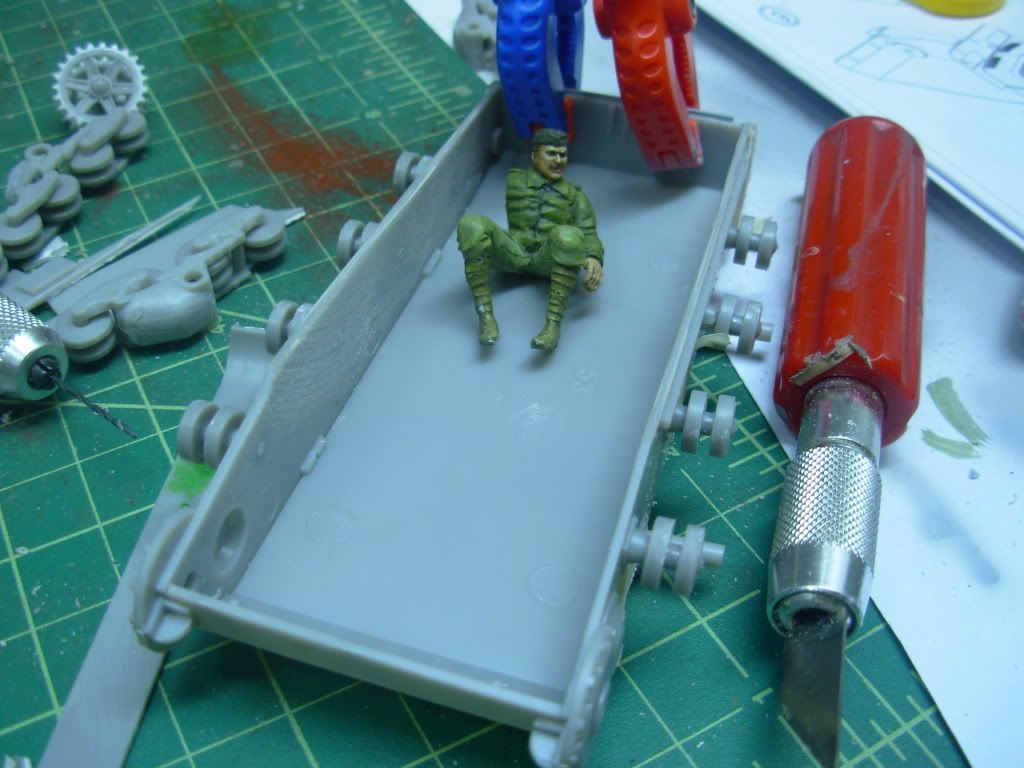
Here it is boxed in, and another with a driver figure for scale, it's REALLY small for something with tracks:

And, lastly for tonight, we have the fenders, which needed a dab of putty to fill some amazingly deep punch out plugs holes, after this I hit them with some Mr Surfacer for a nice smooth result

That's it for tonight, more tomorrow, I hope.

Thanks as always for looking in.

Bill

  • Member since
    January 2009
  • From: Everett, WA
Posted by Schnobs on Sunday, November 29, 2009 1:43 AM

Lookin great Bill I am glad to see you found a little time to model over the Holidays!

Tell your boss to settle down Mr Cratchet or I will have to send three ghosts to see him!

"There is a principle which is a bar against all information, which is proof against all arguments and which cannot fail to keep a man in everlasting ignorance. That principle is contempt prior to investigation." Herbert Spencer
  • Member since
    November 2012
Posted by dioramator on Sunday, November 29, 2009 5:05 AM


G'day Bill

I fell in love with this kit a couple of years ago, so I bought it. Then I found some RPM indy link tracks to suit. Then the problem began, I also found the PE interior manufactured by PART, then went on to buy PE exterior vol 1, then vol 2, then I come across the PE fenders and finally the PE side tarpaulin roller blinds (all made by PART). The problem I have created is that the build is now bigger than Ben Hur, and unfortunately keeps dropping down the priority list of the stash collection. (and I have easily tripled the original purchase price of the kit).

Anyway I will get around to building it one day. In the meanwhile, Ill have to be content to watch your build. (and see what I'm in for).

Brett


  • Member since
    July 2004
  • From: Texas
Posted by wbill76 on Sunday, November 29, 2009 11:36 AM
I'll echo Edmund on this one Bill, nice to see you getting some more time in on this one. Those bogie assemblies look like they needed a lot of cleanup but look good for the effort! Thumbs Up [tup]
  • Member since
    January 2007
Posted by the doog on Sunday, November 29, 2009 4:38 PM

I've a;ways wondered what this kit woul dlook like built up?

Good call on that mesh job, there, but aren't you going to have to canter the weave diagonally to replicate it accurately?

  • Member since
    January 2012
Posted by I make stuff on Sunday, November 29, 2009 6:12 PM
 the doog wrote:

I've a;ways wondered what this kit woul dlook like built up?

Good call on that mesh job, there, but aren't you going to have to canter the weave diagonally to replicate it accurately?

Hi Karl,

Yes, there's a definate slant to the pattern, I plan to cant it, but my bigger problem is that I am going to try to find some railroad chain link fencing, as the PE stuff I have been able to find is not really very close to the pattern on the part.  Nobody will ever know, except me, that is.  Gota get something I am comfortable with.

Thanks, Ed, Wbill, and Dioramator for following along and checking in!  I hope to get some more done tonight.

Bill  

  • Member since
    January 2012
Posted by I make stuff on Tuesday, December 1, 2009 11:13 PM

Today I made some real progress.  First, I was able to find exactly what I needed in terms of PE screen to replace the plastic intakes:

I cut it with some heavy shears, and it looks like this from the back

And the front, pretty close to what I decided it would look like before I cut it

versus, the same part before modification

Here it is in place on the fixture for the rear hull

And that piece glued to the rear, pardon the day glo .99c clamps

Another view showing off my first full interior

And finally for tonight, a close up of the transmission and final drive area

  • Member since
    November 2012
Posted by dioramator on Wednesday, December 2, 2009 12:18 AM


lookin' sweet Bill

that mesh is a huge improvement over the original kit molding, (and the pattern is spot-on as well)

keep up the good work

Brett


  • Member since
    July 2004
  • From: Texas
Posted by wbill76 on Wednesday, December 2, 2009 9:26 AM
Looks like you found the perfect replacement mesh Bill, huge improvement over the kit molded part for sure.
  • Member since
    December 2006
  • From: t.r.f. mn.
Posted by detailfreak on Wednesday, December 2, 2009 12:16 PM
Great job so far.I must remember to add one or three of these to my collection.And I to must congrat you on the excellent grill fix.Bow [bow]

[View:http://s172.photobucket.com/albums/w1/g-earl828/]  http://i158.photobucket.com/albums/t104/cycledupes/1000Roadwheels4BuildBadge.jpg

  • Member since
    January 2012
Posted by I make stuff on Wednesday, December 2, 2009 12:59 PM

Thanks dioramator, WBill, and detailfreak, glad to have you along for the ride.

Turning to the interior, I plan to do some chipping like Edmund did on his Sahriana exterior, anyone have any idea what color the crew compartment and transmission areas would be?  I think a general idea of Polish production, German captured and painted Grey is going to have to suffice, all examples are lost, no color photos that i can find anywhere.

Anyone have any suggestions?

Thanks

Bill 


  • Member since
    December 2006
  • From: t.r.f. mn.
Posted by detailfreak on Wednesday, December 2, 2009 1:20 PM
There is one here who may be able to help.If I remember his user name perhaps he will answer a pm.I have'nt seen him around in a while.In his signature he stated that anyone with a question on polish arms and armor he may be able to help.THE MAN YOU SEEK IS :BEAV

[View:http://s172.photobucket.com/albums/w1/g-earl828/]  http://i158.photobucket.com/albums/t104/cycledupes/1000Roadwheels4BuildBadge.jpg

  • Member since
    February 2003
  • From: Indiana, USA
Posted by cassibill on Wednesday, December 2, 2009 2:48 PM
Interesting beast there.  I think I considered getting this once. It's looking pretty good. I might have to think about this little oddball. I'll be most interested in how those Fruil tracks are. I've managed to get a few of this family in the stash. I've got a T-26 in this scale and two variants of the Vickers and a 7TP in 1/72.

cdw My life flashes before my eyes and it mostly my life flashing before my eyes!!!Big Smile The 1/144 scale census and message board: http://144scalelist.freewebpage.org/index.html

  • Member since
    May 2009
Posted by F Matthews on Wednesday, December 2, 2009 3:23 PM
I've got most of the Vickers and T-26 series in 1/35 and just picked up my first 1/72 kits since 1979(!). A Braille scale version of this one just arrived yesterday and it is miniscule!! Comes with PE for the screens though.
Your progress looks great!
  • Member since
    January 2012
Posted by I make stuff on Wednesday, December 2, 2009 4:23 PM

Thanks detailfreak, I have sent an email and PM to beav, and will wait for a response.

Bill

  • Member since
    January 2009
  • From: Everett, WA
Posted by Schnobs on Wednesday, December 2, 2009 5:56 PM

Sorry Bill we talk all the time and I forget to post on your WIP because I think I did because I am providing verbal feedback and gossip about Indy!  :)  Just teasing Adam because I know you are reading. Smile [:)]

The PE replacement screen was well worth the effort I know you put in to find it.  It really sets off the front of the vehicle.

Keep it coming Bill! 

"There is a principle which is a bar against all information, which is proof against all arguments and which cannot fail to keep a man in everlasting ignorance. That principle is contempt prior to investigation." Herbert Spencer
  • Member since
    January 2012
Posted by I make stuff on Wednesday, December 2, 2009 6:25 PM
 Schnobs wrote:

Sorry Bill we talk all the time and I forget to post on your WIP because I think I did because I am providing verbal feedback and gossip about Indy!  :)  Just teasing Adam because I know you are reading. Smile [:)]

The PE replacement screen was well worth the effort I know you put in to find it.  It really sets off the front of the vehicle.

Keep it coming Bill! 


LOL, in my best Austin Powers, that's no FRONT, that's a REAR, man!

The grill faces the back, but thanks, Edmund.  Call me later, I have some new dirt on Indy.

Bill 


  • Member since
    January 2009
  • From: Everett, WA
Posted by Schnobs on Wednesday, December 2, 2009 6:37 PM
 Citadelgrad87 wrote:
 Schnobs wrote:

Sorry Bill we talk all the time and I forget to post on your WIP because I think I did because I am providing verbal feedback and gossip about Indy!  :)  Just teasing Adam because I know you are reading. Smile [:)]

The PE replacement screen was well worth the effort I know you put in to find it.  It really sets off the front of the vehicle.

Keep it coming Bill! 

LOL, in my best Austin Powers, that's no FRONT, that's a REAR, man!

The grill faces the back, but thanks, Edmund.  Call me later, I have some new dirt on Indy.

Bill 

LOL!  Will do!  We should get Adam's numbr and we can three way conference and talk about someone else!!  I have ran out of adjectives for hisKubelwagen!

"There is a principle which is a bar against all information, which is proof against all arguments and which cannot fail to keep a man in everlasting ignorance. That principle is contempt prior to investigation." Herbert Spencer
  • Member since
    December 2006
  • From: t.r.f. mn.
Posted by detailfreak on Wednesday, December 2, 2009 6:41 PM
Beav was eyeballs deep in a polish tankette last time I heard from him.He's a college student in Fargo No.Dak..Have'nt heard boo so I certainly hope he is in good health.I understand he's also a JROTC member,so maybe his studies have kept him away.He's quite knowledgable in the background of polish afv's.

[View:http://s172.photobucket.com/albums/w1/g-earl828/]  http://i158.photobucket.com/albums/t104/cycledupes/1000Roadwheels4BuildBadge.jpg

  • Member since
    November 2012
Posted by dioramator on Wednesday, December 9, 2009 6:04 AM

Citadelgrad87

Turning to the interior, I plan to do some chipping like Edmund did on his Sahriana exterior, anyone have any idea what color the crew compartment and transmission areas would be?  I think a general idea of Polish production, German captured and painted Grey is going to have to suffice, all examples are lost, no color photos that i can find anywhere.

Anyone have any suggestions?

Thanks

Bill 


It seems the interior was painted the same colour as the exterior (they probably just walked through the thing with the paint gun)


Brett

  • Member since
    January 2012
Posted by I make stuff on Thursday, December 17, 2009 11:14 PM

Tonight I started priming the beast, seeing how much people around here love monochrome, well, here are some pictures:


CHair close up


The front piece was a clear pice of plastic, the idea is you mask off the windows, paint the "metal", then the windows are clear.  THe problem was, the windows were so scratched up, and the goofy ginormous windshield wipers were about 1/16 scale.  Solution:  DREMEL, DREMEL, DREMEL.

I just hogged out the windows, and I'll paint it up and I will use some clear plastic packaging to replace them.  Here's a shot, but I can see I have some more clean up to do:


And lastly, a couple "assembled" shots, to show what it is going to look like some day


This weekend, I will do my best Ed impression:  a base coat, some hair spray, some more paint, some chipping, we shall see!

THanks for looking,

Bill

  • Member since
    January 2009
  • From: Everett, WA
Posted by Schnobs on Thursday, December 17, 2009 11:37 PM

Hey Bill

"Tonight I started priming the beast, seeing how much people around here love monochrome, well, here are some pictures"

You wouldn't be talking about me wouldcha?  Big Smile

Bill I have to ask do you use a hand model for your WIP pictures because that is one nice looking hand!

Seriously though nice progress this is going to look cool with paint on!

Good to see you back on the bench Sir!


"There is a principle which is a bar against all information, which is proof against all arguments and which cannot fail to keep a man in everlasting ignorance. That principle is contempt prior to investigation." Herbert Spencer
JOIN OUR COMMUNITY!

Our community is FREE to join. To participate you must either login or register for an account.

SEARCH FORUMS
FREE NEWSLETTER
By signing up you may also receive reader surveys and occasional special offers. We do not sell, rent or trade our email lists. View our Privacy Policy.