SEARCH FINESCALE.COM

Enter keywords or a search phrase below:

Scratch Built 1/6th scale M26 Pershing project

62343 views
106 replies
1 rating 2 rating 3 rating 4 rating 5 rating
  • Member since
    July 2008
  • From: Florida
Posted by Railfan 233 on Sunday, July 18, 2010 9:34 PM

Thanks for the link. I've always been interested in 1/6 scale tanks, because I like the detail I've seen in them (I collect 1/6 scale wepons and equipment, and seeing how some rifles I got could possibly fire real 1/6 scale ammo, I have been drooling over how much I could possibly add to the adverage tank)

Do you, by any chance, have any tips you could pass on to me (a 16 year old teen-ager) when it comes to getting a 1/6 scale armored vehicle?

Do you also have any reccomendations for a good first kit in this scale?


http://i6.photobucket.com/albums/y211/razordws/GB%20Badges/WMIIIGBsmall.jpgRed, White, and YOU! group build of 2010

  • Member since
    April 2005
Posted by armourguy on Sunday, July 18, 2010 8:55 PM

Thanks guys, The tank only weighs about 50lbs. The reason why it took me two days to get the model painted was that after I wahsed the tank down I needed to let the whole model dry. The weather also needed to clear for me so I could apply the base coat. 

I currently have about 20 of these 1/6th scale tank models. I also have about a dozen or so in the pipeline.  

most of my collection is at the following website. http://www.eastcoastarmory.com/battlezone.htm . I have many of my 1/6th builds on the FSM armor forum.

The markings have been added to the tank. All of the markings are all painted on and are not decals.

The tank's weathering has also been applied.

I can now move on to the next step which is painting the tank's tires, and assembling, painting and installing the tracks. More to follow!

  • Member since
    March 2006
Posted by simpilot34 on Thursday, July 15, 2010 8:58 PM

SurpriseStick out tongueToastBow DownEats

Cheers, Lt. Cmdr. Richie "To be prepared for war, is one of the most effectual means of preserving the peace."-George Washington
  • Member since
    July 2008
  • From: Florida
Posted by Railfan 233 on Thursday, July 15, 2010 8:23 PM

Ditto on the above. How many 1/6 scale tanks (or anything else) do you have?

I swear, that tank grows each time I see itIndifferent

I have one question, though. Your updates say that you transported the tank on the 14, and painted it on the 15th. Does this mean that the tank was so heavy, that it took a full day for the tractor to pull it there, or did you transport on the 14th, and leave it there untill the 15th?

Man, the thing takes up the whole trailer.

Mabe I out to try this for myself, one day.....Smile Dots


http://i6.photobucket.com/albums/y211/razordws/GB%20Badges/WMIIIGBsmall.jpgRed, White, and YOU! group build of 2010

  • Member since
    April 2003
  • From: Newfoundland, Canada
Posted by rodc on Thursday, July 15, 2010 4:13 PM

Armourguy.......simply one of the most amazing modelling feats I have every seen.  I do have a couple of questions though......

(1) How many of these beasts have you built and can you post some pics of the others?

(2) HOW BIG ARE YOUR DISPLAY SHELVES.....ha, ha.........

I can't wait to see the finished product with markings........fantastic.....simply fantastic!

RODC

  • Member since
    April 2005
Posted by armourguy on Thursday, July 15, 2010 3:55 PM

Thanks again, The weather today was perfect for painting and I was able to get the tank painted in it's base coat of OD. For the tank's OD I mixed up my own color for the base coat. It is a different shade of OD which makes it stand out from my other 1/6th scale US tanks.  

the tank is now ready for it's markings and weathering.. More to come very soon

  • Member since
    March 2006
Posted by simpilot34 on Wednesday, July 14, 2010 10:02 PM

WOOHOO!!! Yes, she looks great finally in one color!!!! WOW!!! The size comparison in the garden trailer is tops lol, it's HUGE!!! Looking forward to the green!!!ToastBow Down

Cheers, Lt. Cmdr. Richie "To be prepared for war, is one of the most effectual means of preserving the peace."-George Washington
  • Member since
    April 2005
Posted by armourguy on Wednesday, July 14, 2010 8:08 PM

Today I was able to get the tank hosed down and applied it's final prime.
It's nice to see the tank in one color.

Tomorrow I can apply the base coat.

Here are also some scale images showing the size of the model in a trailer when I was towing it to the place where I paint my large tanks.


  • Member since
    March 2006
Posted by simpilot34 on Tuesday, July 13, 2010 9:01 PM

Amazing work armour!!!!!!!!!!! Can't wait to see her in clothes!!!!Toast

Cheers, Lt. Cmdr. Richie "To be prepared for war, is one of the most effectual means of preserving the peace."-George Washington
  • Member since
    April 2005
Posted by armourguy on Tuesday, July 13, 2010 1:30 PM

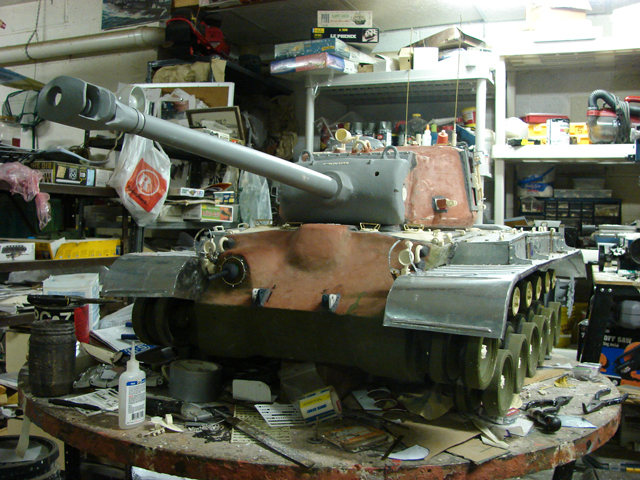
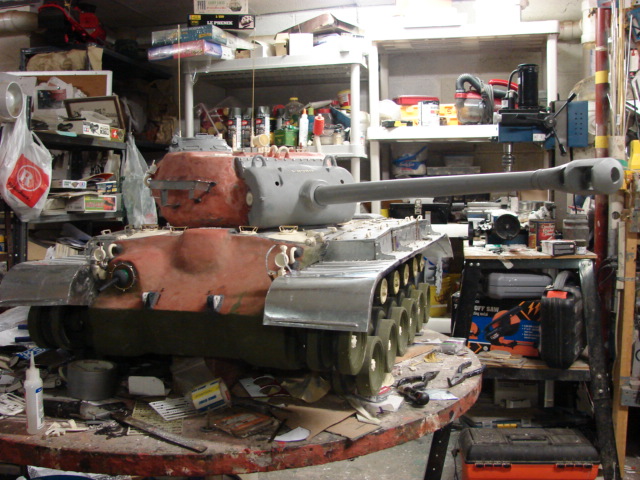
Thanks guys, I'll have a scle picture soon. I have added the last of the details and the tank is now ready for painting!

I have also added the last of the M26 family parts to the product line. http://www.eastcoastarmory.com/ustankparts.htm

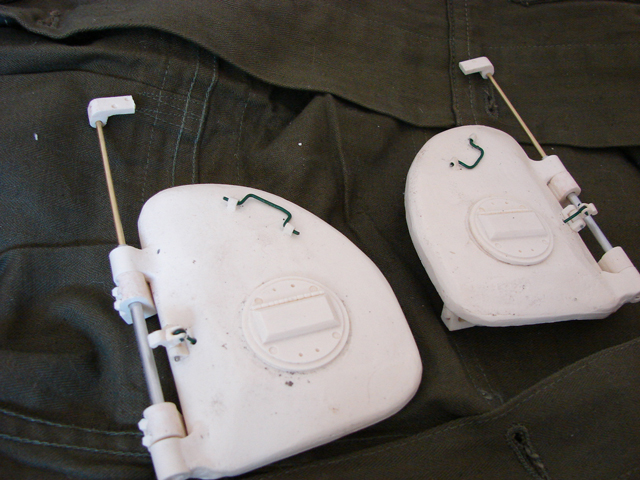
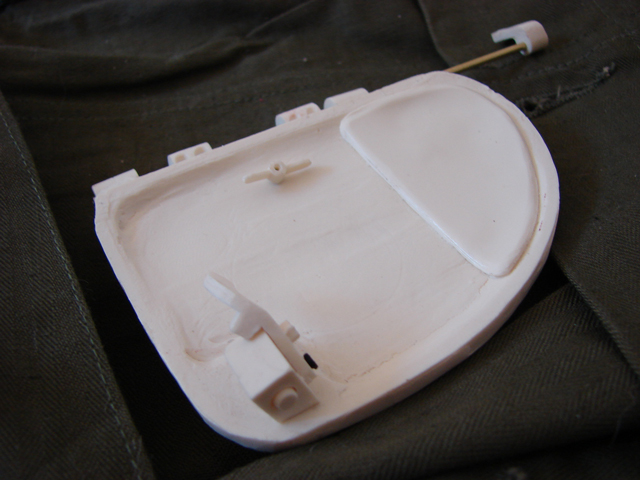
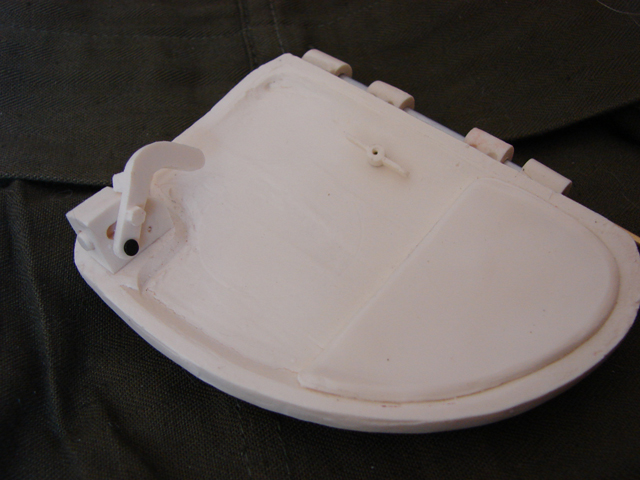
M26 Family Hatch set.

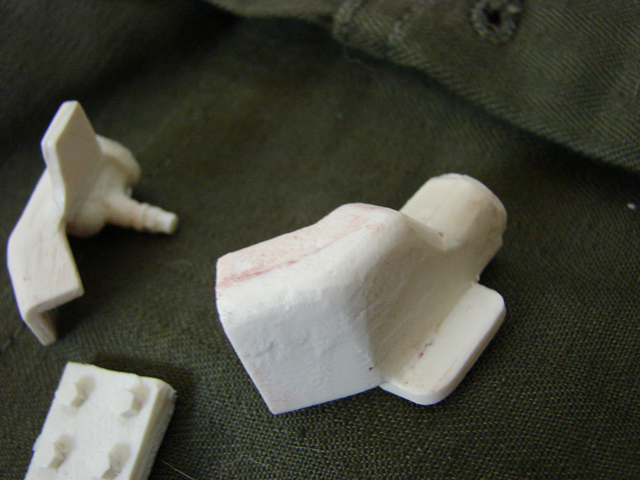
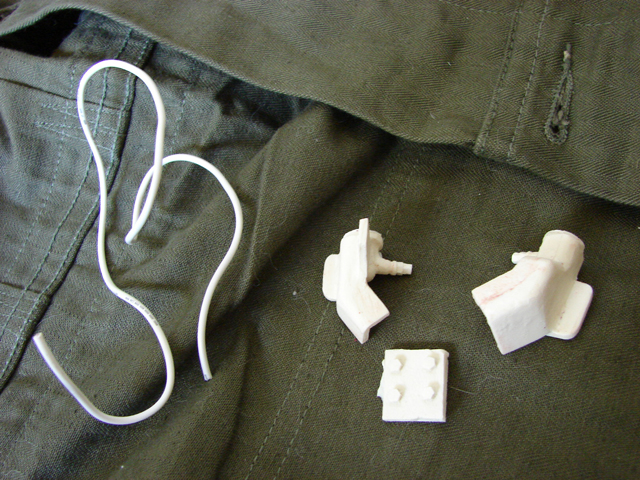
Resin M26 family head light posts set

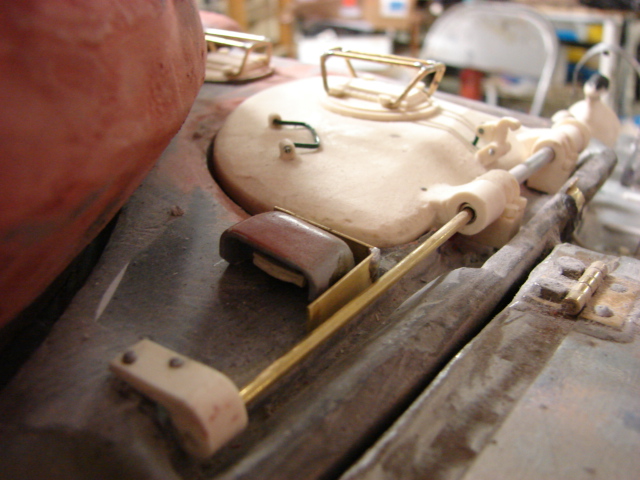
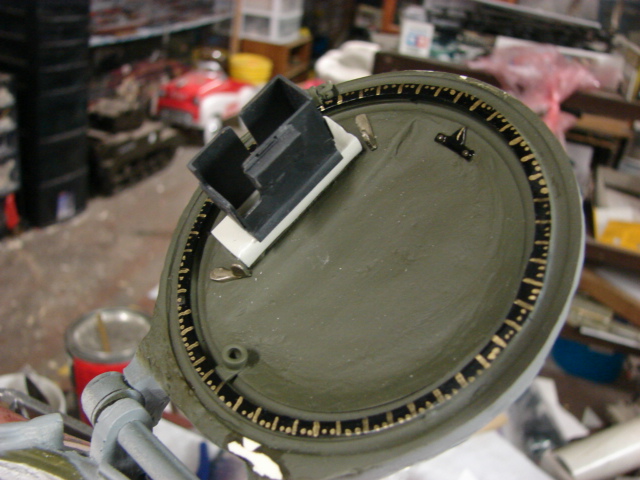
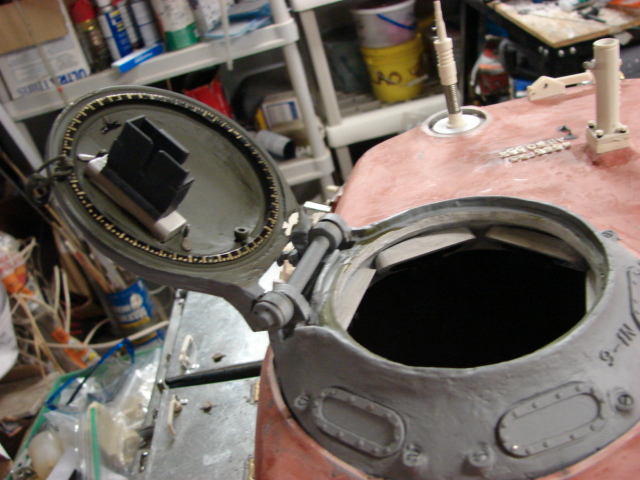
On the hatches I installed a set of Panzerwerk inner periscopes. 

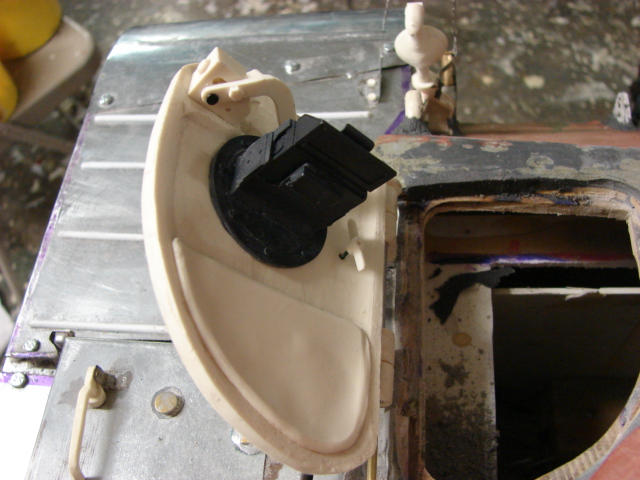
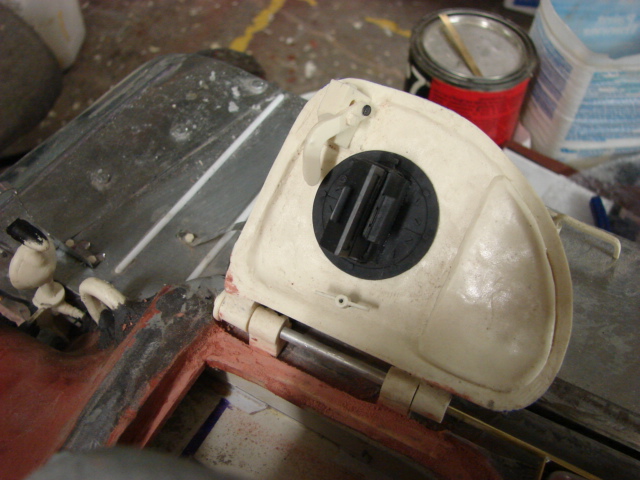
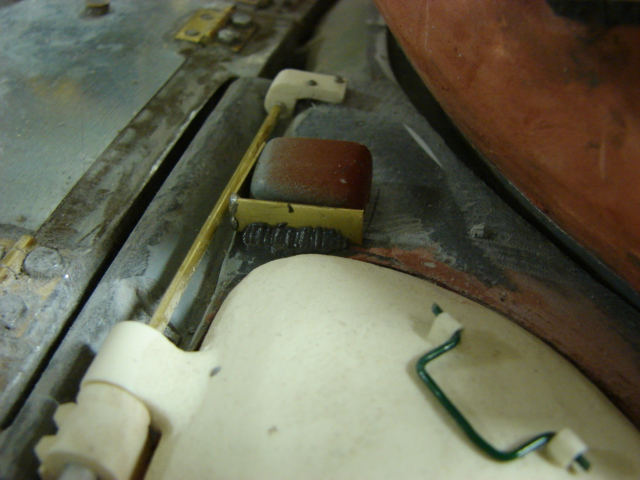
On the hatches I was able to make hatch retaining latch functional. On the M26 The latch retaining latch was at a spot where you could not reach with your arms, so the latch was designed with a T shaped handle on the interior of the hatch that would release the latch. The way this worked was the latch was connected to the handle via a push rod. All of these functions are built into the model and the latches actually lock and release on the latch snags. 

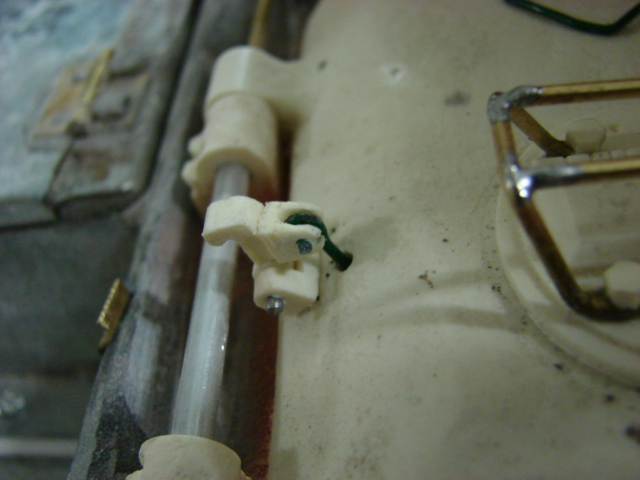
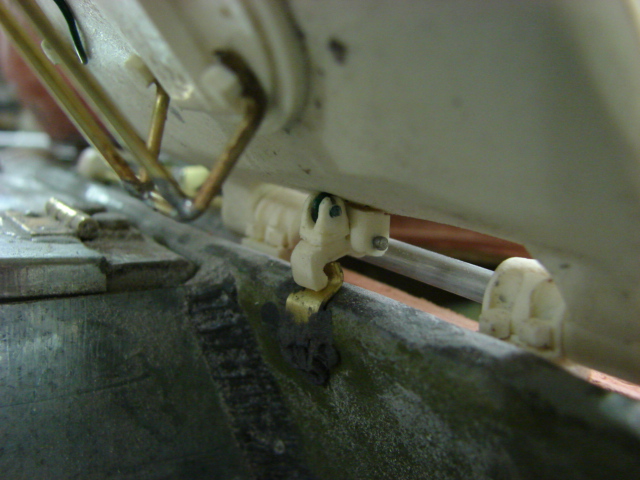
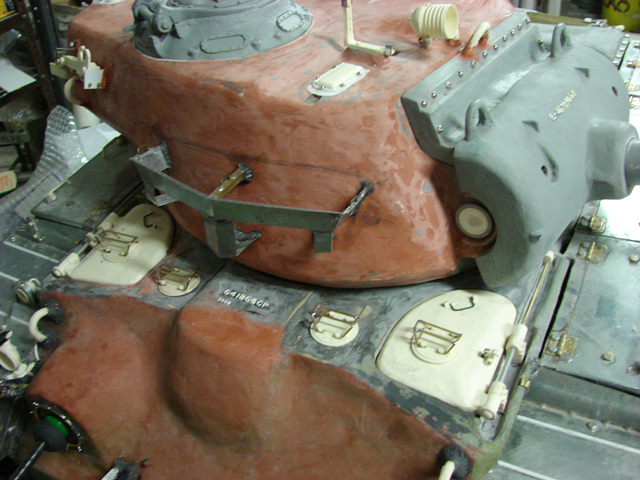
The hatches locked close on the M26 with a large locking stud that is operated with a locking grab handle. All of these details are molded in to the casting. 

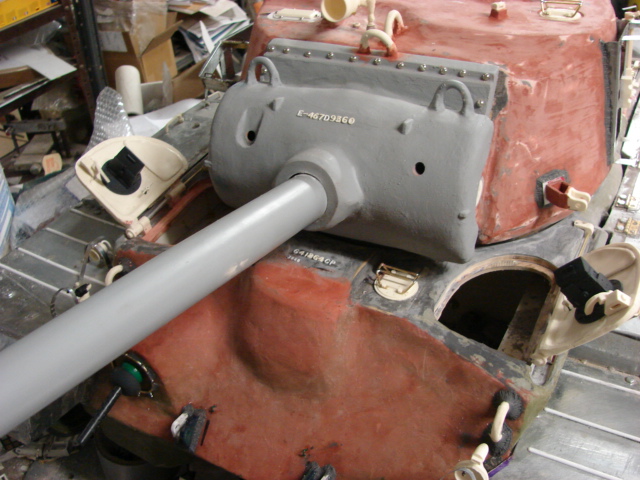
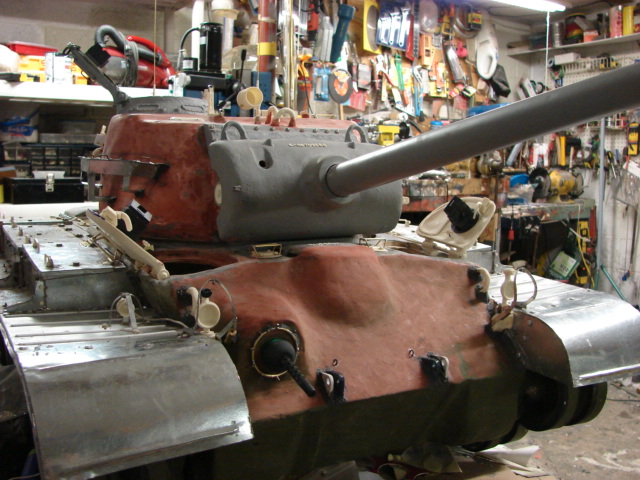
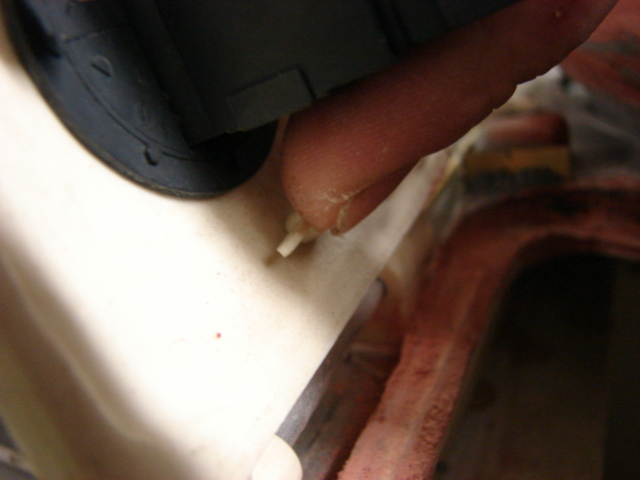
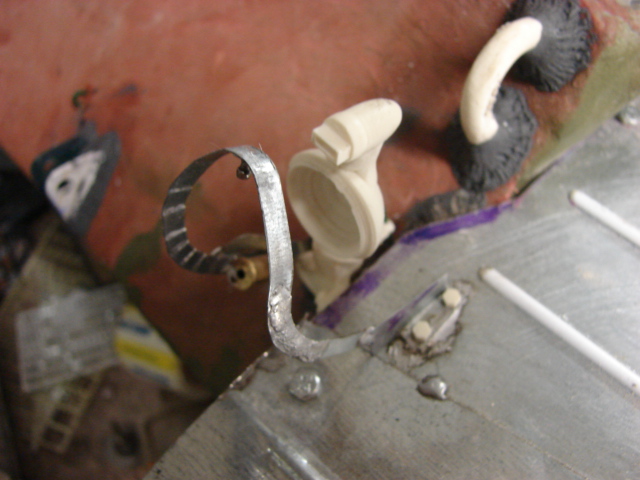
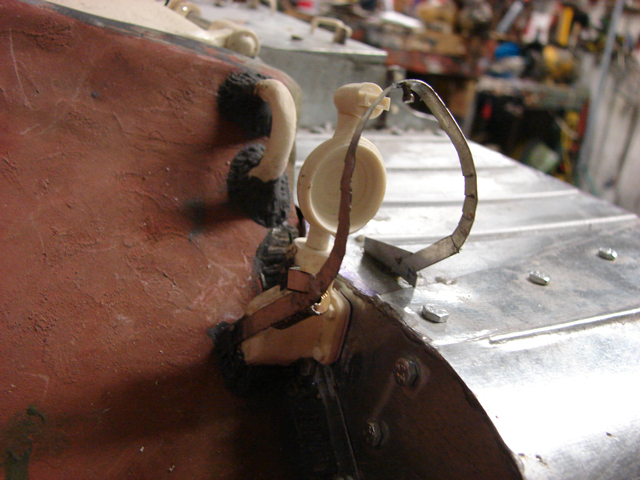
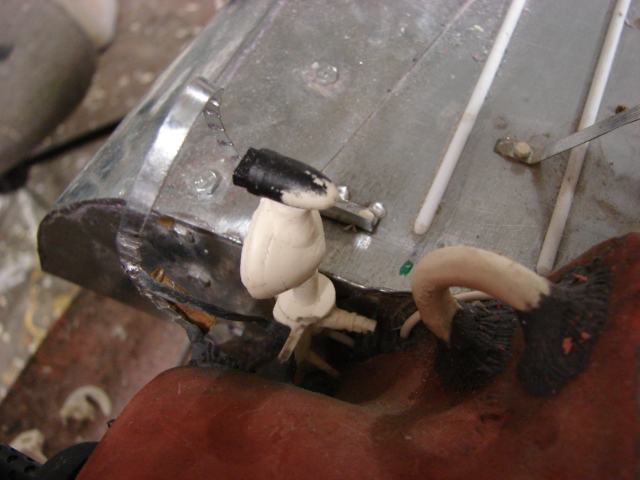
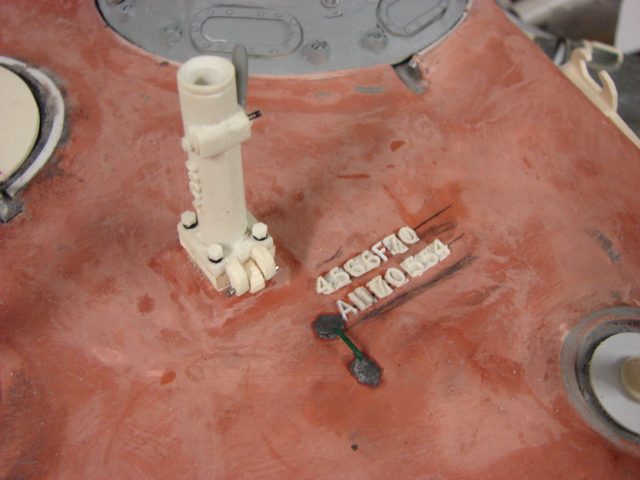
The tank's head lights and head light post were added along with their brush guards. the head light lenses and canister chains  will be added later after the tank is painted. The left and right posts are different. Both posts are a hollow design. The head lights are fastened into the post via a vise type locking bolt. The headlight power cord extends out of the bottom of the post and gets inserted into the tank's hull. All of these details are represented on the resin castings and my model. 

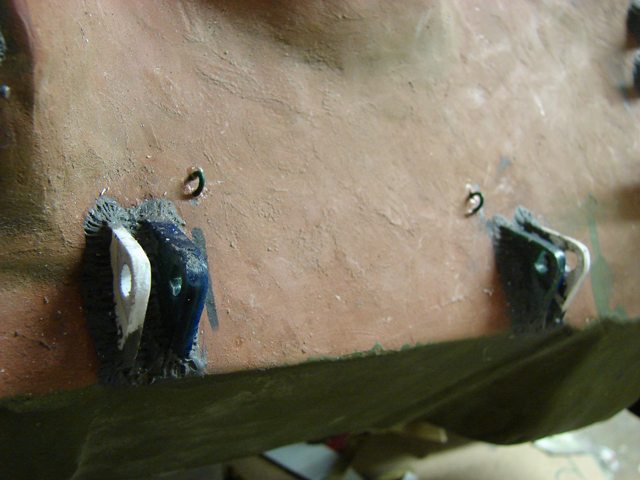
The M26 headlight brush guards have what looks like a tarpaulin snap point on the upper part of the guard. This detail was added to my model and was and was soldered on

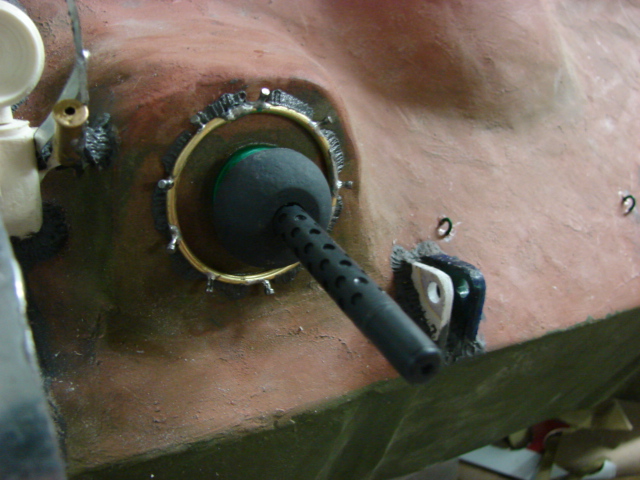
The tank's bow 30.cal was also completed. The bow 30.cal protective tarpaulin rack was all fabricated out of brass and wire brads. the whole component was soldered together. The Bow MG itself is from Panzerwerk. 

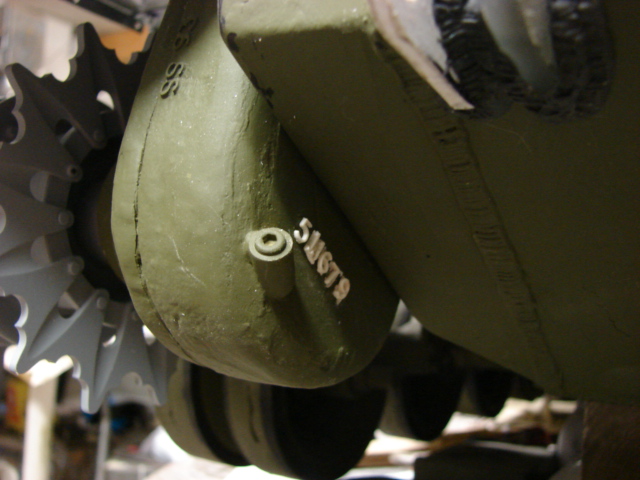
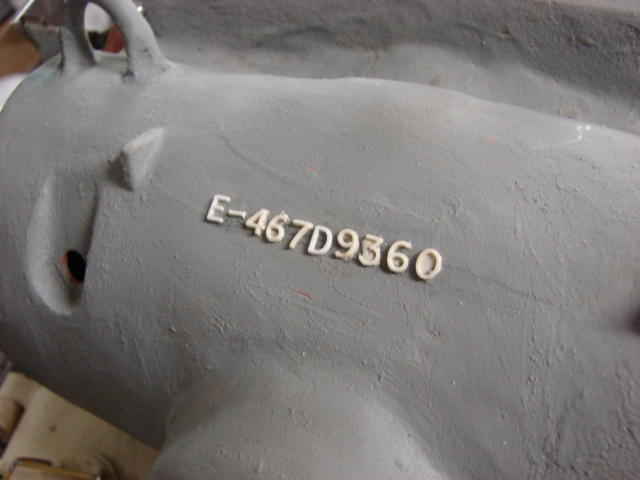
The tank's front tow shackles, lift rings and casting numbers were added aswell. 


The tank that I'm building is an early production M26, and on the early M26 there were two periscopes mounted on either side of the front blower vent. These periscopes have been added along with all the periscopes guards

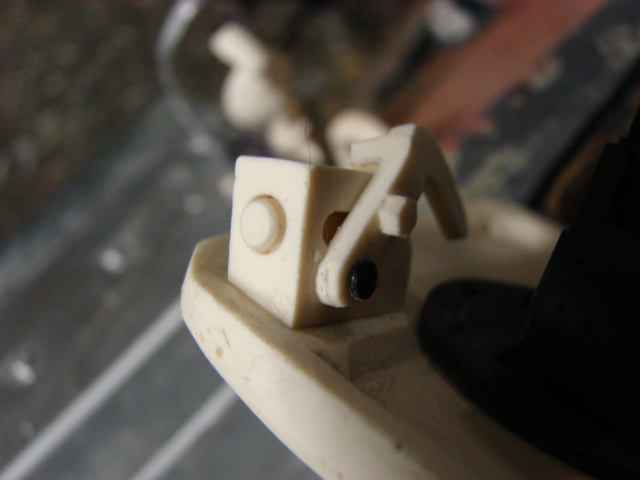
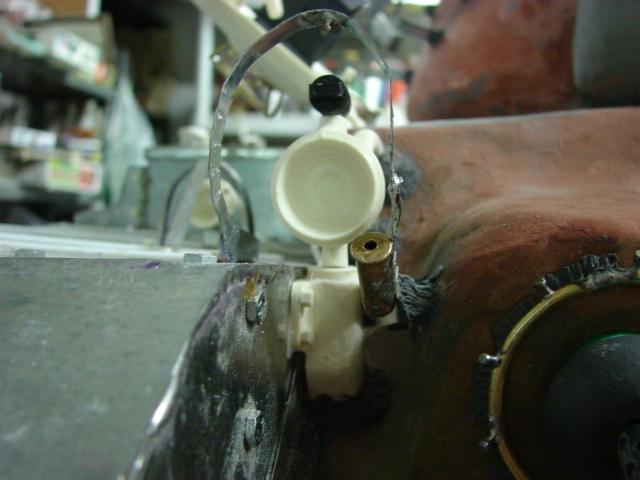
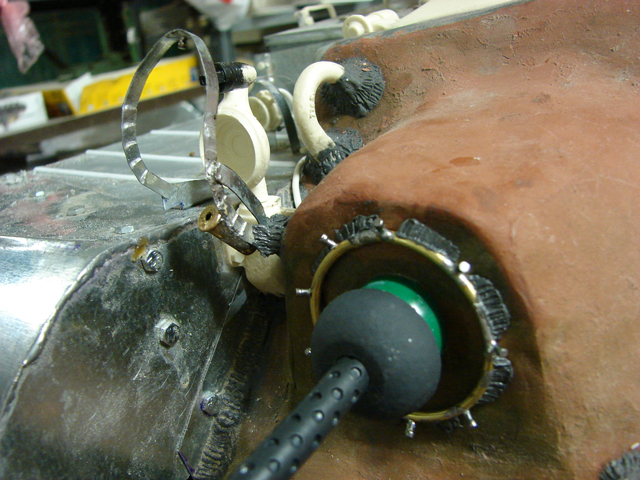
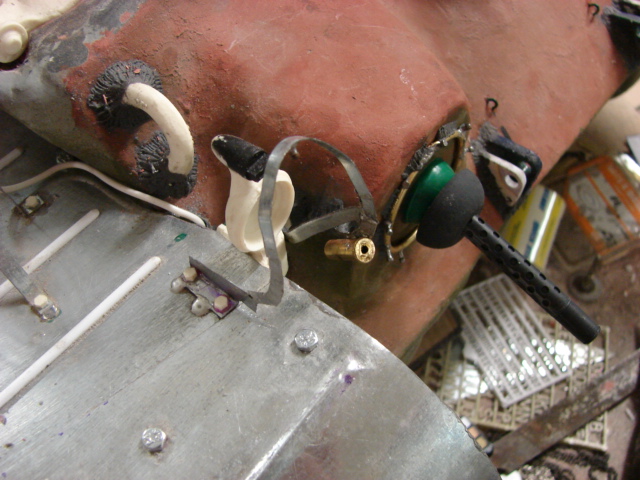
I was also able to install the tank's fire extinguisher. The M26 used the same type of fire extinguisher as the M5 Stuart, which I already have. 

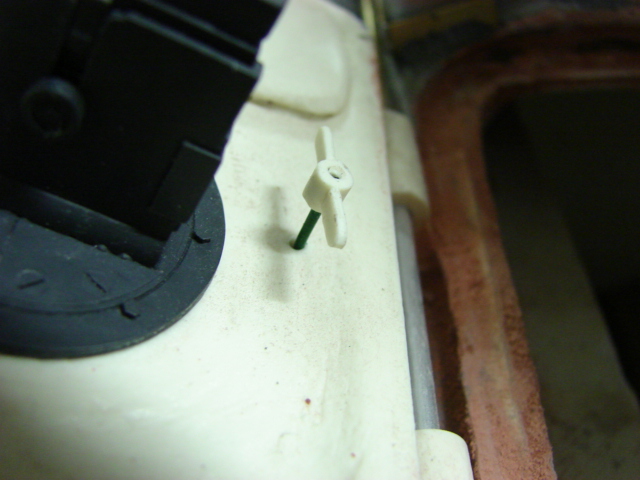
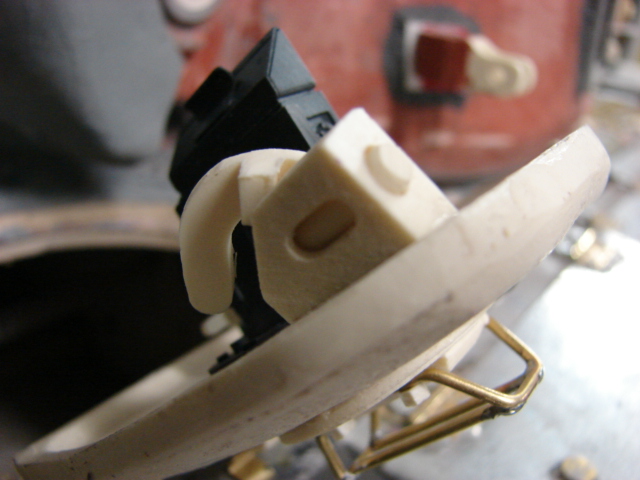
For the tank's copula hatch periscope I also used the Panzerwerk rein periscope. The periscope mount itself was modified by removing it's bottom base.

As soon as the weather breaks I will be able to give the tank a good wash and begin to paint the Tank!!!  :D

  • Member since
    March 2006
Posted by simpilot34 on Friday, July 9, 2010 6:18 AM

Complexly stunning mate!!!!SurpriseToast

Cheers, Lt. Cmdr. Richie "To be prepared for war, is one of the most effectual means of preserving the peace."-George Washington
  • Member since
    July 2008
  • From: Florida
Posted by Railfan 233 on Thursday, July 8, 2010 1:29 PM

Man, that's turning out to be a big tank. Take a look at the cordless phone next to the road wheels in the 10th photo.

It's amazing how much work you are putting into this monster. I would scratch-build 1/6 scale small-arms and improvised AT wepons, but I would not (under any circimstances) try to build a 1/6 scale tank.

One quick question: can you take a photo of this tank standing next to a car, to give sort of a sence of scale size?


http://i6.photobucket.com/albums/y211/razordws/GB%20Badges/WMIIIGBsmall.jpgRed, White, and YOU! group build of 2010

  • Member since
    April 2005
Posted by armourguy on Thursday, July 8, 2010 12:37 PM

I have made a lot more progress on the tank.


I have completed all of the tank's rear deck detailing, this includes the fuel caps, and fastener details.


I have also added two new parts to the product line http://www.eastcoastarmory.com/ustankparts.htm


Resin US AFV engine fluid identification plates set.


Resin M26 style storage bin handles set. These handles will work on any US tank from the M26 Pershing to the M60 MBT.


Like my other US tanks I made the armored fuel caps functional. A lock pin and retaining chain will be added later.


I was able to add the final bit of detail to the tank's Bins. I made the Bin handles fully functional, so that when the turn they actually lock the bin doors shut. the lock itself is a brass strip with a screw soldered to it. The screw then gets inserted firmly into the resin handle. On the bin Lids a small steel bracket is soldered to the lids directly behind the handle bracket. These brackets are for pad locks to lock the handles to the lids in the closed position.


Some shots of the locking tabs


Now that the rear portion of the tank is complete I have now started working on the front. I have already cut out the spots for the bow hatches and have started the bow hatch masters.


The tank is now in it's home stretch for detailing. Once the last bits have been completed the M26 will go into painting!!!

  • Member since
    March 2006
Posted by simpilot34 on Friday, July 2, 2010 10:23 PM

Stunning as always mate!!! Beautiful work!!Toast

Cheers, Lt. Cmdr. Richie "To be prepared for war, is one of the most effectual means of preserving the peace."-George Washington
  • Member since
    April 2005
Posted by armourguy on Friday, July 2, 2010 8:48 PM

Thanks guys,

Just a quick update, The main engine grills have been fabricated and installed.


The grills are made out of the same type of brass as the other rear grills, only the slats on the engine grills are vertical and the slats on the transmission grills are slanted.


The tank's grills are all metal construction with the exception of the hinges which, are resin and are fully functional.


Now that the grills are completed I can now proceed on the fuel caps, which will finish off the tank's rear deck.


  • Member since
    March 2006
Posted by simpilot34 on Sunday, June 27, 2010 10:17 PM

rodc

IndifferentI'm Speechless.......all I can say isBow DownBow DownBow DownBow DownBow Down

I will certainly be watching for the finished product.......incredible!

RODC

Ditto Looking good mate!!!!!!!Toast

Cheers, Lt. Cmdr. Richie "To be prepared for war, is one of the most effectual means of preserving the peace."-George Washington
  • Member since
    April 2003
  • From: Newfoundland, Canada
Posted by rodc on Sunday, June 27, 2010 12:06 PM

IndifferentI'm Speechless.......all I can say isBow DownBow DownBow DownBow DownBow Down

I will certainly be watching for the finished product.......incredible!

RODC

  • Member since
    July 2008
  • From: Florida
Posted by Railfan 233 on Sunday, June 27, 2010 11:25 AM

This tank looks great. I sort of jumped on the bandwagen too late, and missed most of the WIP stuff, but I'll get around to seeing it all, eventually. Exelent work so far. I can't wait to see the finished results.


http://i6.photobucket.com/albums/y211/razordws/GB%20Badges/WMIIIGBsmall.jpgRed, White, and YOU! group build of 2010

  • Member since
    April 2005
Posted by armourguy on Sunday, June 27, 2010 10:47 AM

I have completed the tanks rear grill work.

The grill work is all fabricated out of brass strips. The grills are all soldered together.

The rear grill slats are angled to the tank's rear. These details aere also built into the brass grills.

The inner portions of the grills have support struts that are present on the real vehicle and make the grills more rigid.

The grill grab handles were added and are functional


I was able to make the grills are fully functional. To make them static it would have required the same amount of scratch building, so I decided to make them fully functional.

I will now be focusing on the main engine grills. They will be built using the same method. more info to come.

  • Member since
    March 2006
Posted by simpilot34 on Friday, June 18, 2010 10:25 PM

Bow DownBow DownBow Down

Cheers, Lt. Cmdr. Richie "To be prepared for war, is one of the most effectual means of preserving the peace."-George Washington
  • Member since
    April 2005
Posted by armourguy on Friday, June 18, 2010 7:11 PM

I have completed the tank's rear wall detailing.


The tank's rear wall detailing includes The Tail lights, Tail light guards


The tank's Tow shackles were added, and the chain mounts for the tow Lug Pins.


The tank's Tow hitch and Tow cable mounts were added to the tank's rear wall. Unlike most US tanks the M26 series usually carries it's tow hitch in the stowed position.


The final piece of detail, and the most important to the rear end of the M26 is the tank’s rear exhaust manifold system. The M26 series had about three different exhaust layouts.


The first and earliest (T26-E3) exhaust system had the main gun travel lock mounted directly to the exhaust casting. The travel lock proved to have too much stress on the tank's exhaust and would often break.


The second version moved the travel lock mounts from the exhaust manifold to directly besides the exhaust. The exhaust still had the mounts for the travel lock casted into the housing.


The last version (M26A1) featured a smooth round surface that was void of the travel lock mounting lugs, the travel lock itself was moved to the tank's upper hull behind the center gas cap.


For my model I went with the early T26-E3 style exhaust manifold system. The travel lock is full function and does clamp onto the tank barrel. This item was added to the product line.   


http://eastcoastarmory.com/ustankparts.htm


Now that the rear wall is complete I will now move to the top deck and work on the grill work. More info to follow :D!

  • Member since
    March 2006
Posted by simpilot34 on Monday, June 14, 2010 10:47 PM

WOW this is looking WAY cool!!!!!Toast

Cheers, Lt. Cmdr. Richie "To be prepared for war, is one of the most effectual means of preserving the peace."-George Washington
  • Member since
    April 2005
Posted by armourguy on Monday, June 14, 2010 10:40 AM

Thanks a lot guys, The feedback is much appreciated! Smile

Just a quick update I have completed the tank's turret detailing.

I added a second MP-48 spring antenna base, and the tank's track connector ratchet jacks.

I have also added the jacks the product line. These jacks are used to tighten up the space between the two tracks when they are being re connected to insert the last connector block.

Now that the turret detailing is mostly complete I will now start on the tank's rear wall detailing. This would include the exhaust manifold, tail lights, how hitch....ect. More info to come!!

  • Member since
    October 2009
  • From: South Carolina
Posted by jetmodeler on Saturday, June 12, 2010 8:18 PM

IndifferentWowBow DownBow Down Every time you do one of these builds its hard to believe it isn't real. You put so much detail into it.


  • Member since
    March 2010
Posted by Bocks Suv on Friday, June 11, 2010 12:41 PM

Ask him how many he's already built like this. Be sure you're sitting down first. Heck, I'm amazed at all the photos he takes to show this project off in such detail.

  • Member since
    May 2010
Posted by Mr2ndAmendment on Friday, June 11, 2010 11:42 AM

This is just simply amazing!  You have the skill, the correct dimensions and knowledge, and most importantly the drive to keep plowing through and finishing this beast!  This makes me feel shame for losing interest in a 1/35 scale model and moving onto another, your resolve is unmatched!  Looking foward to seeing this thing painted up and good to go, awesome man!

-Mr. 2nd Amendment

NRA
US Army
Virginia Military Institute Class of 2011

  • Member since
    March 2006
Posted by simpilot34 on Friday, June 11, 2010 1:57 AM

if I ever leave a blank post, Just take it as being SPEECHLESS!!! lol Out standing work mate!!! You have truly whetted my appetite showing a bit of the track!!!! Really looking forward to that part er.....parts, many parts.ToastBow Down

Cheers, Lt. Cmdr. Richie "To be prepared for war, is one of the most effectual means of preserving the peace."-George Washington
  • Member since
    April 2005
Posted by armourguy on Thursday, June 10, 2010 9:56 PM

Thanks again guys. I have made some more progress on the tank.


I have added more new parts to the product line. Many of these parts will work on other vehicles besides M26 Pershings.

http://www.eastcoastarmory.com/ustankparts.htm


M3 90mm gun double baffle muzzle brake. This component will work on the M36 and M36B1 Jackson Tank destroyers.


M26 Pershing family Spent shell port hatch kit. This kit will also work on the M46 Patton family.


M26 family T80-E1 Live Track. The track is fully articulated and is very realistically detailed. The track is almost identical to the T80 track that is used on the M4 HVSS suspension. To transform this set for Sherman use I only need to make a different center guide tooth.


The tank's turret detailing is almost complete.


The turret spare track rack was fabricated out of sheet steel. A length of spare track will be mounted once the tank is finished.


The tank's engine removal studs were also added. These studs are only found on early production M26 Pershings.


The remaining turret details have been added. These would include the MP-48 spring antenna base, 50.cal travel lock, and the spent shell port hatch.


The only components that are left on the turret are the track tension jacks. Which will be done very shortly.  

  • Member since
    March 2010
Posted by Crapgame on Saturday, June 5, 2010 12:25 AM

Excellent !!

JOIN OUR COMMUNITY!

Our community is FREE to join. To participate you must either login or register for an account.

SEARCH FORUMS
FREE NEWSLETTER
By signing up you may also receive reader surveys and occasional special offers. We do not sell, rent or trade our email lists. View our Privacy Policy.