SEARCH FINESCALE.COM

Enter keywords or a search phrase below:

M60A1 Finished (sort of)

13363 views
18 replies
1 rating 2 rating 3 rating 4 rating 5 rating
  • Member since
    February 2014
Posted by medicinehorse179 on Saturday, February 1, 2014 8:13 PM

Won't bore you with the long, winding road, "link-surfing", and Google-images that landed me here by chance....I clicked on a photo of a USMC M-60 / w/ RISE & passive armor, & mine plow, from Gulf War 1, ( 1991), and a photos from your spread appeared, and here we are! Anyway, it looks so good, I created an account, just to comment! ( Been a "FineScale" reader since the late 1980's!...just not a current subscriber, or even posted on the site before now....)

Anyway, anyway, I *COULD* "nit-pick", but I won't. That old Tamiya *DOG* shows it's age! I'm sure you know by now, yes, the casting numbers on the turret ARE correct, and that beast has lots more, all over it! Since you posted this 3 years ago, I'm guessing you've seen the several sites comparing all the various M-60 kits, and their faults. Also, replacing the tracks is worth the ~$25. They are a near perfect fit, and the little holes in the end connectors are very visible when paint highlighted. Back to your M-60:

You have a very neat, light, random touch to your weathering, and your general skills are also excellent. I'm wondering what kind of work you're doing now? Probably showing at AMPS, huh? ( You forgot to paint the silver/black headlights.) Reading some of the other comments here, well, the wear-and-tear depends on many different variables. In 1991, most (?) USMC armor started in NATO tri-color, (green/black/brown), and was simply oversprayed desert sand, which quickly faded, and even rubbed off from being literally sandblasted by sandstorms. For a heavily used vehicle, you're maybe even a little light on the weathering. The M-60 has always been my "favorite" tank to model, and you have done a VERY FINE job on this one... the old ESCI/Ertl version M-60 molds the fender supports as separate pieces, and I found correcting the idler wheel easier, too. Plus, it includes the lift rings on the cupola, and a few more detail "bits", but the tracks are crappier, so try the replacement link-to-link, if you haven't already....Again, very excellent, I am impressed, thank-you! ~from an old guy. ( I built my first plastic model in the 1960's!....*grin*....Ya done good, kid!    

  • Member since
    April 2010
  • From: Lexington, VA
Posted by USAFSPOOK on Wednesday, May 26, 2010 11:27 AM

You forgot to mention your model is currently on display at the "one and only" hobby shop (D&P Crafts and Hobbies) here in Lexington, VA .  The owner of the shop is glad to have it on display--he took me back to see it as soon as I went in the store!  I am glad to see you guys are still allowed to build models in your rooms at VMI.  In my day, we had a very poor hobby shop in town and had to make due with models that could be brush painted--that is when I switched to Humbrol and developed a very light touch to hide brush marks.  Good job on your model and keep up the good work--and thanks for visiting our local shop; I know the owner greatly appreciates it as he is really trying to provide our small community with a first rate shop with quality kits and supplies.  DAB '82

  • Member since
    July 2013
Posted by DURR on Sunday, May 16, 2010 3:48 PM

very nice blazer       i today just started  the same model  only i am doing it as a nato / euro version   it will be  the nato color brn/grn  and without the reactive armor

  • Member since
    May 2010
Posted by Mr2ndAmendment on Saturday, May 15, 2010 10:26 PM

Great insight on the conditions, I guess it just depends on what you're doing.  That was the risk that I was taking by doing this, I didn't want to insult the guys that take pride in maintaining their equipment, especially the Marine Corps that makes sure they take care of what they have.  I just wanted to show a tank that looks like it may be old and has seen a lot of use, yet in the insides are still good to go because they keep them in a great ready-state.  I'll take back what I said partially, because there have been a couple rare moments when we got totally brand new stuff, but most the time it's old and abused. 

Another thing is that the ideologies of the Army and Marine Corps are completely different, and I know the Marines take pride in "making stuff happen."  I'm making an LAV 25 from the same era and I'll tone the weathering down a bit.

-Mr. 2nd Amendment

NRA
US Army
Virginia Military Institute Class of 2011

  • Member since
    September 2004
  • From: Burke, Virginia
Posted by tellis on Saturday, May 15, 2010 8:14 PM

Kudos on a great looking model, you captured the essence of a Desert Storm era M60A1. The tread wear and chunking from the road wheels are good attention to detail. The level of weathering is appropriate for it's age and field conditions.  I do have to disagree with your statement "After my experience in the military so far, I've realized everything we get, ride in, or have is used and abused and neglected beyond repair". ,  during a 20+ year career in the Armor Branch there were times when we did have to work harder with fewer spare parts and less in the budget but our tanks were never abused and neglected. In fact there have been numerous times when we received  Abrams tanks and M1151 HMMWVs that were new or just out of depot that, when maintained properly, gave outstanding service through rotations at the NTC or in Afghanistan. My tankers and mechanics took pride in maintaining a high operational readiness rate with their equipment. I'll get off my soap box. Again, great job on the model and best of luck at VMI and a future career in the Army.

T Ellis  Springfield, VA  http://i158.photobucket.com/albums/t104/cycledupes/WWIIArmorBadge.jpg

  • Member since
    November 2009
  • From: SW Virginia
Posted by Gamera on Thursday, May 13, 2010 1:56 PM

She looks good to me! I build one years ago and thought it went together fairly well. My idea of weathering was 'drybrush the ##@% out of it' and it looks horrible to me today. I love your weathering though.

Welcome to the forum and looking forward to seeing more of your stuff!

"I dream in fire but work in clay." -Arthur Machen


  • Member since
    May 2010
Posted by Mr2ndAmendment on Thursday, May 13, 2010 12:25 PM

I thought our gear was bad, but we train with the Marines sometimes and their stuff is downright abused.  I threw some educated guessing in there, maybe it's a little too much, but I wanted to show that those old retrofitted tanks had seen a lot.  I'm finishing up an LAV 25, I'll put considerably less weathering and paint chipping on it, but it's still Marine Corps equipment so it's going to show signs of use.

-Mr. 2nd Amendment

NRA
US Army
Virginia Military Institute Class of 2011

  • Member since
    March 2003
  • From: Rain USA, Vancouver WA
Posted by tigerman on Thursday, May 13, 2010 11:36 AM

Kind of strange to see modern US armor so battered, but you'd know better then I. I do like the weathering on the rear deck. Worn, but not overly beat up.

I built this kit with my son, and it was little fussy being an older Tamiya kit as far as cleanup, but looked quite nice when finished.

   http://i7.photobucket.com/albums/y269/wing_nut_5o/PANZERJAGERGB.jpg

 Eric 

  • Member since
    May 2010
Posted by Mr2ndAmendment on Wednesday, May 12, 2010 11:44 PM

Thanks everyone!

I think the only thing missing is all the junk they actually put everywhere.  Depending on unit SOP and the crew, they could have fatigues hanging to dry on the basket, a captured enemy weapon near the hatch for the SHTF scenario, or anything like that.  Maybe a future dio idea?  We'll see.  Thanks again everyone!

-Mr. 2nd Amendment

NRA
US Army
Virginia Military Institute Class of 2011

  • Member since
    January 2007
Posted by the doog on Wednesday, May 12, 2010 11:34 PM

I think that this is just absolutely OUTSTANDING. The weathering is some of the best I've seen on modern armor--great to hear it from a veteran who's been there and knows what to do to it.

One of the best M60's I can remember!

  • Member since
    December 2008
  • From: Goffstown, NH
Posted by New Hampshire on Wednesday, May 12, 2010 8:55 PM

Nice job!  That is one bad *** looking beastie ya got there!

Brian

  • Member since
    May 2010
Posted by Mr2ndAmendment on Wednesday, May 12, 2010 3:43 PM

I used the "Light Sand" color (TS-46).  I tried to find a non-spray can equivalent but I couldn't, so when I had to hand-paint or retouch with the sand color I just sprayed the can on a piece of cardboard and hand-brushed it.  I painted the lower half and the turret, but (this is blasphemy) I didn't paint the top of the hull at all because the color of the plastic matched well and it didn't seem necessary at the time.

-Mr. 2nd Amendment

NRA
US Army
Virginia Military Institute Class of 2011

  • Member since
    August 2003
  • From: Connecticut, USA
Posted by Nachtflieger on Wednesday, May 12, 2010 3:22 PM

Nice job.Yes I like the chipping.

Nate


  • Member since
    March 2005
  • From: Georgia
Posted by gpal on Wednesday, May 12, 2010 12:50 PM

Good Job! What colors of the Tamiya did you use? I have this same kit to put together.

George

  • Member since
    May 2010
Posted by Mr2ndAmendment on Wednesday, May 12, 2010 7:10 AM

Thanks everyone!  I've got an LAV-25 on the way along with an Iwata airbrush, so we'll see what can happen now that I can throw the spray cans away!

-Mr. 2nd Amendment

NRA
US Army
Virginia Military Institute Class of 2011

  • Member since
    July 2006
  • From: New Jersey
Posted by redleg12 on Tuesday, May 11, 2010 6:53 PM

Welcome.....nice work, the ODS equipment looked pretty crappy pretty quick .....the quick paint jobs did not hold up well.....you did a great job capturing that look.

Look forward to seeing a lot more from you

Rounds Complete!!

"The Moral High Ground....A Great Place to Emplace Artillery."

  • Member since
    April 2009
  • From: Carmel, IN
Posted by deafpanzer on Tuesday, May 11, 2010 2:02 PM

Welcome to the forum, Mr. 2nd!  Outstanding work especially the weathering and chipping... you made a Tamiya kit look reak GOOD! Yes  Hope to see more of your work...

Andy

  • Member since
    March 2010
  • From: New Zealand
Posted by Scorpiomikey on Monday, May 10, 2010 8:14 PM

Welcome Aboard. Nice Kit. very well done

"I am a leaf on the wind, watch how i soar"

Recite the litanies, fire up the Gellar field, a poo storm is coming Hmm 

My signature

Check out my blog here.

  • Member since
    May 2010
M60A1 Finished (sort of)
Posted by Mr2ndAmendment on Monday, May 10, 2010 7:53 PM

Hello everyone,

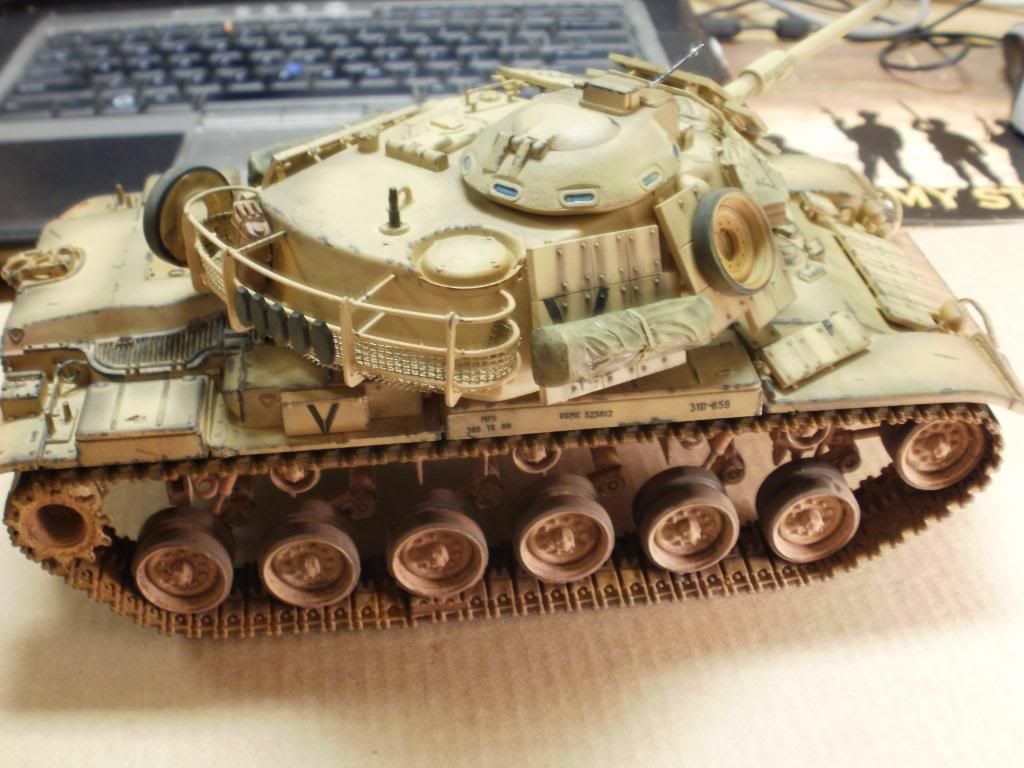
It's been forever since I've been on FineScale, but after recent events I have gotten back into the hobby and I figured I'd kick it off with a Tamiya M60A1, the Marine Corps reactive armor kit.  It's out of the box (as all my stuff is), done with Tamiya acrylics and pastel chalks.  In fact this kit is kind of a poster child for Tamiya, but hey, it's great stuff and it works.


All comments welcome, thanks for looking!


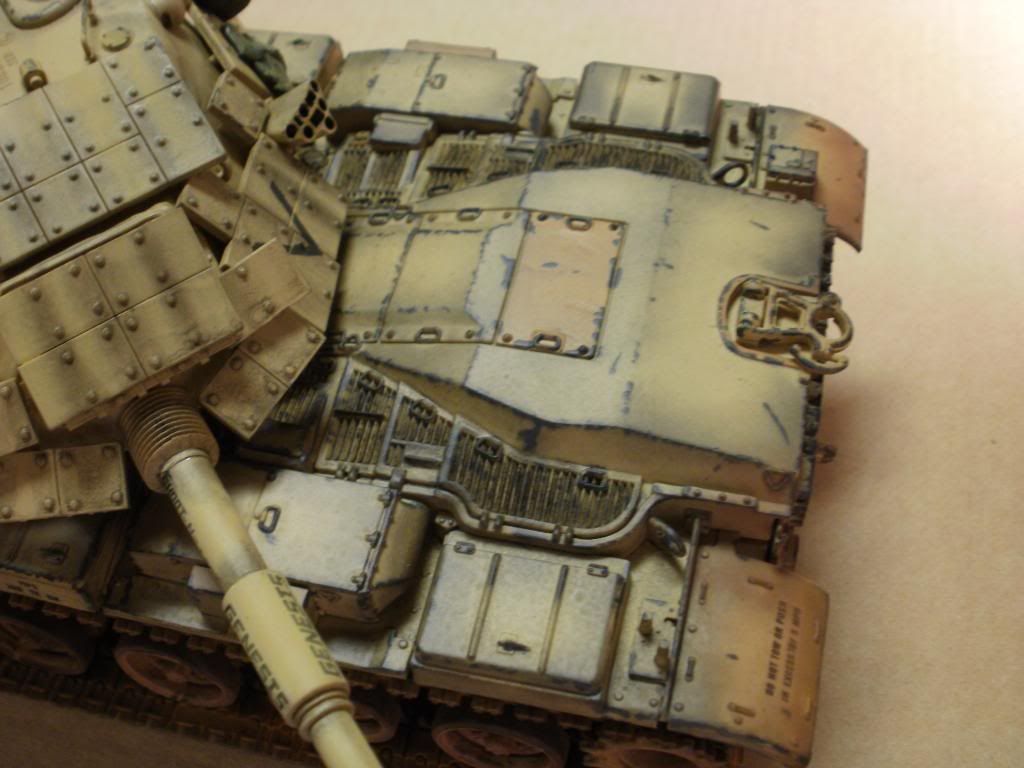
I used pastels for the dust, rust, and black "streaking" weathering.


I still have to paint the headlights amongst other things.


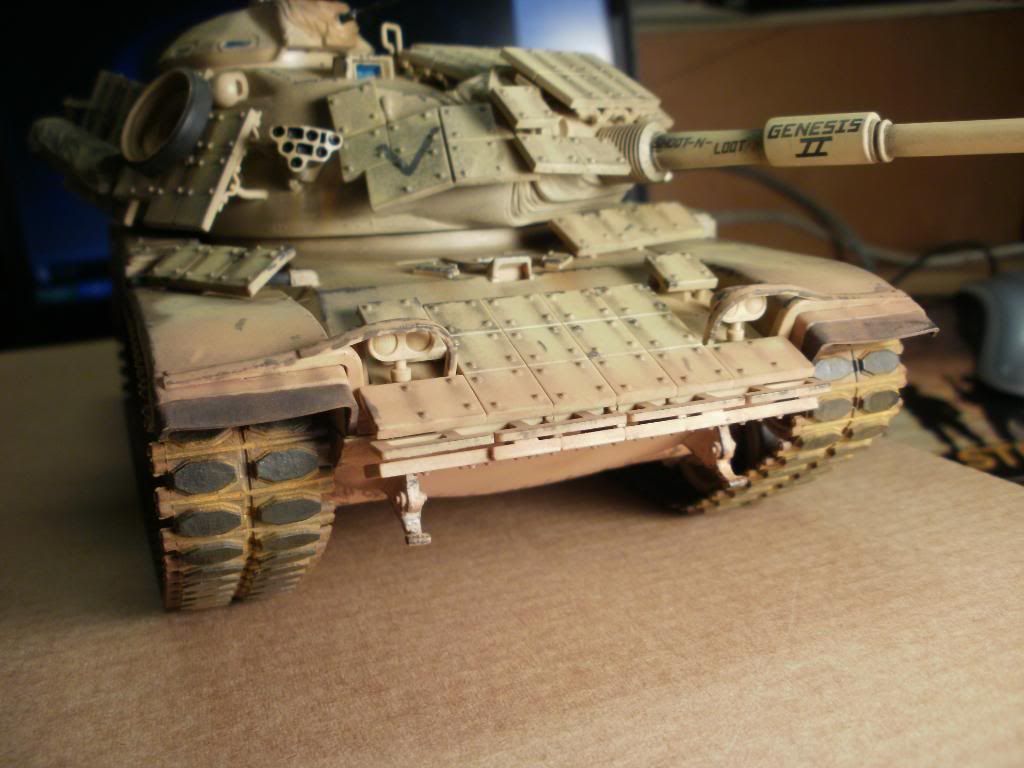
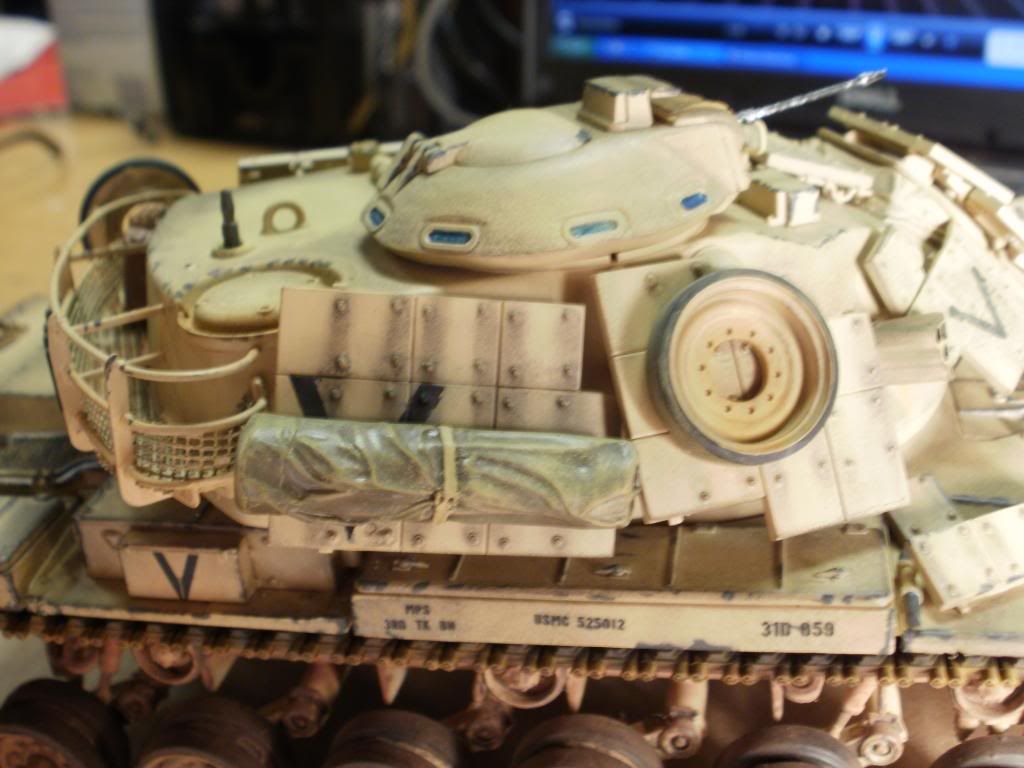
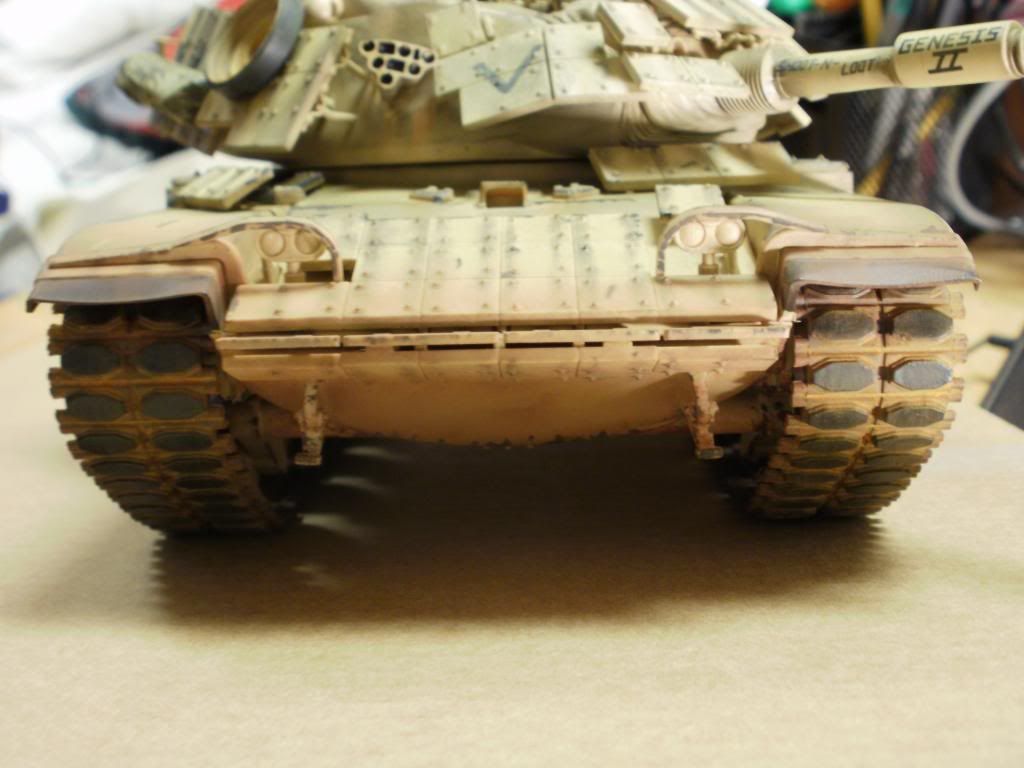
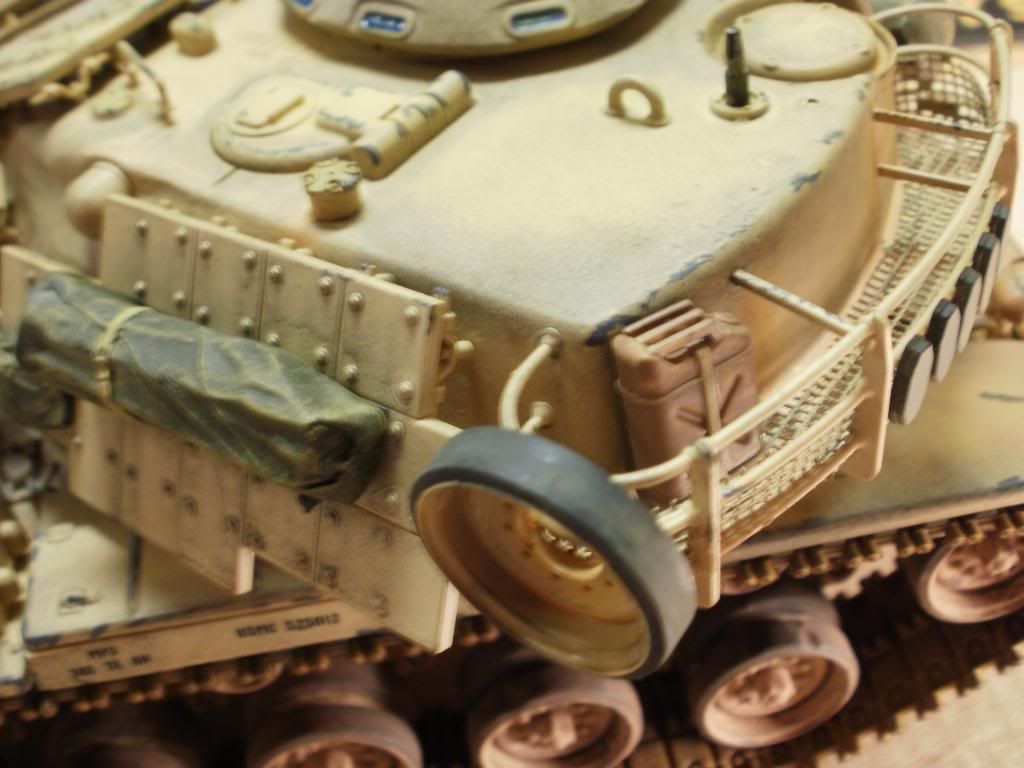
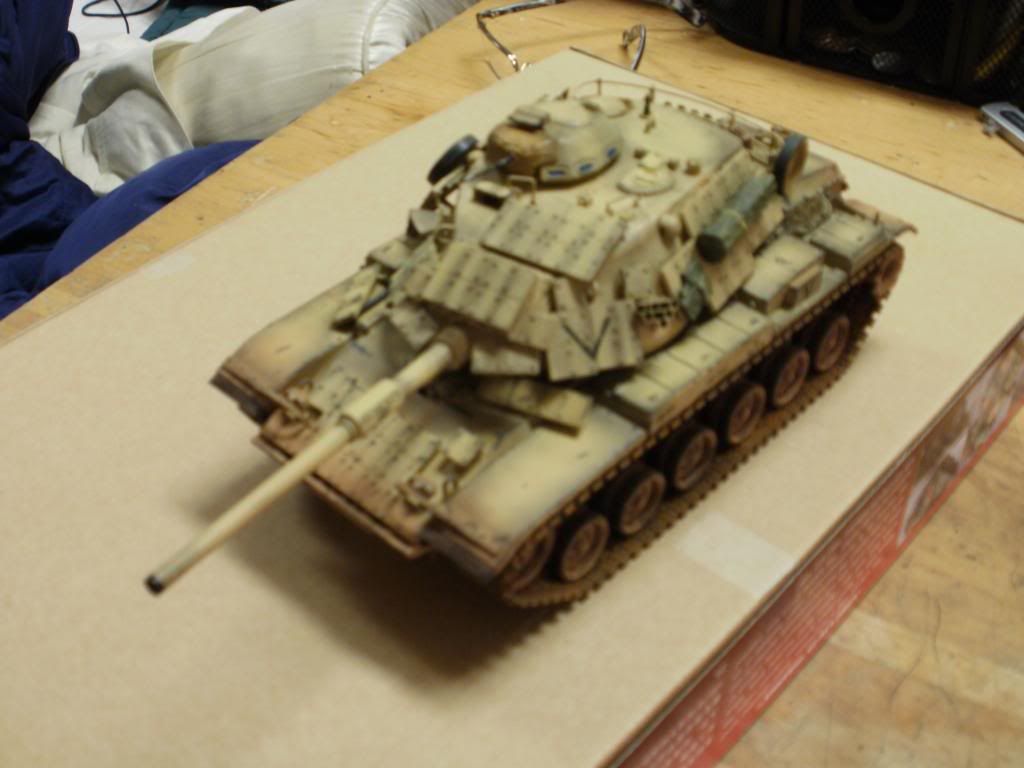
Close up of the front end.


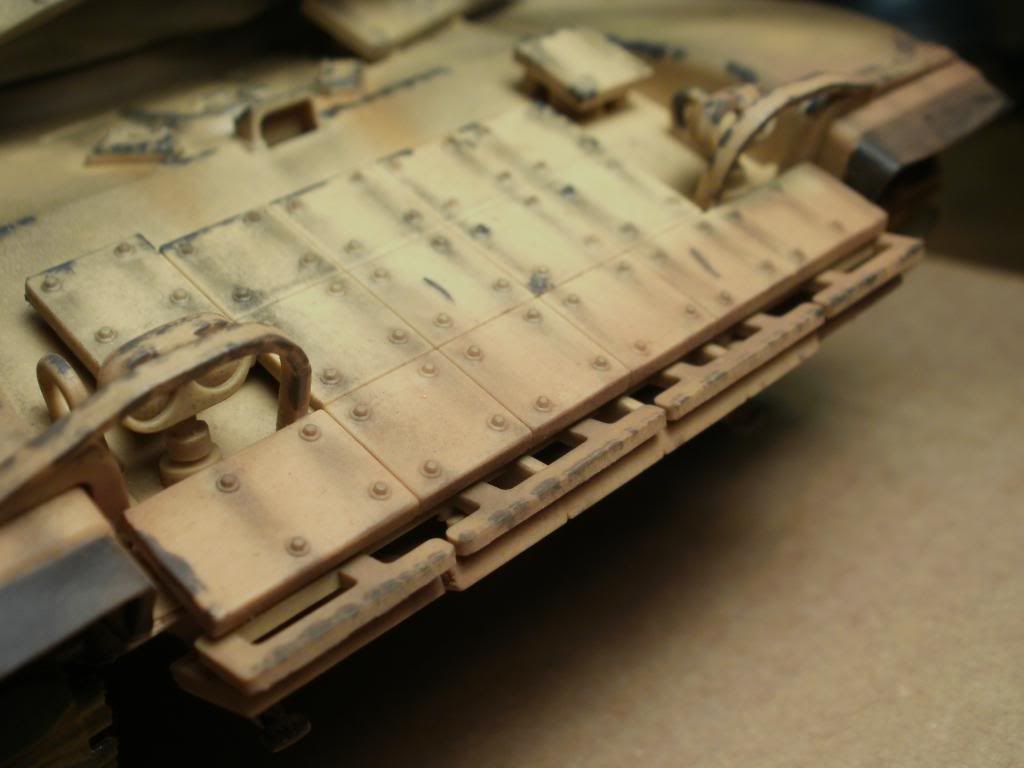
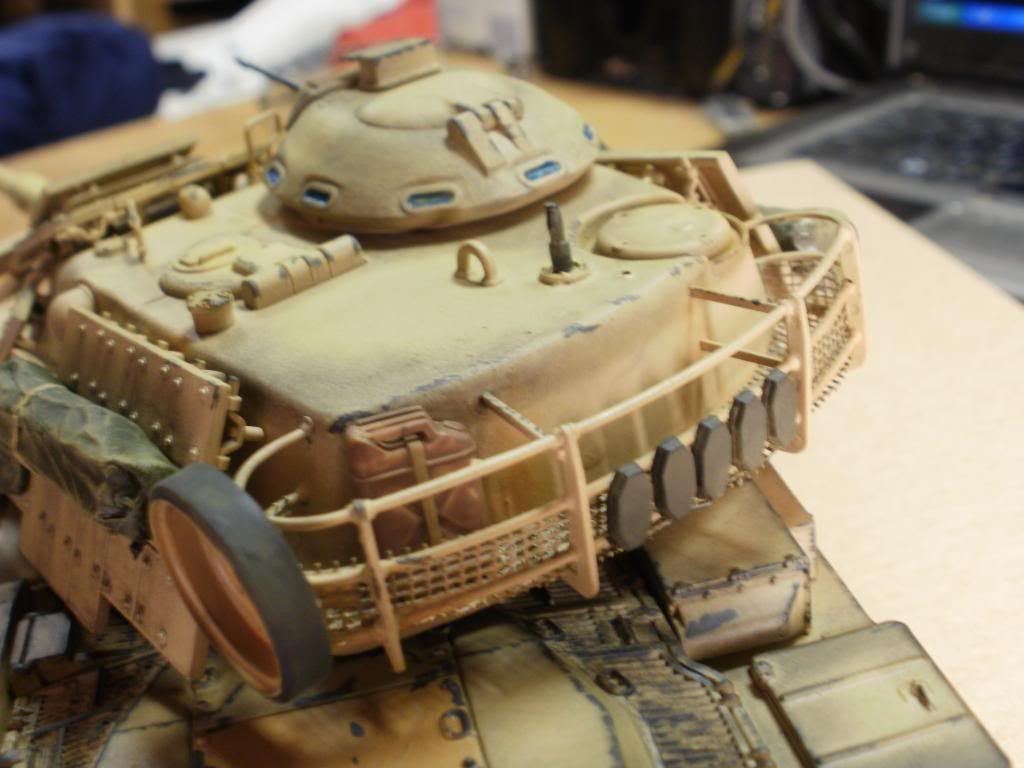
I tried some chipped paint effects with some grease stain on the side.


I'm still going to add a couple more things in the basket and possibly the tow cables, but the cables for this kit are horrifying.


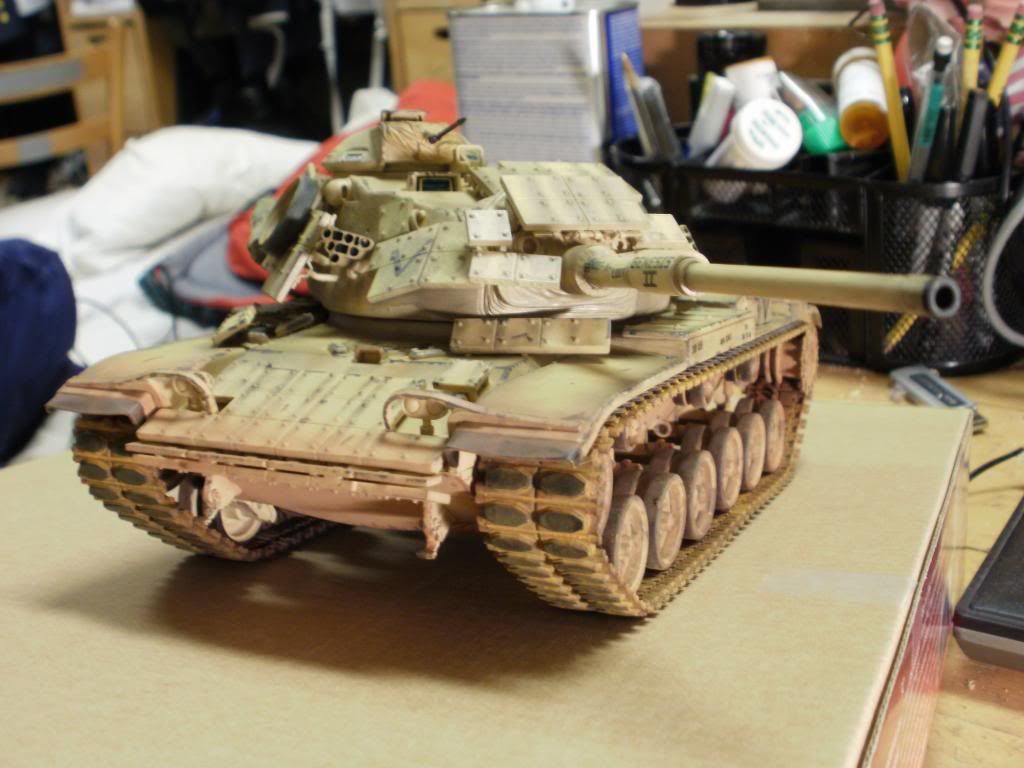
The basket is kind of empty, more stuff to come!


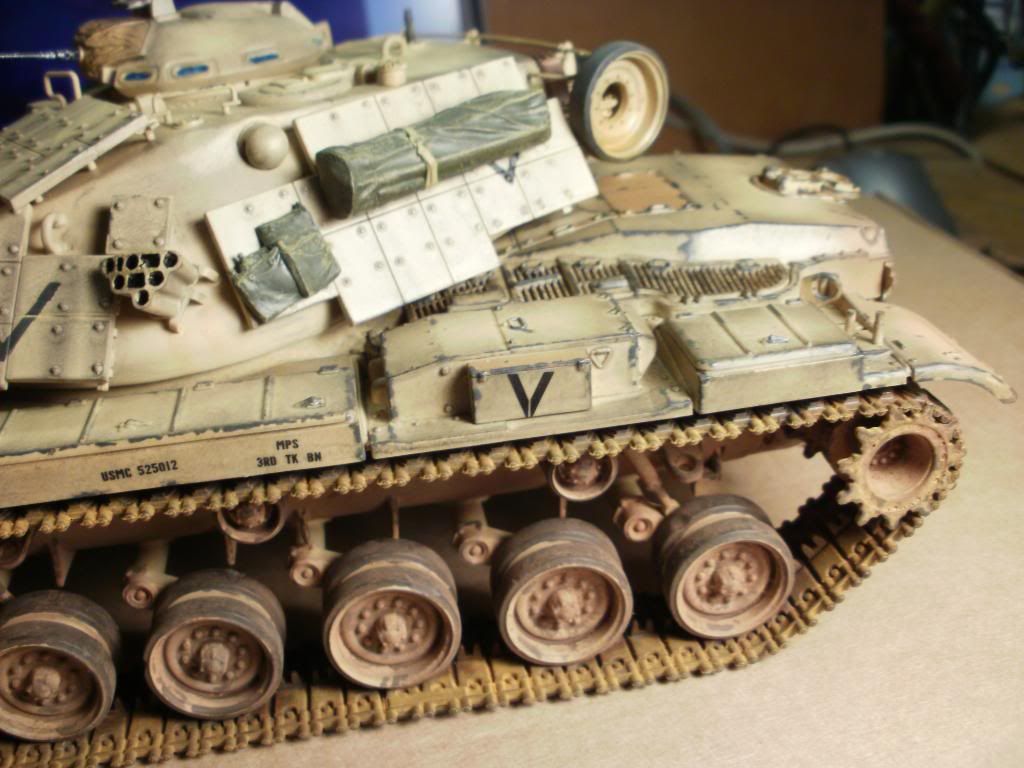
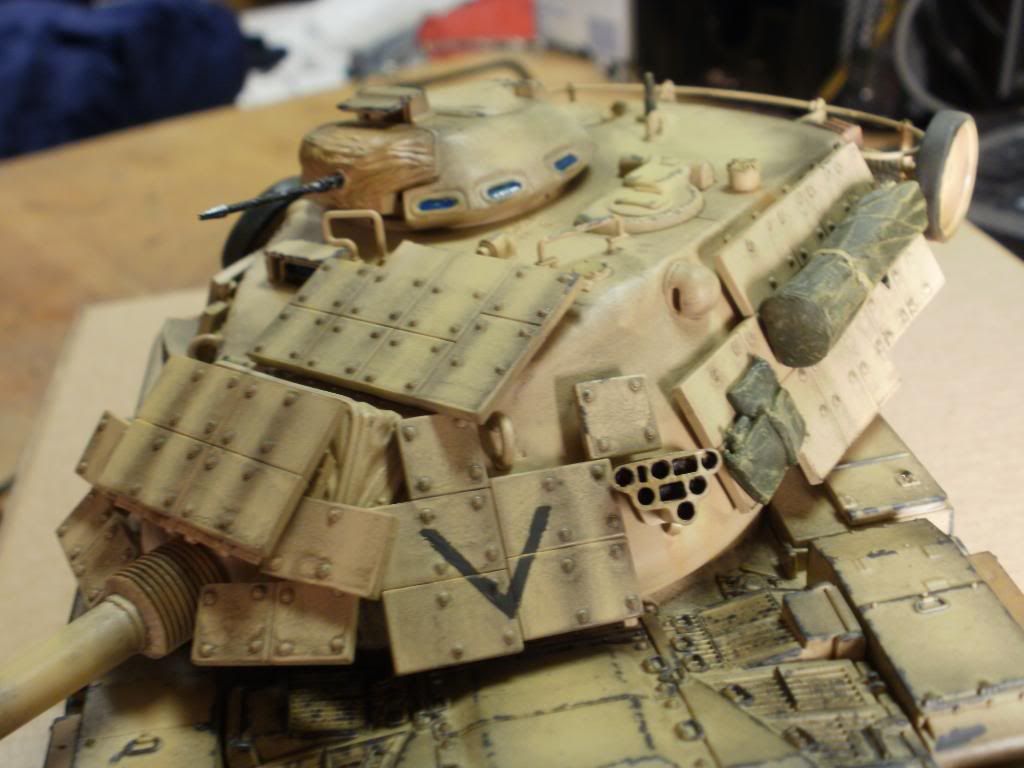
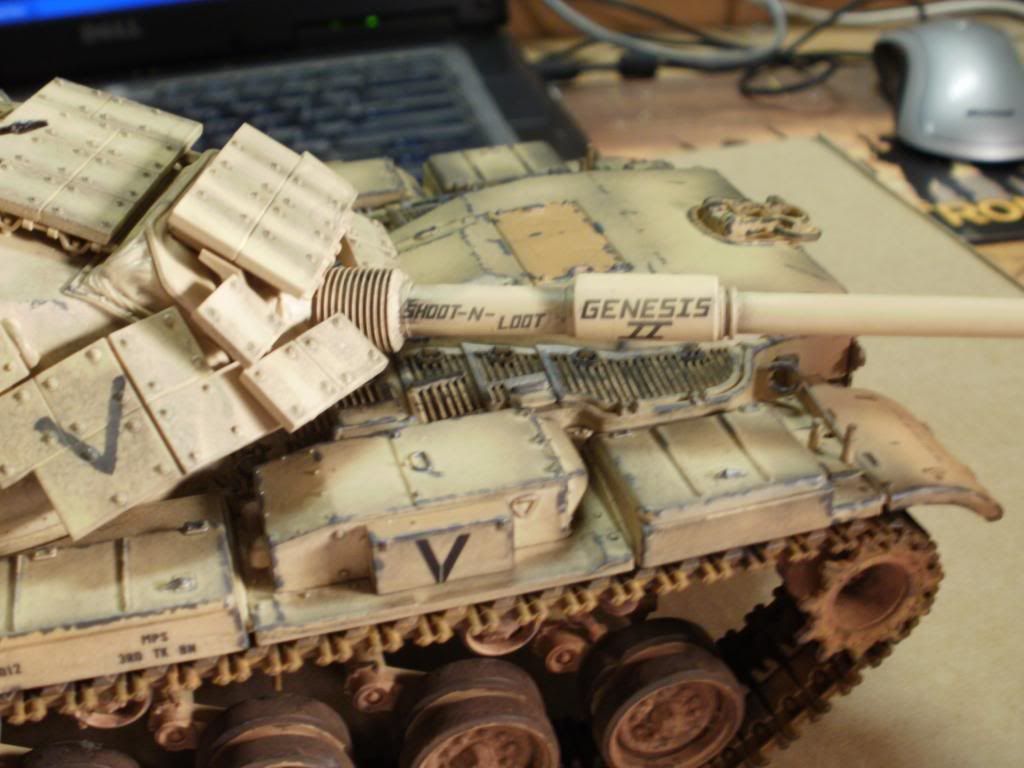
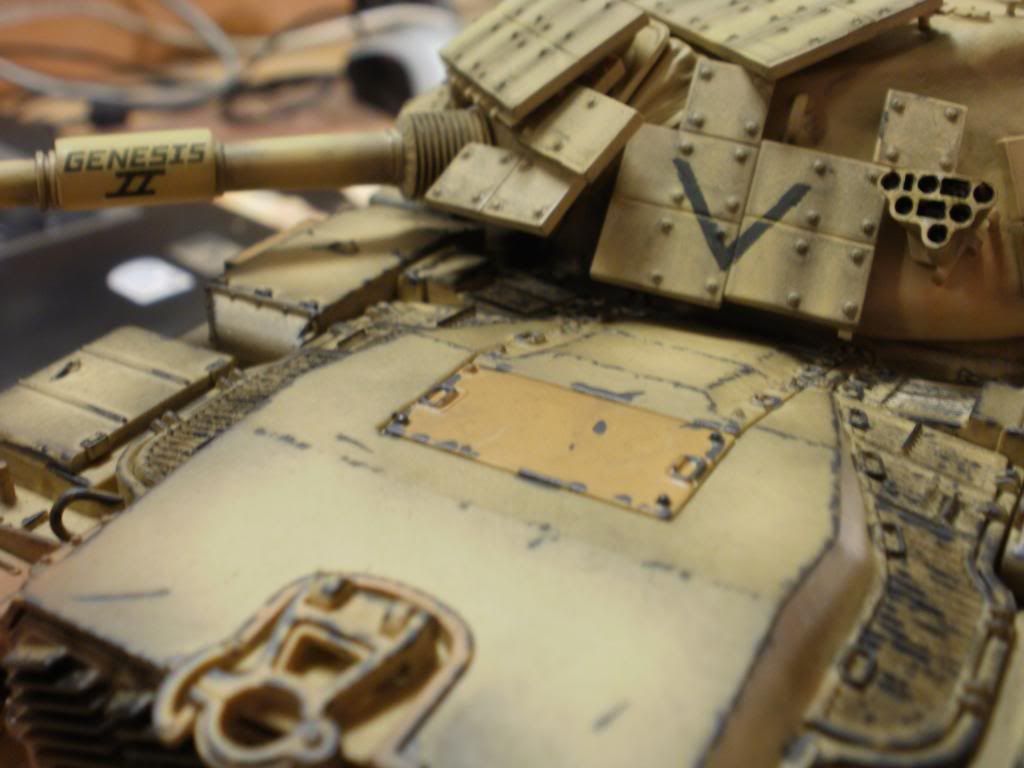
The decals were also horrifying, so I had to improvise and paint my own "Vs" on the turret.  If you noticed, I'm trying to hide them with junk strapped onto the turret.


The last time I was really into making armor models I was in high school.  A couple years in the Army later, and I've realized that my "used and abused" philosophy has changed completely.  I used to make "clean-cut," brand-new looking tanks.  After my experience in the military so far, I've realized everything we get, ride in, or have is used and abused and neglected beyond repair.  I know that the Marine Corps gets a lot of hand-me-downs militarily speaking, so their equipment is usually old, broken, used, and out of date especially.


The bare metal paint chipping was done with a fine brush and Tamiya's "German Gray" (XF-63).


A close-up of a modeler's worst nightmare: bad, thick, non-wrapping, old decals trying to go over a bolt-riddled surface.  Time to bust out the Model Master fine point brush!


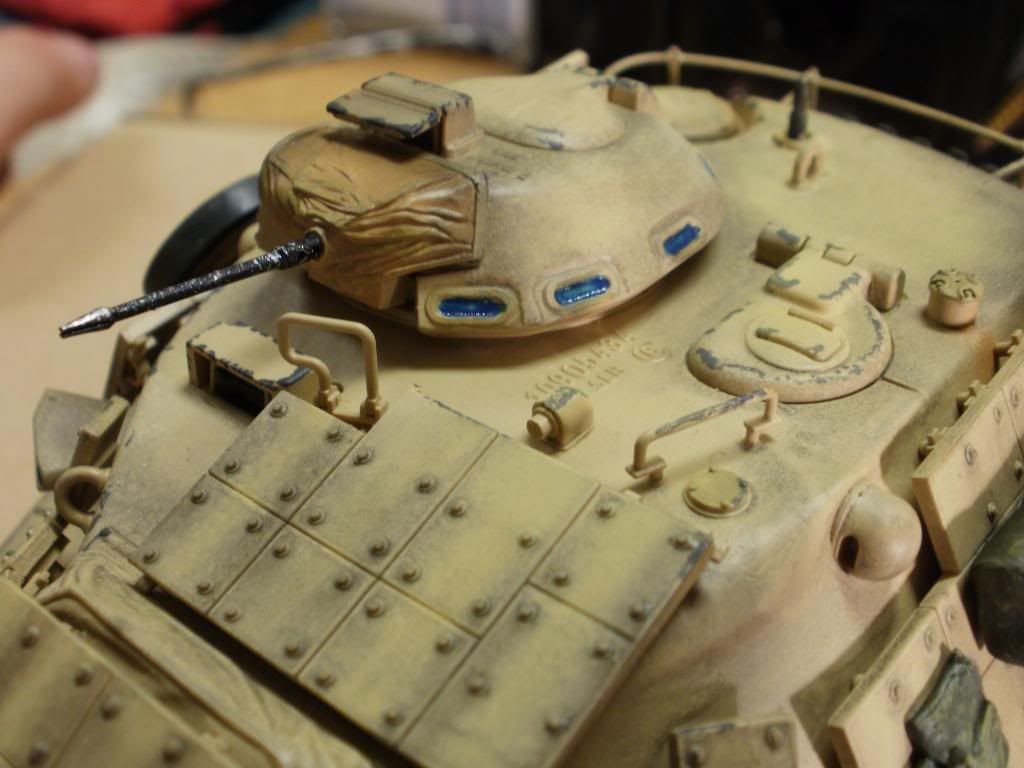
Tamiya "Clear Blue" saves the day with the portholes, while yellow pastel takes the highlights, and black pastel hugs the shadows.  I'm not quite sure if those numbers are supposed to be on the turret, but from what I remember I think they are casting marks?


105 millimeters of rolling Hell to influence the fight!


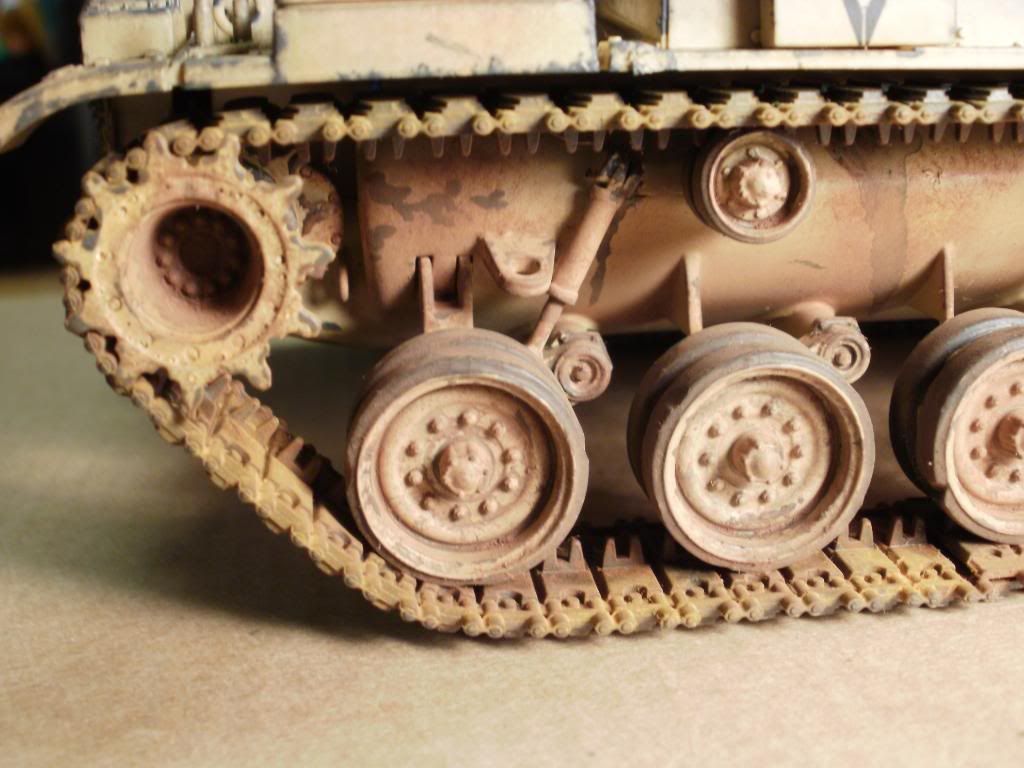
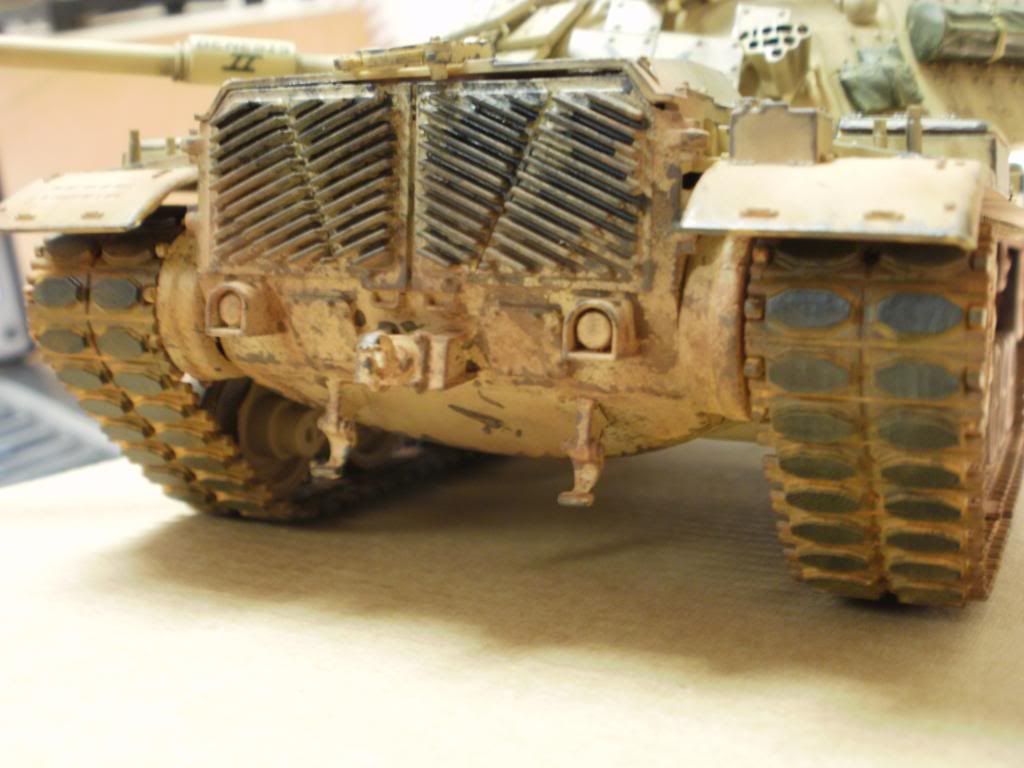
From the front.  Orange pastel for rust between the rubber pads of the treads, and brown for the dirt/dust.


That basket is looking real empty right about now, I got some more gas cans and other miscellaneous stuff that came with the kit, I'll throw them in there.


More basket, along with lonely gas can.


I have no experience with this type of tank, they phased these things out long before my time, but I had to make some serious educated guessing along with artistic license to make it work.


Still need to paint the lights, but "used and abused" is the name of the game.  The treads are dry-brushed with Model Master enamel "rust," then the pads were painted with Tamiya "flat black," orange pastel was dusted into the crevices, Tamiya "German gray" highlights the tread pads, and it's finished off with a light dusting of brown pastel.


Maybe it's just me, but with the reactive armor configuration this tank kind of looks like an Israeli Merkava to me.


Done!  Well, sort of.  Still have some minor things to add.  I remember I always worried about adding "too much" weathering and details and whatnot, so maybe it's good to fix the essentials and stop here.  The M60 is sitting on the box of the next project: Trumpeter's "USMC LAV-25."


Afterthoughts:

The kit was pretty enjoyable, it's been a long while since I've done this kind of stuff and it was fun taking liberty in town to rummage through the local (one and only) hobby shop and piece together the stuff I needed for this.  With my airbrush back home and in storage somewhere, I utilized (for the first time) Tamiya spray cans and Model Master Lacquer sealants and I had a good experience with them.  The kit itself is kind of old, and the decals are downright rancid.  The kit also had this funny tendency to put seam lines at the most inopportune places.  For example, the turret is two pieces, with a nasty seam line right in the middle of the turret towards the bottom all the way around.  The hull has a nasty seam line where the two parts (top and bottom of course) meet, the line is right about where the top road wheels are.  The mini-turret with the 50 cal on top is also cursed with this.  The most horrifying of all was the barrel, with the unique "waffle"-looking base to the gun, but it worked out alright.  For sustains, the kit had good fitting throughout the entire thing, I never had a problem with fit issues.  The parts are detailed and the aged kit still competes with modern kits (at least I think it does, you decide).  Worth building?  Absolutely!  It was a lot of fun, build time was several days (with nothing to do in the barracks, limited formations, and no guard duty, it got done fast enough). 


Thanks for looking everyone!

-Mr. 2nd Amendment


Tags: Tamiya M60A1

-Mr. 2nd Amendment

NRA
US Army
Virginia Military Institute Class of 2011

JOIN OUR COMMUNITY!

Our community is FREE to join. To participate you must either login or register for an account.

SEARCH FORUMS
FREE NEWSLETTER
By signing up you may also receive reader surveys and occasional special offers. We do not sell, rent or trade our email lists. View our Privacy Policy.