SEARCH FINESCALE.COM

Enter keywords or a search phrase below:

1/35 M561 Gamma Goat, WIP, 09/19/10, Weathering

51062 views
144 replies
1 rating 2 rating 3 rating 4 rating 5 rating
  • Member since
    May 2009
  • From: Poland
Posted by Pawel on Monday, August 9, 2010 7:04 AM

Yeah, the fotos show it's a work of loveHeart

Nice progress, I like the colours a lot. Good luck with your build, have a nice day

Pawel

All comments and critique welcomed. Thanks for your honest opinions!

www.vietnam.net.pl

  • Member since
    July 2004
  • From: Texas
Posted by wbill76 on Monday, August 9, 2010 8:48 AM

Nice work on the camo scheme Mike. Beer I'm surprised Ed isn't going nuts over the wheels...may have to give that 50/50 mix a whirl myself one of these days.

  • Member since
    January 2009
  • From: Everett, WA
Posted by Schnobs on Monday, August 9, 2010 9:11 AM

I am I just thought it would be bad form to go over the top on another man's WIP!  Big Smile

"There is a principle which is a bar against all information, which is proof against all arguments and which cannot fail to keep a man in everlasting ignorance. That principle is contempt prior to investigation." Herbert Spencer
  • Member since
    December 2008
  • From: Goffstown, NH
Posted by New Hampshire on Monday, August 9, 2010 9:23 AM

Mike, the camo is looking awesome buddy!

Brian

  • Member since
    July 2006
  • From: New Jersey
Posted by redleg12 on Monday, August 9, 2010 9:41 AM

Pawel - Thanks for stopping by and for the comments

Bill - Thanks, I like the 50/50 mix, it gives what I feel is a good color match for black tire rubber...."Try it, you will like it!!""

Ed - Never worry about stepping on my WIP.....go nuts....that is what these threads are for.....especially me, good or bad, let it all hang out......thanks for stopping by.

Brian - Thanks, always great to have you stop by

Rounds Complete!!

"The Moral High Ground....A Great Place to Emplace Artillery."

  • Member since
    January 2009
  • From: Everett, WA
Posted by Schnobs on Monday, August 9, 2010 10:02 AM

I was born in Texas and raised in North Dakota being polite and respectful are key drivers for me.  I watch how some of you talk to each other and I gurantee that would only happen with me once I would be a ghost.

That being said I used to use that same paint combination for tires and I was reading I believe one of Michaels threads and he advocated using floquil weathered black. http://www.micromark.com/FLOQUIL-WEATHERED-BLACK-PAINT,6958.html

I gave it a try about a year ago and it is wonderful.  They make a Grimey Black that is great as well.  The paint is a little hot so give it a couple days to set and then seal with a flat clear before weathering.  The results are worth the effort IMHO of course.


How is that for "letting it hang out"?  Wink


"There is a principle which is a bar against all information, which is proof against all arguments and which cannot fail to keep a man in everlasting ignorance. That principle is contempt prior to investigation." Herbert Spencer
  • Member since
    July 2006
  • From: New Jersey
Posted by redleg12 on Monday, August 9, 2010 10:23 AM

Ed - Love it...I like ALL the comments, it allows everyone to learn, teach and be a part  of it.

I have heard some things about the Floquil weathered black. I personally try to stay with all acrylics in my case. I do use enamel/lacqor for metallics but colors I try to stay with only acrylic.

I have not found (though I must admit I have not looked) an acrylic answer to my 50/50 mix for tires. For those who are enamel/lacqor users you could try either.

The nice part of the 50/50 mix is they are flat to begin with!!

Now it is always fun to pile on...the most "stuff" is happening at the bottom of the pile!!Wink

Ed, Thanks for letting it "hang out" Ick!

Rounds Complete!!

"The Moral High Ground....A Great Place to Emplace Artillery."

  • Member since
    April 2003
  • From: 41 Degrees 52.4 minutes North; 72 Degrees 7.3 minutes West
Posted by bbrowniii on Monday, August 9, 2010 9:30 PM

Mike

Like I wasn't excited enough for AMPSEast, you gotta start throwing these pics around! 

I'm all goose-pimply...Toast

'All that is necessary for the triumph of evil is for good men to do nothing' - Edmund Burke (1770 ??)


  • Member since
    March 2007
  • From: Michigan
Posted by tonka on Monday, August 9, 2010 10:31 PM

Mike..Wow !!! MAkes me want to go to AMPSEast just to see your work in person.

Question for you??  Using silly putty,,do you just do the outlines of the next color with silly putty then use tape on the rest of the vehicle? Have never tried the silly putty method yet but thinking about it..

Kevin

]

  • Member since
    July 2006
  • From: New Jersey
Posted by redleg12 on Tuesday, August 10, 2010 10:11 AM

Boyd – Awww….goose pimples…..yep….trying to make sure it gets to AMPS East….6 + weeks…..so much to do and sooo little time. Thanks

Kevin – OK, I start with a silly putty “worm” and outline the edges. Once it is in place, I may use a silly putty pancake to cover the larger areas. As I finish up the trailer, I will take some shots and post them in my next update.

It would be great if all of us could meet in person at some FSM show!!! At least we have virtual space

Rounds Complete!!

"The Moral High Ground....A Great Place to Emplace Artillery."

  • Member since
    December 2002
  • From: Valrico, FL
Posted by HeavyArty on Tuesday, August 10, 2010 1:52 PM

The camo is looking great.  This one is going to be great as usual.  Another winner.

Gino P. Quintiliani - Field Artillery - The KING of BATTLE!!!

Check out my Gallery: https://app.photobucket.com/u/HeavyArty

"People sleep peaceably in their beds at night only because rough men stand ready to do violence on their behalf." -- George Orwell

  • Member since
    October 2007
  • From: N.H.
Posted by panzerguy on Tuesday, August 10, 2010 6:12 PM

   Just keeps getting better and better there MikeBow Down! Good thing AMPS is two days this year cause those judges are gonna have a tough time deciding which of your builds is going to get the 'Best American' awardYes

"Happiness is a belt fed weapon"

  • Member since
    July 2006
  • From: New Jersey
Posted by redleg12 on Tuesday, August 10, 2010 6:29 PM

Gino - Thanks....I appreciate you confidence

Steve - Long time, no see....glad to see you stop by.......Thanks for the vote....looking forward to having fun with all you guys.....

As far as the contest......we will see.....there are lots of great models at AMPS East.....especially some on the German side by a fellow redleg Hmm  (Hummm...wonder who that could be???)

Thanks guys for stopping in and for the comments of confidence Wink

Rounds Complete!!

"The Moral High Ground....A Great Place to Emplace Artillery."

  • Member since
    June 2005
  • From: Massachusetts
Posted by minimortar on Tuesday, August 10, 2010 6:44 PM

Lookin' GREAT there Mike! Man, you sure is doin' good! Humm... any 1/35th scale goats of the 4-legged variety available to go along with this? That'd be an interesting little vignette!

Cool

Thanks,
Kevin Keefe

Mortars in Miniature
A Scale Model (Plus!) Collection of the Infantryman's Artillery

  • Member since
    March 2007
  • From: Michigan
Posted by tonka on Tuesday, August 10, 2010 8:21 PM

Mike appreciate the feedback on the silly putty masking...Always learn something new here!

Kevin

]

  • Member since
    July 2006
  • From: New Jersey
Posted by redleg12 on Tuesday, August 10, 2010 9:25 PM

Kevin - Thanks for stopping by....Hummm goat.....I have to look....maybe with a leg lifted checking the tire pressure Surprise

Kevin - That's the main purpose of these sites...teach, learn and have fun with friends!! Got ya covered!!

Rounds Complete!!

"The Moral High Ground....A Great Place to Emplace Artillery."

  • Member since
    December 2006
  • From: t.r.f. mn.
Posted by detailfreak on Tuesday, August 10, 2010 10:24 PM

Just like I remember them goats,the local fire dept. just 20 miles north of here had one to access difficult areas.Going to have to look into that. Fine build my friend.Yes

[View:http://s172.photobucket.com/albums/w1/g-earl828/]  http://i158.photobucket.com/albums/t104/cycledupes/1000Roadwheels4BuildBadge.jpg

  • Member since
    October 2007
  • From: N.H.
Posted by panzerguy on Tuesday, August 10, 2010 10:32 PM

redleg12

Steve - Long time, no see....glad to see you stop by.......Thanks for the vote....looking forward to having fun with all you guys.....

As far as the contest......we will see.....there are lots of great models at AMPS East.....especially some on the German side by a fellow redleg Hmm  (Hummm...wonder who that could be???)

Rounds Complete!!

  Yeah haven't been around much but even with a busy summer schedule I've been able to steal some time at the bench. I think you might be a little surprised at what I've been working on. Hint, It involves a lot of ODWink.

"Happiness is a belt fed weapon"

  • Member since
    July 2006
  • From: New Jersey
Posted by redleg12 on Wednesday, August 11, 2010 4:57 AM

DF - Thanks...yep the goat carried on after the army in many areas as a special off road vehicle. The goat would go almost anywhere!!  Thanks for stopping by and for the comments

Stveve - Bow DownBow DownBow DownBow DownBow DownBow DownBow DownBow DownBow DownBow DownBow DownBow DownBow Down.......the Germaholic community will Crying

I can't wait!!

Rounds Complete!!

"The Moral High Ground....A Great Place to Emplace Artillery."

  • Member since
    May 2009
  • From: Poland
Posted by Pawel on Thursday, August 12, 2010 8:42 AM

Howdy!

Just today I was notified that Perfect Scale Models (www.pefect-scale.com) added their own resin Gamma Goat to their offer. Thought y'all might want to know it.

Mike - just can't wait what you're going to do to your model next! Good luck and have a nice day

Pawel

All comments and critique welcomed. Thanks for your honest opinions!

www.vietnam.net.pl

  • Member since
    July 2006
  • From: New Jersey
Posted by redleg12 on Monday, August 23, 2010 8:05 PM

I made some good progress this weekend.

First, a few people asked about the Silly Putty masking technique. So if you want hard edge camouflage, as most MERDOC patterns were, use this method.

Step one, roll out a small bit of silly putty and roll it on the cutting board to create a strand of spaghetti from the putty.  Using small sections no more than 2 inches long, outline the pattern for the area to be painted. To get a good hard edge gently push down. Do not totally flatten but you should see the bottom inside edge

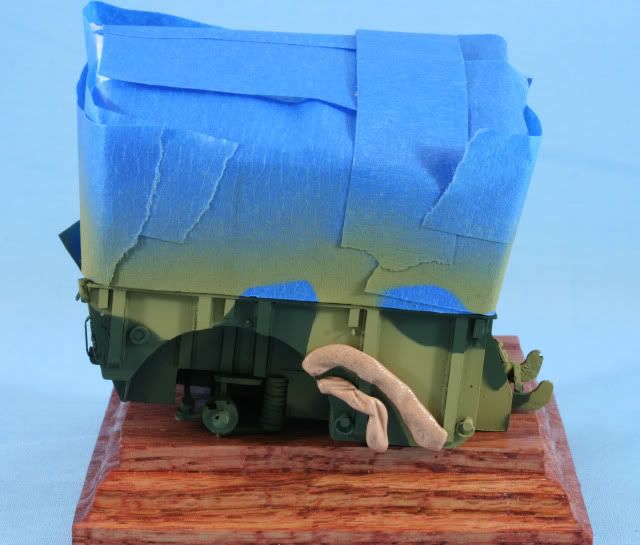
Step two, with the outline complete use painters tape or rolled flat putty pancakes to mask the larger area.

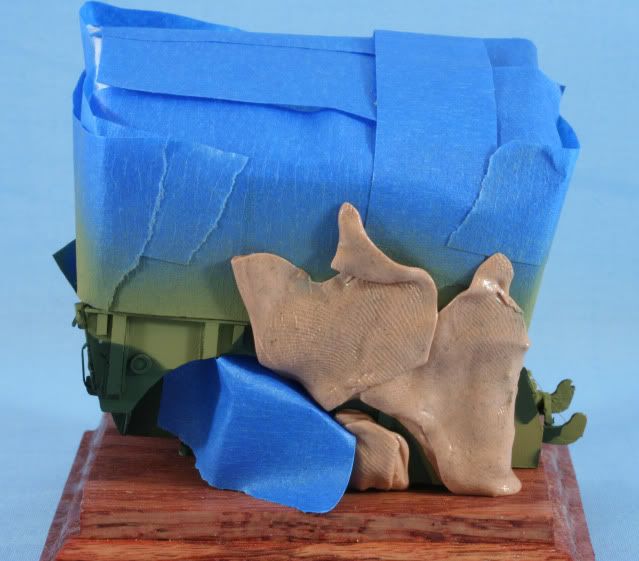
Step three, paint. Make sure you have totally painted the spot!!

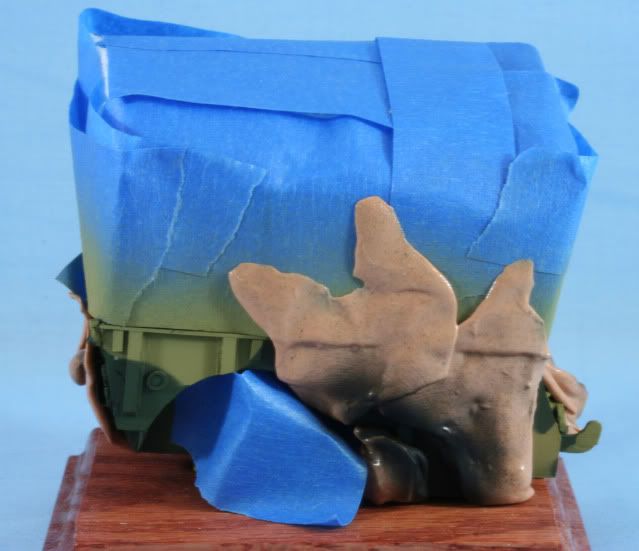
Lastly, unmask, shortly after painting. I use acrylic so dry time is not a problem. If your putty is over small details and PE and it is warm, a short 5 minute trip in the fridge prior to unmasking. Pull the putty back slowly and roll it as you remove it.

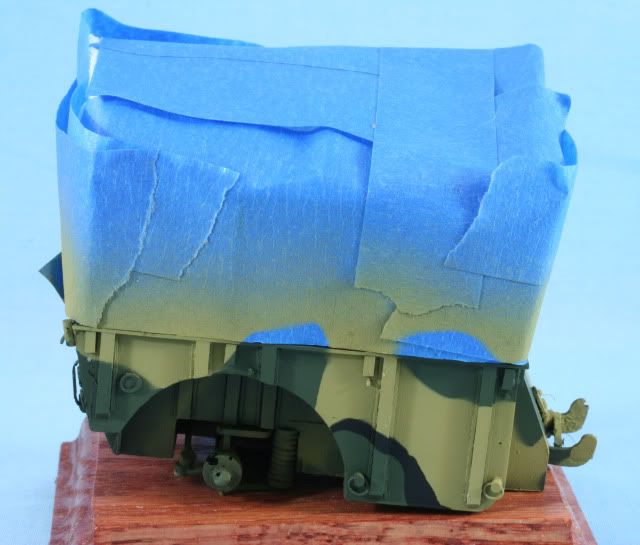
TaDa….a nice hard edge camo


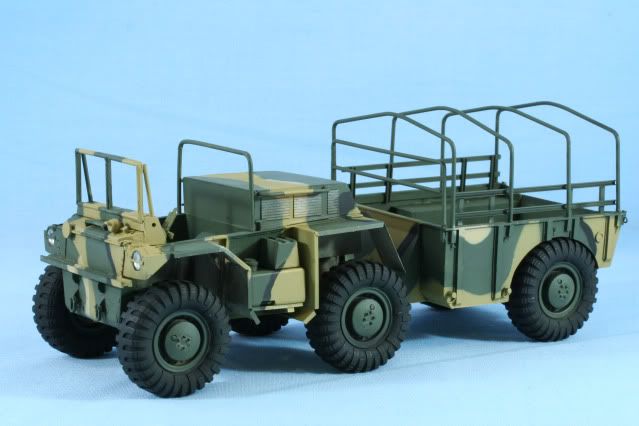
OK back to the build. I weathered in the wheel wells where it would be more difficult after the wheels were installed. After weathering with a mix of MIG Dried Mud and Industrial Dirt I removed the excess pigment and installed the wheels

I also installed the headlights and PE headlight guards.

Most of my other progress was made in the wood shop, making the base, staining and sealing it. I also made up the custom bumper numbers, using the 2/320FA “Ball of the Eagle” from the 101 ABN. The future is drying so next up will be applying the decals and detailing the crew compartment. Plus, working on the base while model items dry

As always, your comments either positive or negative are always welcome.

Rounds Complete!!

"The Moral High Ground....A Great Place to Emplace Artillery."

  • Member since
    July 2004
  • From: Texas
Posted by wbill76 on Monday, August 23, 2010 10:44 PM

Handy little toot there Mike! Looking forward to seeing the Goat marked up and ready for battle. Yes

  • Member since
    March 2007
  • From: Michigan
Posted by tonka on Monday, August 23, 2010 11:42 PM

Mike,,it looks great and thanks for the 'How to' on the silly putty technique. You make it look easy!

I picked some up after your last post and will try it on mt next camo pattern. Looks like it beats cutting up tape, using post-its and even parafilm.

Always appreciate the learnings!

Kevin

]

  • Member since
    July 2003
  • From: On my kitchen counter top somewhere in North Carolina.
Posted by disastermaster on Tuesday, August 24, 2010 8:16 AM

So unique.

Mike, this looks great Well Done

Will you be doing a diorama for this one?

I'm asking so I'll know if you will be continuing this

over in the diorama section and I can look in on it.

Way to go!

http://i20.photobucket.com/albums/b232/gluetank/Decorated%20images/th_T1-4-copy.jpg

Sherman-Jumbo-1945

"I was so much older then, I'm younger than that now"


  • Member since
    June 2005
  • From: Massachusetts
Posted by minimortar on Tuesday, August 24, 2010 9:31 AM

Looking oh, so sweeeeeeeeeet there Mike!! Bring on the details, weathering... frothing at the mouth here. Don't forget the straw/tall grass coming out of the front/back ends!

Awesome build to date!

http://www.goats4h.com/lamancha.au

Thanks,
Kevin Keefe

Mortars in Miniature
A Scale Model (Plus!) Collection of the Infantryman's Artillery

  • Member since
    July 2006
  • From: New Jersey
Posted by redleg12 on Tuesday, August 24, 2010 9:38 AM

Bill - Thanks.....I love my silly putty!!

Kevin - Thanks, glad to be of assitance.....It so easy.....ok I won't go there Wink

Steve - Hummmm.....I usually don't go there as I don't consider what I do dioramas......Yes it will have a base and depending on my mood and time may be set up as an FDC with radios, plotting table etc.. But....no figs....to me figs make it a dio......sooooo it will generally stay here.

As always though, it is a pleasure to have you stop by!! Wherever I reside Wink

Rounds Complete!!

"The Moral High Ground....A Great Place to Emplace Artillery."

  • Member since
    July 2006
  • From: New Jersey
Posted by redleg12 on Tuesday, August 24, 2010 9:41 AM

OK....you jumped in while I was writing. Yep....I love my details!!!!!  I will be starting with the drivers compartment...

Yep.....grass caught on the trans axels....weathering will be fun with this guy!!

Rounds Complete!!

"The Moral High Ground....A Great Place to Emplace Artillery."

  • Member since
    July 2006
  • From: New Jersey
Posted by redleg12 on Sunday, September 5, 2010 9:17 PM

Ahhh…back to the bench after vacation….somewhat. Still trying to get caught up on chores and everything else, but I did make some progress on the details.

The driver’s compartment is sparse from the kit so I made some additions. Using Archer transfers dashboard gauges, I filled in the respective instruments. After the gages dried, I gave them a quick coat of future then a drop of CA glue to create a lens for each gauge.

Also using Archer transfers placard set, I added some of the “required” dash and shifter information and SN placards.

The kit comes with the windshield…but no clear for glass. I cut and added some .010 clear for the windshield.

After adding the kit shifters, some detail dash painting, this is what the dash looked like

The seats that come with the kit do not include cushions. I made cushions using air dry clay. After it was sized and shaped a fiberglass fabric is placed on top and wetted. Rubbing it on the surface and then removing the fabric leaves the fabric imprint in the clay. After the clay dried it was painted with Tamiya Khaki Drab. This shot the drivers back cushion is left out so you can see the difference.

The bumper decals for the front were added. These still need to be dulled.

On the side I made up the “NO STEP” (the kit does not include any decals) for the side of the bilge pump. Using the kit supplied PE, I then added the restraining straps for the bilge pump.

I am down to the short strokes at this point. Still need the steering wheel, add a chain and lock around the steering wheel, wipers, and front turn signals, then it is on to weathering and mounting.

Trying to get it done for AMPS East at the end of the month!!  Hopefully I don’t get inundated with chores!

As always, your comments either positive or negative are always welcome.

Rounds Complete!!

"The Moral High Ground....A Great Place to Emplace Artillery."

  • Member since
    June 2005
  • From: Massachusetts
Posted by minimortar on Sunday, September 5, 2010 11:18 PM

redleg12
http://i177.photobucket.com/albums/w226/redleg12/M56127.jpg

I'm at a loss for words here Mike, so I'll just post this photo...

Bow Down

Thanks,
Kevin Keefe

Mortars in Miniature
A Scale Model (Plus!) Collection of the Infantryman's Artillery

  • Member since
    July 2006
  • From: New Jersey
Posted by redleg12 on Monday, September 6, 2010 6:32 AM

Kevin - Thanks.....you have not looked that good in years Surprise LMAO

Thanks again.

Rounds Complete!!

"The Moral High Ground....A Great Place to Emplace Artillery."

JOIN OUR COMMUNITY!

Our community is FREE to join. To participate you must either login or register for an account.

SEARCH FORUMS
FREE NEWSLETTER
By signing up you may also receive reader surveys and occasional special offers. We do not sell, rent or trade our email lists. View our Privacy Policy.