SEARCH FINESCALE.COM

Enter keywords or a search phrase below:

1/35 M561 Gamma Goat, WIP, 09/19/10, Weathering

51366 views
144 replies
1 rating 2 rating 3 rating 4 rating 5 rating
  • Member since
    February 2004
  • From: Connecticut, East of the River
Posted by tlivancso on Thursday, September 23, 2010 10:55 AM

Mike,

Awesome build can not wait to see it live and in person.

Catch up with you tonight at the hotel.


Cheers, Thom

IPMS Member #42958 /  AMPS Member #2091

IPMS Central Connecticut (President)

IPMS Northeast Military Modelers Association (Web Master)

Like Alice "I try to believe in three impossible things before breakfast"

  • Member since
    July 2006
  • From: New Jersey
Posted by redleg12 on Wednesday, September 22, 2010 8:40 PM

My god is that really the wing nut......down from the mountain top....Wink

The M561 Gama Goat was for light troops especially the airborne.....most in view in the 70s and 80s. A strange vehicle from my past!!

Thanks for stopping by and for the comments. See you this weekend at AMPS East

Rounds Complete!!

"The Moral High Ground....A Great Place to Emplace Artillery."

  • Member since
    April 2005
  • From: Piscataway, NJ!
Posted by wing_nut on Wednesday, September 22, 2010 6:59 PM

Hiya Mike.  been so long I don't even know if i even caught part of this build.  Doesn't look familiar.  But it does look great.

Marc  

  • Member since
    July 2006
  • From: New Jersey
Posted by redleg12 on Tuesday, September 21, 2010 10:41 AM

Andy - Thanks, I am glad you are enjoying and learning....that is a big part of this forum....Glad to have helped in any way. Thanks for the comments

Stick - Thanks, Ahhhh 2/320 FA.....the "Balls of the Eagle" with the 101st. Thanks for the comments!!

Rounds Complete!!

"The Moral High Ground....A Great Place to Emplace Artillery."

  • Member since
    July 2004
  • From: Sonora Desert
Posted by stikpusher on Tuesday, September 21, 2010 2:47 AM

Redleg that looks superb! If one of my old buddy's saw that he would want it. You have it in his unit's markings even... 2/320 PFAYes


F is for FIRE, That burns down the whole town!

U is for URANIUM... BOMBS!

N is for NO SURVIVORS...

       - Plankton

LSM


  • Member since
    April 2009
  • From: Carmel, IN
Posted by deafpanzer on Monday, September 20, 2010 10:49 PM

Outstanding work on your goat! Yes Now you have one for your little farm!  Before I joined the forums, I knew little about artillery and modern vehicles except for WW2 BUT I have been catching up pretty fast.  Thanks to you and others....

Andy

  • Member since
    July 2006
  • From: New Jersey
Posted by redleg12 on Monday, September 20, 2010 8:28 PM

Bill - Thanks...always a welcome guest....as far as details....now all I need is one of my old Army licenses showing the M561 series as one of my qualifed vehicles. thanks for stopping by Wink

Steve - No matter what you always brighten up my day!!!. Thanks for the comments and the great picture.....reminds me...Halloween is coming!!

Thanks Guys

Rounds Complete!!

"The Moral High Ground....A Great Place to Emplace Artillery."

  • Member since
    July 2003
  • From: On my kitchen counter top somewhere in central North Carolina.
Posted by disastermaster on Monday, September 20, 2010 6:58 PM

http://i177.photobucket.com/albums/w226/redleg12/M56143.jpg

The little things like this ⬆are, well; like this...........  ⬇

                                                http://t3.gstatic.com/images?q=tbn:ANd9GcRMLb0uDF0tX7rO1lXYwnYV23DkYQ-fYVWBsmX8jiyUQ_yKybw&t=1&usg=__EMP7mp58vuKuX3EkncBKa78eulc=

Maybe not noticed at first but just brilliant.

This model is beautiful.

http://i20.photobucket.com/albums/b232/gluetank/Decorated%20images/th_T1-4-copy.jpg

 https://i.imgur.com/LjRRaV1.png


  • Member since
    July 2004
  • From: Texas
Posted by wbill76 on Monday, September 20, 2010 5:16 PM

Very nice work on this one Mike, as usual all the little details you add really bring it to life. Yes

  • Member since
    July 2006
  • From: New Jersey
Posted by redleg12 on Monday, September 20, 2010 12:56 PM

Steve - Thanks....the fun part of the chain was not loosing the key......That and the noise as it banged around the floor pan...Surprise    Looking forward to seeing you this weekend!!

Kevin - Thanks....I said I used Dried Mud....not SandConfused...LOL...    It is always fun to build something from the past that you lived!!

Tony - Thanks.....ahhh, the lens secret.....paint the lens area with Alclad Aluminum or a shiny metallic. After it is dry I use Tamiya Clear Orange. I do not thin the jar and these Tamiya clear colors are thick. I carefully apply them to the lens starting in the middle and "pushing" it to the edges. I leave it as a "thick" coat of paint.

Let dry at least a day and you have a clear amber lens with a reflective background!! TADA!!

Works great for me!

Thanks guys

Rounds Complete!!

"The Moral High Ground....A Great Place to Emplace Artillery."

  • Member since
    March 2007
  • From: Michigan
Posted by tonka on Monday, September 20, 2010 12:21 PM

Mike, Happy Anniversary to you and yours!   Cake

great job on the Goat, only one issue I see, the TAC markings are not USMC,, I am sure this was just a slight oversight on your part! Stick out tongue

Seriously the deatil is great and the chain and padlock were a great touch. I can smell the fues and feel the vibration ! Yes

Kevin

]

  • Member since
    August 2008
  • From: S.W. Missouri
Posted by Pvt Mutt on Monday, September 20, 2010 12:19 PM

Chain it down? Must be a rough neighborhood there bro. You've done a lot of neat ticks on this but the thing that just jumped out at me was the amber color of those lights,perfect.

10 years of dating huh. One thing I found out after all the years i've had mine is once they hang their stuff in the closet it's hard to get rid of them.Wink

Congrates my friends

Tony LeeSmile

Shoot Low Boys They're Ridin Ponys

  • Member since
    October 2007
  • From: N.H.
Posted by panzerguy on Monday, September 20, 2010 11:50 AM

  Mike I freaking love it!  You've done one heck of a job on this one and can't wait to see it in person.

Great touch adding that chain on the steering wheel. The military's version of the 'club' Wink

"Happiness is a belt fed weapon"

  • Member since
    July 2006
  • From: New Jersey
Posted by redleg12 on Monday, September 20, 2010 10:42 AM

Gino - Thanks for stopping by and for the comments and congrats....you know she appreciates it!!

Nate - Thanks for stopping by and for the comments.

Kevin - Thanks for the comments. We will miss you this week!! As for the little lady....yep she is truly something special to deal with me this long Surprise    Thanks again

Karl - Always a pleasue to have you stop by. Thanks for the comments. Yes.....the base will get a little more "stuff" added. It has testure and is coated in MIG Dried Mud. I need to add some rocks and odd grass for some dimension. .......It's coming!!

Varnishe plaque surface.....Ick! not me....on the other have, scenery is not one of my strengths!!

Rounds Complete!!

"The Moral High Ground....A Great Place to Emplace Artillery."

  • Member since
    January 2007
Posted by the doog on Monday, September 20, 2010 9:59 AM

Outstanding work once again, Mike! This is one cool little bugger. That canvas top turned out great!

Nice WIP on an obscure subject! Just don't you dare leave this baby on a plain, varnished wood plaque! lol Surprise...Wink

  • Member since
    June 2005
  • From: Massachusetts
Posted by minimortar on Monday, September 20, 2010 9:31 AM

Deliciously outstanding there Mike!!! Love the canvas cover but the chain and padlock made me chuckle!  Nice touch that you never see in 35th scale (or any scale for that matter!)  and once again, you've caused another flashback to another time and place.

Happy anniversary too!!! I don't know how she's done it but she must be one fine woman! (I've got me one of them too!)

Have a good show this week!!!


Thanks,
Kevin Keefe

Mortars in Miniature
A Scale Model (Plus!) Collection of the Infantryman's Artillery

  • Member since
    August 2003
  • From: Connecticut, USA
Posted by Nachtflieger on Monday, September 20, 2010 8:37 AM

Looks great Mike.Yes That is so ugly, it's cool looking!Big Smile Congrats on your anniversaryBeer

Nate.


  • Member since
    December 2002
  • From: Valrico, FL
Posted by HeavyArty on Monday, September 20, 2010 6:10 AM

The Goat looks great.  Good job on it.  Happy Anniversary as well.

Gino P. Quintiliani - Field Artillery - The KING of BATTLE!!!

Check out my Gallery: https://app.photobucket.com/u/HeavyArty

"People sleep peaceably in their beds at night only because rough men stand ready to do violence on their behalf." -- George Orwell

  • Member since
    July 2006
  • From: New Jersey
Posted by redleg12 on Monday, September 20, 2010 5:35 AM

Pawel - Thanks for stopping by and for the comments

Rounds Complete!!

"The Moral High Ground....A Great Place to Emplace Artillery."

  • Member since
    May 2009
  • From: Poland
Posted by Pawel on Monday, September 20, 2010 4:25 AM

Oh yeah Mike, that's a really nice machine! Maybe I'll build one myself some day. Great job on this one, have a nice day

Paweł

All comments and critique welcomed. Thanks for your honest opinions!

www.vietnam.net.pl

  • Member since
    July 2006
  • From: New Jersey
Posted by redleg12 on Sunday, September 19, 2010 9:35 PM

Well  yesterday was my 28 wedding anniversary and really it is 38 as my better half and I went out for 10 years before getting married. The festivities slowed down bench time but not totally!!.

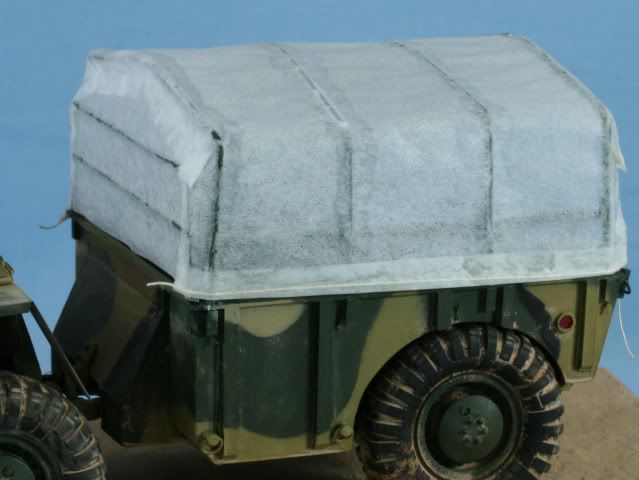
In order to cover the rear trailer section, I created a canvas. Using some airplane tissue, I measure and cut the canvas from the tissue leaving some excess for the edges. Next, creating small folds at each edge, I cut sections of ship rigging as the rope and filled the folds which were then sealed using landscape cement.

While that was drying I cut the front drape canvas from the tissue and applied it using landscape cement. With the front drape in place, I began installing the main canvas using landscape cement and working it down onto the bows. Once on the last work was the wrap around on the front and back, again held in place with landscape cement.  

Well after all that, here is the result
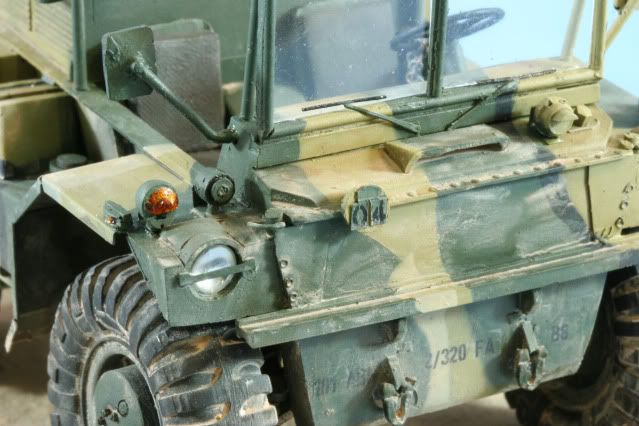
In between all the drying, I worked on some of the details for the front power unit. The kit was missing the front turn signals so I cast a set of turn signals and the side markers.

The bridge maker needed detail. The raised number cards and holder were cut from some label paper, applied and then painted. The numbers were applied from Archer number set, coated with future and then with flat.

The windshield wipers were from the PE set, and were painted the applied.
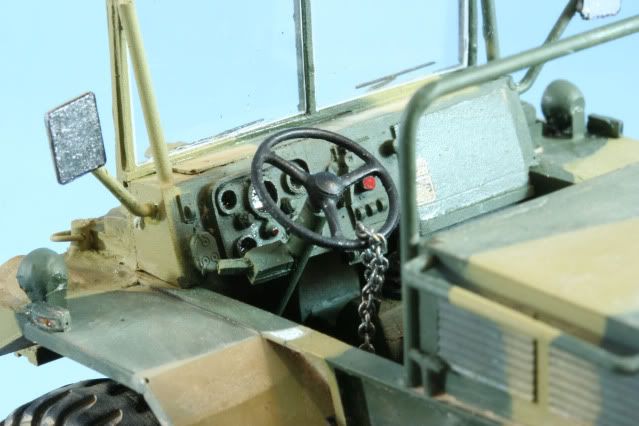
Inside I used silver leaf to create the mirrors and black marker to highlight the edge of the mirror.

The chain is from Michaels, painted steel using Alclad Steel, cut to length and glued to the floor and around the steering wheel. I also added a pad lock from a spare PE set.
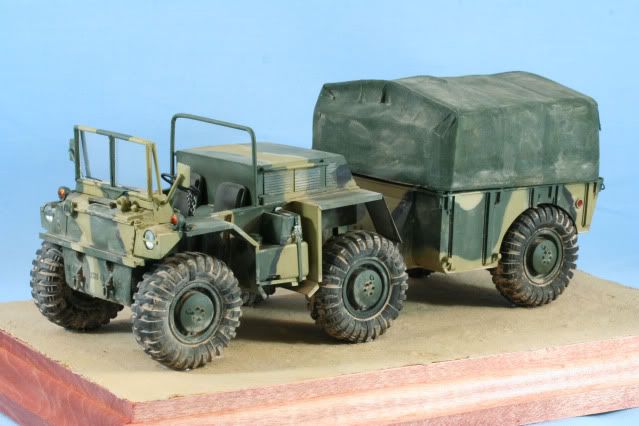
As you can see by the earlier shots, the goat is in the process of being weathered. First the tires were weathered using MIG Dried Mud. Next the underside was given a coat of pigment for weathering. Then the unit was glued to the mounting base.

With the model on the base, details were pin washed using MIG Dark Wash. Then the model was washed with a coat of MIG Light Grey for Green. Next began the pigment using MIG Dried Mud.

I still have some touch up and cleanup of the dust but here is where the goat is now.
I will post final “fire for effect” shots later this week….hopefully before leaving for AMPS East

As always, your comments either positive or negative are always welcome.

Rounds Complete!!


"The Moral High Ground....A Great Place to Emplace Artillery."

  • Member since
    July 2006
  • From: New Jersey
Posted by redleg12 on Tuesday, September 7, 2010 10:33 PM

Kevin

Thanks for stopping by and for the comments.....glad the silly putty is working for you!!

Rounds Complete!!

"The Moral High Ground....A Great Place to Emplace Artillery."

  • Member since
    March 2007
  • From: Michigan
Posted by tonka on Tuesday, September 7, 2010 8:12 PM

Details are looking great Mike! Yes

Glad you are back into it and good luck on finishing it for AMPS !

By the way ,,you were right earlier.......... The silly putty camo is so easy even a Marine can do it!! Stick out tongue

Kevin

]

  • Member since
    July 2006
  • From: New Jersey
Posted by redleg12 on Monday, September 6, 2010 1:22 PM

Thanks Bill.....This one is seaming to take forever....hoping to catch a wind accross the finish line soon.

Rounds Complete!!

"The Moral High Ground....A Great Place to Emplace Artillery."

  • Member since
    July 2004
  • From: Texas
Posted by wbill76 on Monday, September 6, 2010 11:08 AM

Sharp work on the details Mike, heading down the home stretch with this one now! Yes

  • Member since
    July 2006
  • From: New Jersey
Posted by redleg12 on Monday, September 6, 2010 6:32 AM

Kevin - Thanks.....you have not looked that good in years Surprise LMAO

Thanks again.

Rounds Complete!!

"The Moral High Ground....A Great Place to Emplace Artillery."

  • Member since
    June 2005
  • From: Massachusetts
Posted by minimortar on Sunday, September 5, 2010 11:18 PM

redleg12
http://i177.photobucket.com/albums/w226/redleg12/M56127.jpg

I'm at a loss for words here Mike, so I'll just post this photo...

Bow Down

Thanks,
Kevin Keefe

Mortars in Miniature
A Scale Model (Plus!) Collection of the Infantryman's Artillery

  • Member since
    July 2006
  • From: New Jersey
Posted by redleg12 on Sunday, September 5, 2010 9:17 PM

Ahhh…back to the bench after vacation….somewhat. Still trying to get caught up on chores and everything else, but I did make some progress on the details.

The driver’s compartment is sparse from the kit so I made some additions. Using Archer transfers dashboard gauges, I filled in the respective instruments. After the gages dried, I gave them a quick coat of future then a drop of CA glue to create a lens for each gauge.

Also using Archer transfers placard set, I added some of the “required” dash and shifter information and SN placards.

The kit comes with the windshield…but no clear for glass. I cut and added some .010 clear for the windshield.

After adding the kit shifters, some detail dash painting, this is what the dash looked like

The seats that come with the kit do not include cushions. I made cushions using air dry clay. After it was sized and shaped a fiberglass fabric is placed on top and wetted. Rubbing it on the surface and then removing the fabric leaves the fabric imprint in the clay. After the clay dried it was painted with Tamiya Khaki Drab. This shot the drivers back cushion is left out so you can see the difference.

The bumper decals for the front were added. These still need to be dulled.

On the side I made up the “NO STEP” (the kit does not include any decals) for the side of the bilge pump. Using the kit supplied PE, I then added the restraining straps for the bilge pump.

I am down to the short strokes at this point. Still need the steering wheel, add a chain and lock around the steering wheel, wipers, and front turn signals, then it is on to weathering and mounting.

Trying to get it done for AMPS East at the end of the month!!  Hopefully I don’t get inundated with chores!

As always, your comments either positive or negative are always welcome.

Rounds Complete!!

"The Moral High Ground....A Great Place to Emplace Artillery."

  • Member since
    July 2006
  • From: New Jersey
Posted by redleg12 on Tuesday, August 24, 2010 9:41 AM

OK....you jumped in while I was writing. Yep....I love my details!!!!!  I will be starting with the drivers compartment...

Yep.....grass caught on the trans axels....weathering will be fun with this guy!!

Rounds Complete!!

"The Moral High Ground....A Great Place to Emplace Artillery."

JOIN OUR COMMUNITY!

Our community is FREE to join. To participate you must either login or register for an account.

SEARCH FORUMS
FREE NEWSLETTER
By signing up you may also receive reader surveys and occasional special offers. We do not sell, rent or trade our email lists. View our Privacy Policy.