SEARCH FINESCALE.COM

Enter keywords or a search phrase below:

GERMAN RAILWAY GONDOLA TYP OMMR

43447 views
134 replies
1 rating 2 rating 3 rating 4 rating 5 rating
  • Member since
    March 2006
  • From: Right Side of a Left State
Posted by Shellback on Thursday, April 12, 2012 7:38 PM

deafpanzer

Your work reminds me of a lodge I stayed in Maryland years ago... floors and walls were made of wood.  You did GREAT!  Keep it coming...


Andy , was it a caboose ? Whistling

  • Member since
    October 2009
Posted by PANZERWAFFE on Thursday, April 12, 2012 2:38 PM

CARL - Working on the wood graining now for the gun deck.  Taking pics of each step and will post in case anyone is interested.  Figure pictures are better than words.  When I had first explained the process, had forgot one step Oops  That will be corrected with the picture show.

Will see what I can do about the refrigerated car...........

ANDY - "Penthouse" it is.  Almost ready for you to move in.  Thinking I should come up with some gear and what not to put in there before putting the overhead deck on, will see?  Glad you like the scratch work.  This work was not too difficult due to I already had and used the correct shape and size of Evergreen styrene.  Just had to cut everything to the correct length and attach into place.

DISASTER - I'm surprised at how much feedback I'm getting with this build, was not sure if there was going to be much interest not truly being an armor piece.  Happy to hear that I could inspire someone who inspires so many.  It would be fun to watch you work your sprue juice magic one one of these railcars.  Thank you for the great comments.

How is your 4502 coming along?  Knew you were working on it, is there any pic's out yet?  I don't want to miss it.

WBILL - That answer helps indeed, just the answer I was looking for.  Many Thanks Yes  I now just have to decide what the scenario of the scene will be.  The overall plan with the train is still real early in the planning stag but it's out come will largely depend on what / how the Pz III's will be represented and since they will dictate  the theme so much, I really appreciate you filling in the answers Beer

DOOG - It's great too have you stop in.  Thank you very much for the comments.  This is my first exploration into these railcars and I have to admit, have been enjoying working on it.  Glad you too like the wood effect.  After playing around with it for a while was surprised at how easy it was to achieve the effect.  As mentioned, will show the process on my next post.


Thanks to all for looking and for your comments Beer

Rob

  • Member since
    January 2007
Posted by the doog on Wednesday, April 11, 2012 4:59 PM

Man, this is just STUNNING. Bow Down

That wood is just a home run outta the park! Great work!

A very unusual and compelling project, for sure. You're doing some awesome detailing and painting here!!!

  • Member since
    July 2004
  • From: Texas
Posted by wbill76 on Wednesday, April 11, 2012 10:04 AM

Rob,

Your question has a two-part answer....if it's a "factory depot" setting where the tanks are shipping out for delivery to units in the field, they wouldn't yet have any tactical markings applied as that would be done by the units in the field. If you want to show an established unit on the move, then they would all have the same divisional/tactical markings but different turret numbers. The turret numbers would likely all start with the same first digit (like 3 or 5) for example to denote they belonged to the same company (you could even go further and have the second digit match as well to show they were from the same platoon) as it was common for units to entrain as entities to make it easier when they offloaded to stay organized and move together as a unit. HTH!  

  • Member since
    July 2003
  • From: On my kitchen counter top somewhere in North Carolina.
Posted by disastermaster on Tuesday, April 10, 2012 11:13 PM

http://t3.gstatic.com/images?q=tbn:ANd9GcT00Y3T1E7lA8R3i_OPIaYnDs8fX1TpgMvqKxoIvimuGHQgeaXxSAY6 Aw crap, now you got me wanting to do one of    these......

  http://www.gif-mania.net/animated-signatures/img/attente.gif  .........and I'm still working on my 4502.

        Now THIS is what inspiration is about.

             Some really superior woodwork and detail here.

                   You go man.........

Sherman-Jumbo-1945

504 Gateway Time out


  • Member since
    April 2009
  • From: Carmel, IN
Posted by deafpanzer on Tuesday, April 10, 2012 10:44 PM

Great scratch building result! Beer I am going to call that space the 'penthouse'... isn't that normally the best room in the building?  

Andy

  • Member since
    March 2006
  • From: Right Side of a Left State
Posted by Shellback on Tuesday, April 10, 2012 9:46 PM

Nicely done Rob . Yes I'll remember your wood graining technique .

Hope you find a refrigerated rail car to hall my beer ........Beer......you can leave Andys beer out in the sun .Whistling

  • Member since
    October 2009
Posted by PANZERWAFFE on Tuesday, April 10, 2012 9:00 PM

CARL - Thanks buddy Yes  I had to build this train car so that I could move you and Andy's Beer around.

WBILL - Good to hear you like the frame work.  Question for you or for anyone who may have a suggestion: This is for later on when I get around to the flat cars.  Have 3 flat cars that will be attached to this gondola and each car will have a Pz III on it so what would the numbering on the tanks be?  Meaning would they be in sequential order or what / how would they be represented?  I'm assuming the Pz's would be leaving a factory or a unit would be moving to a new position at the front so the tactical numbers would would have to represent them belonging all to the same group.  Any suggestions?

ERIC, REDLEG - Thanks guys Yes  Have the gun deck left to get the wood treatment and then will revisit the car as a whole and give it some heavy grim to finish off the wood / car.  Stay tuned, it's great to have yall along for the ride.

ANDY - Are you sure it was Maryland or was it on your way to the Eastern front Hmm  Glad you like.


The update does not look to busy but a little time was put in to cut and texture all of the gun deck boards.  Wanted to of course try to match the kits supplied boards and what I had come up with is:  Used some Evergreen .015 x .188" strips, that measures out to 3/16" wide and that is the exact same width of the kit boards Yes  Then used a razor saw and drug it across the styrene strips to give it texture.  After texture then cut 21 boards and made the deck. 

In order to get the proper board placement and spaces between the boards, had taped down a small carpenters square and placed tape with the sticky side up to the bench.  Now took the boards and laid into position and used a razor for the spacing between the boards.

Now that all the boards are in place had then used .022 x .066" strips and glued 2 of these at equal distances on the bottom to hold the boards together.  Let dry and this is how it came out.  Not sure if you will be able to see the wood grain in the pic but it's there and should show much better once painted.

The deck has now been prepped and a coat of MM wood has been applied.  Will let that dry overnight then it will receive the same wood technique as the rest of the wood has.

Can now get a better idea of how things will look with the deck temporally in.

Until next time Beer


Rob

  • Member since
    July 2006
  • From: New Jersey
Posted by redleg12 on Tuesday, April 10, 2012 7:55 PM

DAM NICE WOOD......Nuff Said

Rounds Complete!!

"The Moral High Ground....A Great Place to Emplace Artillery."

  • Member since
    April 2009
  • From: Carmel, IN
Posted by deafpanzer on Tuesday, April 10, 2012 10:44 AM

Your work reminds me of a lodge I stayed in Maryland years ago... floors and walls were made of wood.  You did GREAT!  Keep it coming...


Andy

  • Member since
    March 2003
  • From: Rain USA, Vancouver WA
Posted by tigerman on Tuesday, April 10, 2012 10:39 AM

Just love that wood detail.

   http://i7.photobucket.com/albums/y269/wing_nut_5o/PANZERJAGERGB.jpg

 Eric 

  • Member since
    July 2004
  • From: Texas
Posted by wbill76 on Tuesday, April 10, 2012 10:03 AM

Beat that sucker into shape Rob! Nice fix on the framing and the gun platform is shaping up nicely. Beer

  • Member since
    March 2006
  • From: Right Side of a Left State
Posted by Shellback on Monday, April 9, 2012 10:56 PM

Good griefe Rob thats comin out great !Yes

  • Member since
    October 2009
Posted by PANZERWAFFE on Monday, April 9, 2012 10:20 PM

TREAD - Thanks buddy!  Good to "see" you.

OK, a little bit more.  Painted the gun deck frame work.

This was just a simple frame sense it would not really be seen but have had so concern with the deck possibly sagging in the middle with no support.  Have added a center support beam.

My original idea was to put the front side cross bracing on both sides but after some thought had decided to leave the side you see on the right open.  My thought process is if there was a crew in the car on a long ride....were would they stay to relax and get out of the elements?  Leaving the cross members out allows access under the gun deck and figure this space can be used for crew quarters and gear / stowage.  Not sure how realistic that would be but that was the thought.

Rob

  • Member since
    September 2005
  • From: beacon falls , Ct.
Posted by treadwell on Monday, April 9, 2012 9:09 PM

Man Rob.....very cool : )


  • Member since
    October 2009
Posted by PANZERWAFFE on Monday, April 9, 2012 9:06 PM

GUN TECH - Thanks for those comments and good too hear you like.

WAYNEC - Sounds like you have a lot going on at the bench.  Think the railbed looks good and your Baureihe 52 looks GREAT!  Thats the locomotive I have but in 1/35 will use your tips when construction begins on it.  It looks to be quite intense in the box.

CARL - That's alright too say "You like my wood"  Thanks buddy.

ANDY - Quit drooling on my wood, you'll make it swell.

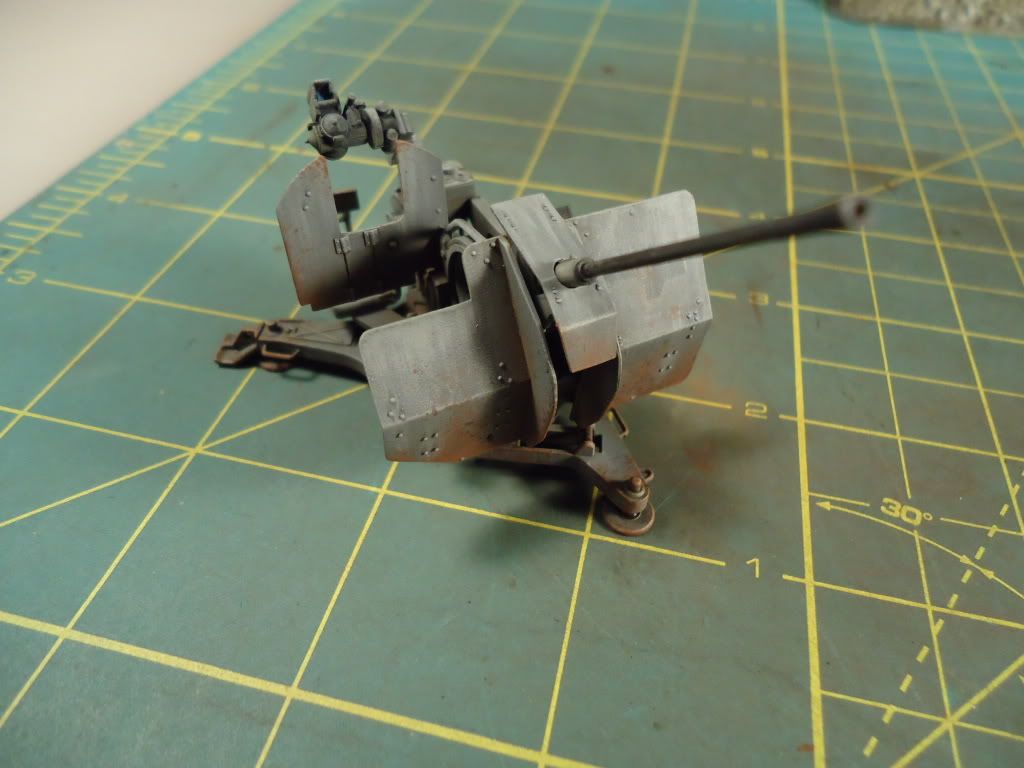
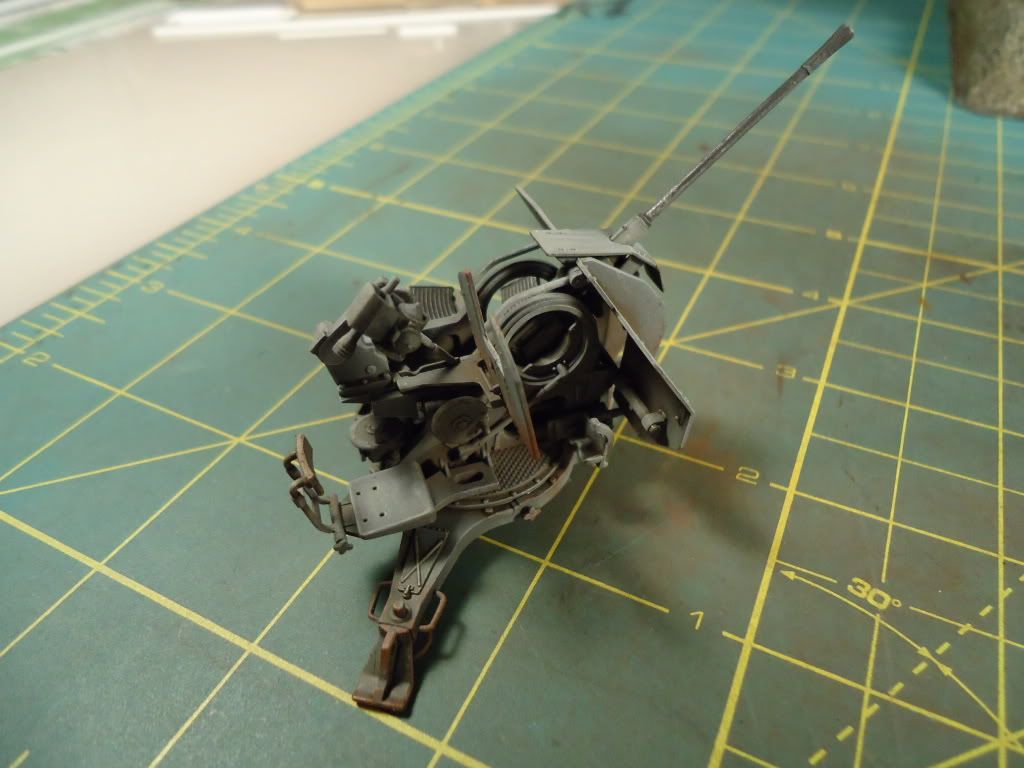
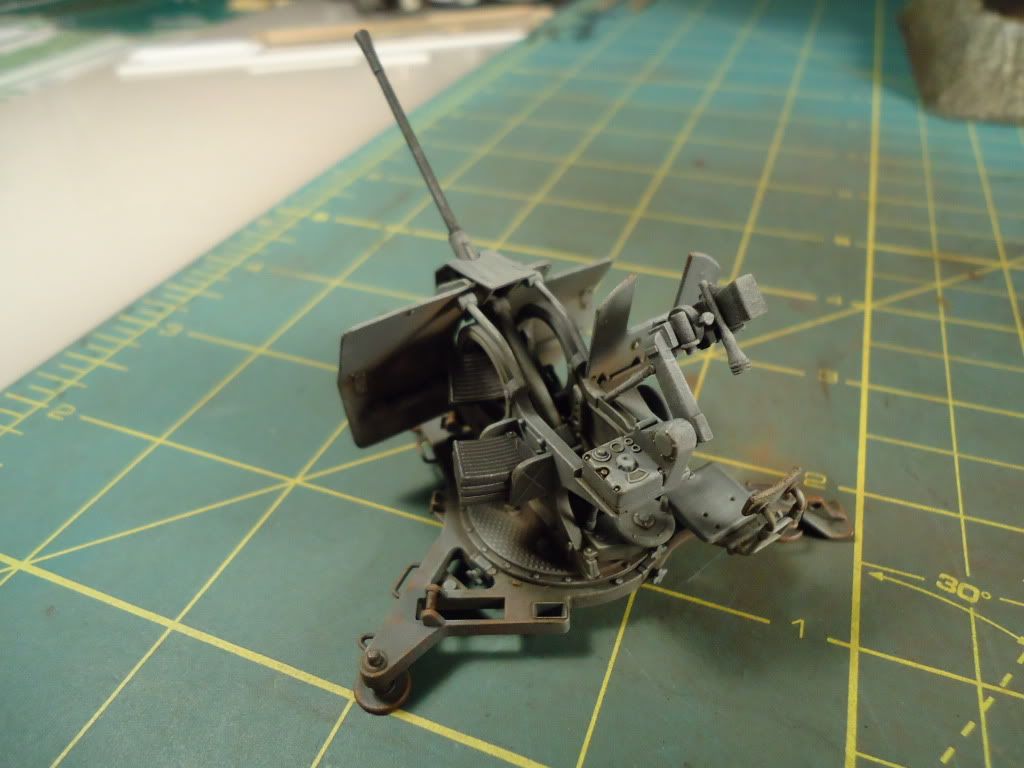
Have not had much time at the bench lately but have done some here and there.  Will start with the Flak gun.  Painted and some light weathering may go back later and weather a bit more, dont know, but will see how the rest of the build progresses first.

After the gun went ahead and attached the car sides onto the bed.  I now know why maybe you do not see many people finish these Gondola kits.  The sides did not go on easy and actually had to remove all of the side beams, bend some and manipulate them into position once the wood section had already been glued onto the bed.  Also had to cut off all the locating taps from the beams.  It was a real challenge to get the sides erected and attached.  They came out all right but not as good as I had expected.

Any flaws that may be there I'm not to worried with because the weathering that is to come should cover any that may be there up.  I figured that these cars are actually really dirty.  In the picture above you may have seen some stuff going on in the inside of the car.  The frame work for the "gun deck" has begun.  Here some views from the inside of the car.

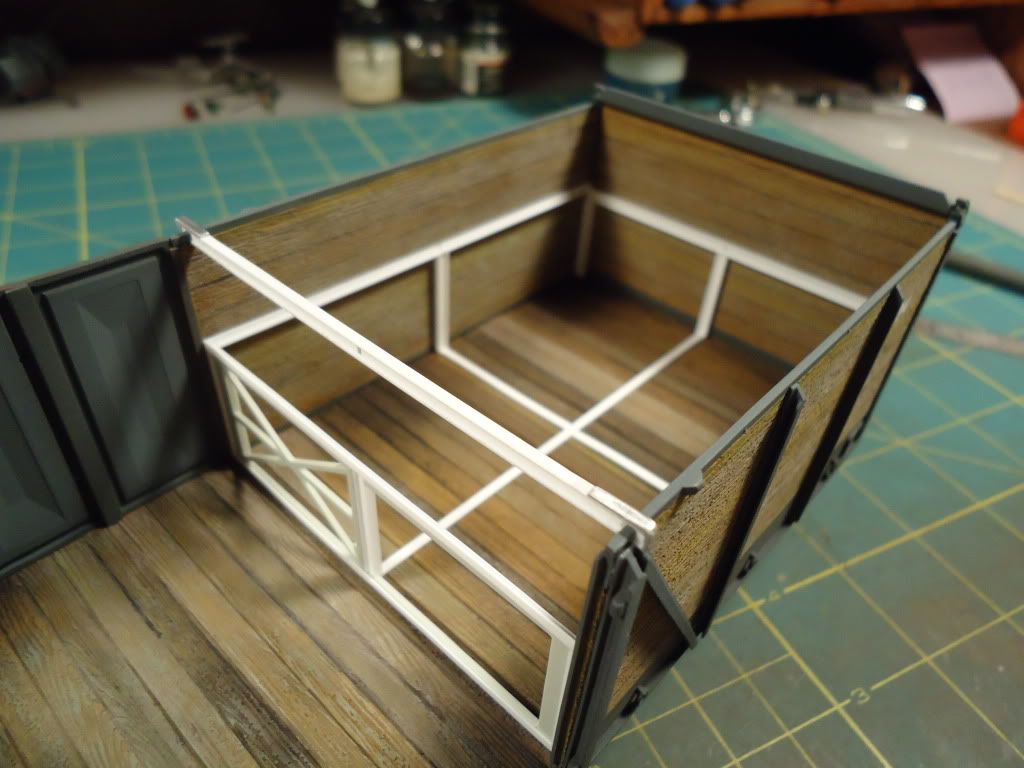
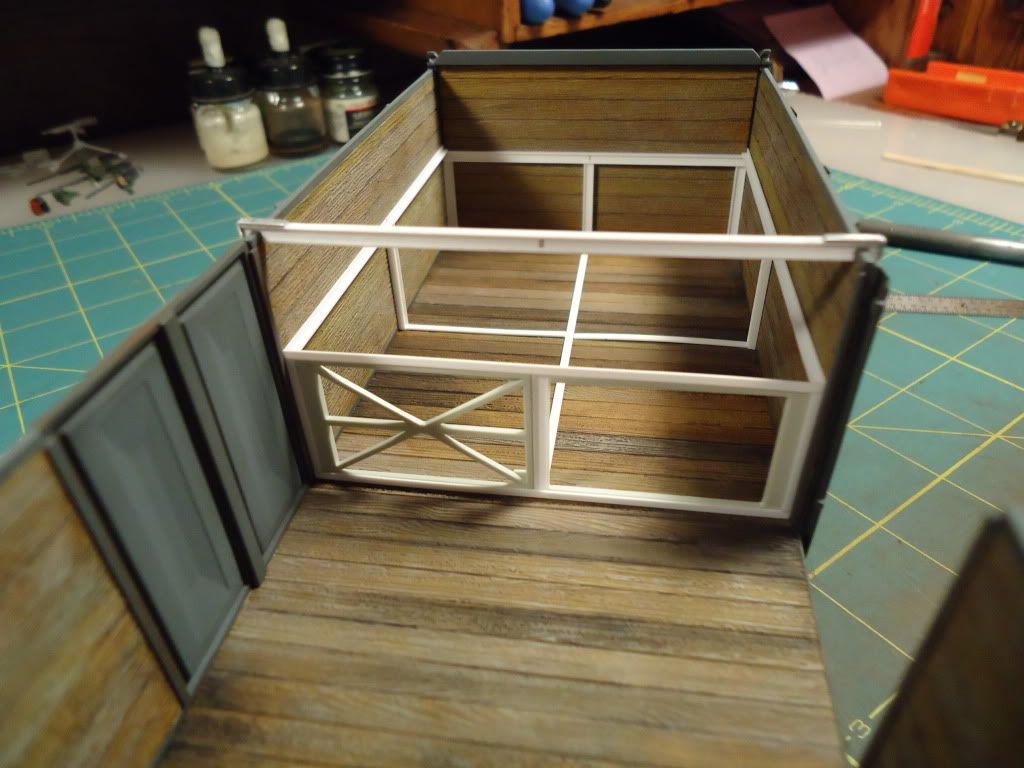
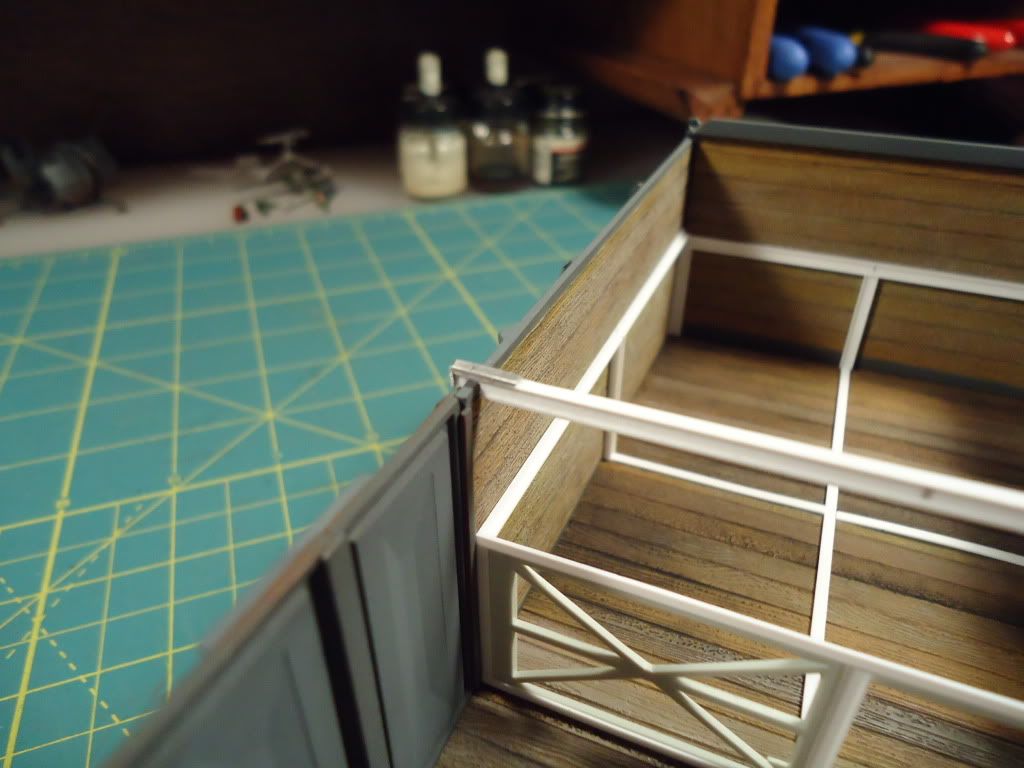
Back too the problem with the sides giving problems, well that made them not square with the bed and the tops bowed out something awful.  To fix this had made the beam seen going across the car and it had a notch cut out on each end and that would hook onto the sides of the car pulling them together.  There was too much pressure for the thin styrene and it was bending / warping the beam and it's ends.  To fix this had made some aluminum end caps and fixed them to the ends of the beam, that solved the problem.  Can see the end caps in this picture:

Thats it for now.  Will get some more pictures up soon.

Thanks to all for looking.

Rob

  • Member since
    April 2009
  • From: Carmel, IN
Posted by deafpanzer on Monday, April 2, 2012 10:24 PM

Catching up here... it still makes me drool every time I look at your work on the wood.  Nice work on the flak too!  

Andy

  • Member since
    March 2006
  • From: Right Side of a Left State
Posted by Shellback on Monday, April 2, 2012 10:12 PM

Rob , i didnt say it b4 , but thats some nice wood man ! OopsHmm Thats ok to say i think ...........Toast

  • Member since
    April 2006
  • From: Denver, Colorado
Posted by waynec on Monday, April 2, 2012 9:39 PM
mine is partially done. i think the dragon kit has a more detailed undercarraige which no one will see. it's on hold as i finished or will have finished this week my 1/35 MAS (ship forum), 1/72 k-5 rr gun (get 'er done group build), me-163, LAV-III and COUGAR (armor forum). i hand brushed it after it was together. bad move lots of hard to get to nooks and crannies. see lessons below. i will post some pics by end of the week. this is my first rail bed which i will use for 1/72 k-5. o guage rail, basswood ties ballast on top of modeling clay. (NOTE PAINT MODELING CLAY CLOSE TO BALLAST COLOR SO THE BLUE CLAY DOESN'T SHOW THROUGH GAPS IN THE BALLAST.) they may make them but i think they are still attached to the plastic ties. i will investigate further. i have not built the big locomotives yet, just 3 1/72 and 1/87 locomotives. WHAT I LEARNED DOING RAILROAD STUFF: 1. patience. 2. really look at the instructions to figure out what can be put together before painting and what has to be painted before assembly 3. don't put all the fiddley stuff like ladders, lights, etc on until major construction and painting is done. keeps it from getting broken. 4. on 1/35 be very careful building the couplers. they should be completely moveable in order to couple cars together. in 1/72 thet tend to be one piece so that is not an option. look at how some of these guns are mounted on trucks. looks like you take the feet off so the bottom is flush, brace on both dsides of the legs with lumber and maybe BIG u-bolts through the deck.

Никто не Забыт    (No one is Forgotten)
Ничто не Забыто  (Nothing is Forgotten)


  • Member since
    August 2006
  • From: Oromocto, Canada
Posted by Gun Tech on Monday, April 2, 2012 7:35 PM

Rob,

I am utterly speechless...  That wooden effect is simply amazing!!! Yes


BRAVO!!!!!

Jean-Michel    "Arte et Marte"

  • Member since
    July 2004
  • From: Texas
Posted by wbill76 on Monday, April 2, 2012 7:21 PM

Rob,

That pic is of a Flak 30 and they were commonly fielded without splinter shields regardless...one of the reasons the Flak 38 did get them...the crews were awfully exposed otherwise as you can see! Wink I would suggest sticking with the shields...if for no other reason than it gives you some more "canvas" to work with in terms of painting/finishing.

  • Member since
    October 2009
Posted by PANZERWAFFE on Monday, April 2, 2012 7:00 PM

ERIC - Thanks for helping me stay on track.

WBILL - Thanks for the input.  That was on the same lines I was thinking.  My only concern would be is if it really should have the splinter shield on or not?  Have seen them with the shields on flat cars but not sure about these taller gondolas.  Don't think it would make any difference if it was a tall or short car as long as it had enough room to traverse 360 as you had pointed out.  I'm still going with the shields unless anyone knows any better.  Went back searching for pictures and this is the closest thing I could come up with on a high sided car.


Have been detailing the Flak Gun, will get pic's when finished with it.

Rob

  • Member since
    October 2009
Posted by PANZERWAFFE on Monday, April 2, 2012 6:45 PM

WAYNEC - Have not tried any of the Trump kits yet though I do have a few in the stash.  You say you have a start on yours, sure would like to take a look.  The low sided car sure would make things easier for mounting an anti-aircraft gun of any type in.  Have found a few pictures on line of the low sided car with the 20, 37, and a lot of quad mountings.  That will be quite the job to lay all of that track.  Not sure how to make the rail holders?  Could be wrong but I believe either Dragon or Trumpeter makes them as an accessory kit?  Will have to take a look.  I too have thought about laying my own track when ever I get to a permanent location but for now will just use the kit supplied ones.  Have you built up any of the Trumpeter locomotives in 1/35?  OH yea, thats alot of cars....12' - 14' !

This is how I painted the wood:  All MM enamel paints.  Base coat of WOOD 1735, a few small random spots of MILITARY BROWN for an addition to the base coat.  Light wash this with Winsor & Newton RAW UMBER.  Heavy dry brush (almost paint them) random boards with LIGHT SEA GRAY and then go back over all the boards lightly, dry brush LIGHT GRAY.  Use the W&N RAW UMBER again and pin wash the lines between the boards.  Thats it for paint, now the fun part is using MIG pigments.  I used 2 different pigments, P023 BLACK SMOKE and P039 INDUSTRIAL CITY DIRT.  Put these pigments on at your discretion and use rubbing alcohol as a carrier.  Thats it, let me know if you have any questions when you try it.

Rob

  • Member since
    April 2006
  • From: Denver, Colorado
Posted by waynec on Sunday, April 1, 2012 9:47 PM
i have the trumpeter version of this kit partially built. i will use your techniques for the wood. that looks really nice. i will put the sides on since i have a low sided car too. the single 20mm is a good choice, maybe even a 37mm. the quad 20mm gun would fit but there are too many crew members which us why thay didn't stay long on u-boats. i will be laying my own track. already did this with 1/72 br-52 and k-5. i use o scale rails and basewood with a miter saw to cut the ties after staining the entire strip(s). at 1/72 i can spike the rails but at 1/35 i am going to have to figure out how to make a boat load of german rail holders since i probably have 12'-14' of 1/35 rolling stock and locomotives.

Никто не Забыт    (No one is Forgotten)
Ничто не Забыто  (Nothing is Forgotten)


  • Member since
    July 2004
  • From: Texas
Posted by wbill76 on Sunday, April 1, 2012 11:07 AM

I like the idea you're heading in with this one Rob, the 2.0cm Flak 38 was often used in this kind of an ad-hoc role. Just a thought in terms of the platform, make sure there's enough room for 3 crew members to work/serve the gun (gunner, spotter, ammo loader) effectively and you should be golden with the concept! The width of the car should be sufficient to allow the gun to rotate cleanly through 360 degrees even with the splinter shields fitted so you have some options as to how high to mount the platform within the bed. Stock the car with plenty of ammo and you should have a nicely occupied space while still showing off some of that awesome wood work! Yes  

  • Member since
    March 2003
  • From: Rain USA, Vancouver WA
Posted by tigerman on Sunday, April 1, 2012 3:37 AM

I like the idea of a 20mm. I was thinking maybe a couple of MG-34's, but I think you're on the right track.

   http://i7.photobucket.com/albums/y269/wing_nut_5o/PANZERJAGERGB.jpg

 Eric 

  • Member since
    October 2009
Posted by PANZERWAFFE on Sunday, April 1, 2012 1:47 AM

Yes, wasn't very sure if it should have been in here with armor but now with the Flak Gun it fits right in.  Much later on when I get to the other cars it will all make a little more since being here.  Have a few other cars that will be transporting Pz III's and they will be connected to this car along with the engine and another flat car.  Beside this train I may put my armored train on the track next to it?  Thats all a long way from here now so will just have to see how it all pans out.  With all of that said, thats another reason had wanted to arm this gondola car.  With a full load transport figured it would need some air protection.

Thanks for taking a look Yes


Rob

  • Member since
    March 2006
  • From: Right Side of a Left State
Posted by Shellback on Sunday, April 1, 2012 12:36 AM

When i looked at this the other day i was thinking "what would make this a piece of armor ? " A gun !Yes

  • Member since
    October 2009
Posted by PANZERWAFFE on Sunday, April 1, 2012 12:18 AM

CARL, ERIC - Yes

WBILL, ANDY - Thanks guys Yes

Was going to add those fresh oil stains that I had mentioned and throw some barrels and just junk in the car..........after thinking for a while figured that was a waste of a gondola car and it needed to be carrying something?????

This is what I came up with.

There is not much for parts or really a build progress for this little fellow so just slapped it together real quick.  Here are the sprue's.

It had a fair amount of detail and the fit was really good.  There were no big problems but care had to be taken removing and cleaning some of the small and fragile parts.  Everything is out of the box and the only mod I did was to drill out the sight telescope tube.  Even on something this small I normally paint things as I go but this time, the first time, I just built everything first.  I did leave the shields off for now to make it easier to paint.  Here she is built.

This is the basic concept.

Now since the gondola has the high sides I figured I will have to make a platform for the Flak Gun to sit on.  Had first thought of making a grate like platform so that you could still see the wood planking underneath but thought that would not be correct.  Will just build a wood planked platform for the gun.  Picture below you can see how high the sides are compared to the Flak Gun.

I'm thinking of going 4 boards from the bottom to put the platform in.  That should provide enough hight and not give any interference to the gun but still give the gun crew some protection.

More to come.

Rob

  • Member since
    April 2009
  • From: Carmel, IN
Posted by deafpanzer on Wednesday, March 28, 2012 7:25 PM

DittoDittoDitto  Wood just look great and very realistic!  Just found this... now you have my attention! Beer

Andy

JOIN OUR COMMUNITY!

Our community is FREE to join. To participate you must either login or register for an account.

SEARCH FORUMS
FREE NEWSLETTER
By signing up you may also receive reader surveys and occasional special offers. We do not sell, rent or trade our email lists. View our Privacy Policy.