SEARCH FINESCALE.COM

Enter keywords or a search phrase below:

Neubau-Fahrzeug Nr. 3-5 Finished! 05-12-13

19997 views
146 replies
1 rating 2 rating 3 rating 4 rating 5 rating
  • Member since
    July 2004
  • From: Texas
Neubau-Fahrzeug Nr. 3-5 Finished! 05-12-13
Posted by wbill76 on Sunday, December 16, 2012 6:56 PM

I received DML's kit #6690, the Neubau-Fahrzeug Nr. 3-5, as an early Christmas gift so figured I would get started on it for the holiday season.

Got this one off and rolling with the usual hurdle coming first in the form of the road wheels. The Germans were suckers for lots of wheels and the Neubau doesn't disappoint in that area. Beginning with Step 1, I cleaned up the mold seams on each of the wheel halves with a sanding stick and assembled the pairs. 11 main wheels per side plus 1 idler pair plus 4 return rollers made for no less than 32 wheels per side or 64 in total. The sprockets were also assembled at this point to go with everything else.

Those wheels will need to be painted prior to installation into the suspension due to the way the suspension is designed which is what is addressed in Step 2. The vast majority of parts in the kit are devoted to the suspension (and tracks) due to the vehicle's design. This step calls for the construction of the wheel pairs and their installation into the long plates that go into the hull sponsons. I checked to see if it's possible to add the plates without the wheel pairs installed and the design doesn't allow for that, so the plates were left uninstalled until after the wheel pairs are painted and installed. I did assemble the bogey halves, the instructions contain an error in that the parts should be paired up with D11 going with D23 and D12 going with D24. I also added the mount halves for the large idler wheel that support the 11th wheel on either side.

Step 2 also adds the sprockets and their capture plates as well as a couple of hatches for the sponson sides. Step 3 adds the hull belly plate to the large one-piece hull and also adds the rear plate and some other small details like the access hatch, brake light, and tow points.

That's as far as things got for this round, next up will be doing the paint work and detailing on the suspension.

  • Member since
    May 2005
  • From: Dublin Rep Of Ireland
Posted by terry35 on Sunday, December 16, 2012 8:33 PM
Excellent choice, I have the trumpeter one, wanted to do this vehicle for years, but the only choice was from Cromwell.
Well good luck with this build Bill.

Regards,

Terry.

  • Member since
    September 2005
  • From: beacon falls , Ct.
Posted by treadwell on Sunday, December 16, 2012 9:44 PM

Hi Bill Smile

This should be cool  Smile

I know the Germans only built about 5 of these guys, and it is very  'old school ' for their way of thinking and the way they actually progressed.  

In your WIP pictures, the unfinished hull resembles a Char B1  (not the B1 bis, but the earlier one )

Looking Good !

Gotta get back to the NFL...New England is getting their butt handed to them in a basket !

treadCool


  • Member since
    September 2006
  • From: Australia
Posted by Blitzwing on Monday, December 17, 2012 1:05 AM

I was dying to get this kit when it first came out but the thought of all those road wheels scared me off. I'm looking forward to seeing this one come together.

URL=http://picasion.com/]

  • Member since
    July 2004
  • From: Texas
Posted by wbill76 on Monday, December 17, 2012 11:02 AM

Terry

glad to have you on board! I never thought we'd see a single kit of this vehicle in styrene nevermind have 3 different kit makers fighting over it (Dragon, Trumpeter, Amusing Hobby)!

Tread

you're right, total of 5 vehicles with Nr 1 and Nr 2 having different designs while 3-5 were the same and represented by this particular kit. Easy to see why this one proved to be a dead-end...complex, heavy, but not well protected/armored and prone to mechanical troubles! It definitely has that mid-'30s 'land-ship' type of feel to it. The Pats-Niners game was a wild one and fun to watch...may be a preview of the Super Bowl, you never know!

Blitzwing

the suspension is definitely one that requires some thought and attention. I sat and fiddled with it for a good hour or so before deciding on the best course of action for assembly and painting. Hope I made the right call! Big Smile
  • Member since
    April 2007
Posted by tenthumbs on Monday, December 17, 2012 9:03 PM

Bill, thanks for braving new ground, It will be great to see you work your magic. Dan

  • Member since
    January 2007
Posted by the doog on Monday, December 17, 2012 9:38 PM

Good lord-and he's off and doing another one! No pause, no breath, onward, onward onward!!

WOW! You work quickly, Bill! Looking good already!

  • Member since
    April 2007
  • From: Schroon Lake, NY
Posted by SMJmodeler on Tuesday, December 18, 2012 8:46 AM

Hey Bill!:  Another TANK VARIANT!?!?!  How many did the Germans produce?  Cool looking build...just wanted to drop by so I could follow along.Yes

  • Member since
    March 2003
  • From: Western North Carolina
Posted by Tojo72 on Tuesday, December 18, 2012 8:59 AM

Well this is interesting,not one you see everyday.

  • Member since
    December 2002
  • From: Bury St Edmunds, Suffolk, England
Posted by Bish on Tuesday, December 18, 2012 9:19 AM

Looking forward to watching this. Still haven't got one of these kits yet. I think i need to add one soon.

64 wheels, makes a Pz IV look like a breeze.

I am a Norfolk man and i glory in being so


On the bench: Airfix 1/72nd Harrier GR.3/Fujimi 1/72nd Ju 87D-3

  • Member since
    May 2005
  • From: Dublin Rep Of Ireland
Posted by terry35 on Tuesday, December 18, 2012 10:23 AM
Hi, Bill just checking back, I need to check it out properly but I think that when these vehicles were sent to Norway it was the first numbers that were only mild steel prototypes and the other 3 armoured, another point is the secondary turrets, on some they only look like pz.I but are different in that they only have one MG.
I'm just rambling off the top of my head such is my interest in this wonderful vehicle, you know I love oddball stuff and it does not get any better than this baby, considering it was also called the panzer VI long before the Tiger, lord I could ramble on all day but the small screen on the iPhone puts manners on me.

Keep up the good work and pace.

Terry.

P.s the Main armament arrangement on the main turrets are also different I think between Alkett and Rhinemetal?

  • Member since
    July 2004
  • From: Texas
Posted by wbill76 on Tuesday, December 18, 2012 10:49 AM

DanBeer thanks for following along!

BeerKarl

It only seems fast because you caught this one and the T-34 in the same pass...but there's actually been a two week delay between the two projects and I've only managed to get 5 builds done in total this year, so definitely down from past years although an improvement over 2011 when I finished only 3! Smile

Steve

That's the beauty (or curse!) of German armor...so many different vehicle types and so little time to model them all!

Anthony

Yep, it's a wierd one...but at least it did see some combat even if it was limited and not very renowned!

Bish

This one will definitely put you in road wheel purgatory but worth it considering the uniqueness of the subject IMHO. You should get one!

Terry

It's a fascinating subject with a lot of info available unlike some of the other designs the Germans played around without throughout the course of things. The first 2 vehicles were mild-steel and had different turret designs and gun arrangements (one had an over-under design, the other a side-by-side but different from that on the 3-5 vehicles) while 3-5 were the same design and were armored.

The Krupp MG turrets are indeed a spin-off of the Pz I style turrets (Krupp designed those as well) being roughly the same size but only 1 MG and different hatch and viewport arrangements. It's one of my favorite oddball designs for many reasons...and the Pz VI designation definitely has caused some confusion among modelers over the years before the Neubau-Fahrzeug designation became accepted.

  • Member since
    July 2006
  • From: New Jersey
Posted by redleg12 on Wednesday, December 19, 2012 5:24 AM

Wait....wait....this was supposed to be the Bill Xmas build....sneaking out early....

Rounds Complete!!

"The Moral High Ground....A Great Place to Emplace Artillery."

  • Member since
    July 2012
Posted by Hasenpfeffer on Wednesday, December 19, 2012 9:26 AM

Hey Bill,

I'll be following along as I find this vehicle intriguing... nothing like a Christmas Neubau, right? Yes

I'll be particularly interested in how you pull off the construction/painting as this one looks quite challenging. 

(It looks like Dragon puts out one of these thru CyberHobby as well, but looks more expensive and harder to find. Strange since they are probably ~90%+ identical...)

  • Member since
    July 2004
  • From: Texas
Posted by wbill76 on Wednesday, December 19, 2012 10:58 AM

Guilty as charged Mike! Have to take advantage of bench time when it comes available! Smile

Dave

Glad to have you along! The CH kit is of vehicle Nr. 2 and has a different turret but otherwise it's pretty similar!  It's more expensive because of the 'white box' limited one-time production run nature of the kit and the fact that there was only 1 vehicle produced like this, making it a true 'one-off'! Beer
  • Member since
    December 2002
  • From: Bury St Edmunds, Suffolk, England
Posted by Bish on Wednesday, December 19, 2012 11:08 AM

I have just seen the white box CH kit on Hannants. I didn't realise it was the earlier one and was a bit confused. I think i will deffinatly get one of these Dragon ones. There seem to be a few on E-bay still.

I am a Norfolk man and i glory in being so


On the bench: Airfix 1/72nd Harrier GR.3/Fujimi 1/72nd Ju 87D-3

  • Member since
    July 2012
Posted by Hasenpfeffer on Wednesday, December 19, 2012 11:13 AM

Thanks for the explanation Bill. I don't think I would have ever realized the difference without a lot more research...

Bish, if your looking for the Dragon version, I saw that Dragon USA has it in stock for $40 (usually $65)...

  • Member since
    December 2002
  • From: Bury St Edmunds, Suffolk, England
Posted by Bish on Wednesday, December 19, 2012 11:40 AM

Thanks Dave, i will check it out. It will depend on the postage and if i get slapped by customs as to if its worth getting it from overseas.

I am a Norfolk man and i glory in being so


On the bench: Airfix 1/72nd Harrier GR.3/Fujimi 1/72nd Ju 87D-3

  • Member since
    July 2004
  • From: Texas
Posted by wbill76 on Friday, December 21, 2012 5:38 PM

Hope you're successful Bish! I've always had a soft spot for the pre-war/early-war tank designs myself and never ever thought I'd see the Neubau done in styrene...nevermind by three different kit makers! Smile

  • Member since
    December 2002
  • From: Bury St Edmunds, Suffolk, England
Posted by Bish on Saturday, December 22, 2012 1:56 AM

There seems to be a few on there, so hopefully shouldn't have a problem. And i know the feeling. I was rather pleased when i saw this released.

I am a Norfolk man and i glory in being so


On the bench: Airfix 1/72nd Harrier GR.3/Fujimi 1/72nd Ju 87D-3

  • Member since
    July 2004
  • From: Texas
Posted by wbill76 on Sunday, December 23, 2012 1:39 PM

After studying the rest of the hull construction steps and wanting to avoid having to do multiple paint-work sessions, I decided to go ahead and install as much as possible on the hull first before starting to paint.

So of course that lead me to continue on from the last update and add the details from Step 5. This includes all the driver's area hatches and the left side hull hatches as well as the front headlight. The option is given to pose it raised or lowered and since the kit provides a clear lens, I opted to pose it raised. The grab handle for the driver's hood hatch needed a little bit of putty help as the holes provided are slightly larger than the handle bases. The track installation called for in this step was skipped for now.

Steps 6-8 deal with the fenders and also adds details to the right hull side that more or less mirror what was already on on the left hull side. One little difference is the need to drill out a hole in the turret ring base to take the 2nd width indicator light, this is a little tricky as you have to guesstimate where the hole should go and you should NOT drill the hole all the way through the hull in order for the light to sit at the right depth to match the other side. I used a #76 finger drill for that purpose.

I cleaned up the fenders and did a test fit with some poster putty to see how they would sit and whether or not I could add the front mud flaps or not and still be able to install them over the tracks and idlers when those are added. The answer to that is no, so the front flaps had to be kept off for now. The fender tools and details will get added later after painting.

I went ahead and assembled the main twin muffler/exhausts for the right fender side. The exhaust ends only have depressions to represent their openings so I drilled them out to give them more depth. I also added the curved extension pipe that connects into the engine deck, the fit here needs to be precise to avoid issues with the fender and exhaust sitting correctly, so the dry-fit with the fender helped ensure that occurred. The full exhaust is removable for easier painting and detailing off the fender as a result.

Step 9 deals only with the front mud flaps. Those were assembled and set off to the side for separate painting.

Completing things for the hull is Step 10 which adds the details to the rear engine deck. I opted for the styrene air intake grill slats as the PE option was pretty fragile to work with and didn't offer much of a gain in the looks department. It's also worth noting that the diagram shows the grills (both the styrene and PE option) installing upside down, so be careful to get the orientation right prior to committing to glue on that part.

Next up will be working on the turrets.

  • Member since
    April 2007
Posted by tenthumbs on Tuesday, December 25, 2012 7:50 AM

This is a real interesting subject. Any of them survive to make it  into a museum or collection?

  • Member since
    December 2002
  • From: Bury St Edmunds, Suffolk, England
Posted by Bish on Tuesday, December 25, 2012 8:55 AM

From what i can gather, those that survived were scrapped in 1942. I believe a Museum in Norway does have some small parts.

I am a Norfolk man and i glory in being so


On the bench: Airfix 1/72nd Harrier GR.3/Fujimi 1/72nd Ju 87D-3

  • Member since
    July 2004
  • From: Texas
Posted by wbill76 on Tuesday, December 25, 2012 11:09 AM

Bish is correct. None of the Neubau's survived the war...so all that exists are the photos and plans of their construction as the basis for the models. I suspect that's a big part of the reason that DML chose not to provide any interior details on the turrets or engine compartments of this beast! Smile

  • Member since
    July 2004
  • From: Texas
Posted by wbill76 on Tuesday, December 25, 2012 12:33 PM

A special Merry Christmas update is in order for this project considering it is, after all, a Christmas present build! :)

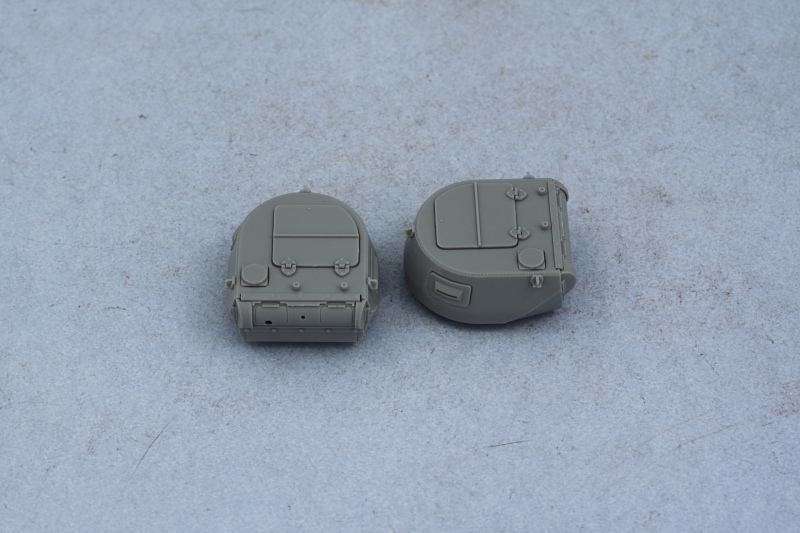
Continuing on with the turrets, Step 11 addresses the twin MG turrets that are cousins of the type seen on the Pz I. I had no desire to display any of the view flaps in the open position so skipped the use of the interior parts and installed them all in the closed position. Curiously DML provides clear armored glass inserts for only the flat side flaps and not the curved flaps...for whatever reason, the curved flaps get an ordinary gray styrene insert. I opted for the hexagonal style of lifting hooks, parts D52, as those are the type commonly seen in the Nr. 3-5 vehicles based on the available reference photos. The MG13s were left off for now and will be installed later after painting. With care during assembly by avoiding getting any glue on part D16, the mantlets can be left movable although their range of movement/positioning is restricted by the turret design.
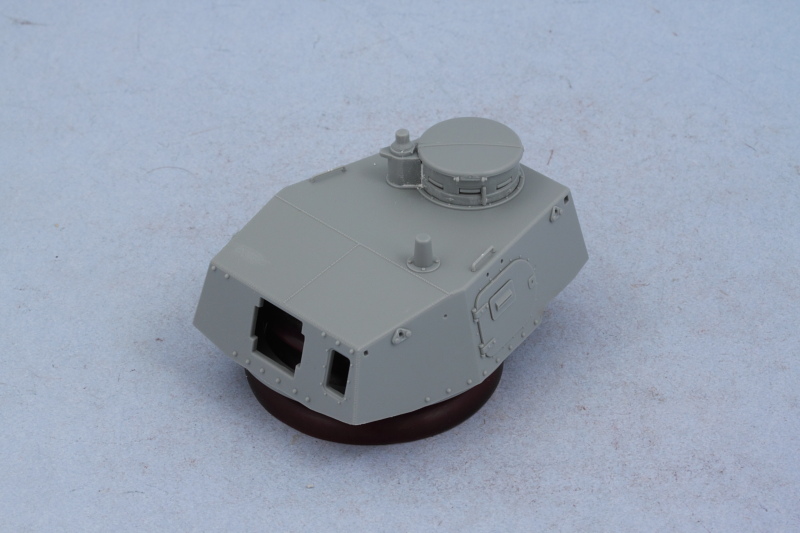
Step 12 begins work on the large main turret and attaches the base of the turret to the top, adds the side hatches, and installs the commander's cupola. The side hatches here also receive ordinary gray styrene vision blocks instead of clear parts and without any kind of interior provided, there's not much point to posing the doors open unless you're going to stuff a figure in there...so mine were closed up. The commander's cupola assembles as a 'stack' of multiple parts and some putty was needed to fill the gap between the cupola and the signal flag port extension that attaches to it.
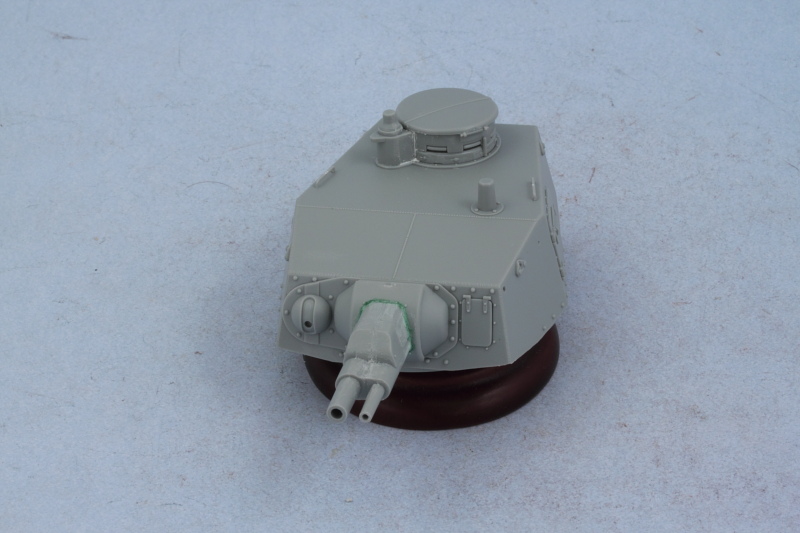
Step 13 adds a lot of delicate detail to the turret side so I bypassed it momentarily to work on Step 14 which assembles and adds the side-by-side main armament. The smaller 3.7cm antitank gun barrel was drilled out slightly to give the barrel a more in-scale diameter and thickness for the muzzle opening. The two guns are paired up in the mantlet as halves, so the resulting join seam needed to be carefully sanded away to create a seamless part. The base of the mantlet is a separate part and shouldn't have a gap, so some Squadron Green putty thinned with liquid glue was used to correct that issue. While the instructions don't indicate it, if you're careful with the assembly and get the alignment of the mantlet base plate and the swivel hub that attaches to it (part B4) correct, it will 'trap' the part sufficiently to allow the main armament to elevate and hold it's position.
Returning to Step 13, I added the lifting eyes, the antenna and holding tray, and the turret hatch latches. Two different styles of latch are offered and parts B45/44 are the correct style for Nr. 3-5 so those were installed accordingly.
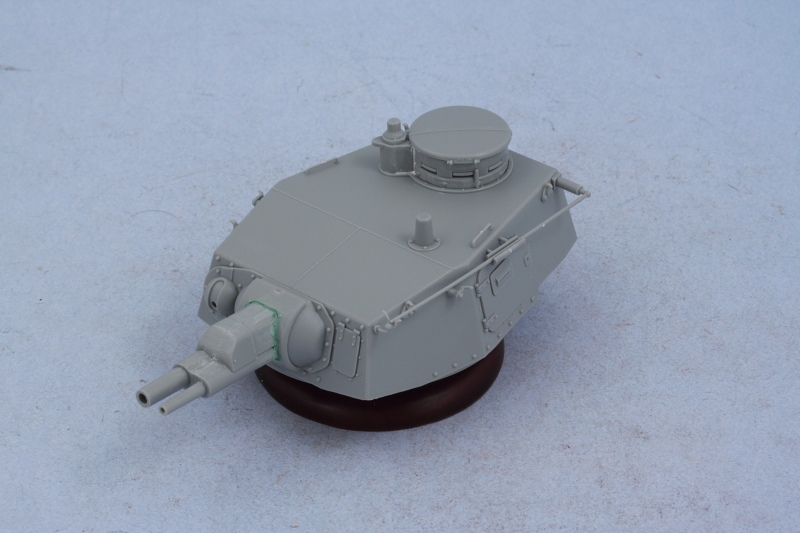
Last but not least, Step 15 adds the turrets to the hull so a sample shot of them in place was called for!
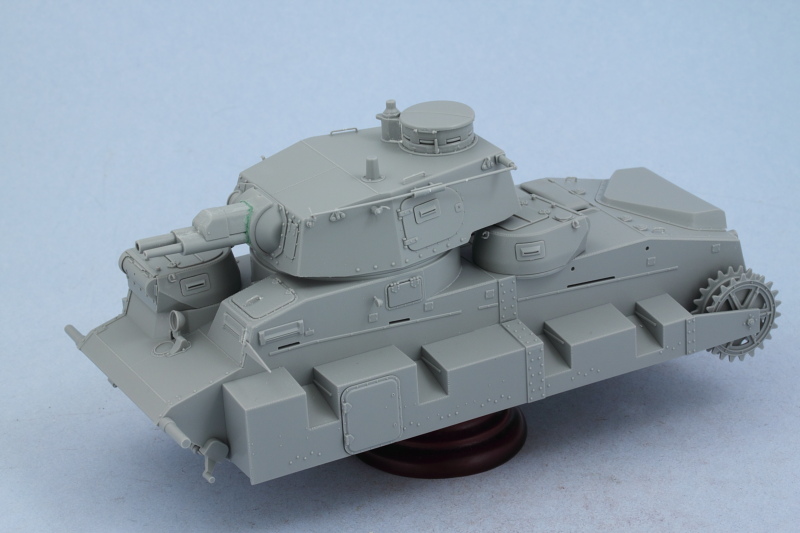
That concludes all the major construction so paint work will be up next!

  • Member since
    September 2005
  • From: beacon falls , Ct.
Posted by treadwell on Tuesday, December 25, 2012 8:15 PM

Nice update ,Bill Smile .....

and a very Merry Christmas to you and yours !

The fine detail on the main turret is very nice looking. I sure wonder what was going through the heads of tank designers of many countries when they came up with these complex , multi-turret ' land ships' . Surprise

A very interesting build !

tread[H]


  • Member since
    May 2005
  • From: Dublin Rep Of Ireland
Posted by terry35 on Tuesday, December 25, 2012 8:49 PM
Great progress Bill, that is a great shot of the Pz. I type turrets, definitely a close cousin of the Pz. I .

Merry Christmas,

Terry.

  • Member since
    December 2002
  • From: Bury St Edmunds, Suffolk, England
Posted by Bish on Wednesday, December 26, 2012 2:58 AM

Great work Bill. And ye, can deffinatly see the relation to Pz I turrets.

I am a Norfolk man and i glory in being so


On the bench: Airfix 1/72nd Harrier GR.3/Fujimi 1/72nd Ju 87D-3

  • Member since
    December 2004
  • From: ohio
Posted by vonryan on Wednesday, December 26, 2012 4:11 AM

well Bill AWESOME work as always. and Marry Chirtmas to you and your's. i look in from time to time here, too tired after Chemo but still working on my Shermans anyway Q. on the twin MG turrets can they be opened? i'd like to build one of these tanks with figures out the twin MG turrets

Clay

  • Member since
    July 2004
  • From: Texas
Posted by wbill76 on Wednesday, December 26, 2012 9:18 AM

Tread

Have to agree with you there...the 'on-paper' design must've seemed ideal...the best of all possible worlds in terms of vehicle capability! Reality proved to be very different though...this beast weighed in at 23 metric tons with a combat load, stood around 9 feet tall and 18 feet long, had a top speed of 30 km/hr, but only a maximum armor thickness of 20mm (roughly the same as a Pz I!). That meant big, heavy, slow, and very lightly protected...not a good recipe for combat survival! Stick out tongue

Terry

and Bish,  Thanks, appreciate the comments! I'm not 100% sure but I believe this same Pz-1 cousin type of turret showed up on the Minenraumer, so it got around!

Clay

Glad to hear you're able to stop in from time to time, keep strong! As for your question on the turrets, the large top hatches can be posed open if you choose to. Beer
JOIN OUR COMMUNITY!

Our community is FREE to join. To participate you must either login or register for an account.

SEARCH FORUMS
FREE NEWSLETTER
By signing up you may also receive reader surveys and occasional special offers. We do not sell, rent or trade our email lists. View our Privacy Policy.