SEARCH FINESCALE.COM

Enter keywords or a search phrase below:

Juno Beach Sherman Vc WIP is now COMPLETED!

11091 views
36 replies
1 rating 2 rating 3 rating 4 rating 5 rating
  • Member since
    April 2006
  • From: ON, Canada
Juno Beach Sherman Vc WIP is now COMPLETED!
Posted by jgeratic on Tuesday, October 29, 2013 6:57 PM

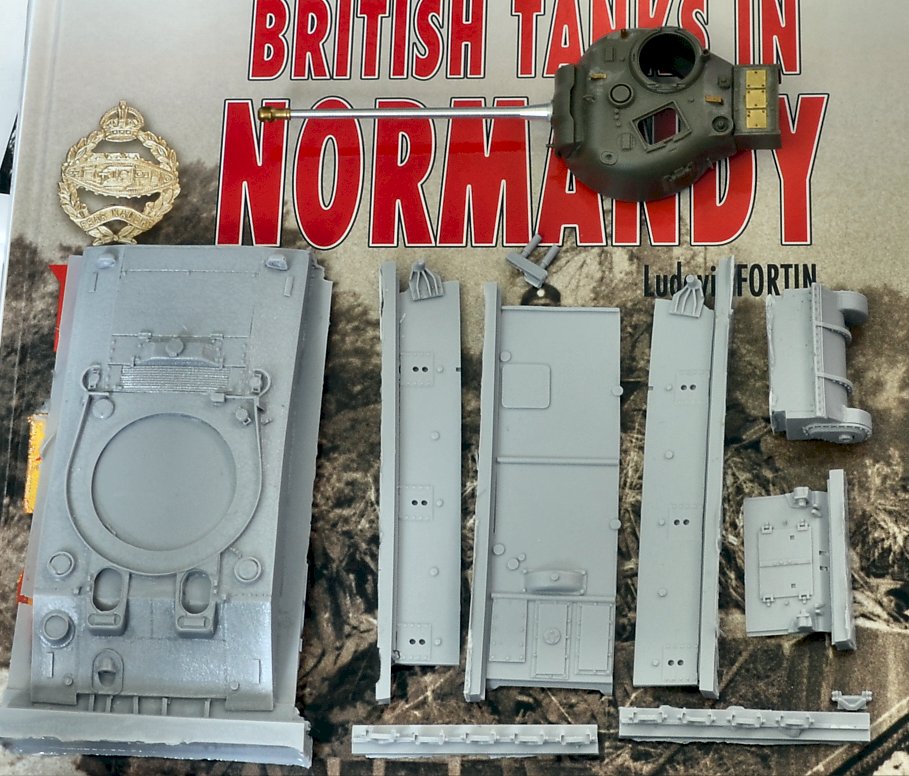
Building this for a GB, but decided to make a separate thread for those interested (as well as getting feedback from the Shermaholics out there).   

Started off with Tamiya's 1/48 Ic Firefly, but can't say it will be the basis of the build as not much is being used.   It is combined with TankWorkShop's M4A4 hull combo set, after market 17 pdr. gun, and some PE from Hauler and Part.


9735650337_021028ed4f_o.jpg


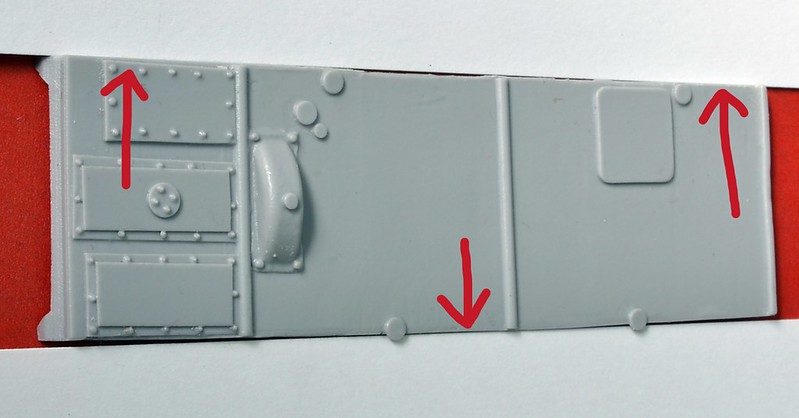
It's a resin casting, but is more of a soft plastic and quite flexible - which may be the reason for the problems - read on...

Beginning with the hull floor, it is a bit wonky.  On one side, the center curves outwards, while the opposite is slightly curved in.   Could be just the nature of the beast, or a quality control issue.


9761852404_b02b6782ed_c.jpg


Four main pieces glued together.  I didn't bother sanding too much of the 'yaw' shape of the floor as it won't be noticeable.  Another problem area now is one side wall comes up short, (interestingly it is on the convex side of the curved floor edge).


9770211765_e9a670c652_o.jpg


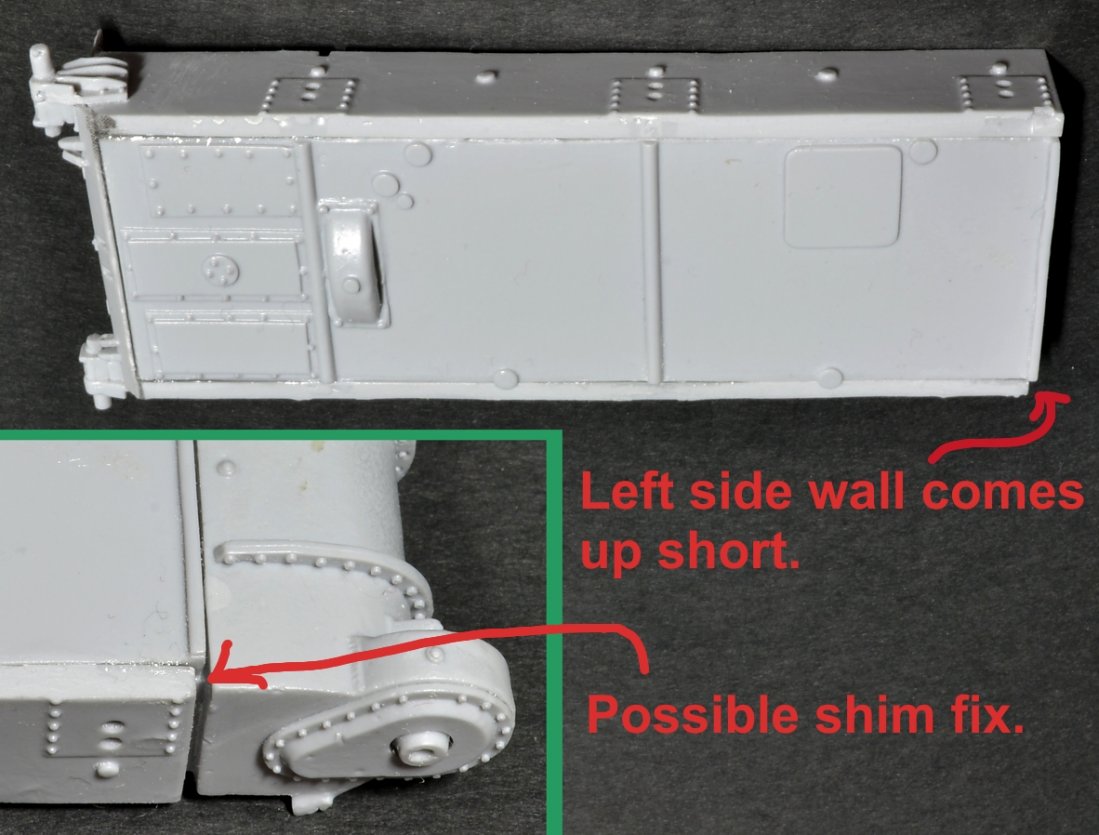
Dry fitting the transmission housing, it looks it can be corrected by placing a shim in the space.   A little more sanding should close the gap, and make sure every angle is perpendicular.


------------------------------------------


Sherman Vc finally taking shape.  After cutting the floor and attaching the front piece, replaced the lost detail with a thin strip of sheet plastic.  Both upper and lower hulls had to be braced from  inside to correct the wobbly shapes to the walls.  This resin is not the type I'm use to. Very soft, and not very strong when thin - recycled product?


9886295716_44ba7f174f_o.jpg


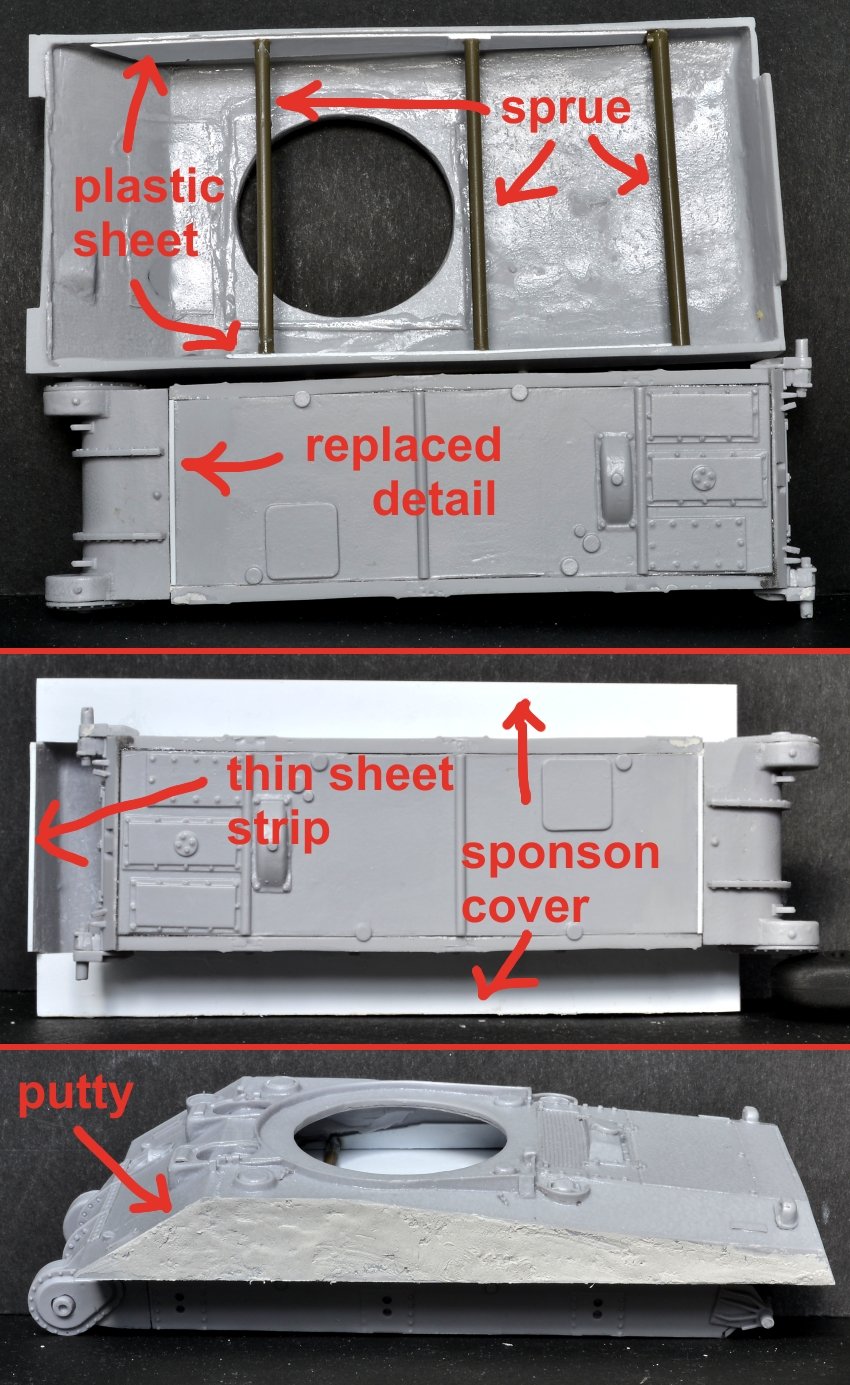
The back plate that over hangs the hull also had deformed corners.  To achieve crisper edge here, a thin strip was glued across the bottom, filled in, and then sanded.


The port hull side wall was still misbehaving, yawning inwards.  Squadron putty to the rescue - this will take several sessions of building up and sanding.


9886409663_892cb8dde1_o.jpg


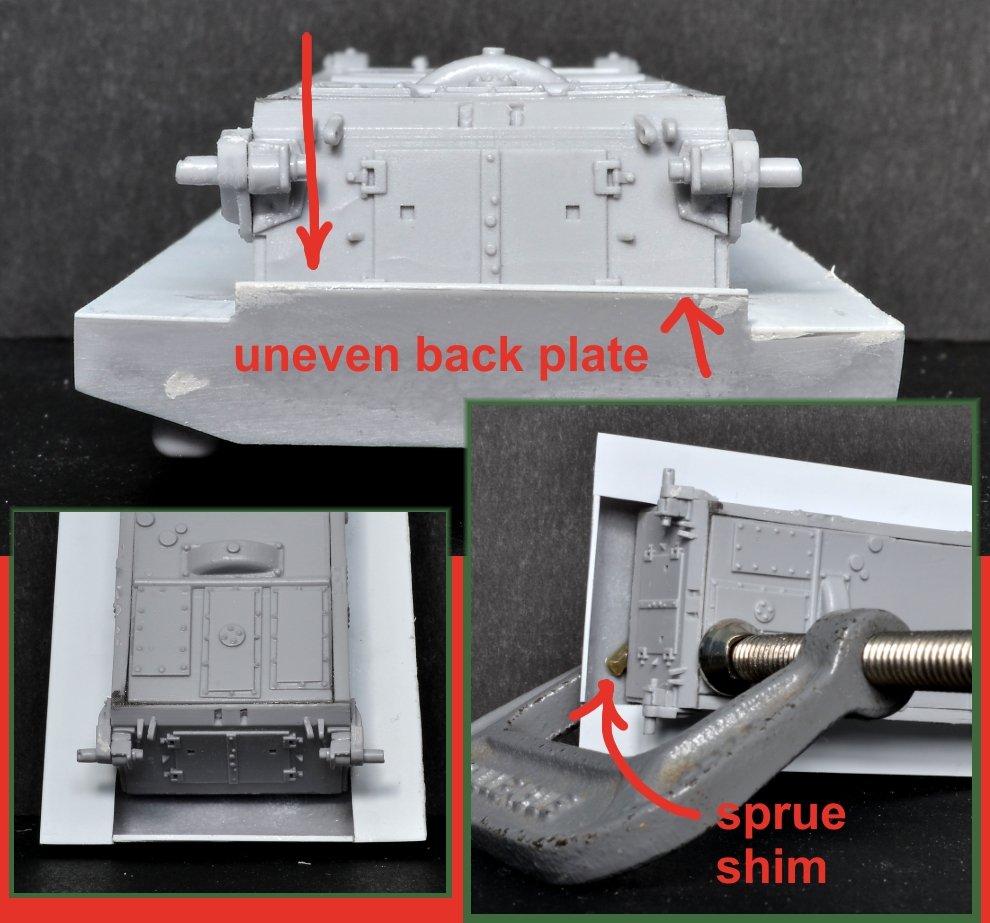
A single thin sheet of plastic was used to cover  the hollow sponson areas, and once that was sandwiched between the upper and lower hull sections, I noticed the back plate wasn't parallel with the bottom hull.  Another shim made of sprue, was strategically placed in the suspect corner, with a clamp holding it in place while the glue dried.


-----------------------------------------------------


Front detail is now done, just one more shackle to make.


10008508146_48bcfca901_o.jpg

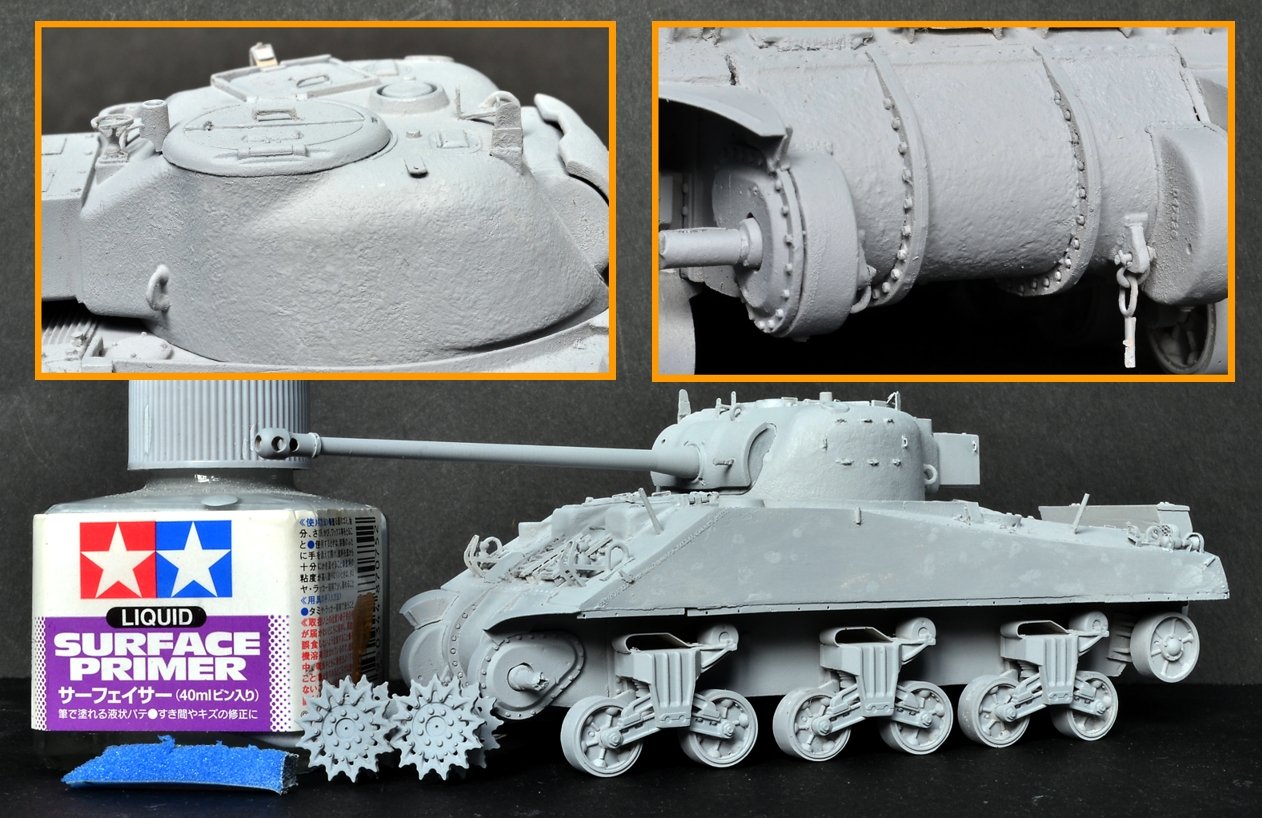
I've reworked the major  weld lines, masking the edges off with Tamiya tape, brushing on a couple layers of surfacer, and then scouring with the sharp end of a knife before it completely cured.

The spring on the hatches was made by twisting speaker wire around a small drill bit.

----------------------------------------


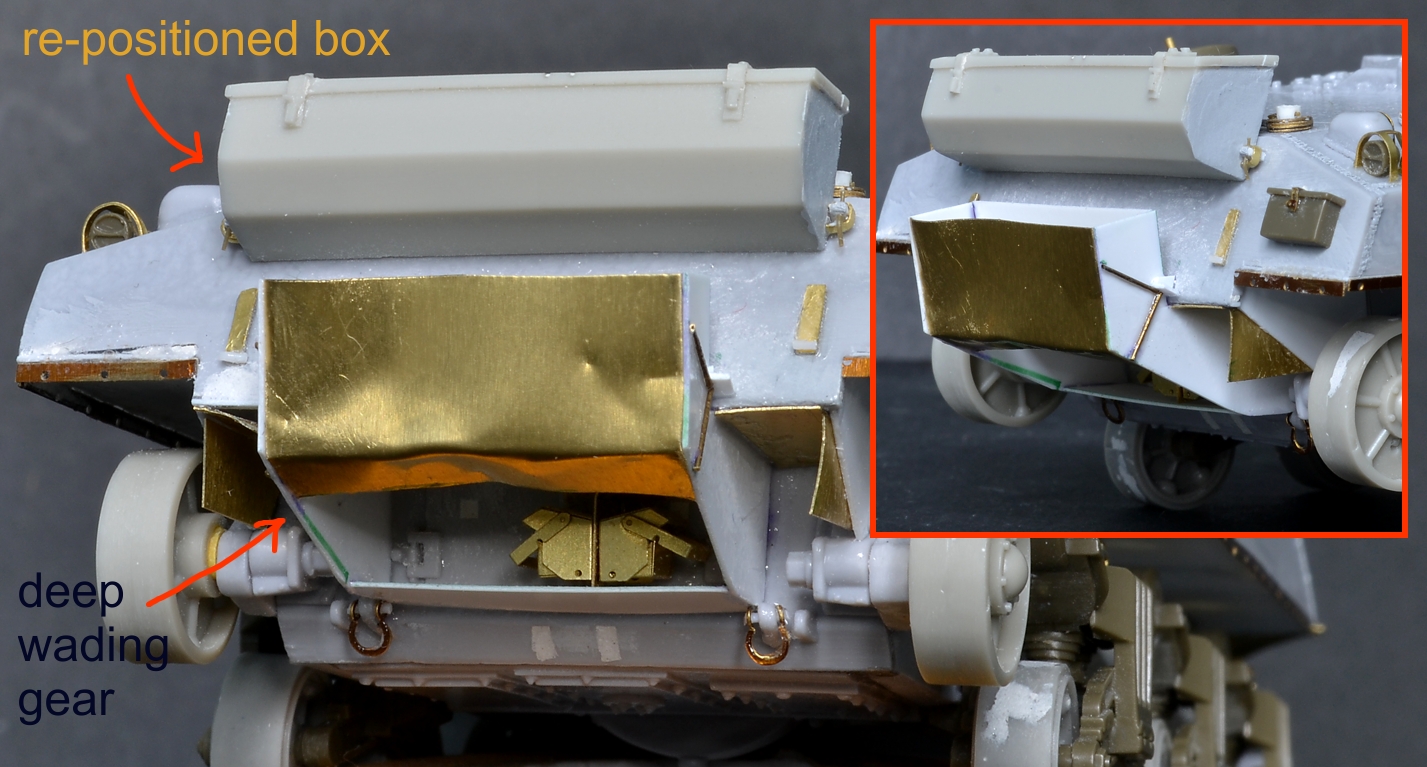
Suspension and road wheels are on.  Rear hull detail also complete.  Using period photos as reference, scratch built some details (1. and 2.) to hold rear storage bin in place. Detail # 3.  are just some brackets which, I believe, were used to hold in position the deep wading gear.


10151922123_0977eca647_o.jpg

 -----------------------------------------------------

This update deals with the tools and their respective brackets on the hull.   The bottom section of the deep wading gear will be scratch built.  This will require elevating the storage box at the rear to provide clearance for said gear, though I can't figure out why the bin seen in these photos is upside down:


65675038270_002691_3.jpg

65675038270_002714_3.jpg


I've also removed the spare tracks and have to redo this.  Photos show those stored in the provided racks had the guide teeth removed, while the remainder had the teeth on backwards:


65675038270_002783_3.jpg


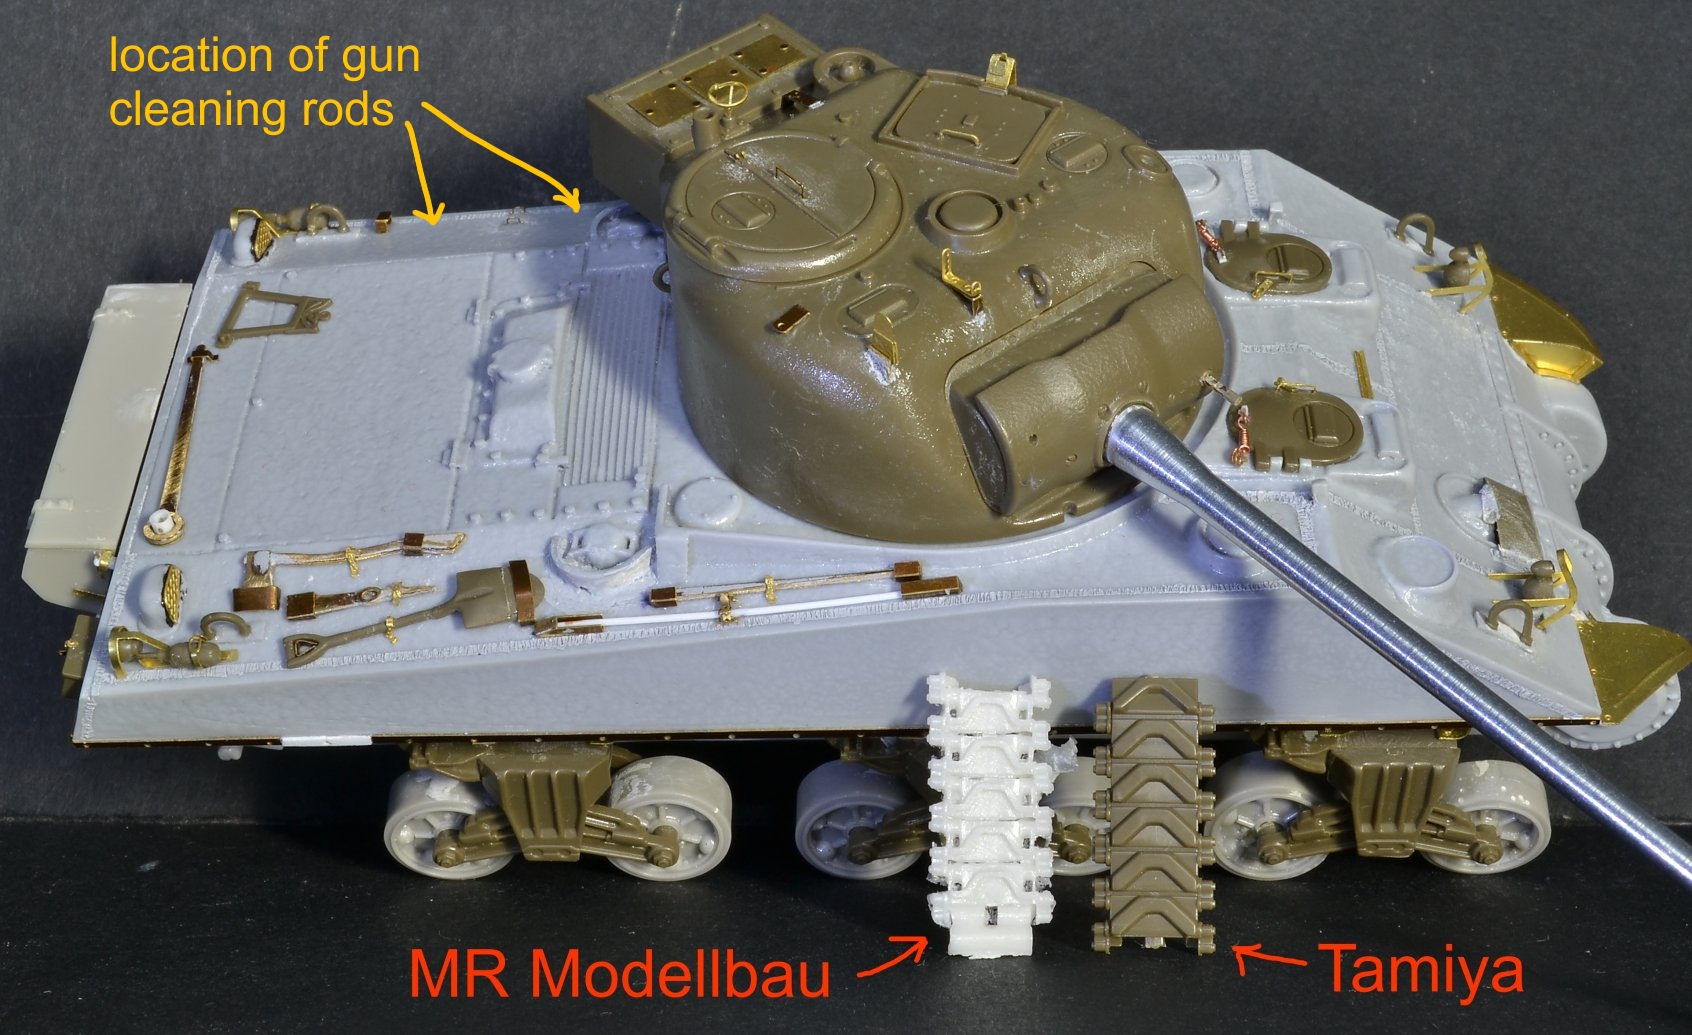
The only regular gear I've left off the tank were the gun cleaning rods, though I did attach the clamps for them.  They likely were placed in the rear bin.  There should be a sledge hammer too, but none provided in the kit.


10256399804_14b07d469f_o.jpg

 ---------------------------------------------

I've raised the rear tool box to make room for the deep wading gear, of which I completely scratched based from what I could make out in period photos.


10393124106_afae68558f_o.jpg


The turret needed some changes:

1.) removal of the gun port, which was pretty straight forward grinding and then puttied over.

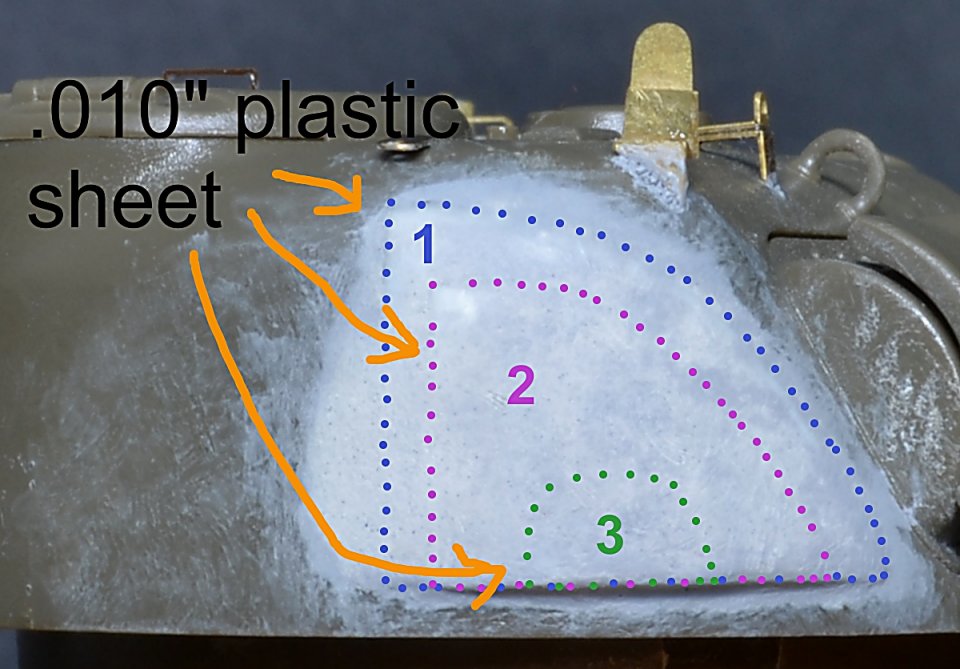
2.) cast turret cheek armour.  Did this with first layering 3 sections of .010" plastic sheet, and then puttied over and smoothed out.

The footman loops are really small.  Found best way to hold them was with a section of rolled Tamiya tape (sticky side out).  Another piece of tape on the turret helped with the placement.


10398220535_c4fb5933a9_o.jpg


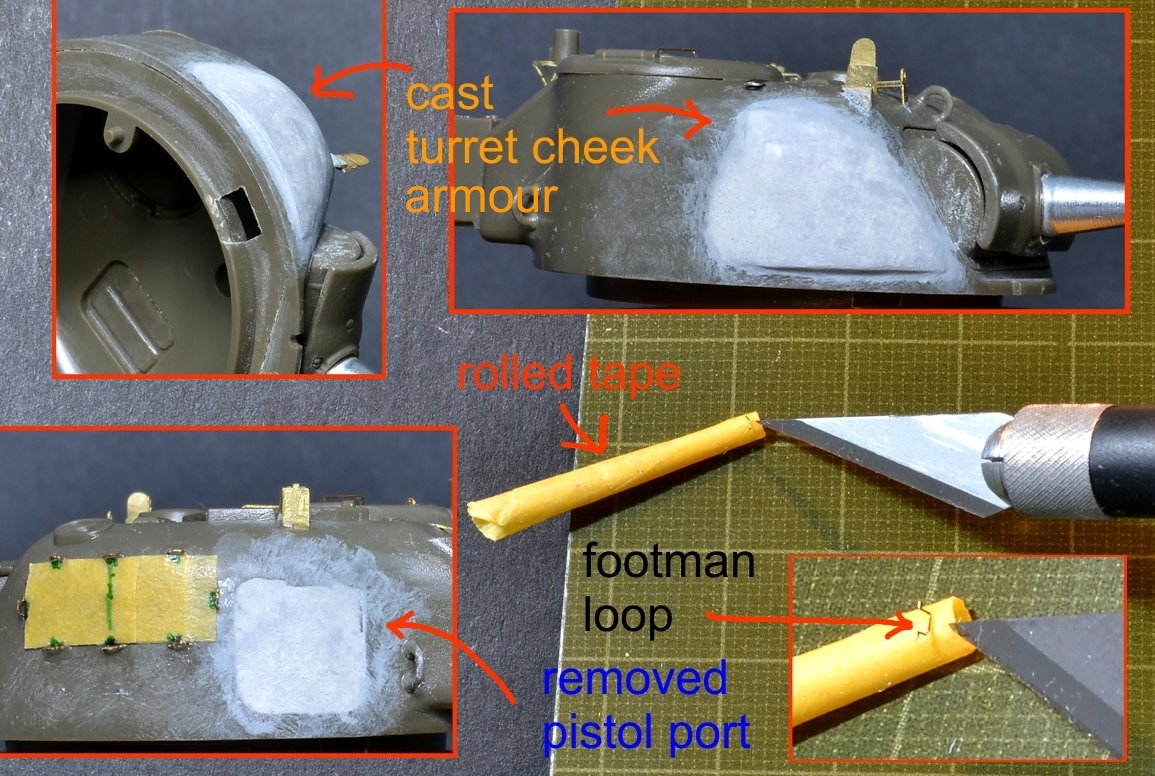
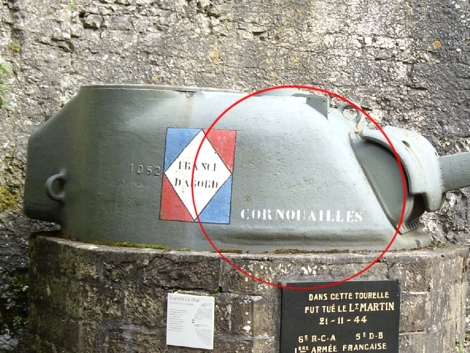
The cast cheek armour was something stumbled upon after noticing there was no sign of the pistol port in my reference photo.  Upon further reading, I learned that this usually  meant the cheek armour was added during the casting process.  It really isn't noticeable, except at the bottom.

I was lucky to find this diagram, though intended for a 1/35 build, and a decent photo to give a general idea of the look to go for.

turretcheekarmor.jpg

turret_cheek.JPG


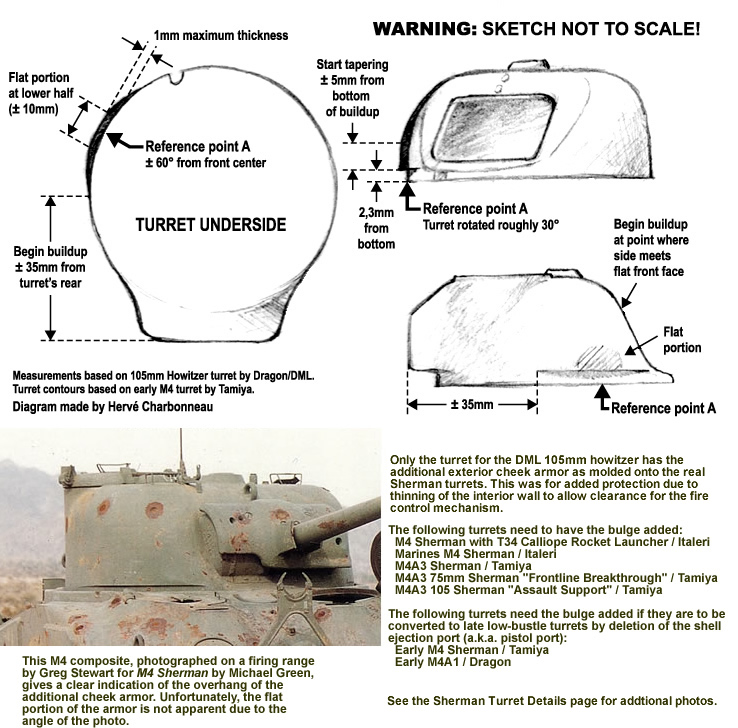
I used three separate sheets of sheet styrene so it would be more pliable around the curves of the turret.  Each piece was cut smaller than the previous, though they all share the same bottom edge to form the distinct lip.  Also, each section of sheet was sanded slightly before another was added on top, as .030 inches is the suggested thickness for  1/35 scale.  The third and final layer roughly represents the flat portion.


10398225505_8ff8fa7343_o.jpg


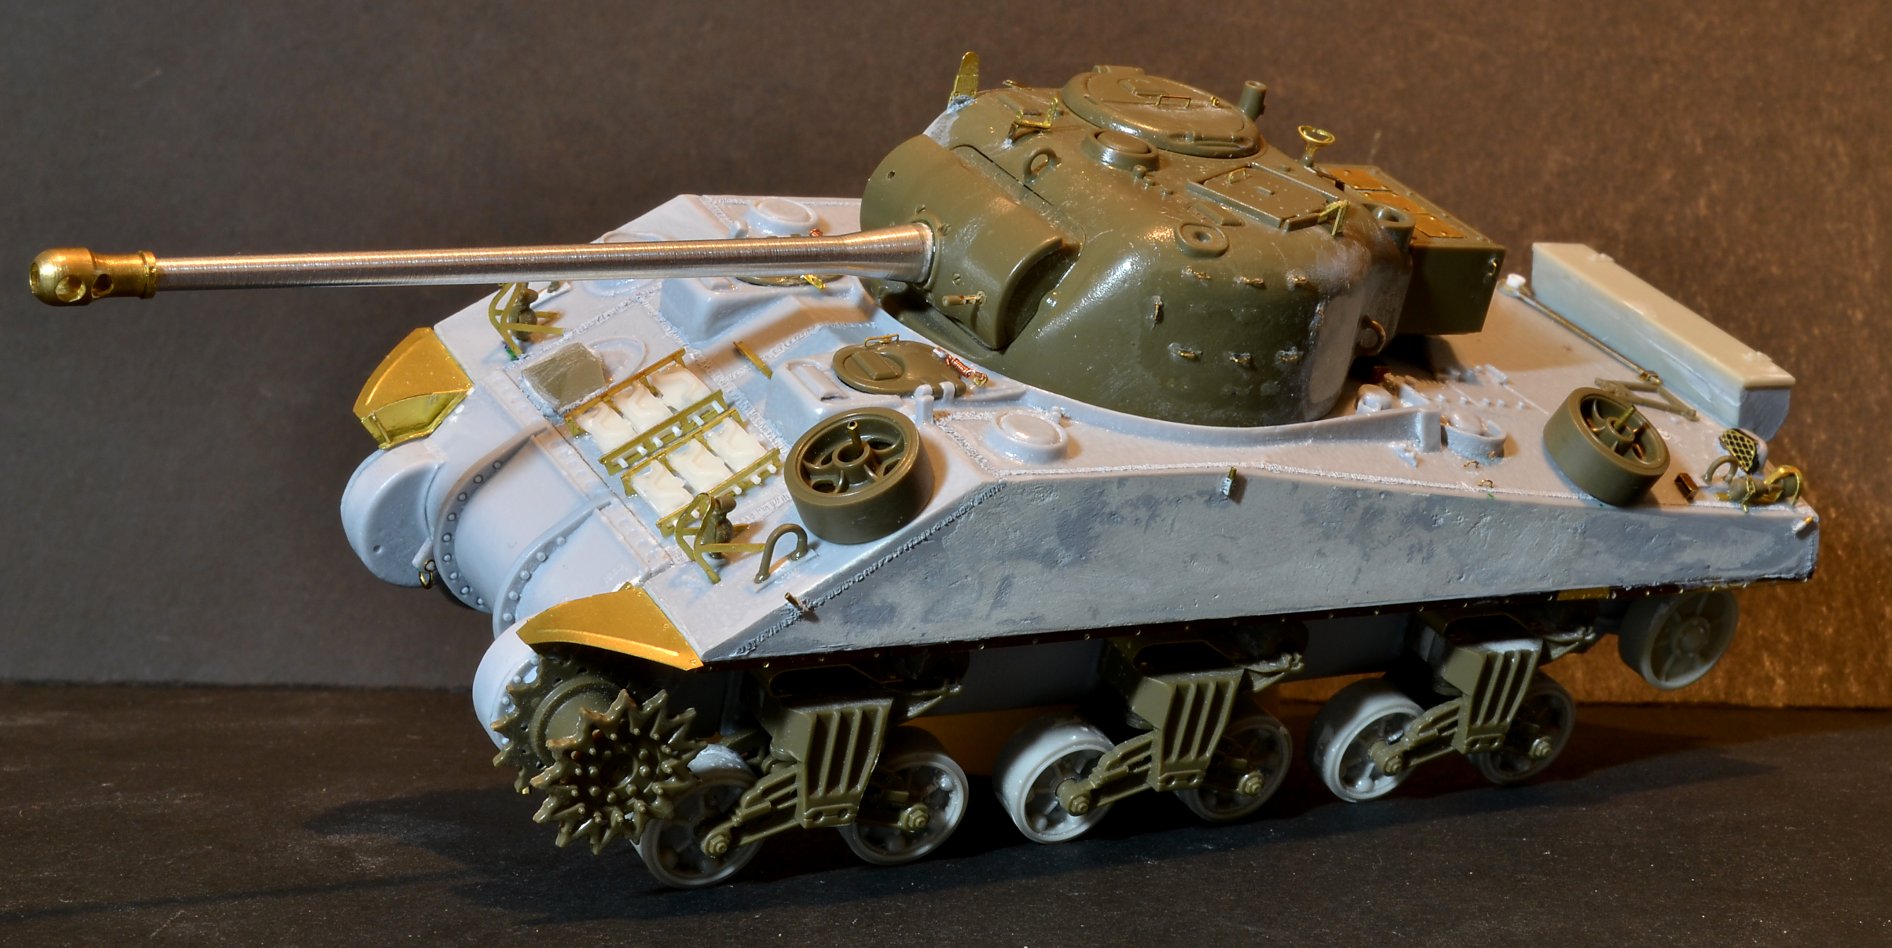
Final shot before primer and paint, but afterwards will add some more spare track, a towing cable, a few fuel cans and a Browning to the commander's hatch.


10393085444_9dabdf2acd_o.jpg

 -------------------------------------------

After spraying on some diluted surfacer, the cast look of the turret and transmission seemed to be all but lost.  So I brushed on some  surfacer, and while still wet tried the stipple method with an old synthetic brush.   The result resembled more 'sand in paint' finish, so tried some foam from a sanding stick (that's the blue thingy in the pic.)


10465813416_ee36aae487_o.jpg


It looked better, but after all surfaces were done, I brushed it over with lacquer thinner, followed with some gentle sanding.  With these enlarged views, some clean up on other surfaces is required.


-----------------------------------------------------------------------------


In April of 1944, Britain issued S.C.C. 15 as a colour equivalent of US Olive Drab.  A very close match, only after fading was a difference readily detected, as it would become more green.  It is unknown whether Fireflies were completely repainted in this new paint, as orders specified there was to be no wasteage if the lone  purpose was to make all vehicle colours uniform.    There certainly would be a fair amount on the turret due to modifications with the new 17-pdr.  Perhaps the hull, depending on how much work was required for the seabourne invasion.

I used one of Mike Starmer's suggested colour mixes for Tamiya paints:

5 parts XF81

1 part XF58

1 part XF71

10483005085_4913e1df9d_o.jpg


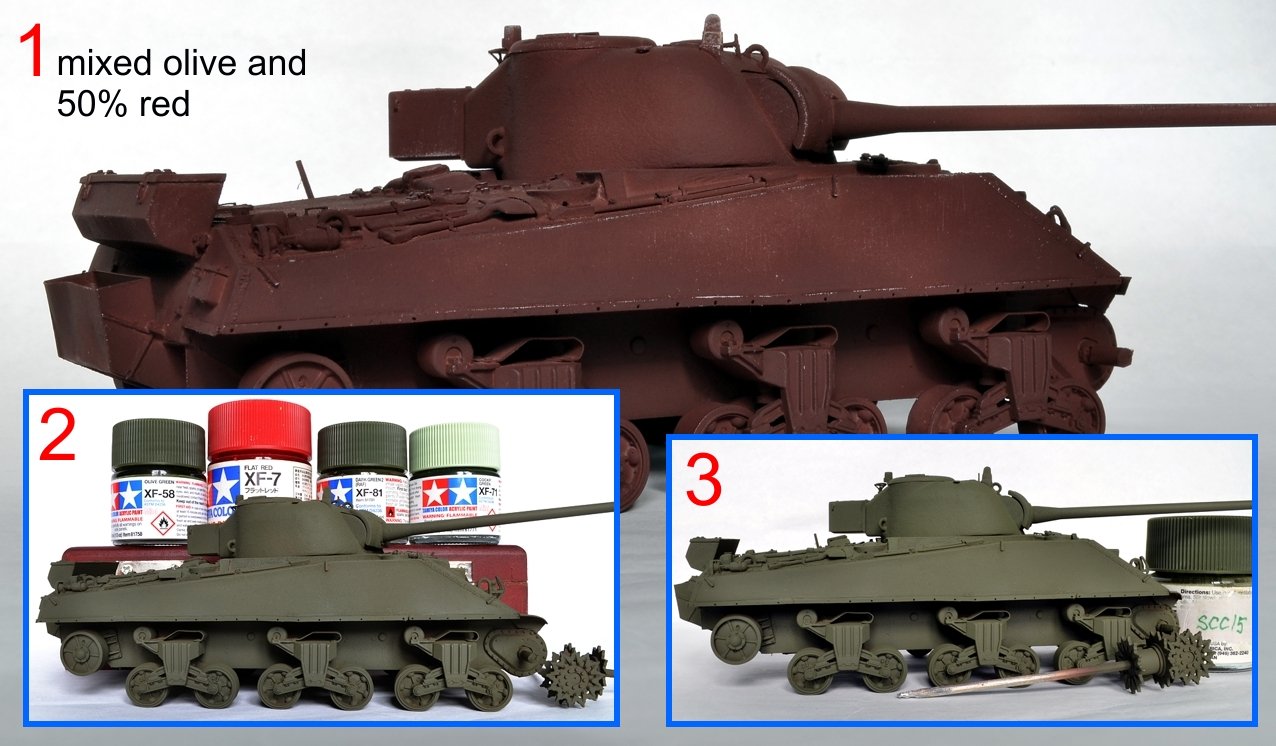
For the first spray coat, I tried something different by adding close to 50% red to the mixture, reason being two fold.  First, this would help in conveying an olive hue.  Second was sort of a test on the colour wheel theory dealing with complimentary colours.  The compliment of green is red, and mixing the two resulted in what looks close to a hull red.  This deeper shade would be useful in shadow areas while at the same time still remain vibrant.

Pic#2 introduces the S.C.C.15 mix onto the model - I decided to add a few drops of red into the airbrush cup.  With the smaller scale build, it was difficult to retain some semblance of the first layer without compromising coverage in non-shadow areas. (pic #2)

Finally, the original mix was applied, concentrating more on the turret.  You have to look closely, but you can see a bit more of a green tone in pic#3.


----------------------------------------------------------------------


Weekend was spent on designing, and then affixing my home made decals.  There is a loading number chalked in white on the front, but plan to try to replicate that later in the build using a very sharp  pencil crayon.  


10545394664_225f3d63cb_o.jpg


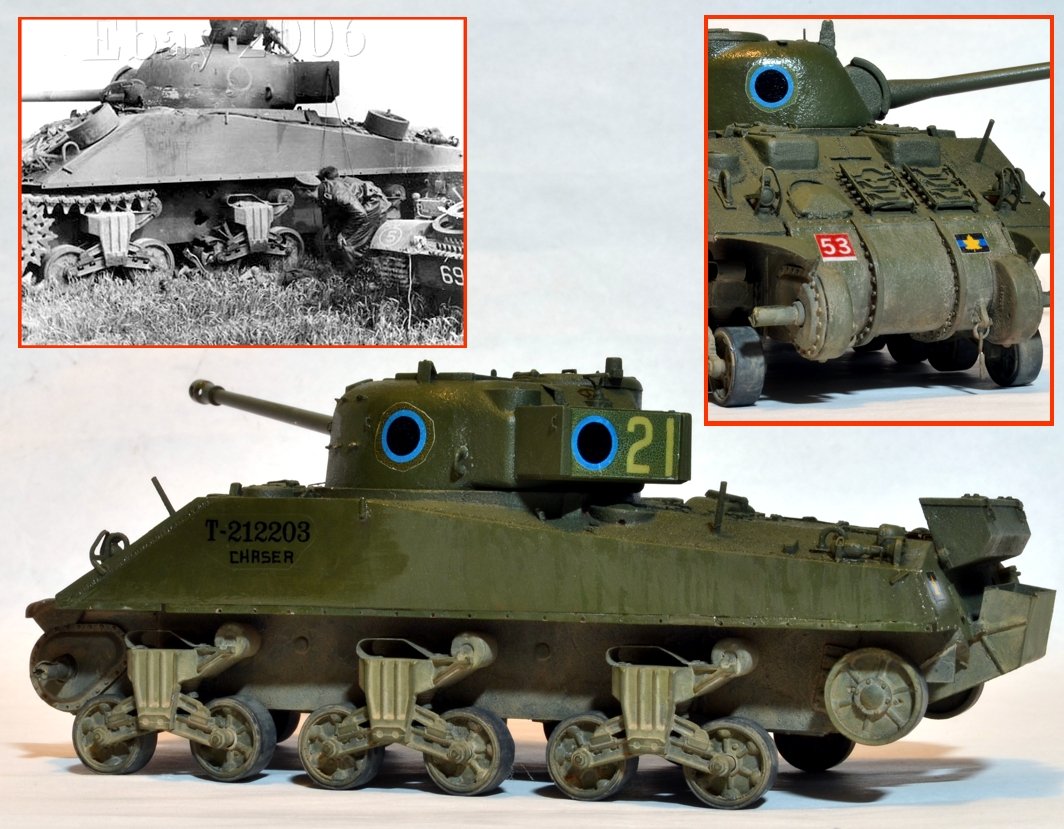
Those markings that were printed on white decal paper still need their edges touched up.  These set of pics looks to have some darker hues on the vehicle, but is all due to the application of the future coat.  I have started some weathering on the lowers.  Just a couple basic washes with Flory's product, followed with some wiping away with a damp brush.


Closest font I could find for the serial number can be downloaded here:

http://www.dafont.co...ubberstamp.font


regards,

Jack

  • Member since
    July 2006
  • From: San Francisco Bay Area
Posted by bufflehead on Tuesday, October 29, 2013 11:14 PM

Wow Jack!  I saw this posted in the GB section and thought it was 1/35 scale!  Freakin amazing work dude!!  I am sorry to see the problems you're having with the Tank Workshop parts.  I thought their products would be of higher quality.  I have a few of their resin Sherman upper hulls, turrets, and other assorted parts, but have yet to use them....makes me a bit nervous now.  

Still your Firefly is looking fantastic!  I'm glad you posted it here for all to enjoy!!

Ernest

Last Armor Build - 1/35 Dragon M-26A1, 1/35 Emhar Mk.IV Female


Last Aircraft Builds - Hobby Boss 1/72 F4F Wildcat & FW-190A8


  • Member since
    April 2006
  • From: ON, Canada
Posted by jgeratic on Wednesday, October 30, 2013 3:46 AM

Hi Ernest, glad to see you stopped by and posted your thoughts.  

This was my first experience with TankWorkShop products, and when I linked the problems on another site dedicated to 1/48, only one person responded and they stated the company 'hand cast' their items, but usually quality control stops this from leaving their store front.   So hopefully your Sherman parts will be fine.

Anyways, I dug in my heels and persevered.  I was really surprised, after attaching the bogie assemblies to the hull,  that it was all sitting flat on the table.

regards,

Jack

  • Member since
    April 2005
  • From: Gothenburg
Posted by JohanT on Wednesday, October 30, 2013 4:52 PM

Great stuff Jack,

I am comfortably seated and look forward to your next update.

Amazing stuff - and just as inspiring as always!

Very Best Regards

Johan

  • Member since
    December 2008
  • From: Goffstown, NH
Posted by New Hampshire on Wednesday, October 30, 2013 5:22 PM

Wow, you sure look to be handling this beast with ease.  Nice job!

Brian

  • Member since
    July 2004
  • From: Texas
Posted by wbill76 on Wednesday, October 30, 2013 5:53 PM

Dressing up this one nicely despite the challenges along the way Jack. Yes

  • Member since
    April 2006
  • From: ON, Canada
Posted by jgeratic on Sunday, November 3, 2013 5:25 PM

Johan, NH and Bill - thanks for the kind words.

Have some initial steps done on the weathering, concentrating mostly on the turret - I was switching back and forth with that and the hull while dealing with the clear decals that have the vehicle's number and nick name. Didn't keep count, but did well over half dozen  layers of future and sanding, repeating the procedure to get rid of the decal edge.  The upper hull sides have nothing added since last post, just some flat spray.

After the initial detail wash using Florys dark dirt and mud brown, I lightly dry brushed the original vehicle colour to clean up excess wash.  I then mixed up a shadow colour with red and ultramarine blue for deeper details, like the hull deck grill located behind the turret.

Colour modulation consisted of a MiG filter ochre wash on the turret top, and their brown product over other areas. 

For further highlighting, instead of oils, I just relied on my Tamiya paints, thinning them with their dedicated product, and building up just a couple thin layers of lightened olive (SCC15).

regards,

Jack

  • Member since
    July 2006
  • From: San Francisco Bay Area
Posted by bufflehead on Sunday, November 3, 2013 9:05 PM

Holy Smokes Jack, that Firefly is looking awesome!! Hard to believe its 1/48, not 1/35!  I love the initial stages of weathering; how the highlighting contrasts with the shading....beautiful!   I have that Florys wash....it's great stuff!

Ernest

Last Armor Build - 1/35 Dragon M-26A1, 1/35 Emhar Mk.IV Female


Last Aircraft Builds - Hobby Boss 1/72 F4F Wildcat & FW-190A8


  • Member since
    July 2004
  • From: Texas
Posted by wbill76 on Monday, November 4, 2013 10:28 AM

Nice color variations going on with the green Jack, very nice. Yes

  • Member since
    April 2006
  • From: ON, Canada
Posted by jgeratic on Tuesday, November 12, 2013 1:53 AM

Thanks, Ernest and Bill.

Not much achieved at the bench this past week.  The type T54E2 resins tracks arrived from Tank Workshop, so I set about completing the spare links on the front hull.  This involved  shaving off the tread pattern and reattaching it to the opposite side, as well as adding short lengths of plastic rod on those ends that have no coupling.  I also got the base colours on the two spare wheels.

The quality of the tracks, again, is hit and miss.  Every second link has an excess chunk of resin in one corner.  This has to be cleaned out in order for the adjoining link to fit in .  I noticed too that the odd guide tooth wasn't fully formed, resulting in a broken tip appearance (I didn't count how many as I was already discouraged enough).  

In hindsight now, with the amount of time and money going into this one, I should have opted for  1/35 scale, and I would still have some coin left for several servings of V8.

regards,

Jack

  • Member since
    July 2004
  • From: Texas
Posted by wbill76 on Tuesday, November 12, 2013 1:00 PM

Hang in there Jack! You're too far gone now to back out. Wink Bummer about the tracks but the end result you're getting will definitely add to the finish.

  • Member since
    April 2006
  • From: ON, Canada
Posted by jgeratic on Tuesday, November 12, 2013 1:41 PM

Bill, thanks for the encouragement - but yea, this is what can happen when undertaking a conversion that requires multiple sources.  Combined with even further accurizing to build from a specific photo,  it has been an interesting journey thus far.

regards,

Jack

  • Member since
    January 2007
Posted by the doog on Friday, November 15, 2013 9:35 AM

Wow, you're quite the trooper with this impressive build, Jack! I wonder which took you longer--your impressive first posting with all the stylish photos, or the actual build itself? Wink

Nice to see you soldiering on so competently on your way to a spectacular finish!

  • Member since
    March 2004
  • From: Spartanburg, SC
Posted by subfixer on Friday, November 15, 2013 10:14 AM

Simply superb!

I'm from the government and I'm here to help.

  • Member since
    April 2006
  • From: ON, Canada
Posted by jgeratic on Friday, November 15, 2013 1:23 PM

doog and subfixer, thanks or stopping in, much appreciated.

Yes, the first posting was just a summary of about six weeks of work, which was cut and pasted from the Longest Day GB.

regards,

Jack

  • Member since
    July 2006
  • From: San Francisco Bay Area
Posted by bufflehead on Sunday, November 17, 2013 12:46 PM

Jack, I have to agree with Bill.....can't stop now even with the Tank Workshop track problems.  All your hard work will produce a superb finished build!!

On another note:  That's two dings against TW's 1/48 resin castings.......

Ernest

Last Armor Build - 1/35 Dragon M-26A1, 1/35 Emhar Mk.IV Female


Last Aircraft Builds - Hobby Boss 1/72 F4F Wildcat & FW-190A8


  • Member since
    April 2006
  • From: ON, Canada
Posted by jgeratic on Tuesday, November 19, 2013 4:48 PM

Ernest, thanks for the continued interest and support.

-----------------------------------------------------------

The stowage, for the most part, is now done.  Still need some touch-ups, likely add  washes to alter some colour.  Once the tracks are on,  weathering powders will be applied.  Also worked on the streaking of the hull sides.

The items in the front required some scratch building in order to copy what could be discerned from the period photo.   The wrapped rods (possibly the gun cleaning rods) was pretty straight forward to make.  After cutting a section of facial tissue, a mixture of water, paint and white glue was applied.  While still wet, six rods were placed at one end, rolled up,  and placed in position.  

One of the fuel cans looked to be the allied style, so a conversion of a jerrycan was on order, first by puttying in the unwanted details and then sanding smooth.  Intention was to scribe in the new detail, but proved difficult over a combined resin and putty surface.  So I just painted some highlights and shadows to give the illusion of the "X" stamped on the side as well as the seam running the circumference of the top portion.   Stereo wire also provided the lip around the base.  One last detail was removing the off-centered spout and replacing this with a disc punched out of .010 sheet plastic, centrally located.

regards,

Jack

  • Member since
    July 2004
  • From: Texas
Posted by wbill76 on Wednesday, November 20, 2013 5:20 PM

Some nice detail additions there Jack, looking good.

  • Member since
    December 2008
  • From: Goffstown, NH
Posted by New Hampshire on Wednesday, November 20, 2013 7:54 PM

Jack, all I can say is impressive!  Very very impressive!

Brian

  • Member since
    July 2006
  • From: San Francisco Bay Area
Posted by bufflehead on Wednesday, November 20, 2013 9:55 PM

Wow Jack!!  I can't believe that allied gas can was originally German!!  The "X" looks like a real indentation!!  Beautiful work on all the new details my friend!

Ernest

Last Armor Build - 1/35 Dragon M-26A1, 1/35 Emhar Mk.IV Female


Last Aircraft Builds - Hobby Boss 1/72 F4F Wildcat & FW-190A8


  • Member since
    January 2007
Posted by the doog on Friday, November 22, 2013 7:59 AM

Excellent so far. The model, and the care taken with presenting your WIP here. I wish more people would present their builds this way, but I can see how much time it would take to carefully modify your photos in such a manner. You must be a wizard with "Paint"!

  • Member since
    April 2006
  • From: ON, Canada
Posted by jgeratic on Tuesday, November 26, 2013 2:25 AM

Bill, Brian, Ernest and the doog, thanks for your kind words.

I use Corel photopaint to put the WIP pics together.  I usually do this after I get home from work, which is well after 2am, so it gives me a chance to unwind, and also keeps me familiar with some of the many bells and whistles with the software.

--------------------------------------------------

This weekend was spent on the tracks.  To expedite things, I utilized Tamiya's longer length track sections (green plastic).   The different tread pattern is not really that noticeable under the hull sponsons, and those touching the ground can only be seen if the vehicle is flipped upside down.  The front spockets themselves were used as a jig for the individual links, and after the crazy glue had dried, there was no problem removing the assembly, though it is a tight fit.  Same premise on the idler end.

Painting begin first with a grey primer, followed with a full coating of AK acrylic chipping colour, applied with an airbrush.  Flory Sand wash was applied liberally over all.  Tread highlights from regular wear, were picked out with Tamiya's metallic grey.  Another thicker wash was applied by adding some raw umber powder to Flory's Sand wash.  Again, once the track's are in place, some lighter weathering powders will be applied.

regards,

Jack

  • Member since
    July 2004
  • From: Texas
Posted by wbill76 on Tuesday, November 26, 2013 7:10 PM

Nice adaptation with the tracks Jack, once painted and weathered they will all fit right in.

  • Member since
    April 2006
  • From: ON, Canada
Posted by jgeratic on Monday, December 2, 2013 5:24 PM

Thanks Bill... one more little update before the final photos:

Final bits arrived to make the copula machine gun  for my Sherman.  Originally I had ordered just the RB set, but it did not include a resin stock for the .50 cal Browning.  So I had to turn to Hauler, but at least now I've got the ammo box as well.    Looks like I've got a mini build in front of me:

The .50 cal Browning did require some further scratch building so it would have a post to sit on where it attaches to the turret/copula.  So a short length of brass rod, and a disc section cut from plastic rod to the rescue.  Can't say how accurate it is, (on the net found a huge array of gun cradles, never realized there were so many examples), but it works for me.

The white painted ammo box is copied from period photos, though the pic of this particular tank had the box attached length wise, running parallel with the gun.

-----------------------------------------------------------

For those not into history, you can skip this part, photos of the completed build follow.

The Sherbrooke Fusilier Regiment was the reserve armoured unit for Juno beach, the Canadian sector during the Normandy invasion.  Due to congestion on the beachhead, it would be almost noon before they began unloading.  Further traffic jams were experienced on the roadway, as there was only the one leading inland.   By evening they were within view of the main objective, Carpiquet airfield.  Out of friendly artillery range and no ground troops in the vicinity, the Shermans pulled back to a more secure position.


On D-day+1, the drive forward continued.  Unknown to the Canadians was the arrival of elements of the 12SS (Hitler Jugend) Panzer Division during the night.  Two companies of Panzer IVs along with panzergrenadiers were given specific orders that afternoon - simply put, drive the allies back into the sea. 

During the afternoon the two offensively minded sides would meet.  Both forces were new to battle, resulting in some reckless behaviour.  For two hours, tank versus tank battles raged in the area between Authie  and Buron.  Final figures vary on losses. but Chaser was one of the them.  Though the Canadians were given a bloody nose, they did managed to straighten their line and hold ground, stuffing the enemy's counter attack.

regards,

Jack

  • Member since
    December 2008
  • From: Goffstown, NH
Posted by New Hampshire on Monday, December 2, 2013 6:54 PM

Jack, this thing came out beautifully!  Yes

I have had a Tamiya 1/48 Sherman in my stash for a few years now that has been waiting to get it's turn.  I have a pretty nice PE kit for it to spruce things up, but all those tiny parts are the reason I have not gotten around to it yet.  Of course I am now building a 1/700 IJN Yubari with a smashing PE kit, and my fear of small PE ended.  1/700 scale PE makes the 1/48 PE parts look like beach balls! Big Smile

Brian

  • Member since
    July 2003
  • From: On my kitchen counter top somewhere in North Carolina.
Posted by disastermaster on Tuesday, December 3, 2013 12:02 AM

  A splendid manner of presentation and a especially nice piece of work.

  Great attention to detail and a good eye for the finish too.    

                                                            http://cur.cursors-4u.net/smilies/images2/smi114.png

This is my favorite shot.

http://farm4.staticflickr.com/3817/11177797684_8c3466bc1b_o.jpg

Sherman-Jumbo-1945

"I was so much older then, I'm younger than that now"


  • Member since
    December 2006
  • From: N. Georgia
Posted by Jester75 on Tuesday, December 3, 2013 12:28 PM

That is a gorgeous Sherman Jack!! Whoever said OD is boring?

Eric


  • Member since
    April 2006
  • From: ON, Canada
Posted by jgeratic on Tuesday, December 3, 2013 7:40 PM

Brian - thanks for that.  Yes, I’m sure if you can handle 1/700 PE, the 1/48 should be no problem.  Ship details include much more parts, like rails, that have to balanced on their ends, and then you have to be careful not to knock them off.

D-Master -  you are too kind with the comments.  Compared to your linked Sherman build, I’ve got several steps to go before reaching your plateau of refined work.   Interesting the favourite photo you chose … that one was a last minute decision to add to the finished set.

Eric – glad you like it.  It has been decades since I had last tried a Sherman.  With the amount of time spent on this one, it has without doubt, made me appreciate not only this important vehicle, but also those that are fond of modeling it on a regular basis.

regards,

Jack

  • Member since
    July 2004
  • From: Texas
Posted by wbill76 on Tuesday, December 3, 2013 8:30 PM

Came out a real beauty Jack! Would never know of the trials it presented along the way. That .50 cal is  a nice 'cherry on top' for this one certainly. Yes

  • Member since
    March 2006
Posted by TD4438 on Wednesday, December 4, 2013 4:37 PM

Perfection! No other word comes to mind.Besides jealousy that is.

JOIN OUR COMMUNITY!

Our community is FREE to join. To participate you must either login or register for an account.

SEARCH FORUMS
FREE NEWSLETTER
By signing up you may also receive reader surveys and occasional special offers. We do not sell, rent or trade our email lists. View our Privacy Policy.