SEARCH FINESCALE.COM

Enter keywords or a search phrase below:

Juno Beach Sherman Vc WIP is now COMPLETED!

11112 views
36 replies
1 rating 2 rating 3 rating 4 rating 5 rating
  • Member since
    April 2006
  • From: ON, Canada
Posted by jgeratic on Sunday, December 8, 2013 12:30 PM

Johan, thanks very much!

----------------------------------------

So, got the headlights painted:

Added some semi-gloss around filler caps and stains, as well as more dirt colour on rear deck since infantry were known to hitch a ride there.

Tried another round of light dust on the lower hull.  Seems the camera is the culprit here ... under naked eye it looks like beach sand, but soon as it goes to digital it turns red on me.  If i try to adjust the red, that will effect the olive colour of the tank.  So yea, time to move on to the next project.

regards,

Jack

  • Member since
    April 2005
  • From: Gothenburg
Posted by JohanT on Saturday, December 7, 2013 7:04 AM

Hi Jack,

congratulations on your build, I keep coming back to the blog and with a big smile on my face.

That M2 is just amazing but you have so many "final touches" :)

Thank you for sharing, love the trick with the tracks!

Very Best Regards

Johan

  • Member since
    April 2006
  • From: ON, Canada
Posted by jgeratic on Saturday, December 7, 2013 12:27 AM

disastermaster - thanks for describing what you see.

the doog - thanks a bunch!  I'll see what I can do about glossing up the fuel spills this weekend.  I'll also add some colour to the headlights - I totally forgot those. Embarrassed

Ernest -  happy to see you here and voicing your approval.  I'm curious about the film segment in question, but was it also in colour?  I've only seen it in b/w... but yes, if one of the scenes includes an SS officer riding around in a captured universal carrier with a star on it's side, then that is the same film. 

regards,

Jack

  • Member since
    July 2006
  • From: San Francisco Bay Area
Posted by bufflehead on Friday, December 6, 2013 6:21 PM

Jack that is absolutely beautiful!!  You did a FANTASTIC job on that little Tamiya kit, with the TW conversion and all the problems along the way!  Painting and weathering are fabulous, a work of art!

Now here's something interesting.  I was watching WWII In Color a couple of nights ago and the episode was about the Normandy landings.  While showing scenes of the battles around Caen there was a scene of a German vehicle passing a knocked out Firefly that looked to have the same markings as "Chaser".  I replayed the scene a few times on my DVR, pausing and advancing frame by frame and I could swear the vehicle did indeed have the name "Chaser" on it, but it was just barely visible at the correct spot on the side of the hull!   Can you lend any insight on this?

Ernest

Last Armor Build - 1/35 Dragon M-26A1, 1/35 Emhar Mk.IV Female


Last Aircraft Builds - Hobby Boss 1/72 F4F Wildcat & FW-190A8


  • Member since
    January 2007
Posted by the doog on Thursday, December 5, 2013 4:15 PM

That's gorgeous, Jack!

The only thing ti need, in my opinion, is a little bit of semi-gloss  fuel stains around the filler caps. And maybe put a little bit of gloss on that fuel spill there. That will break up monotone flatness a bit.

The running gear looks great by the way. I like the dusty weathering,

  • Member since
    July 2003
  • From: On my kitchen counter top somewhere in North Carolina.
Posted by disastermaster on Thursday, December 5, 2013 12:24 PM

jgeratic

TD4438 - grateful for your comments...... suppose to be mud but looks more like rust. 

regards,

Jack

  The photo looks (to http://www.atomicefi.com/WorkArea/threadeddisc/emoticons/wink.png me) more like dried red mud with dust.

Sherman-Jumbo-1945

"I was so much older then, I'm younger than that now"


  • Member since
    April 2006
  • From: ON, Canada
Posted by jgeratic on Thursday, December 5, 2013 2:28 AM

Bill - thanks!  Pretty soon your Tiger should be done, then we can have a little rumble.  My Firefly will be hiding somewhere in the shrubbery.

TD4438 - grateful for your comments.  I wouldn't call it perfect, as I know where all the warts and blemishes are.  One thing I didn't like was the burnt umber weathering powder on the lowers, suppose to be mud but looks more like rust. 

regards,

Jack

  • Member since
    March 2006
Posted by TD4438 on Wednesday, December 4, 2013 4:37 PM

Perfection! No other word comes to mind.Besides jealousy that is.

  • Member since
    July 2004
  • From: Texas
Posted by wbill76 on Tuesday, December 3, 2013 8:30 PM

Came out a real beauty Jack! Would never know of the trials it presented along the way. That .50 cal is  a nice 'cherry on top' for this one certainly. Yes

  • Member since
    April 2006
  • From: ON, Canada
Posted by jgeratic on Tuesday, December 3, 2013 7:40 PM

Brian - thanks for that.  Yes, I’m sure if you can handle 1/700 PE, the 1/48 should be no problem.  Ship details include much more parts, like rails, that have to balanced on their ends, and then you have to be careful not to knock them off.

D-Master -  you are too kind with the comments.  Compared to your linked Sherman build, I’ve got several steps to go before reaching your plateau of refined work.   Interesting the favourite photo you chose … that one was a last minute decision to add to the finished set.

Eric – glad you like it.  It has been decades since I had last tried a Sherman.  With the amount of time spent on this one, it has without doubt, made me appreciate not only this important vehicle, but also those that are fond of modeling it on a regular basis.

regards,

Jack

  • Member since
    December 2006
  • From: N. Georgia
Posted by Jester75 on Tuesday, December 3, 2013 12:28 PM

That is a gorgeous Sherman Jack!! Whoever said OD is boring?

Eric


  • Member since
    July 2003
  • From: On my kitchen counter top somewhere in North Carolina.
Posted by disastermaster on Tuesday, December 3, 2013 12:02 AM

  A splendid manner of presentation and a especially nice piece of work.

  Great attention to detail and a good eye for the finish too.    

                                                            http://cur.cursors-4u.net/smilies/images2/smi114.png

This is my favorite shot.

http://farm4.staticflickr.com/3817/11177797684_8c3466bc1b_o.jpg

Sherman-Jumbo-1945

"I was so much older then, I'm younger than that now"


  • Member since
    December 2008
  • From: Goffstown, NH
Posted by New Hampshire on Monday, December 2, 2013 6:54 PM

Jack, this thing came out beautifully!  Yes

I have had a Tamiya 1/48 Sherman in my stash for a few years now that has been waiting to get it's turn.  I have a pretty nice PE kit for it to spruce things up, but all those tiny parts are the reason I have not gotten around to it yet.  Of course I am now building a 1/700 IJN Yubari with a smashing PE kit, and my fear of small PE ended.  1/700 scale PE makes the 1/48 PE parts look like beach balls! Big Smile

Brian

  • Member since
    April 2006
  • From: ON, Canada
Posted by jgeratic on Monday, December 2, 2013 5:24 PM

Thanks Bill... one more little update before the final photos:

Final bits arrived to make the copula machine gun  for my Sherman.  Originally I had ordered just the RB set, but it did not include a resin stock for the .50 cal Browning.  So I had to turn to Hauler, but at least now I've got the ammo box as well.    Looks like I've got a mini build in front of me:

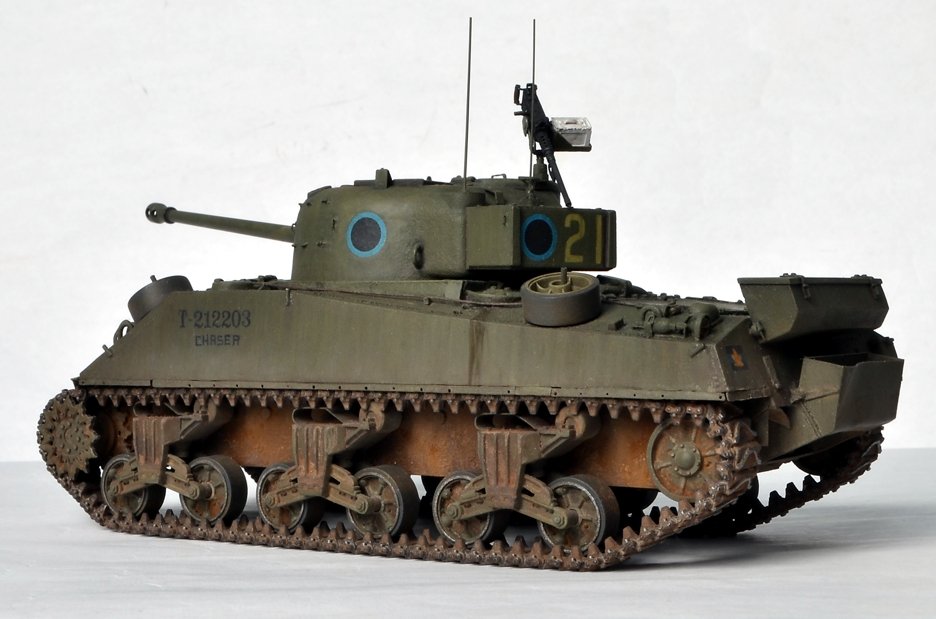
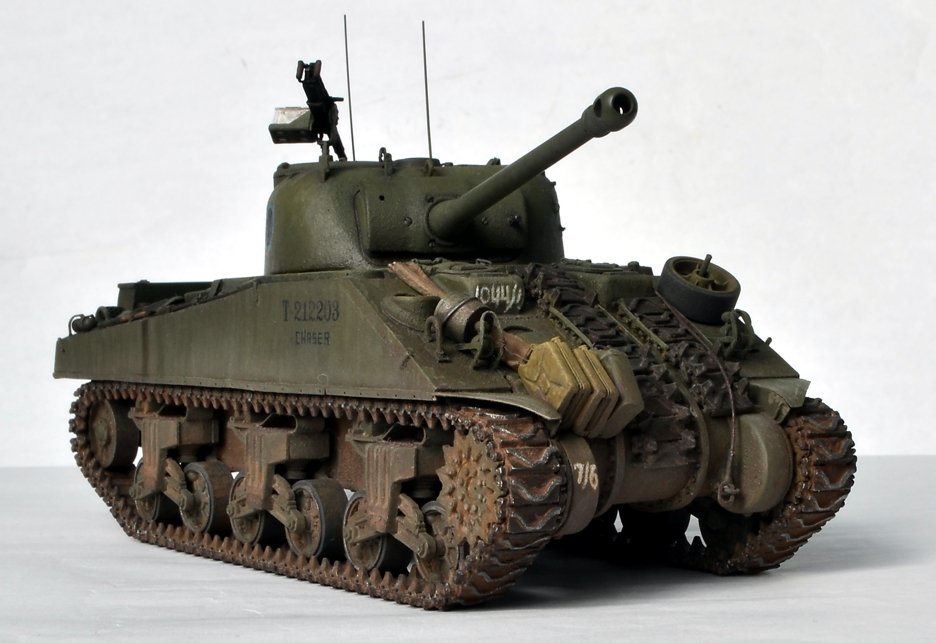
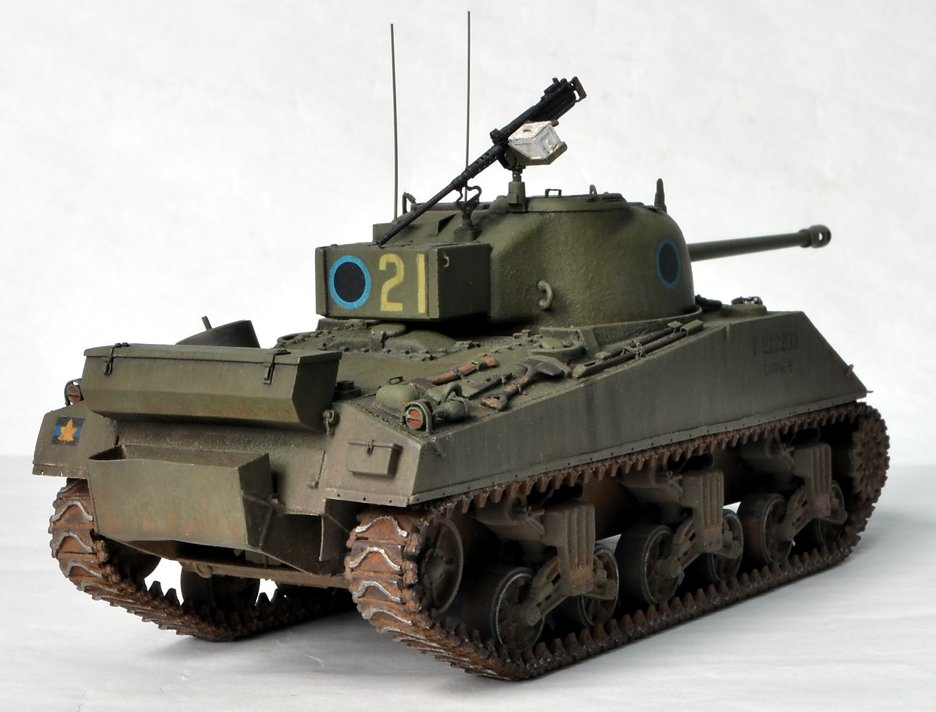
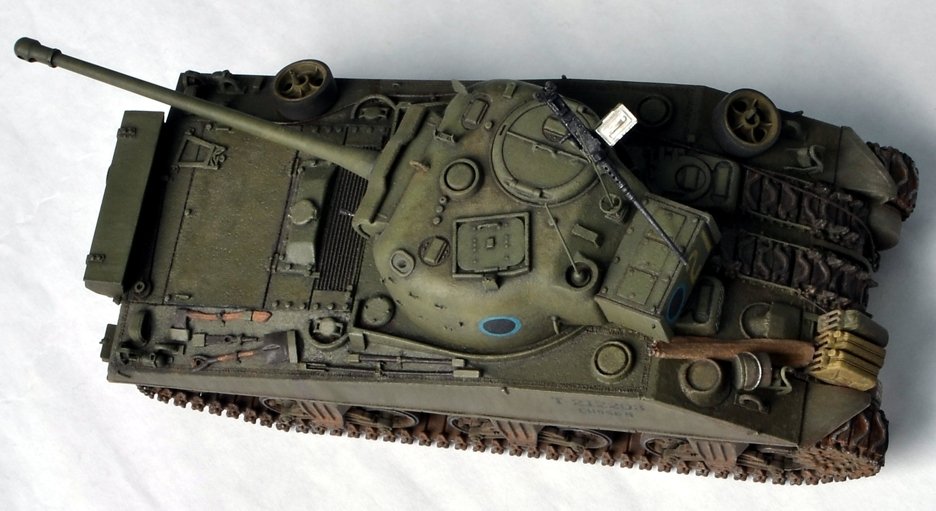
The .50 cal Browning did require some further scratch building so it would have a post to sit on where it attaches to the turret/copula.  So a short length of brass rod, and a disc section cut from plastic rod to the rescue.  Can't say how accurate it is, (on the net found a huge array of gun cradles, never realized there were so many examples), but it works for me.

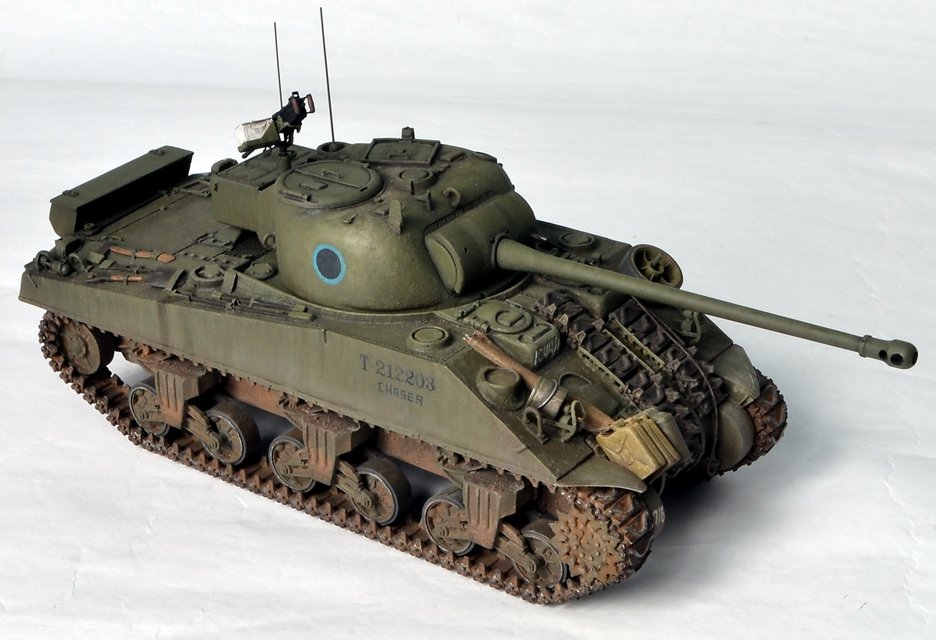
The white painted ammo box is copied from period photos, though the pic of this particular tank had the box attached length wise, running parallel with the gun.

-----------------------------------------------------------

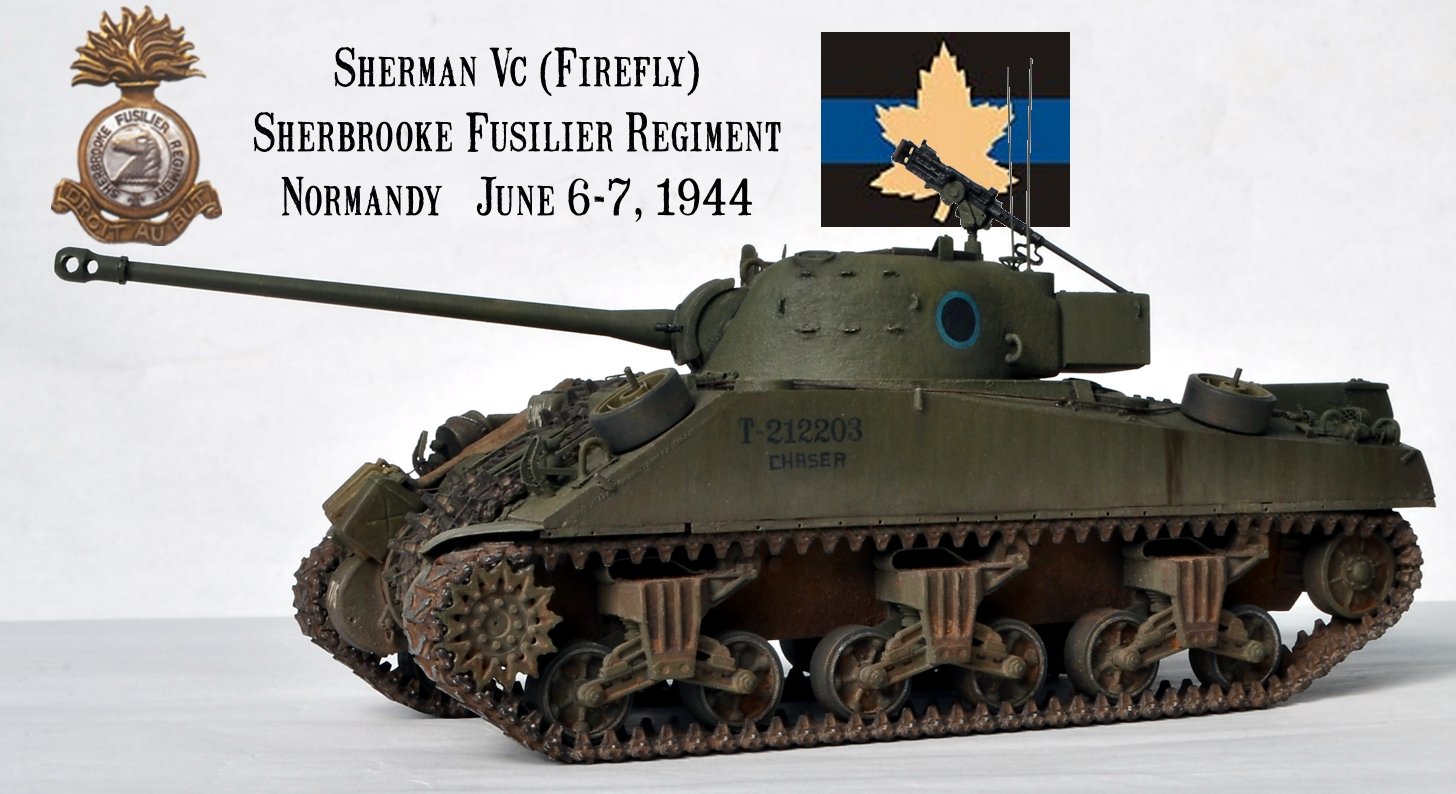
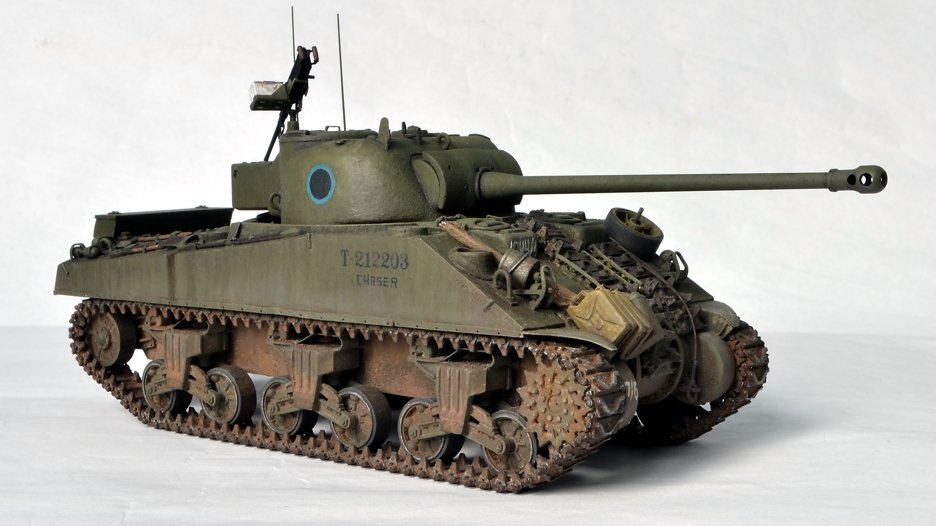
For those not into history, you can skip this part, photos of the completed build follow.

The Sherbrooke Fusilier Regiment was the reserve armoured unit for Juno beach, the Canadian sector during the Normandy invasion.  Due to congestion on the beachhead, it would be almost noon before they began unloading.  Further traffic jams were experienced on the roadway, as there was only the one leading inland.   By evening they were within view of the main objective, Carpiquet airfield.  Out of friendly artillery range and no ground troops in the vicinity, the Shermans pulled back to a more secure position.


On D-day+1, the drive forward continued.  Unknown to the Canadians was the arrival of elements of the 12SS (Hitler Jugend) Panzer Division during the night.  Two companies of Panzer IVs along with panzergrenadiers were given specific orders that afternoon - simply put, drive the allies back into the sea. 

During the afternoon the two offensively minded sides would meet.  Both forces were new to battle, resulting in some reckless behaviour.  For two hours, tank versus tank battles raged in the area between Authie  and Buron.  Final figures vary on losses. but Chaser was one of the them.  Though the Canadians were given a bloody nose, they did managed to straighten their line and hold ground, stuffing the enemy's counter attack.

regards,

Jack

  • Member since
    July 2004
  • From: Texas
Posted by wbill76 on Tuesday, November 26, 2013 7:10 PM

Nice adaptation with the tracks Jack, once painted and weathered they will all fit right in.

  • Member since
    April 2006
  • From: ON, Canada
Posted by jgeratic on Tuesday, November 26, 2013 2:25 AM

Bill, Brian, Ernest and the doog, thanks for your kind words.

I use Corel photopaint to put the WIP pics together.  I usually do this after I get home from work, which is well after 2am, so it gives me a chance to unwind, and also keeps me familiar with some of the many bells and whistles with the software.

--------------------------------------------------

This weekend was spent on the tracks.  To expedite things, I utilized Tamiya's longer length track sections (green plastic).   The different tread pattern is not really that noticeable under the hull sponsons, and those touching the ground can only be seen if the vehicle is flipped upside down.  The front spockets themselves were used as a jig for the individual links, and after the crazy glue had dried, there was no problem removing the assembly, though it is a tight fit.  Same premise on the idler end.

Painting begin first with a grey primer, followed with a full coating of AK acrylic chipping colour, applied with an airbrush.  Flory Sand wash was applied liberally over all.  Tread highlights from regular wear, were picked out with Tamiya's metallic grey.  Another thicker wash was applied by adding some raw umber powder to Flory's Sand wash.  Again, once the track's are in place, some lighter weathering powders will be applied.

regards,

Jack

  • Member since
    January 2007
Posted by the doog on Friday, November 22, 2013 7:59 AM

Excellent so far. The model, and the care taken with presenting your WIP here. I wish more people would present their builds this way, but I can see how much time it would take to carefully modify your photos in such a manner. You must be a wizard with "Paint"!

  • Member since
    July 2006
  • From: San Francisco Bay Area
Posted by bufflehead on Wednesday, November 20, 2013 9:55 PM

Wow Jack!!  I can't believe that allied gas can was originally German!!  The "X" looks like a real indentation!!  Beautiful work on all the new details my friend!

Ernest

Last Armor Build - 1/35 Dragon M-26A1, 1/35 Emhar Mk.IV Female


Last Aircraft Builds - Hobby Boss 1/72 F4F Wildcat & FW-190A8


  • Member since
    December 2008
  • From: Goffstown, NH
Posted by New Hampshire on Wednesday, November 20, 2013 7:54 PM

Jack, all I can say is impressive!  Very very impressive!

Brian

  • Member since
    July 2004
  • From: Texas
Posted by wbill76 on Wednesday, November 20, 2013 5:20 PM

Some nice detail additions there Jack, looking good.

  • Member since
    April 2006
  • From: ON, Canada
Posted by jgeratic on Tuesday, November 19, 2013 4:48 PM

Ernest, thanks for the continued interest and support.

-----------------------------------------------------------

The stowage, for the most part, is now done.  Still need some touch-ups, likely add  washes to alter some colour.  Once the tracks are on,  weathering powders will be applied.  Also worked on the streaking of the hull sides.

The items in the front required some scratch building in order to copy what could be discerned from the period photo.   The wrapped rods (possibly the gun cleaning rods) was pretty straight forward to make.  After cutting a section of facial tissue, a mixture of water, paint and white glue was applied.  While still wet, six rods were placed at one end, rolled up,  and placed in position.  

One of the fuel cans looked to be the allied style, so a conversion of a jerrycan was on order, first by puttying in the unwanted details and then sanding smooth.  Intention was to scribe in the new detail, but proved difficult over a combined resin and putty surface.  So I just painted some highlights and shadows to give the illusion of the "X" stamped on the side as well as the seam running the circumference of the top portion.   Stereo wire also provided the lip around the base.  One last detail was removing the off-centered spout and replacing this with a disc punched out of .010 sheet plastic, centrally located.

regards,

Jack

  • Member since
    July 2006
  • From: San Francisco Bay Area
Posted by bufflehead on Sunday, November 17, 2013 12:46 PM

Jack, I have to agree with Bill.....can't stop now even with the Tank Workshop track problems.  All your hard work will produce a superb finished build!!

On another note:  That's two dings against TW's 1/48 resin castings.......

Ernest

Last Armor Build - 1/35 Dragon M-26A1, 1/35 Emhar Mk.IV Female


Last Aircraft Builds - Hobby Boss 1/72 F4F Wildcat & FW-190A8


  • Member since
    April 2006
  • From: ON, Canada
Posted by jgeratic on Friday, November 15, 2013 1:23 PM

doog and subfixer, thanks or stopping in, much appreciated.

Yes, the first posting was just a summary of about six weeks of work, which was cut and pasted from the Longest Day GB.

regards,

Jack

  • Member since
    March 2004
  • From: Spartanburg, SC
Posted by subfixer on Friday, November 15, 2013 10:14 AM

Simply superb!

I'm from the government and I'm here to help.

  • Member since
    January 2007
Posted by the doog on Friday, November 15, 2013 9:35 AM

Wow, you're quite the trooper with this impressive build, Jack! I wonder which took you longer--your impressive first posting with all the stylish photos, or the actual build itself? Wink

Nice to see you soldiering on so competently on your way to a spectacular finish!

  • Member since
    April 2006
  • From: ON, Canada
Posted by jgeratic on Tuesday, November 12, 2013 1:41 PM

Bill, thanks for the encouragement - but yea, this is what can happen when undertaking a conversion that requires multiple sources.  Combined with even further accurizing to build from a specific photo,  it has been an interesting journey thus far.

regards,

Jack

  • Member since
    July 2004
  • From: Texas
Posted by wbill76 on Tuesday, November 12, 2013 1:00 PM

Hang in there Jack! You're too far gone now to back out. Wink Bummer about the tracks but the end result you're getting will definitely add to the finish.

  • Member since
    April 2006
  • From: ON, Canada
Posted by jgeratic on Tuesday, November 12, 2013 1:53 AM

Thanks, Ernest and Bill.

Not much achieved at the bench this past week.  The type T54E2 resins tracks arrived from Tank Workshop, so I set about completing the spare links on the front hull.  This involved  shaving off the tread pattern and reattaching it to the opposite side, as well as adding short lengths of plastic rod on those ends that have no coupling.  I also got the base colours on the two spare wheels.

The quality of the tracks, again, is hit and miss.  Every second link has an excess chunk of resin in one corner.  This has to be cleaned out in order for the adjoining link to fit in .  I noticed too that the odd guide tooth wasn't fully formed, resulting in a broken tip appearance (I didn't count how many as I was already discouraged enough).  

In hindsight now, with the amount of time and money going into this one, I should have opted for  1/35 scale, and I would still have some coin left for several servings of V8.

regards,

Jack

  • Member since
    July 2004
  • From: Texas
Posted by wbill76 on Monday, November 4, 2013 10:28 AM

Nice color variations going on with the green Jack, very nice. Yes

JOIN OUR COMMUNITY!

Our community is FREE to join. To participate you must either login or register for an account.

SEARCH FORUMS
FREE NEWSLETTER
By signing up you may also receive reader surveys and occasional special offers. We do not sell, rent or trade our email lists. View our Privacy Policy.