SEARCH FINESCALE.COM

Enter keywords or a search phrase below:

1/35 MaxxPro w/ scratch built RPG netting - Afghanistan 2014 * WIP

11950 views
38 replies
1 rating 2 rating 3 rating 4 rating 5 rating
  • Member since
    December 2003
  • From: Colorado
1/35 MaxxPro w/ scratch built RPG netting - Afghanistan 2014 * WIP
Posted by psstoff995 on Thursday, March 26, 2015 2:08 AM

After a long hiatus, four years (so far) of Army service and a few quick weekend projects that turned into month long builds, I decided to start a month long build that will no doubt take me quite some time to complete.

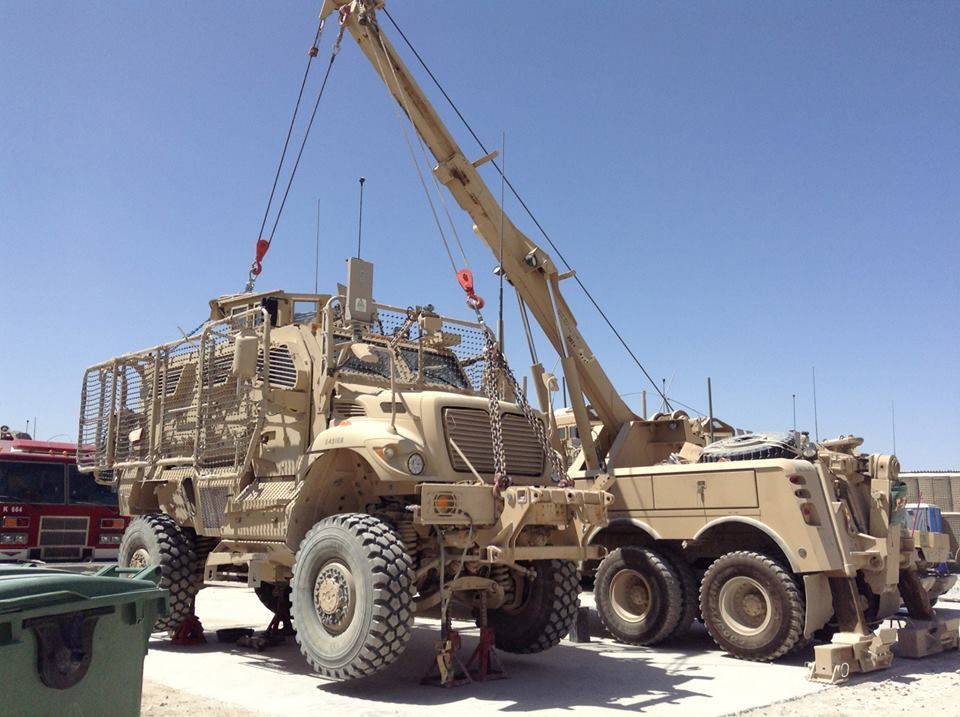
I've deployed twice to Afghanistan with the biggest benefit being plenty of reference pictures and the layout of vehicles/equipment forever burned into my brain. With all this knowledge, I decided I should build a vehicle that I lived in for a few months overseas. The International MaxxPro MRAP. Very close to my heart Heart

Kinetic makes a decent kit but it's either based on one of the early 2007 models or it's some kind of export model of the MaxxPro. I say this because 1) the version I manned the turret in had some pretty serious differences but 2) I saw this version Kinetic modeled their kit after in service as late as 2014 (maybe still?) with the Romanian Army. So depending on what you want to build, this may very well be a nice kit right out of the box.

I did invest in the Voyager PE set as well (mainly for the sake of the rear ramp stairs. The kit stairs are garbage but we'll get to that one of these days).

The first challenge I knew I was going to have to overcome (and what has prevented me from starting this sooner) was not only the aforementioned fact that Kinetic's MaxxPro is of the wrong vintage, but more importantly- every vehicle I saw on Highway 1 (with the exception of some REMF vics that had to eventually be pulled off of FOBs after years of hibernation with the rest of the war effort as we shut the country down last year) had some kind of RPG netting or cage device attached to it.

As I have never seen anyone build an MRAP with such a net, I knew there was likely no AM parts, which meant I'd have to do it on my own.

I thought this meant I would have to try and work with styrene pipe or rod or some kind of mess that no doubt would take too long for the glue to set, would snap when bent or melt if I tried to heat it up, I don't know, basically I'm not too hot when it comes to scratch building with styrene. It's too soft and too malleable and I'm just not patient enough.

Then I had an epiphany... why not use brass rod and just solder it in place? Oh right Chris, because the last thing you soldered was some copper plumbing with a blow torch and your Dad's supervision in the year 2000. At best. But eh... how hard could it be?

And sure enough, here we are...

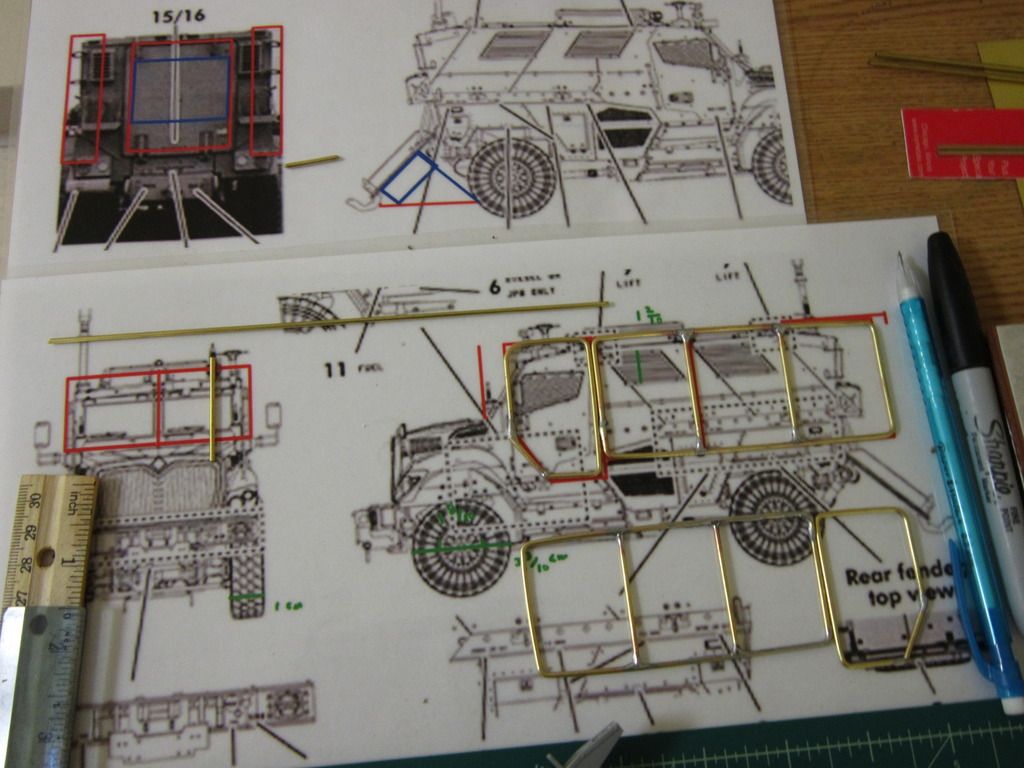
Shown on a 1/35 (roughly) scale blow up of the MaxxPro diagram from the Kinetic instruction to help give me a basis to bend/cut brass rod- and some of the RPG netting structure already completed. There was a pretty decent learning curve but I think for the most part I've figured it out. The actual netting is going to wind up being something like cheese cloth unless someone chimes in with a better idea.

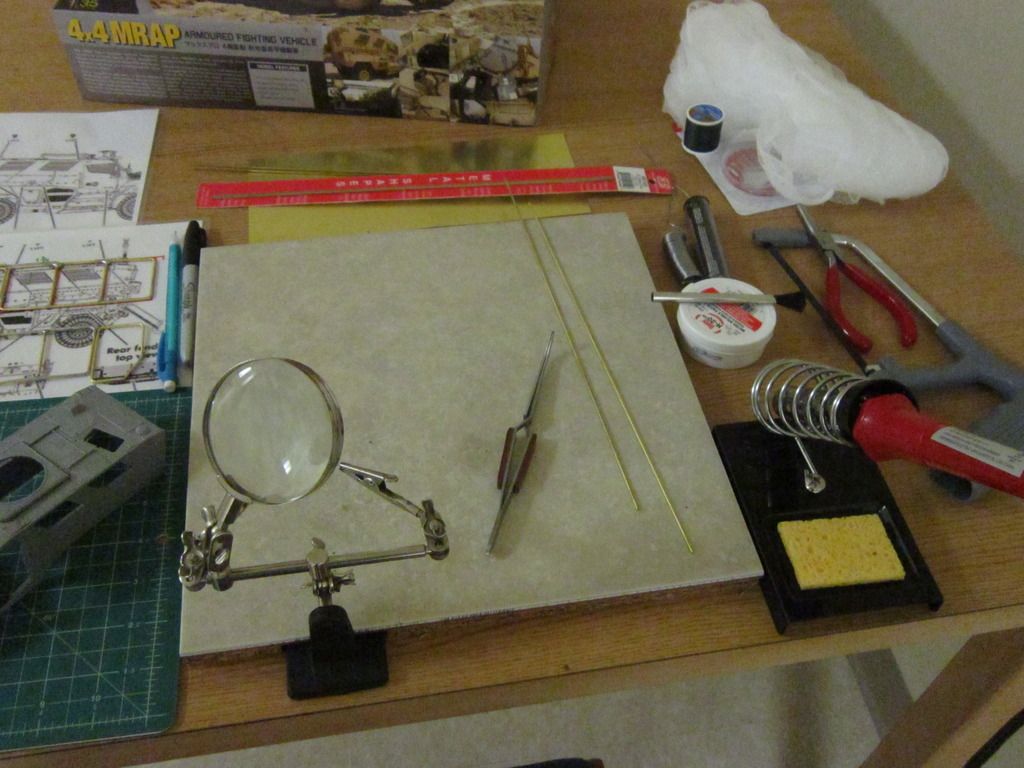
Here's my workbench by the way

And what I resort to when the "helping hands" aren't up to the task.

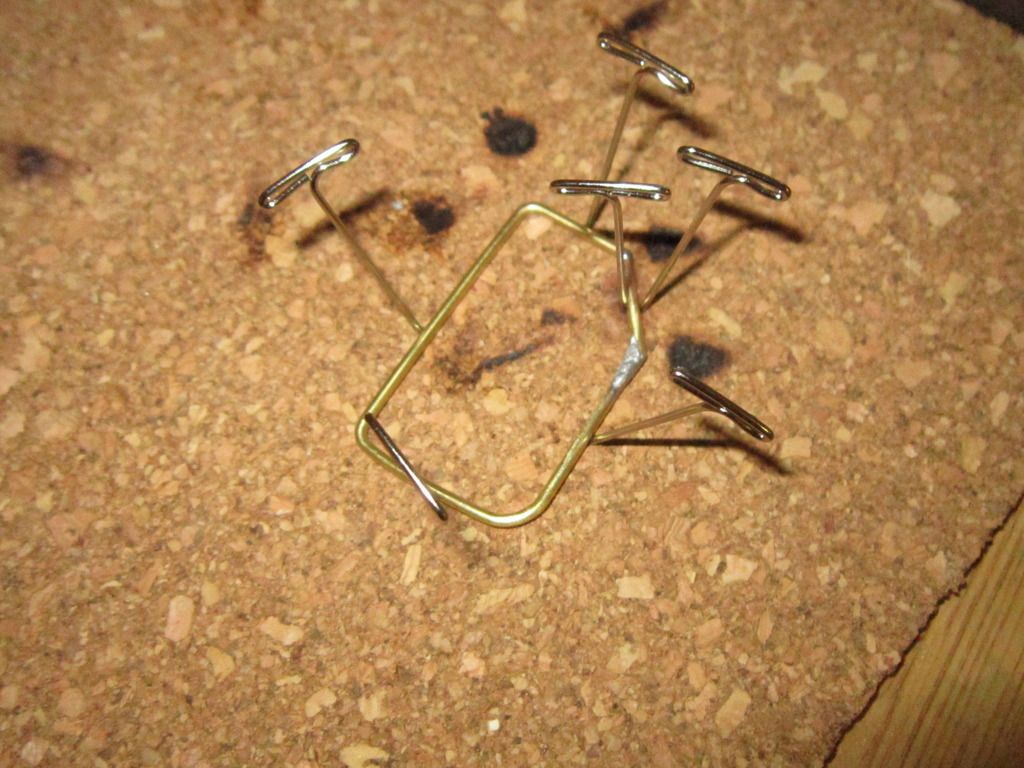
Just some cork board, not trying to burn up my barracks room furniture...

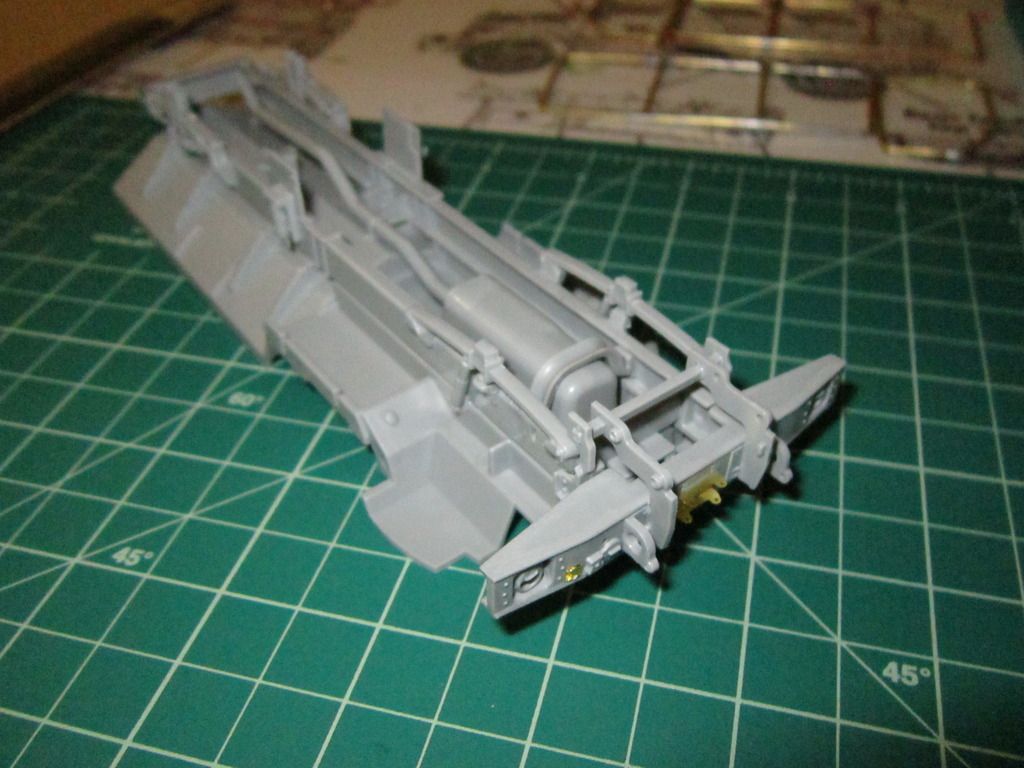
Here's some progress on the actual kit itself.

First major attempted fix to the kit (unsuccessful representation, but better than nothing?)

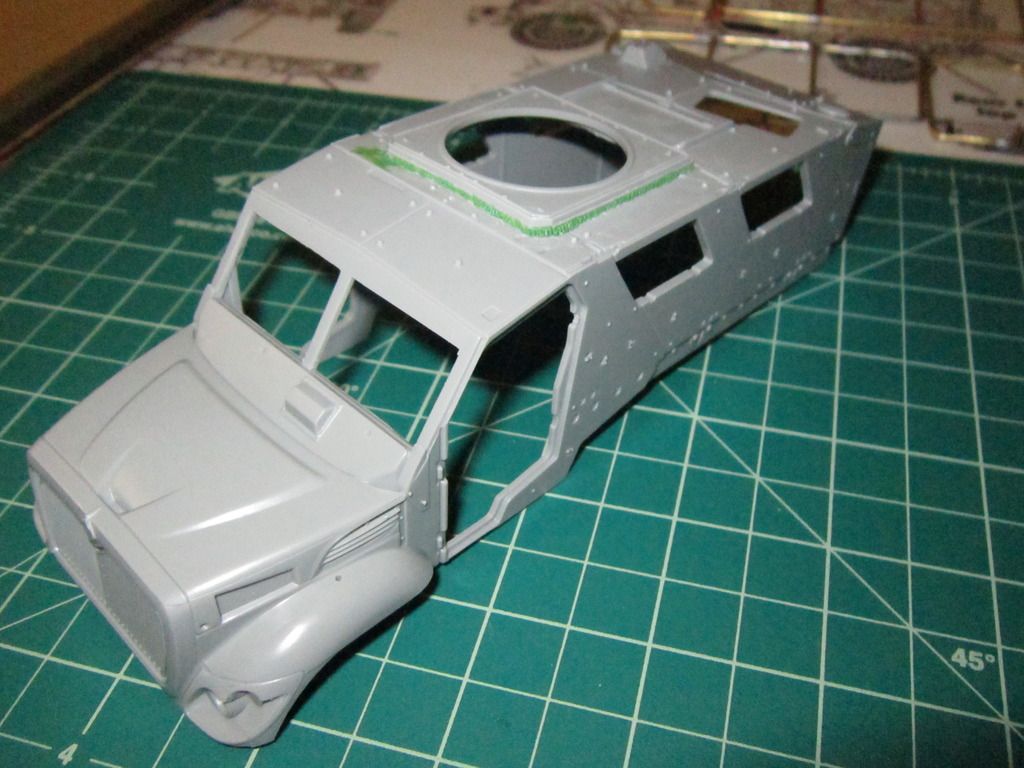
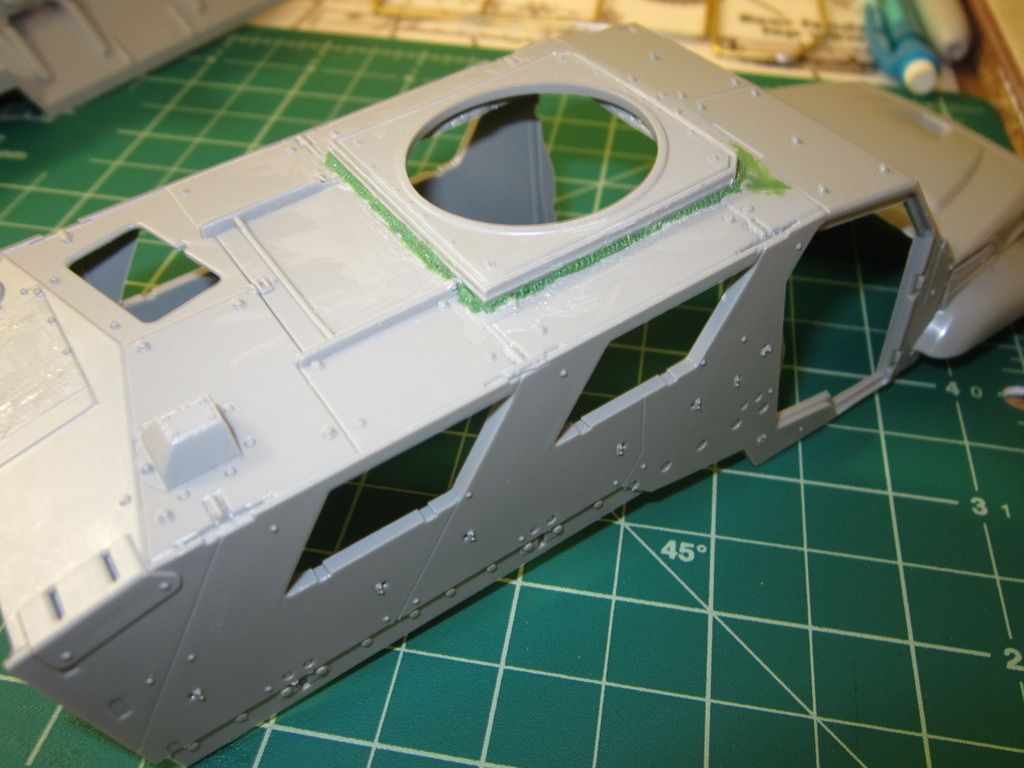
I tried to get the turret to sit flush on the roof, the kit (and the other version of the MaxxPro) had a box elevated off the roof about 4 to 6" (in 1/1 scale) that the turret sat on top of. Almost like the whole turret was an after thought when they designed it, so they just plopped it down on top. The version I had was flush, this isn't a great picture, but you can see just how low the turret sits compared to how the MaxxPro looks on the box art.

Also, you'll get to see me (the one with the blue colored 1/2 sleeve) playing soccer with the ANA in the foreground.

By the way, unless otherwise noted, all these reference pictures are my own property. Either taken by myself or my coworkers.

-Chris

US Army Infantryman

  • Member since
    November 2005
Posted by T26E4 on Thursday, March 26, 2015 4:46 AM

At this scale, would vinyl mesh -- the kind used to repair window bug screens -- be an option?

Roy Chow 

Join AMPS!

http://www.amps-armor.org


  • Member since
    May 2009
  • From: Poland
Posted by Pawel on Thursday, March 26, 2015 5:11 AM

Hello Chris!

Good to see you back on the forums!

You might want to try to do your own PE parts - I mean draw them (CorelDRAW is best for this) and find a company to etch them for you. I tried it once and it works just fine. The other option could also be to laser-cut them - companies that offer this service are also very popular.

Anyhow, welcome back, good luck with your build and have a nice day

Paweł

All comments and critique welcomed. Thanks for your honest opinions!

www.vietnam.net.pl

  • Member since
    December 2002
  • From: Valrico, FL
Posted by HeavyArty on Thursday, March 26, 2015 5:46 AM

Looks like you are off to a good start.  I second the window screen or some other type of mesh as opposed to the cheese cloth.  Cheese cloth works well for camo nets, but I don't think it would look right for the RPG screen.

Gino P. Quintiliani - Field Artillery - The KING of BATTLE!!!

Check out my Gallery: https://app.photobucket.com/u/HeavyArty

"People sleep peaceably in their beds at night only because rough men stand ready to do violence on their behalf." -- George Orwell

  • Member since
    July 2003
  • From: On my kitchen counter top somewhere in North Carolina.
Posted by disastermaster on Thursday, March 26, 2015 7:43 AM

http://www.sherv.net/cm/emoticons/new-year/confetti-cannon-smiley-emoticon.gifGood to see you back home here with a great debut!

Sherman-Jumbo-1945

"I was so much older then, I'm younger than that now"


  • Member since
    November 2009
  • From: SW Virginia
Posted by Gamera on Thursday, March 26, 2015 8:06 AM

A lot of work but she's going to look awesome!

"I dream in fire but work in clay." -Arthur Machen


  • Member since
    December 2003
  • From: Colorado
Posted by psstoff995 on Thursday, March 26, 2015 10:58 AM

Roy, Gino, I think you're both right. Depending on the size of the mesh screen I think that would work a lot better. Knew you guys would have some ideas. I think the only potential issue I was trying to avoid with the bug screen and using PE would be the effect of the droop. In 1/1 scale these things really are just nets, and there is no stiffness whatsoever to them, they're not hanging tightly off the framework either, so they wind up drooping pretty noticeably. There's the issue of the little octagonal discs that are at every net string intersection too, but I think in this scale I'll be okay to just avoid them all together.

Pawel, nice to see that you're still around here too, glad to hear from you again. I think the PE screens would work just as well as the bug screens but the bug screens seem easier to get a hold of. That being said if I wind up finding a spot where I need some custom PE I've always wanted to try that route as I've seen people that design their own stuff to good effects.

disastermaster, glad to be back I'll have to look through everyones galleries of recent work, I've been away at least 4 years from the site, that's a lot of builds! That Sherman in your signature looks real nice, great photography as well

Gamera, thanks! I appreciate it. I thought it was going to be a lot of work too, but once I had everything figured out for the RPG framework it actually went together pretty quickly, especially once I figured out some good soldering techniques on YouTube <- an invaluable modeling resource these days, I've been watching MIG Airbrushing videos and all kinds of walk throughs now, pretty cool that they can upload full length movies instead of having a 10 minute cap now.

-Chris

US Army Infantryman

  • Member since
    September 2006
  • From: Dripping Springs, TX, USA
Posted by RBaer on Thursday, March 26, 2015 1:48 PM

Chris, welcome back!

Looks like you're jumping back in with a grand project as well.

I have another suggestion for the mesh: A number of years ago, I gave in to my wife's desire to have a pool put in. One of the positives (other than being able to jump in the damm thing after working all day in a 110 degree shop) was the mesh from the worn out leaf skimmers. They last about 3 years, and I've been using sections of the old ones for the mesh in bustle racks for a while now. It may be a bit big for what you're needing to represent, but the ones I've been buying lately are actually molded, not woven but look woven, take paint really well and adhere with cryo glue.

I'd be happy to send you a little section of it if you wanna take a look-see.....    I've got a lot. PM me if interested.

Apprentice rivet counter.

  • Member since
    September 2012
Posted by GMorrison on Thursday, March 26, 2015 2:25 PM

 Modeling is an excuse to buy books.


  • Member since
    December 2002
  • From: Valrico, FL
Posted by HeavyArty on Thursday, March 26, 2015 3:06 PM

You can also use bridal viel toole.  It is a small octagonal mesh.  I use it for turret baskets and the like.  It comes in a couple different sizes as well.  You can find it at fabric stores.  A square yard (about $2.00) will last a lifetime.

Gino P. Quintiliani - Field Artillery - The KING of BATTLE!!!

Check out my Gallery: https://app.photobucket.com/u/HeavyArty

"People sleep peaceably in their beds at night only because rough men stand ready to do violence on their behalf." -- George Orwell

  • Member since
    October 2007
  • From: Louisville, KY
Posted by pordoi on Thursday, March 26, 2015 5:39 PM

Here's a link to a thread on teh Military Modeling site that may give you some additional photo etch options;

http://www.militarymodelling.com/forums/postings.asp?th=52014

Don

  • Member since
    December 2003
  • From: Colorado
Posted by psstoff995 on Friday, March 27, 2015 10:35 PM

Thanks so much for all the support and tips on the products out there guys! I really appreciate it

RBaer, that actually sounds like an ideal mesh, as it's not rigid like the the PE or bug screen. That being said, I did wind up finding some bug screen (for free- always a benefit) that looks like its actually dead on in terms of the scale size square holes I needed. It's a little too rigid but I think that's the price I'll pay for the right size. It doesn't look flat like how some PE mesh (grills really) tend to look. And again, it was free.

Thanks for the link GMorrison, my Dad's a big HO modeler, I think he actually has a similar kit back home if not the same one. I'd have to hold it in my hand though to see how the holes look in 1/35 and if they were square or that diamond shape that real chain-link has. But I do appreciate it.

Gino, that'd be nice if it came in square mesh instead of octagonal- but that being said octagonal might work for a chicken-wire look if I ever wanted to make some old school WWII allied panzerfaust type mesh (like Steve did with that Sherman build in his signature!)

Thanks Don, that scalelink catalog has some really cool stuff, even foliage, will definitely bookmark that for later.

But as I said, I did get some bug screen and will post a picture of it with the framework as a reference by the end of the weekend, along with some more progress on the styrene.

-Chris

US Army Infantryman

  • Member since
    December 2003
  • From: Colorado
Posted by psstoff995 on Saturday, March 28, 2015 4:01 PM

And a quick update before I head out to do some cardio...

Bug screen (in a pretty good scale I think!)

So this was cool enough for me to stop and take a photo...

All these little bolts are kind of a strange addition for the inside of the undercarriage, you'll never see it right? So it might be accurate to have them there, but why not use a simpler, more traditional mounting system for the cover part?

Because you can actually see it, the folded piece of plate armor actually has a visible gap (maybe 1/2" on the 1/1 scale MaxxPro) and by building the kit the way they did, it accuratly represents the fact that you can see through that gap to the bolts that hold the plating in place. Too cool! I had actually forgotten about that detail until I noticed the kit had replicated it. So good work on that Kinetic. I applaud your efforts.

Now this masking tape isn't for painting, I'm actually going to leave it in place and paint over it. It's just going to give some texture to what would be padded flooring material designed to take some force of an IED blast without transferring it to the feet of soldiers that sit in the back. The cross beams that are bolted to the frame in between these padded mats on the frame floor are actually painted in red and are stenciled in white to the effect of "No Feet" or something like that- don't put your feet on the cross bars, they are a part of the frame and an IED blast will transfer directly through your foot.

I took a picture halfway through to try and show the difference in texture. Some people use putty or Mr Surfacer, I think masking tape is much simpler.

Hopefully you can see what I was getting at.

Here's a shot of the bottom-

And you can tell I've had to readjust the muffler. In the next two pictures you'll see that although the original 2007 MaxxPro (still in service with at least the Romanian Army, probably others) has the exhaust like the kit would have you install it- flat and out the back left- our upgraded vehicles had the muffler rotated up at an angle and out the back right.

You can also see in this reference shot, the frame is actually different, as is the rear suspension. It's not leaf springs but an actual coil, looks similar to what you'd find on a HMMWV. I'm sure one could recreate the more accurate frame curve and the updated suspension. Honestly I'm not sure if the leaf design is found on the original MaxxPro or if Kinetic just made it up, but I imagine it's accurate given the other details they've gotten right. Anyway, I didn't realize the difference in the frame/suspension myself until I got to the exhaust. Even if I had noticed it sooner, that's too much modification for me to tackle.

*By the way- That's me posing for a joke photo carrying everything I was assigned at the time.

-M240L

-M4

-M320

-PAS13

-PVS14

-Helmet and plate carrier

-Backpack full of ammo

You know- just the typical quick swap load out from the Call of Duty video games...

And I'll leave you guys with a quick mockup

-Chris

US Army Infantryman

  • Member since
    December 2002
  • From: Valrico, FL
Posted by HeavyArty on Saturday, March 28, 2015 5:24 PM

Looking good.  The coil spring suspension is known as TAC-4 suspension.  It is a later mod; the original MaxxPro had the leaf springs.  It is the same suspension on the USMC Mk23 MTVR truck.  Trumpeter's Mk23 suspension could be modified to fit on the MaxxPro.

Gino P. Quintiliani - Field Artillery - The KING of BATTLE!!!

Check out my Gallery: https://app.photobucket.com/u/HeavyArty

"People sleep peaceably in their beds at night only because rough men stand ready to do violence on their behalf." -- George Orwell

  • Member since
    December 2003
  • From: Colorado
Posted by psstoff995 on Saturday, March 28, 2015 7:05 PM

Nice! Good to know, if I ever revisit it I'll make sure to snag a Mk23 as well. Thanks for the nomenclature. I'm sure it'll help anyone else that stumbles across this wanting to build more of a corrected later version.

-Chris

US Army Infantryman

  • Member since
    December 2003
  • From: Colorado
Posted by psstoff995 on Sunday, March 29, 2015 7:35 PM

I'm trying to order some Pro Art Model sets for this, anyone ever order through them before or have a good way to go about doing it through a distributor? The main thing I'm interested in is their MRAP radio set...

www.proartmodels.be/.../product_gal_055.html

It's designed for the M-ATV, but probably 90% of the components in that set work in the MaxxPro as well.

I really need the DAGR, Kinetic didn't supply one, and the BFT screen looks a lot better than the one in the kit. Plus the keyboard is necessary. The dual Harris radio mounts, again, look a lot nicer in resin. I'm not too worried about the DUKE box as I'm going to have to scratch a shelving bracket that closes it in.

I've already contacted the guys at R&J Enterprises (the only US distributor listed on Pro Art's website) so even though the sets I'm looking at aren't listed on their site, it'd be cool if they could order them as the Pro Art's ordering page seems a little iffy at best.

Have gotten a little farther along... need to take some pictures and I'll upload them tonight or tomorrow.

-Chris

US Army Infantryman

  • Member since
    January 2007
Posted by the doog on Sunday, March 29, 2015 9:01 PM

Wow, what a BEAST of a vehicle! Cool that you can post your own personal photos of it. It must be so cool to build something that you have personal knowledge of!

Welcome back to the forums too, Chris!

  • Member since
    December 2003
  • From: Colorado
Posted by psstoff995 on Sunday, March 29, 2015 9:35 PM

Thanks a lot Karl! It is a pretty cool feeling, two of my buddies have been vying for 1/35 versions of themselves to go with it! haha

I'm glad I got as many photos as I did, some of these vehicles were sold off to various militaries (or even melted down as the rumors went) as we pulled out at the end of last year. I think it wasn't cost effective to ship them all back stateside. But there's still US troops over there so who really knows...

I'm sure you know how cool the feeling is though having built that German castle you visited, your own pick up truck with your dirt bike in the back, that rusty old stock class Impala from the abandoned race track (and maybe more that I missed?)

ALTHOUGH I'm sure you also know just how frustrating it can be when the kit doesn't recreate all those little details that you know are supposed to be there. Or in my case, when it's a real decent representation of the first generation vehicle and I wound up spending 7 months in a third or fourth (??) generation...

But I'm having fun with it! Thanks for the welcoming message :)

-Chris

US Army Infantryman

  • Member since
    January 2007
Posted by the doog on Monday, March 30, 2015 8:14 AM

psstoff995

I'm sure you know how cool the feeling is though having built that German castle you visited, your own pick up truck with your dirt bike in the back, that rusty old stock class Impala from the abandoned race track (and maybe more that I missed?)

ALTHOUGH I'm sure you also know just how frustrating it can be when the kit doesn't recreate all those little details that you know are supposed to be there. Or in my case, when it's a real decent representation of the first generation vehicle and I wound up spending 7 months in a third or fourth (??) generation...

Actually, Chris, you're 100% right! I guess I never thought of it that way, but come to think of it, it's really the same thing!

And yes, I know the feeling of wanting to make every little detail..I am currently contemplating building my 1984 Chevette Scooter, and will have to change the grille and add trim, etc. That's about as close to any "tank" I've ever driven ,lol.

  • Member since
    December 2003
  • From: Colorado
Posted by psstoff995 on Friday, April 3, 2015 5:45 PM

A later update than I wanted. But I've been going slow on some of the photo etch (love/hate relationship)

I managed to finish the exhaust modification

...and just got in my resin AM parts from Pro Art Models today! Really nice radio set. The stretchers look good too. Will be using one on the finished build. Still haven't decided what color I'm going to paint it though... Hmm

Here's an overhead shot, took me most of the week after work and school to get all the seat belts in. I modified the Voyager PE to give the impression of an unbuckled 5 point set up. Still need to go in with sheet styrene and add some more buckles for the shoulder straps, and then use some putty to build the required locking mechanism that would be hanging off the front of the seats. (The extra straps are made of masking tape by the way)

Pro Art Models makes a really nice PE set that replicated our seat belts perfectly http://www.proartmodels.be/productgallery/product_gal_052.html but I wasn't going to spend even more money on that, and I think they're only included in the MAT-V detail set.

Another view of the seat belts, tried to get quite a few of them dangling off the sides of the seats as that's how they would often be found.

And a front cabin detail shot

The dash and the Harris radios/bench are just mocked up there now, will probably leave them off for painting.

-Chris

US Army Infantryman

  • Member since
    January 2007
Posted by the doog on Friday, April 3, 2015 5:53 PM

Man, that's some seriously impressive detailing, Chris! That's going to look stunning when it's all painted up and detailed!

  • Member since
    December 2003
  • From: Colorado
Posted by psstoff995 on Friday, April 3, 2015 6:04 PM

Thanks Karl! Going slower than I would have liked, but then it always seems to be like that haha

Almost forgot to reply to this, saw it the other day and got distracted

the doog

I am currently contemplating building my 1984 Chevette Scooter, and will have to change the grille and add trim, etc. That's about as close to any "tank" I've ever driven ,lol.

The grill work sounds tricky but I'd imagine the trim wouldn't be too bad (??) I've never really delved too deep into autos. I'm working on a 1/35 scale Ming SF pick up (which looks suspiciously like a Tacoma...) and had tried to do a 1/24 scale Ford Expedition (or Explorer? I don't remember) modified into the First Responder vehicle I volunteered with in my college days, but that got hung up as I was trying to figure out good ways to paint and construct. Will probably try again on that one day.

As for the 1984 Chevette Scooter "tank"- I know it's not what you meant but now I'm just picturing some kind of Mad Max zombie apocalypse modifications..... Whistling

-Chris

US Army Infantryman

  • Member since
    August 2014
  • From: Willamette Valley, Oregon
Posted by goldhammer on Friday, April 3, 2015 6:36 PM

First off, welcome back home in one piece and a big THANK YOU is in order.

For sag in the screens, take a look at the nylon/plastic version of window screen.  Might be just what you are looking for since the metal stuff is about right for scale. Looking good so far.

  • Member since
    November 2009
  • From: SW Virginia
Posted by Gamera on Friday, April 3, 2015 9:57 PM

Very nice work there on the radio and seat belts!

"I dream in fire but work in clay." -Arthur Machen


  • Member since
    December 2003
  • From: Colorado
Posted by psstoff995 on Saturday, April 4, 2015 9:29 AM

goldhammer- thanks a lot! I really appreciate it. As for the screens, I think what I have is the plastic, maybe nylon mesh, I'll see how much sag I can get into it, but I think even a little wont be enough for scale. These nets were loose I mean imagine 'flapping in the breeze' loose. I'm not too worried about it though, I think it will look alright even if it's stiff.

Gamera- thank you! Here's another Harris radio/Blue Force Tracker/DAGR update

Put in some wiring. The brass is .51mm rod and the styrene is .3mm rod.

I could have added a lot more and it still would have looked too clean.

I filled the void under the Truck Commander's dashboard with the bendy part of a juice box straw. Give it that utilitarian, military industrial look.

As I knew I wasn't going to be able to wire this thing and do justice to a full scale version, instead of going for accurate I just went for the easiest route. By no means is this all inclusive- and even in the cases of the wires I did add, maybe 20% of them are in the right general spot. Maybe.

(To note: These things had 7 years of wiring and rewiring on top of each other. Plenty of old wires to no where. These vehicles stayed in country even as different units switched out every year or so. So the new unit's commo guys would come in, rewire stuff, leave the old junk, and so on and so on. Lots of dead ends and undone connections, empty radio mounts, etc. There was no real sense of ownership, at least with our unit, and we knew when we were done with these vehicles, they would be sold or scrapped, so we really didn't treat them very well. More on that in the weathering stages to come...)

-Chris

US Army Infantryman

  • Member since
    October 2004
  • From: Northern Virginia
Posted by ygmodeler4 on Monday, April 6, 2015 9:53 PM

Looks great Chris and welcome back...seems like just yesterday we were right down 81 from each other

-Josiah

  • Member since
    December 2003
  • From: Colorado
Posted by psstoff995 on Thursday, April 9, 2015 2:36 AM

Hey!! Thanks, how've you been? I know right? I guess it's about 4 years now though... got anything on the bench?

-Chris

US Army Infantryman

  • Member since
    January 2007
Posted by the doog on Thursday, April 9, 2015 7:14 AM

That's looking juicy and sweet, Chris!

Some real mouthwatering detail!!! That straw detail is just killer!

Again, all I can think is, what a blast to be able to "see" the real machine as you're modeling it--it's a rare treat to be able to model "from real life". I am really looking forward to seeing this painted!!

  • Member since
    November 2009
  • From: SW Virginia
Posted by Gamera on Thursday, April 9, 2015 7:56 AM

Chris, the wiring does look really good, doesn't have to be perfect just nice to have the detail there esp for guys like me who have no idea if it's right or wrong!

"I dream in fire but work in clay." -Arthur Machen


  • Member since
    December 2003
  • From: Colorado
Posted by psstoff995 on Sunday, April 12, 2015 10:22 PM

Thanks a lot Karl! What's really cool is I haven't been on one of these in over 6 months so every now and then, I'll be going through the kit and my photos and remember details I've forgotten.

Quick update: I've managed to solder together this tricky piece of photoetch nightmare- probably my most elaborate photoetch contraption successfully put together to date. Without the solder I don't think superglue would have done the trick and I probably would have given up and gone with the plastic part.

It's the radio rack that goes behind the driver. In our vehicles, the rack was shorter, and the old radio mounts were there, but the radios themselves had long been pulled out. I just decided to act like this vehicle still had all the bells and whistles, so I included them. I still need to add some wire detail. I appreciate the comments Gamera! I kind of feel the same way, I really don't even remember how these things were wired up, and I had been the Platoon's RTO for a few months at the start of the deployment, so I figure making an attempt is the best I can do as far as detailing goes.

Here's the front bumper/rhino mount, soldered this together before the radio rack just to get a feel for it. Both this and the radio rack are real practice for assembling the rear stairs and the OGPK turret shield to come.

The key was the fact that even after the solder, I was able to drill out some of the holes that got filled in. As soon as I figured out the solder was soft enough for that, it gave me the confidence to knock out that radio rack. The Voyager PE is working out really well so far, folding decently on the lines, and not too tricky to fit together, but the solder really helps to lock it in place.

Quick check on the holes!

Anyone on the fence about soldering PE sets (as I've been for years) let me go ahead and encourage you to try it. I think it takes a little more work, but you only have to do it once and it alleviates the frustration of super glueing it time after time as parts fall (or fling!) off. Only wish I could solder it to the vehicle!

Karl- I'm really looking forward to painting this! It's getting to the point where I can start painting the subassemblies, so this weekend I took my new airbrush out for a spin with the Hetzer Starr kit I've mentioned on here a few times. Really like it, an iwata Eclipse gravity feed, lots of control and detail can be achieved with the double action. I know I'm not yet using it to its full potential. Still need to work out the kinks of paint/thinner ratios and watching for paint drying on the needle (using Vallejo Air acrylics). Not to mention figuring out the right distance from the model, PSI... done lots of test spraying though! If I stay on top of it (and considering this is all solid color application) I should be good to go. Next weekend I'll be on a two day fishing trip somewhere in the Rockeys so probably no updates for a bit Crying

-Chris

US Army Infantryman

JOIN OUR COMMUNITY!

Our community is FREE to join. To participate you must either login or register for an account.

SEARCH FORUMS
FREE NEWSLETTER
By signing up you may also receive reader surveys and occasional special offers. We do not sell, rent or trade our email lists. View our Privacy Policy.