SEARCH FINESCALE.COM

Enter keywords or a search phrase below:

FINISHED PICS--Two Leopards in Gelb Oliv :)

16795 views
99 replies
1 rating 2 rating 3 rating 4 rating 5 rating
  • Member since
    April 2006
  • From: Denver, Colorado
Posted by waynec on Saturday, July 4, 2015 10:08 PM

hi Karl

very nice. while i like the looks of the real 2A4 better than the 1, for your builds i like the 1 better. i think the modulation and the washes are more subtle. of course the overall boxiness of the 2 lends itself to more panel lines. i do like how you will disregard  perfect realism for some artistic panache.

Никто не Забыт    (No one is Forgotten)
Ничто не Забыто  (Nothing is Forgotten)


  • Member since
    January 2007
Posted by the doog on Wednesday, July 1, 2015 7:32 PM

Terry, thanks so much man, That's a very nice compliment from you!

BTW, I got your other message and meant to get back to you but just got busy. I'll respond soon! :)

  • Member since
    January 2013
Posted by jibber on Tuesday, June 30, 2015 7:11 PM

Karl two mighty impressive builds, the shading, modulation and lower hulls are second to none. I keep enhancing on different parts and the detail just jumps off the page. Two beautifully done works Karl.  

Terry  

  • Member since
    January 2007
Posted by the doog on Tuesday, June 30, 2015 1:55 PM

Zack, I'm happy to know that my work here inspires and teaches you in a small way. Giving back to the hobby is what I"m all about.  :)

Great choice in that Stridvagen 122! I just got one myself as well! Be aware though, that the STRV-122 is usually seen in either NATO colors or more accurately Swiss colors, which use a light green. Make sure you research it on the internet to get a correct scheme!

  • Member since
    May 2014
Posted by Sackgasse on Tuesday, June 30, 2015 1:31 PM

and  or? 

You just inspired me to get a STRV 122 and give it a go.
  

And you have explained some very basic, new to me, techniques how to get a good result:

1. Khaki Drab + Black, about 20-80%

2. Khaki Drab + Black, about 50-50%

3 Khaki Drab untinted

4 Khaki Drab + Buff + Dark Yellow, about 60-30-10%

That is the only reason I vist this page; inspiration, tips & tricks and new ideas.

Zack

Happy Modeling! Cool

  • Member since
    January 2007
Posted by the doog on Monday, June 29, 2015 7:49 PM

Hugo, I'm blushing, lol, Embarrassed

Thank you or some very generous compliments--I do really appreciate them, my friend! Toast

Please do keep posting photos of your work! I like to watch people improve and inspire others through the years! You're already doing fine work, and I would be sad to see you stop! Yes

  • Member since
    March 2013
  • From: Puebla, Mexico
Posted by garzonh on Monday, June 29, 2015 6:53 PM

Karl!!

You did it again..what masterpieces you have built!!.

It becomes harder and harder to be even at level 1 from your level 100 expertise.

It is starting to become embarassing to post pics of own builds, they are just not that worthy.

The color variation and modulation is book perfect. AWESOME!!!Bow Down

  • Member since
    January 2007
Posted by the doog on Monday, June 29, 2015 5:19 PM

Thanks, Bish; I"m thinking about the dio now and ordering stuff--I have to put that Soviet quad-tracker tank into a dio with those spooky soldiers! It's going to echo "Spooked" in a way...

Thank you, Scarecrow Joe!

STEVE---thanks for that suggestion. I actually have a pretty expensive caliper that I used to use working on my bike's cylinder. I'll have to dig it out.. :)

Zach--thanks for following along and or the comment!!

Cliff, thanks so much! It's much appreciated

Russ! COOL BEANS!!! PM inbound!! Thanks!!!

  • Member since
    September 2006
  • From: Dripping Springs, TX, USA
Posted by RBaer on Monday, June 29, 2015 3:25 PM

Karl, Karl, Karl. You sir can paint.

So I was looking at the Leo 1 and noticed the tracks, and got to thinking "Karl likes indies...." Well, it just so happens I recently  picked up a bag full of Meng Leo 1 non-workable indies, part of a bulk thing, and have absolutely no intention of ever using them, yours if you want. Just shoot me an addy.

Apprentice rivet counter.

  • Member since
    November 2009
  • From: SW Virginia
Posted by Gamera on Monday, June 29, 2015 7:29 AM

Again, you knocked both right outta the park Karl! Love to see the colour modulation working on a single colour subject like this.

"I dream in fire but work in clay." -Arthur Machen


  • Member since
    May 2014
Posted by Sackgasse on Sunday, June 28, 2015 2:26 PM

Hi Karl,

Thank you very much!
The colormodulatin is very convincing. 

Zack

Happy Modeling! Cool

  • Member since
    July 2003
  • From: On my kitchen counter top somewhere in North Carolina.
Posted by disastermaster on Sunday, June 28, 2015 11:10 AM

the doog

 I do have to say that it's annoying that they don't have the lights classified as to what models they fit. I can imagine myself getting pretty frustrated trying to find the right size?

Sure Karl,

http://x6.nabble.com/images/smiley/anim_confused.gif EZ...... Here's the how.

 All you need is a cheap one-time investment (got mine for less than $4 'bout 15 yrs ago....  a fancy high priced pair is overkill) in a pair of plastic dial calipers (they're easy to read) from harbor freight or a comparable source.

Here's mine ....https://img1.etsystatic.com/056/0/6112481/il_570xN.687269719_o0m6.jpg

                    ................. cheap and simple.


Here's a huge page of CHEEP and not so cheap options. Scroll down as they get cheaper......


 Measure the diameter (the size of the lens is given on the the package) of the painted area of the light to be replaced and then carefully hand drill it out. Glue it in.

Sherman-Jumbo-1945

"I was so much older then, I'm younger than that now"


  • Member since
    April 2015
Posted by Scarecrow Joe on Sunday, June 28, 2015 9:02 AM

Very nice attention to detail and great weathering.

  • Member since
    December 2002
  • From: Bury St Edmunds, Suffolk, England
Posted by Bish on Sunday, June 28, 2015 8:50 AM

Really nice looking builds there Karl. Some great weathering as well. A pair of great looking bests.

I hope you do that dio, I'll look forward to that.

I am a Norfolk man and i glory in being so


On the bench: Airfix 1/72nd Harrier GR.3/Fujimi 1/72nd Ju 87D-3

  • Member since
    January 2007
Posted by the doog on Sunday, June 28, 2015 8:19 AM

Steve,

Thanks for those links and the suggestion--you're definitely right about the low cost and expense; To be honest, I've never much concerned myself with lights, but that's probably because of the kind of WWII German tanks I normally build where the lights don't even require thought.  With these more modern bulb-type you're correct that it does warrant the investment and time. I do have to say that it's annoying that they don't have the lights classified as to what models they fit. I can imagine myself getting pretty frustrated trying to find the right size?

  • Member since
    July 2003
  • From: On my kitchen counter top somewhere in North Carolina.
Posted by disastermaster on Saturday, June 27, 2015 7:19 PM

the doog

Maybe one day I'll start improving them--do you have any suggestions?

 http://i1099.photobucket.com/albums/g399/mercsman01/idea.gif~original Never fear, that day can be here; but of course it is your option. Yes, there are other ways to accomplish this task, and I'm aware that my suggestion is a common reference; but I'm surprised that I don't see it used more often. It   looks far better than any "paint only" solution because it reflects depth and is simple. The link  I've included below shows what I'm getting at.

 In my opinion, when you build something of this distinct quality, then a very small expense is more than justified. Personally, if I was to invest the time and effort that you have put into this - then this headlight upgrade would be a definite "do" for me.

 At around 5 bucks for both lights, and installed properly (easy).....  you can make this as close to flawless as possible.

 Not having the actual model here to measure, I think the approximate diameter would be maybe about .183" which would equate to a headlight lens of about 6.5 inches.

 If you are interested, go to this page to view a wide variety of options.

 And again, those two Leopards are still brilliantly executed examples of armored vehicles, and I'm extremely impressed.

Steve

Sherman-Jumbo-1945

"I was so much older then, I'm younger than that now"


  • Member since
    January 2007
Posted by the doog on Saturday, June 27, 2015 6:46 PM

Thanks, kindly, Feldgrau! THanks for taking the time to comment! :)

  • Member since
    November 2012
  • From: Capon Bridge West by God Virginia
Posted by feldgrau23 on Saturday, June 27, 2015 9:31 AM

Those Leopards look great. Fantastic work Karl!!!!!!

  • Member since
    January 2007
Posted by the doog on Saturday, June 27, 2015 7:50 AM

Thank you, Axeman, Carlos, and Steve!

Steve, I had to laugh--I've gotten criticized before on the headlights issue, but I honestly don't know what to do to them to make them look any nicer beyond ordering aftermarket clear parts, and I just couldn't be bothered...too insignificant to me I guess. But the criticism is noted and I thank you for your honesty. Maybe one day I'll start improving them--do you have any suggestions?

  • Member since
    July 2003
  • From: On my kitchen counter top somewhere in North Carolina.
Posted by disastermaster on Friday, June 26, 2015 11:32 PM

         This is for "you" http://www.e-moticone.com/emoticone/show-biz/3d-oscars.gif

                          .....(or should there be "two"?)

Beyond mere words my friend.......

 With minor exception to the appearance (first tank) of the headlight lenses on the Leo 1, you've progressed to a new and higher level of creativity in my opinion.

 Your contributions to the armor forum are always something to look forward to; and, they never fail to create anticipation as to what will be coming from you next.

 The 2A4 is my favorite one here, it's also one of my few modern favorites too.

Sherman-Jumbo-1945

"I was so much older then, I'm younger than that now"


  • Member since
    July 2004
  • From: Sonora Desert
Posted by stikpusher on Friday, June 26, 2015 8:43 PM

Two sweet cats! I really like the old 11th Panzer insignia on the 2A4!  The both look ready to repel those Commie Red hordes


F is for FIRE, That burns down the whole town!

U is for URANIUM... BOMBS!

N is for NO SURVIVORS...

       - Plankton

LSM


  • Member since
    June 2015
Posted by Axeman on Friday, June 26, 2015 8:42 PM

wow.....simply,jaw-droppingly.....wow

  • Member since
    January 2007
Posted by the doog on Friday, June 26, 2015 8:16 PM

garzonh

Good lord!!

Your painting skills just keep amzing me...yes, I know...you have done it before, but you make it look so easy. I always start good on the paneling shading but when I do the overall coat, everything goes away and I end up with nothing of shading...seems you have to be more aggresive on the shading.

I will try something like this on my Merkava...probably will exagerate on the modulation.

Good work Karl!!

Thanks, Hugo; you always make me feel well-appreciated, lol. I do genuinely appreciate your enthusiasm!  And yes, you have to be aggressive and fearless on the shading to get the results that I like. Smile

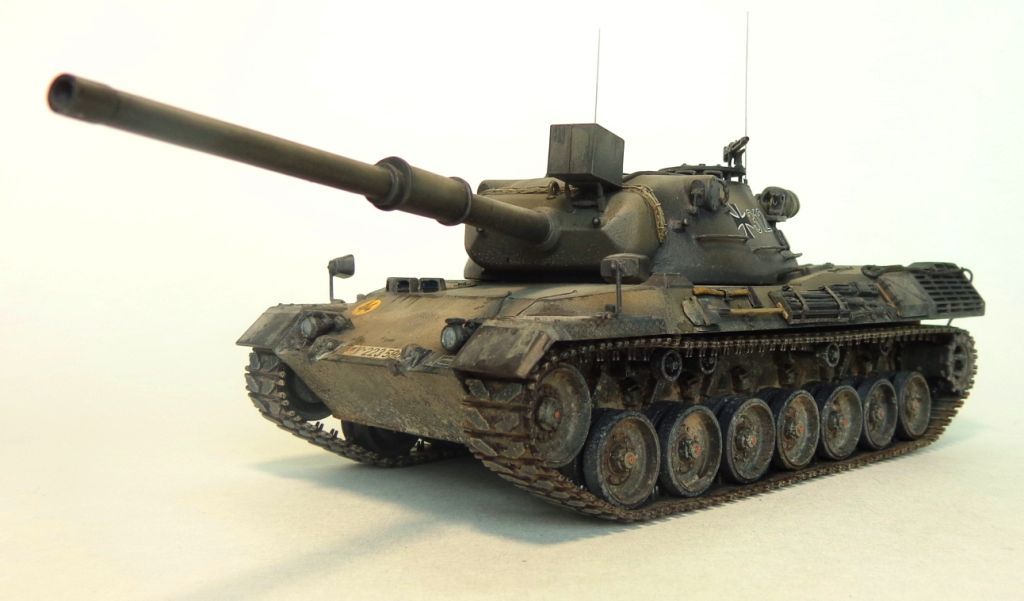
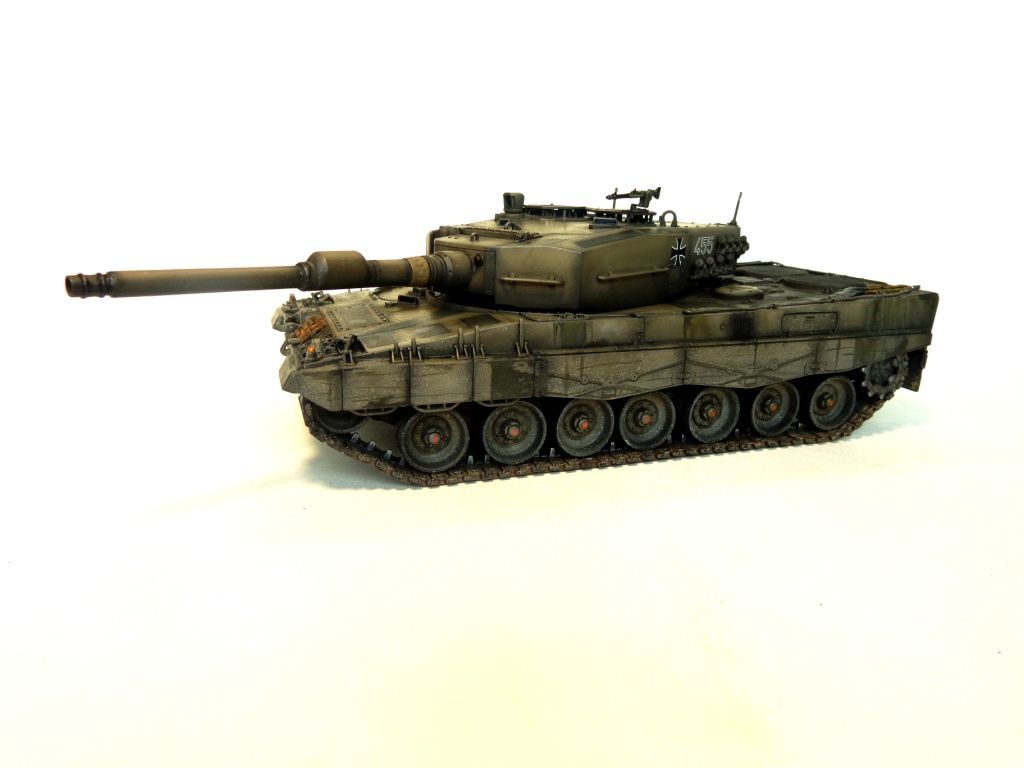
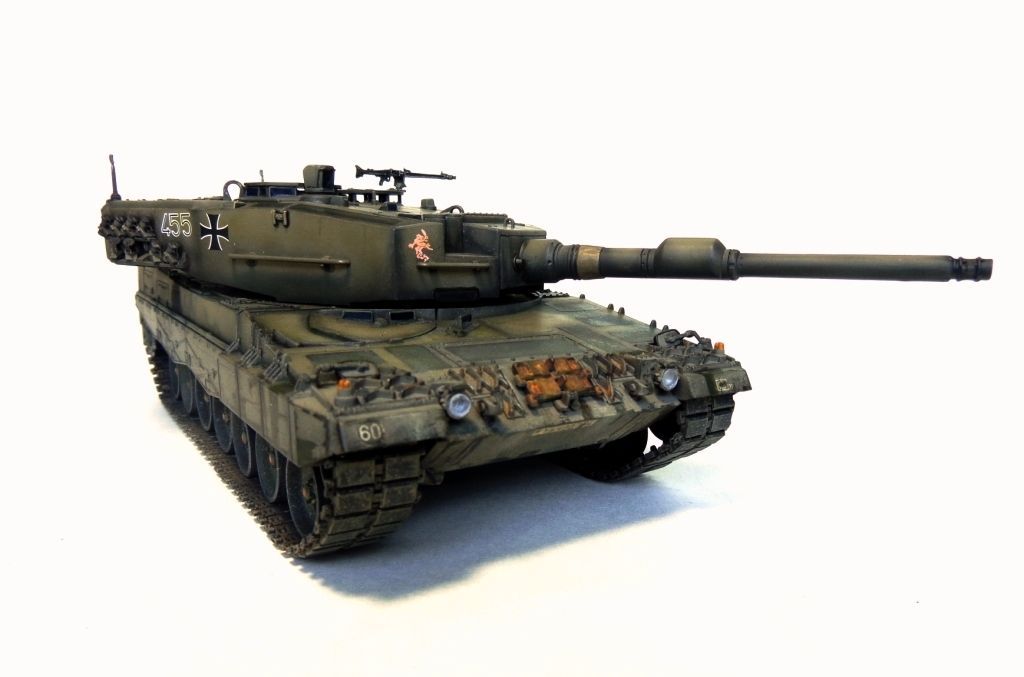
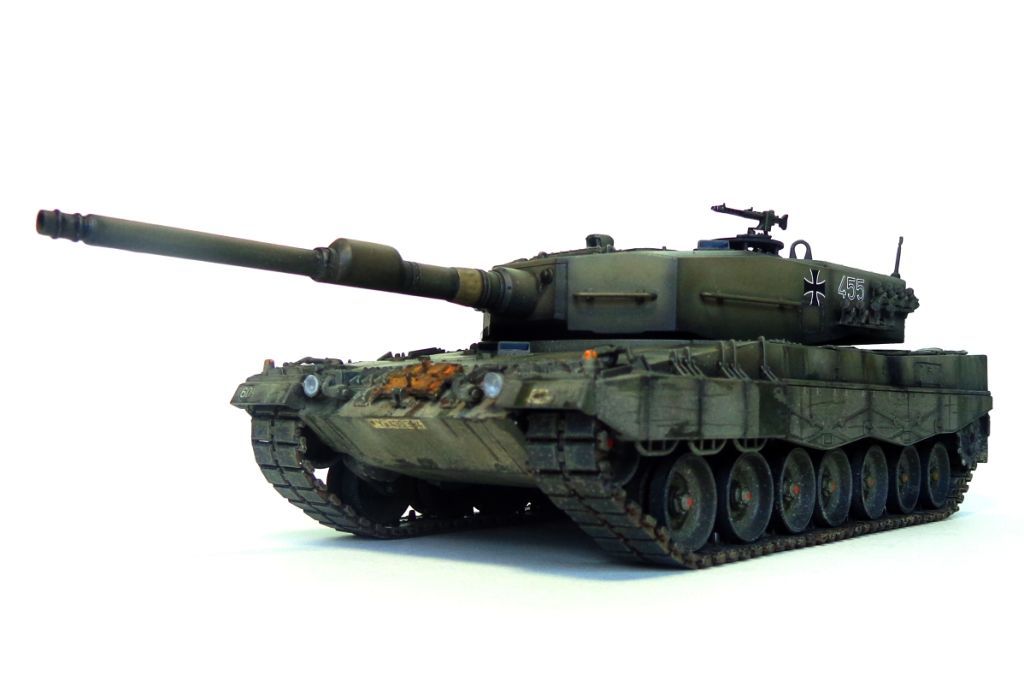
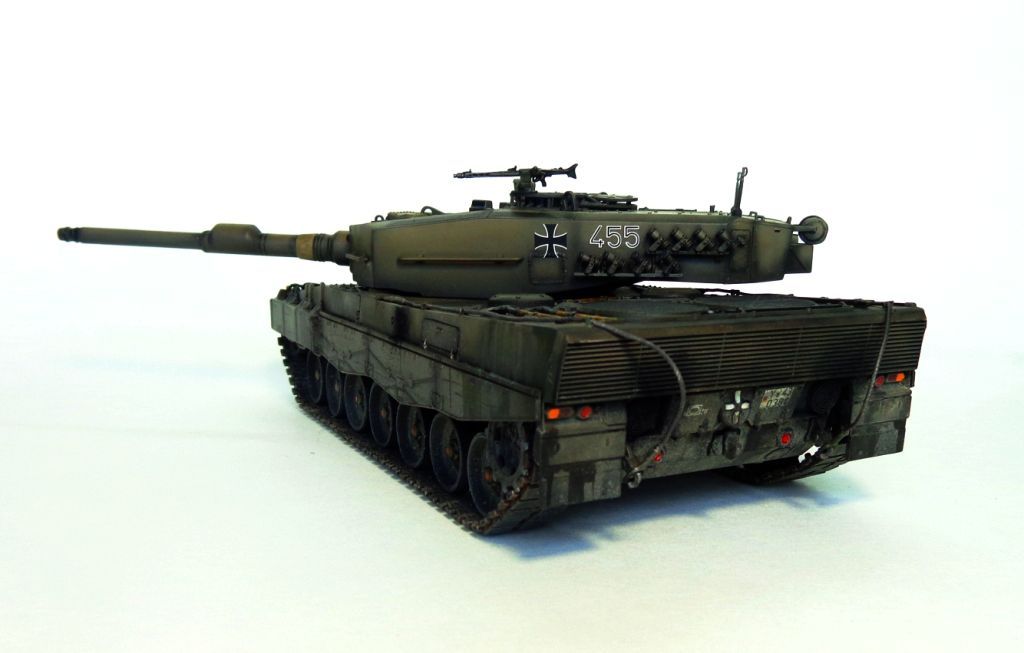
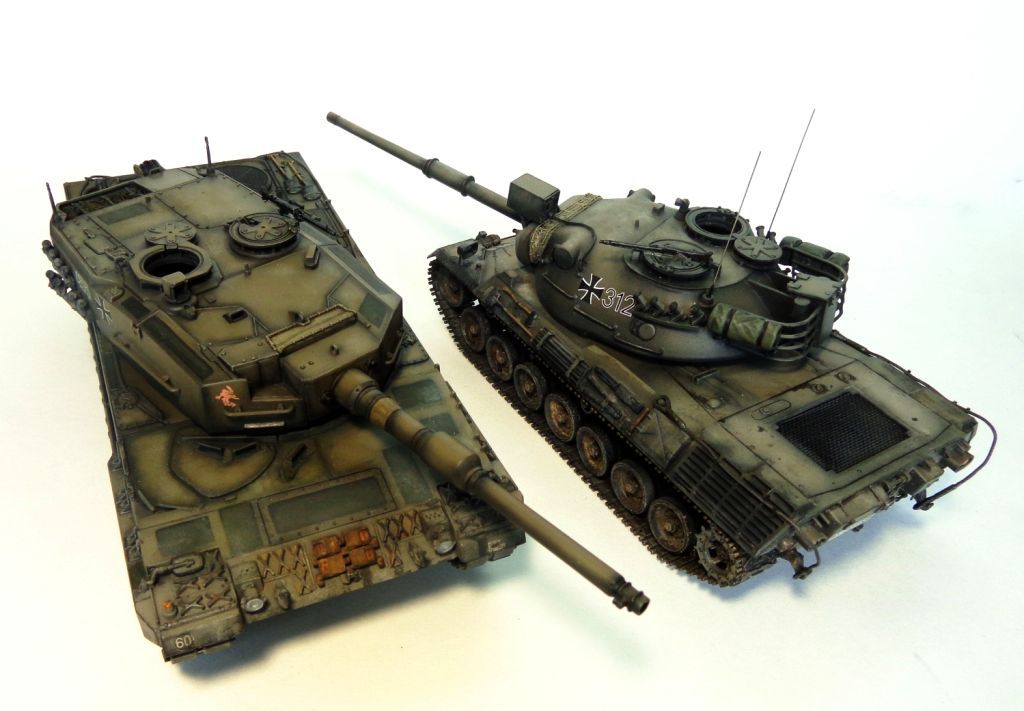
So I am calling these "Finished"! I apologize for not documenting all of the weathering steps; honestly, I just was modeling for the sake of the love of modeling and the nostalgic thrill that working on these old gems gave to me. These were some models that were among the earliest build for me, and re-doing them in more detail and care was a special experience. I'll try to detail what I did to them, but honestly, I didn't go nuts on the weathering---in fact, the 2A4 is almost a "clean" finish; rare for me! Propeller

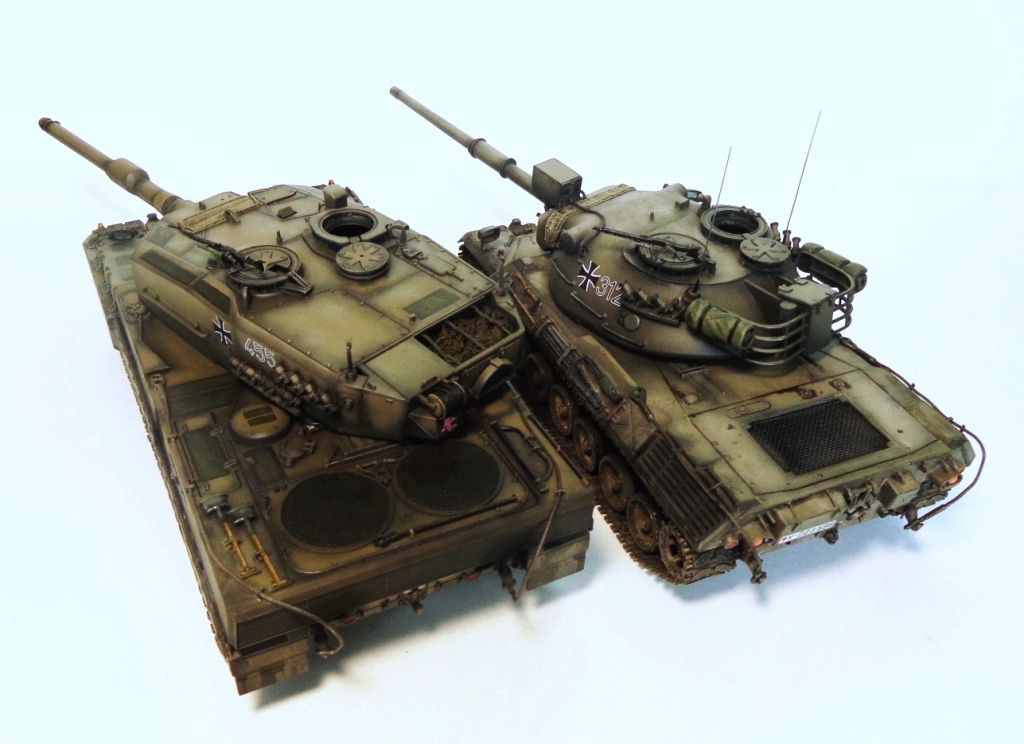
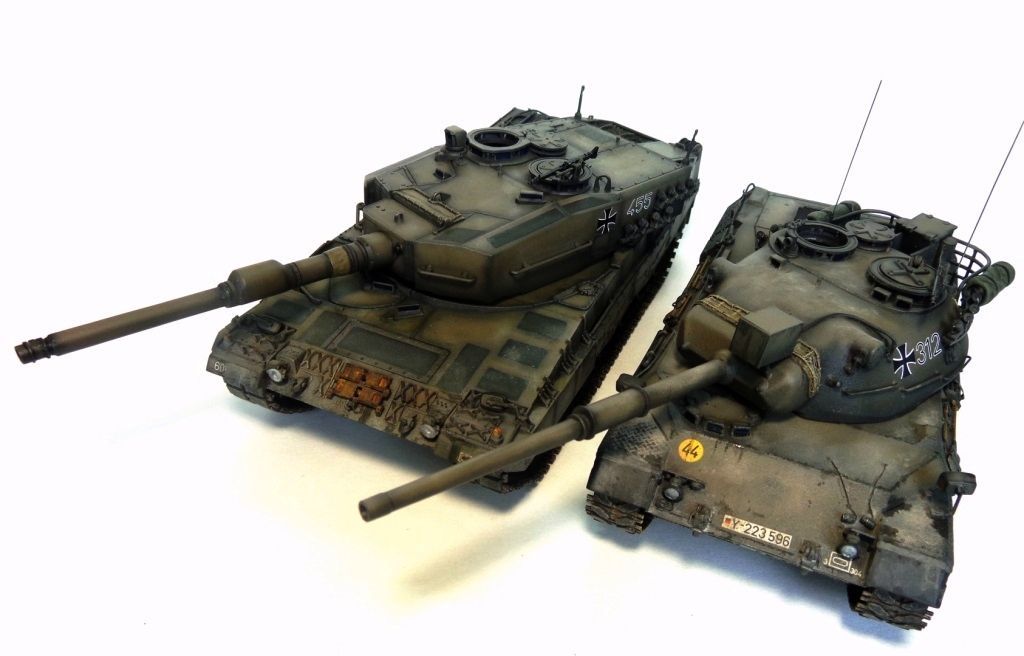
So here's the pics; first, the two together...

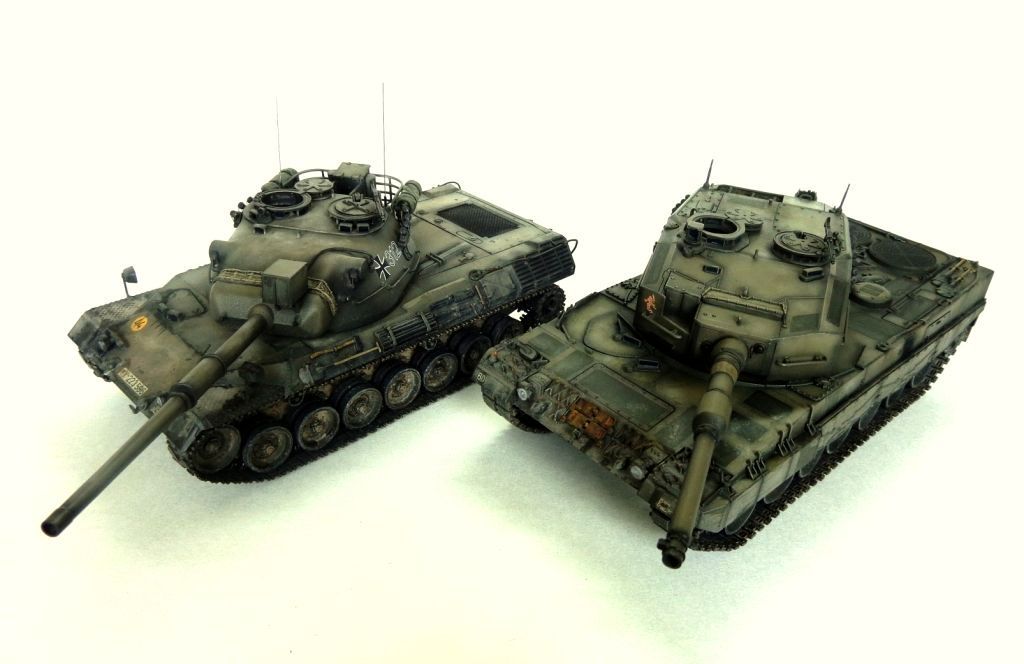
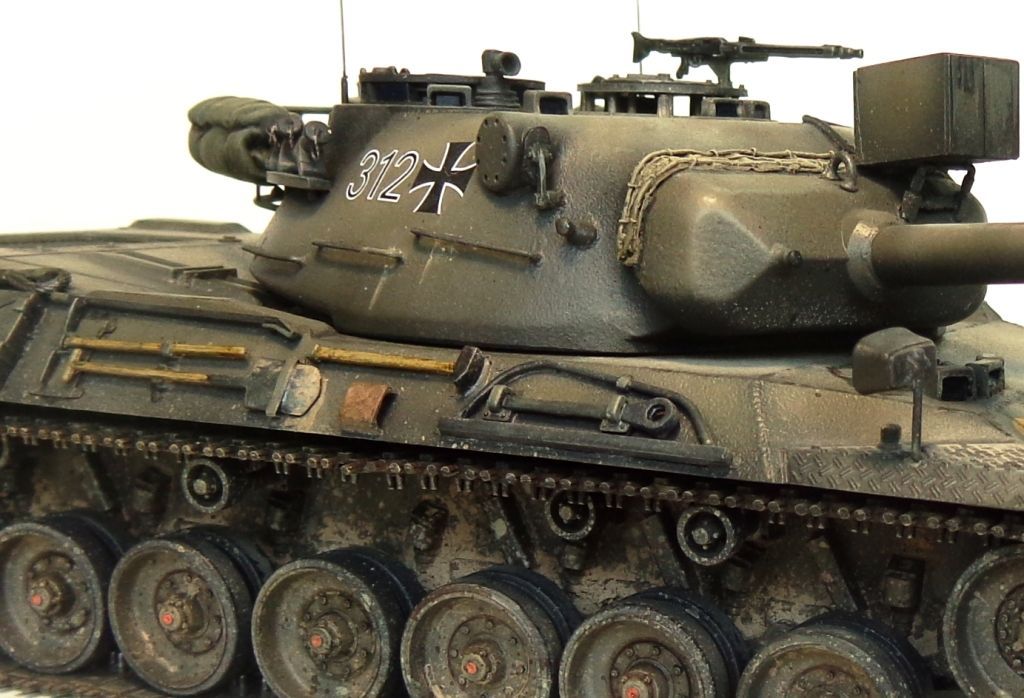
And some of the Leopard 1, which is the dirtier finish of the two.

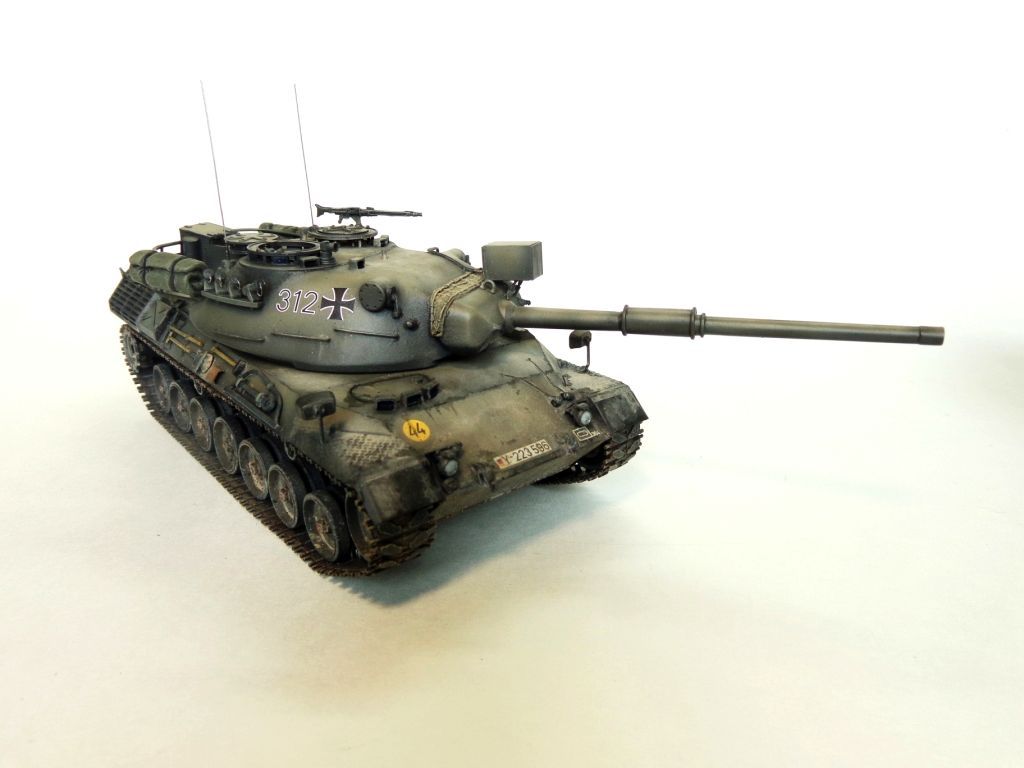
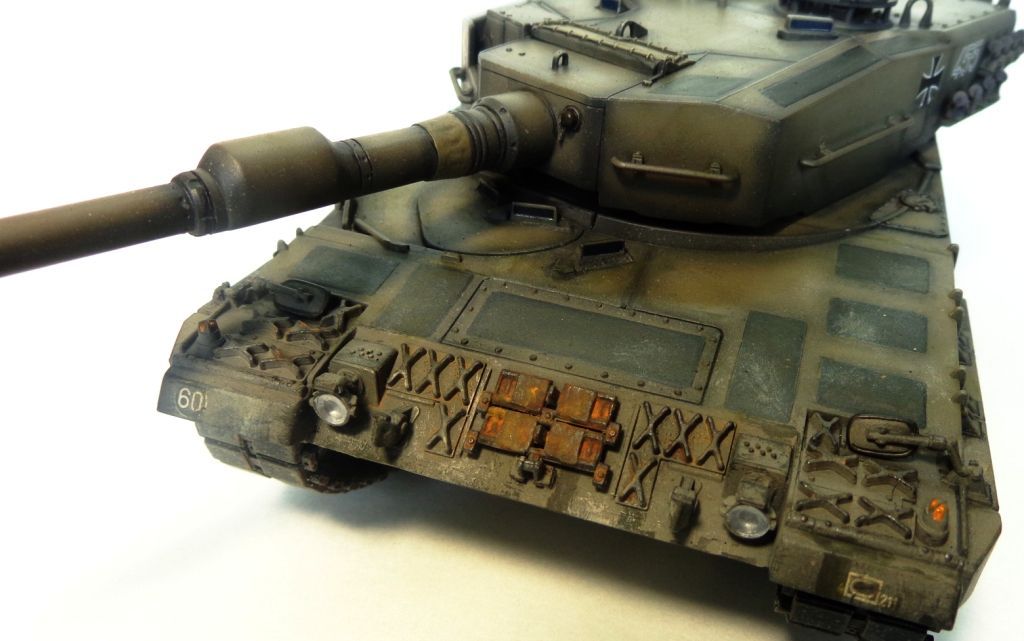
You can see that last two things that I added were those "drain plugs" on chains there on the front hull.

The front hull was spattered and weathered again with craft store acrylics.

Those "drain plug" things....some Wilder pigments were used to give a dust coat on select surfaces.

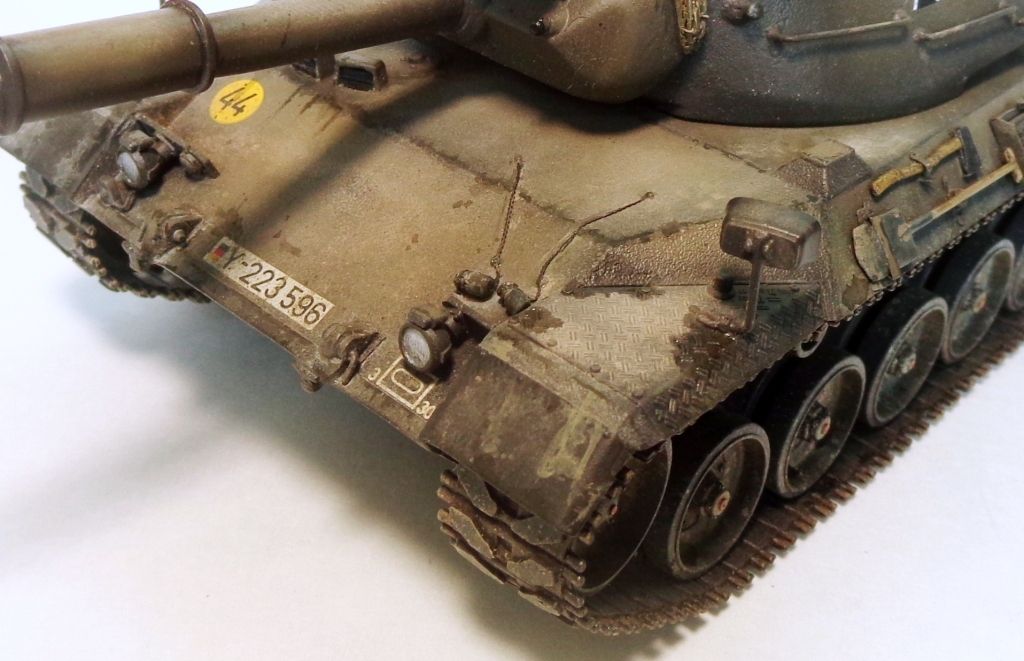
The cables are copper cables from Kayaba, cut to size.

A couple bags dressed up the back..black pigments were used on the exhaust outlets

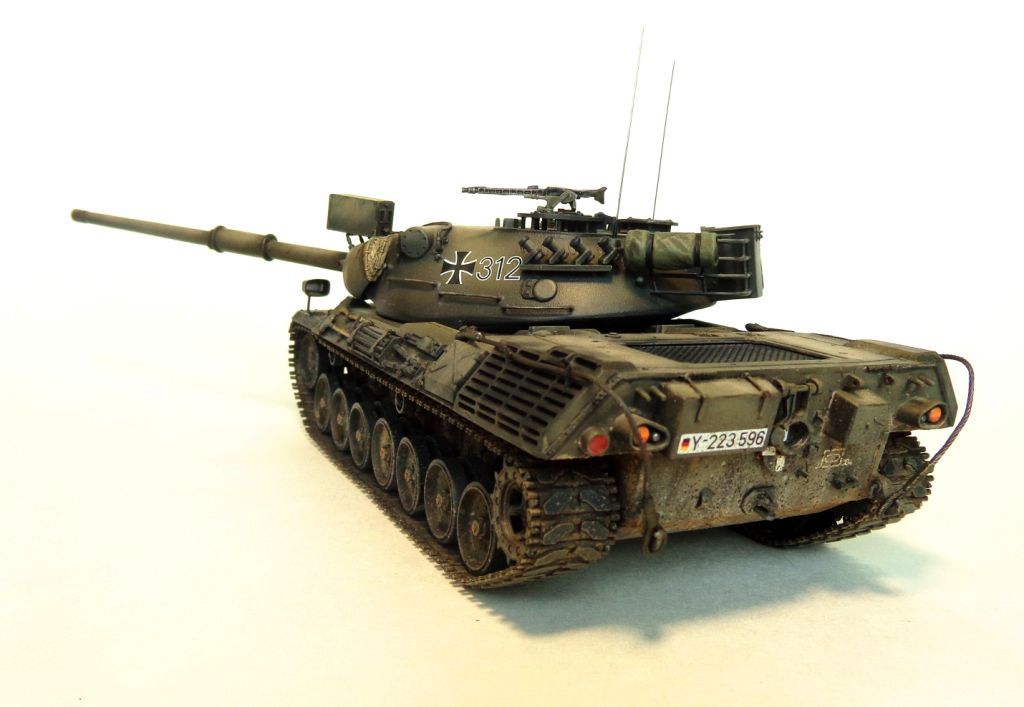
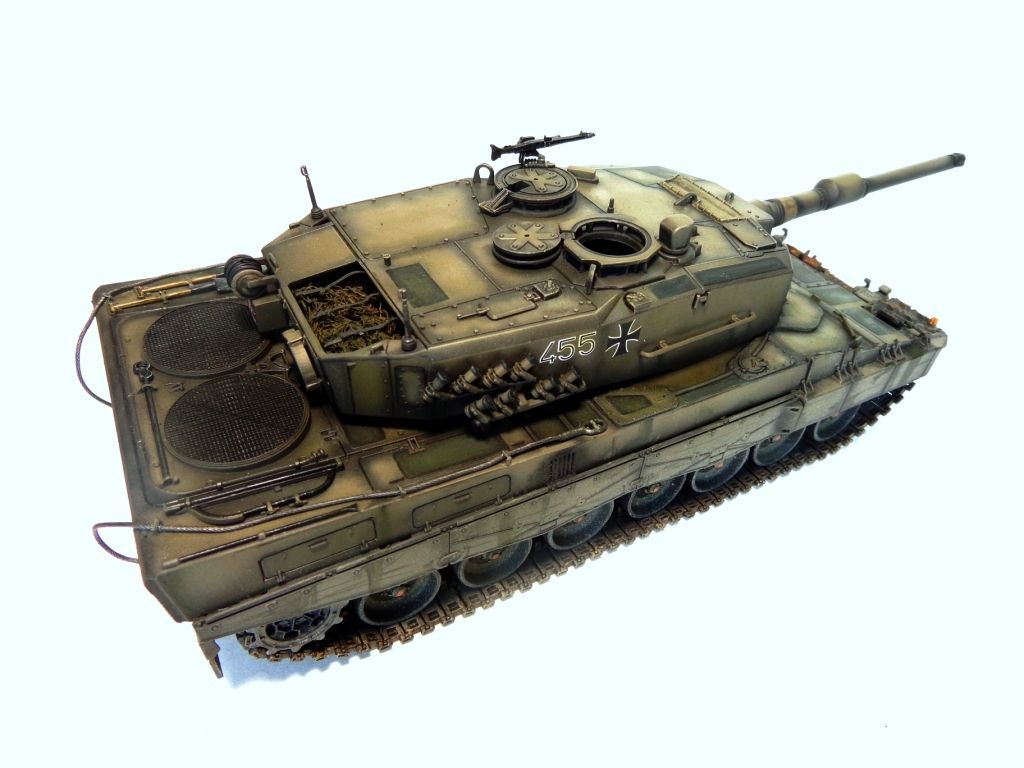
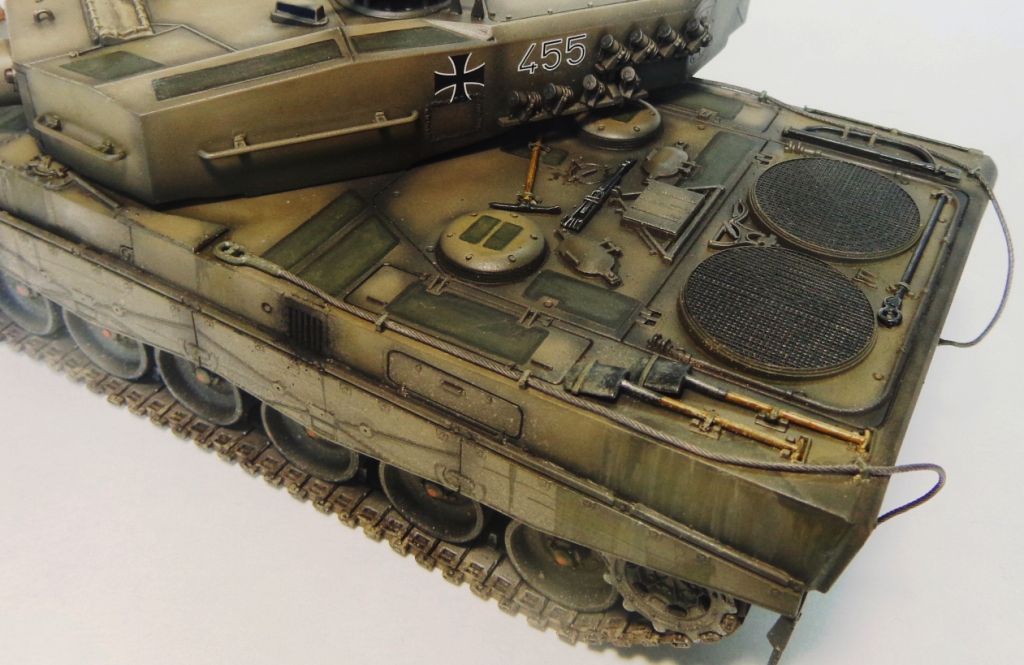
The Leo 2, 95% weathered with acrylics, only.

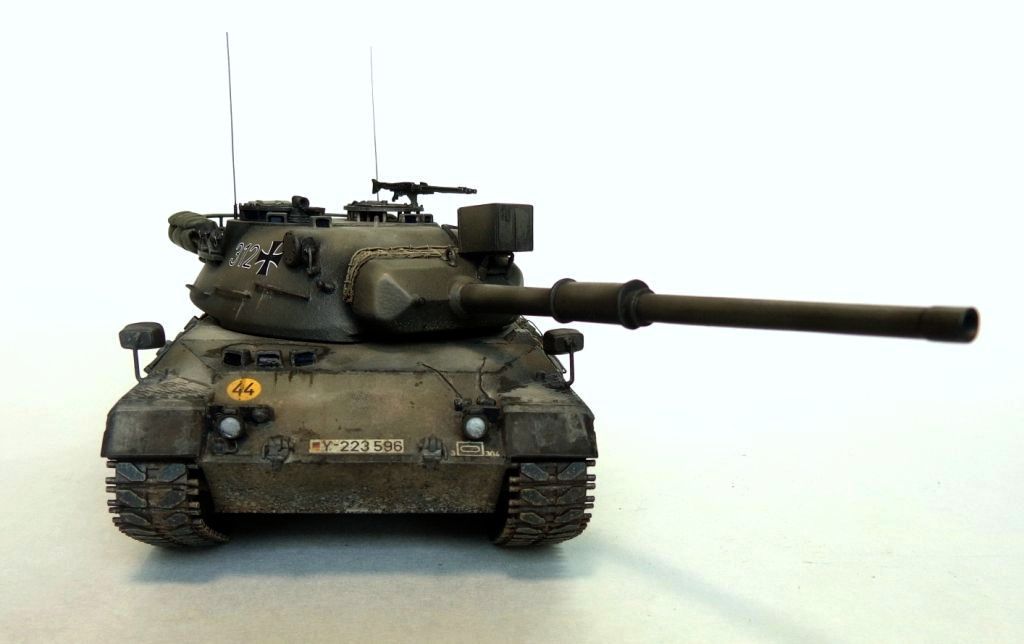
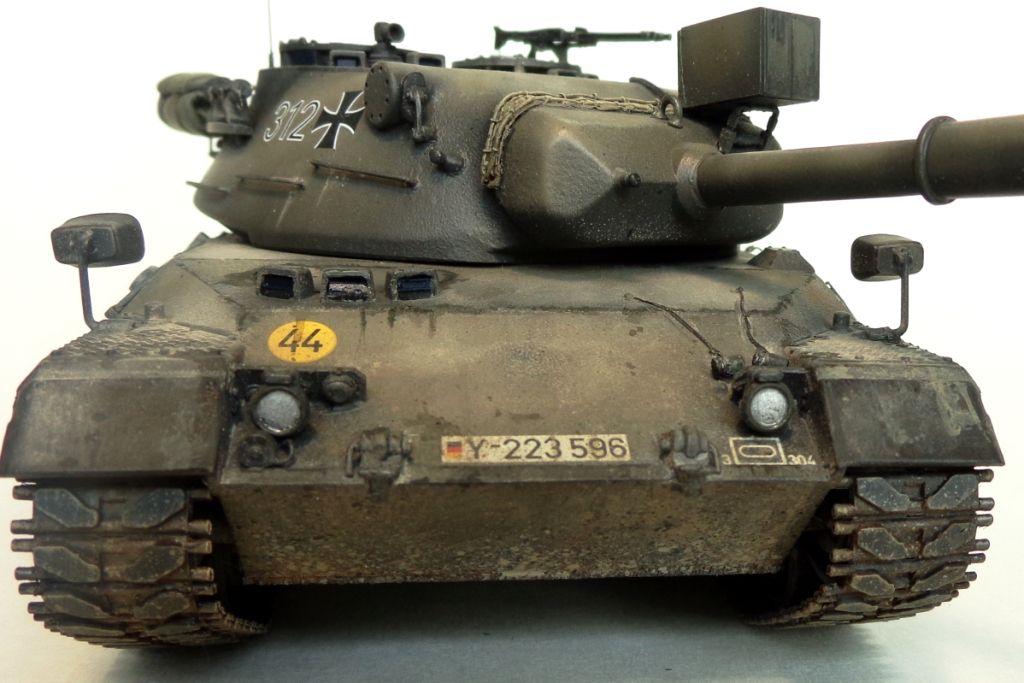
Outlining was done using acrylic washes and pinwashes. The no-skid areas are supposed to be black, I think, but I wanted them to look a little more .... interesting,..so I painted a little base color into them. All done with acrylics...also, I filled the bin there with Verlinden netting and made lead foil straps.

The cables are those Kayaba jobbers again...

The lights are from some other kit, I honestly can't remember. I had them in the spares box and thought that the clear plastic would look cool.

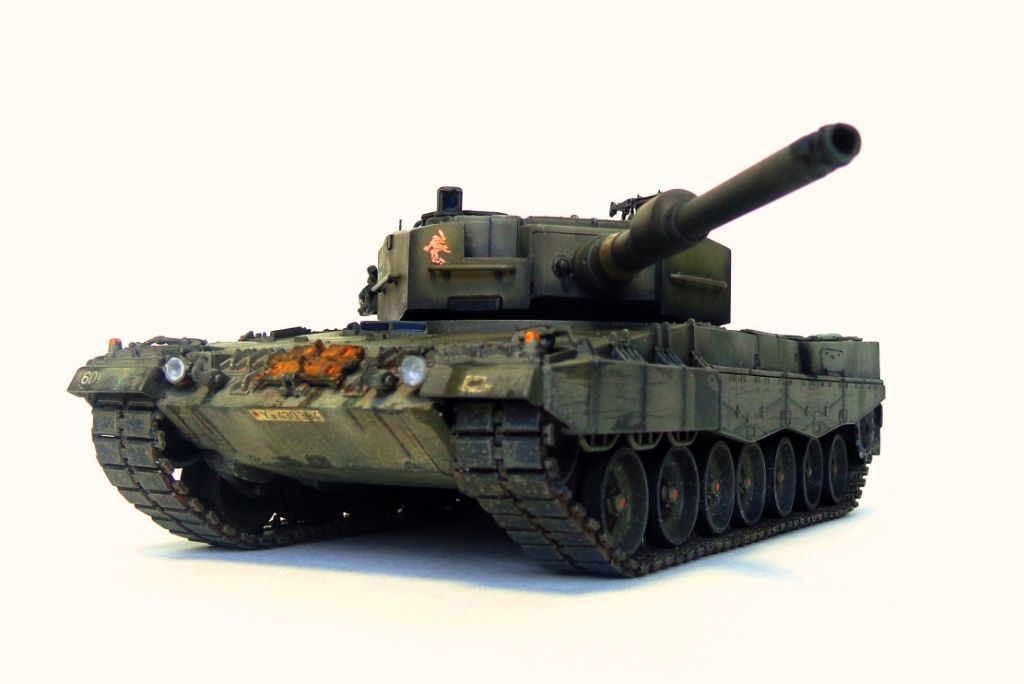
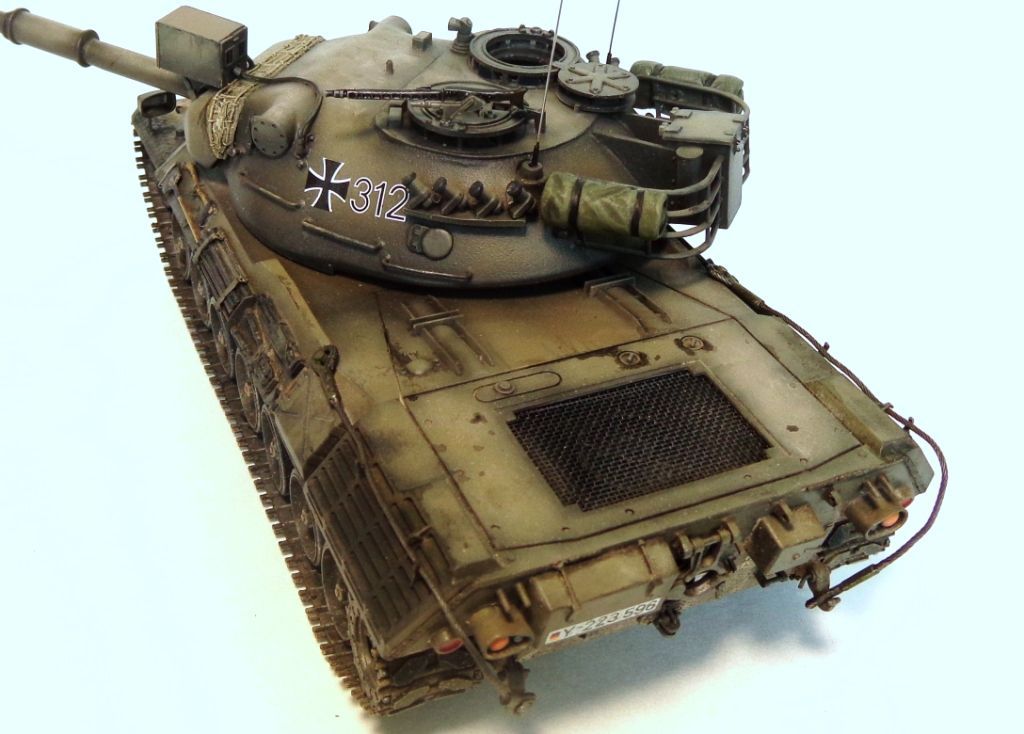
I used Wilder pigments to make rust on the spare track. Normally, this is jus painted the base coat, but I found a few pics where it was freshly-rusted, so I thought it added a nice splash of color to it.

The happy couple...SmileGeeked

Thanks to everyone who's followed along on this build! It's been a long time since I've done two tanks at the same time, and it was pretty challenging at times to keep things separate and progressing at same levels, but I"m happy with the results. I think that they look a bit different than my other builds, and are surely miles beyond the original builds which I sold on eBay months ago. I'm happy to have these updated versions in my display case!

Comments and questions are, of course, always welcomed!

Thanks again, guys---on to the next project...might be a diorama!?? Whistling ........Big Smile

  • Member since
    March 2013
  • From: Puebla, Mexico
Posted by garzonh on Thursday, June 11, 2015 8:19 AM

Good lord!!

Your painting skills just keep amzing me...yes, I know...you have done it before, but you make it look so easy. I always start good on the paneling shading but when I do the overall coat, everything goes away and I end up with nothing of shading...seems you have to be more aggresive on the shading.

I will try something like this on my Merkava...probably will exagerate on the modulation.

Good work Karl!!

  • Member since
    November 2009
  • From: SW Virginia
Posted by Gamera on Thursday, June 11, 2015 7:57 AM

the doog

Gamera

Very cool Karl, I'm almost afraid to go with that much contrast even when I know the filters etc will tone it back down.

Trust me, Cliff--I ruminated on this finish for more than a few days; how to approach it, how to shade it, how to fade and modulate one tone into the next...it IS a scary thing to do, and not easy to pull off. I toned down the starkness of the difference between tones at least twice, spraying a very light coat of super-thinned "straight" Khaki Drab over the "finished" coat and then going back to touch up where I wanted more light. That's kinda the way these finishes go--you have to plan them, think about them a lot more than you would a "normal" finish. Really, what you're doing is doing a lot to bring about a more vibrant finish BEFORE you actually start to weather the finish with the same goal in mind. But it's not for everyone, I agree. Indifferent

Thanks, I am watching and learning! 

"I dream in fire but work in clay." -Arthur Machen


  • Member since
    January 2007
Posted by the doog on Thursday, June 11, 2015 7:54 AM

Thanks, Josiah!

And thanks, Steve. That's a cool compliment, and I appreciate you taking the time to word it so beautifully. :)

  • Member since
    January 2007
Posted by the doog on Thursday, June 11, 2015 7:53 AM

Gamera

Very cool Karl, I'm almost afraid to go with that much contrast even when I know the filters etc will tone it back down.

Trust me, Cliff--I ruminated on this finish for more than a few days; how to approach it, how to shade it, how to fade and modulate one tone into the next...it IS a scary thing to do, and not easy to pull off. I toned down the starkness of the difference between tones at least twice, spraying a very light coat of super-thinned "straight" Khaki Drab over the "finished" coat and then going back to touch up where I wanted more light. That's kinda the way these finishes go--you have to plan them, think about them a lot more than you would a "normal" finish. Really, what you're doing is doing a lot to bring about a more vibrant finish BEFORE you actually start to weather the finish with the same goal in mind. But it's not for everyone, I agree. Indifferent

  • Member since
    July 2003
  • From: On my kitchen counter top somewhere in North Carolina.
Posted by disastermaster on Wednesday, June 10, 2015 10:36 PM

 Well Karl, you've easily managed to bring the art of the 17th and 18th centuries into the model tank world of the 20th century.

                                           http://www.millan.net/minimations/smileys/goodsigh.gif

This project has been beautifully characterized by the ornate detail and especially in the painting technique that you've quite obviously mastered.

                                          http://www.bigbigforums.com/image.php?u=36073&dateline=1169732380

      You never fail to excell dude, even when it's baroque'n.

Sherman-Jumbo-1945

"I was so much older then, I'm younger than that now"


  • Member since
    October 2004
  • From: Northern Virginia
Posted by ygmodeler4 on Wednesday, June 10, 2015 8:17 PM

Oooh they're looking real good Karl!

-Josiah

JOIN OUR COMMUNITY!

Our community is FREE to join. To participate you must either login or register for an account.

SEARCH FORUMS
FREE NEWSLETTER
By signing up you may also receive reader surveys and occasional special offers. We do not sell, rent or trade our email lists. View our Privacy Policy.