SEARCH FINESCALE.COM

Enter keywords or a search phrase below:

My very FIRST tank! Panzer IV

1849 views
19 replies
1 rating 2 rating 3 rating 4 rating 5 rating
  • Member since
    April 2015
  • From: Detroit, MURDER CITY
My very FIRST tank! Panzer IV
Posted by RudyOnWheels on Saturday, January 2, 2016 12:02 AM

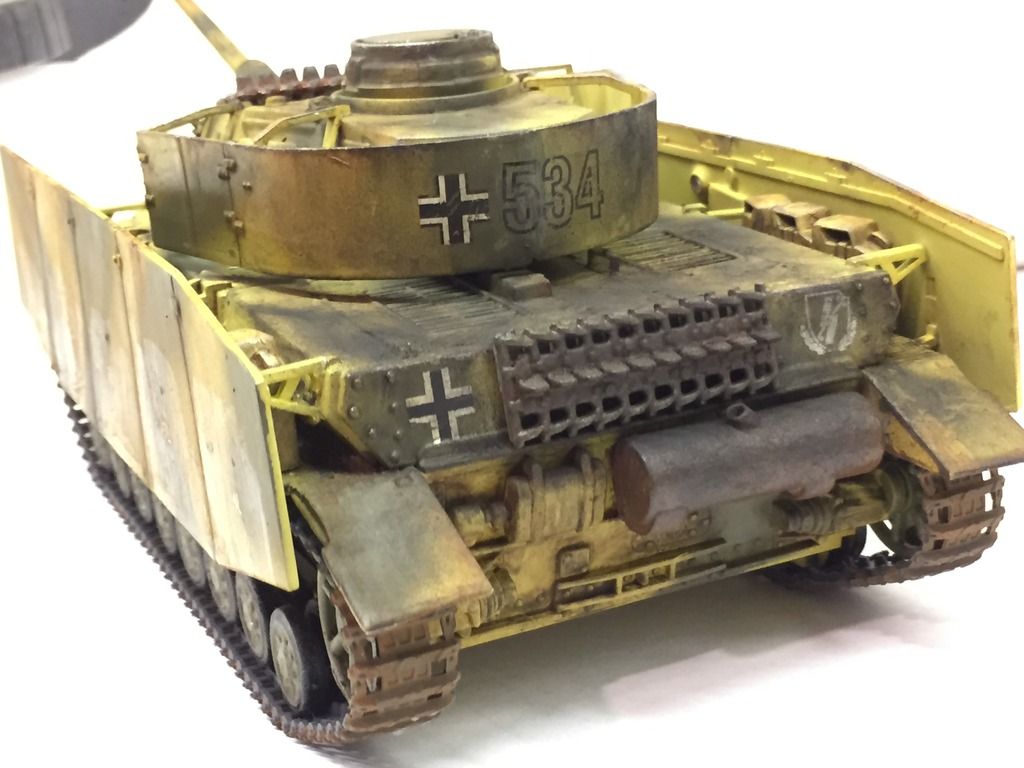
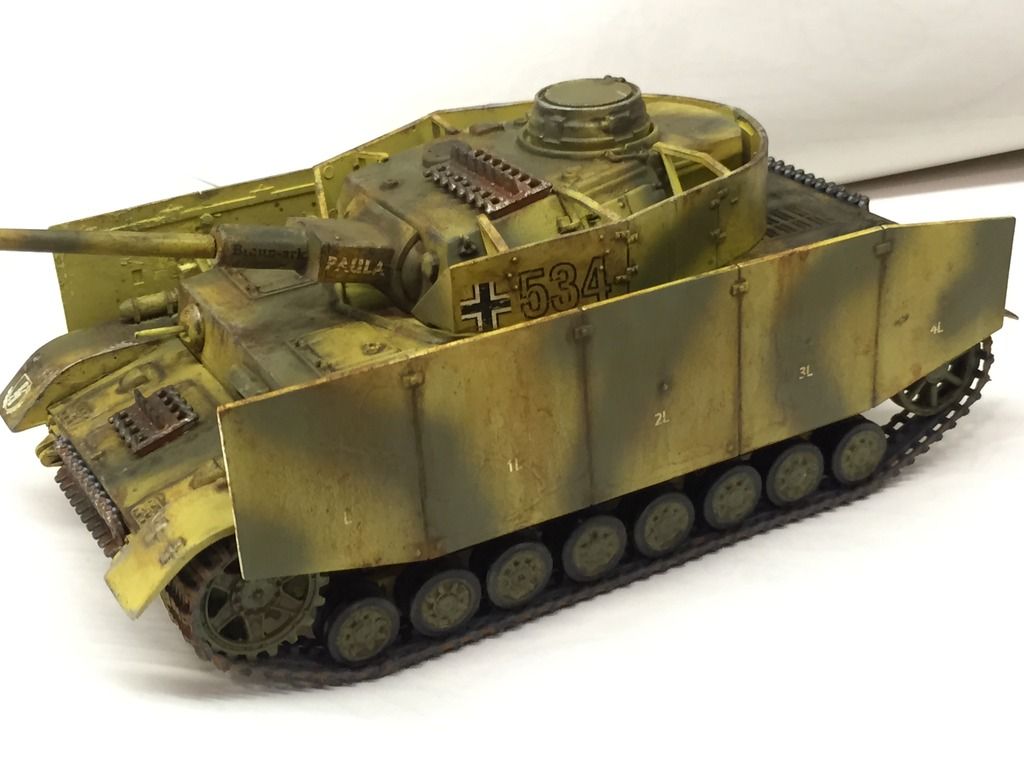
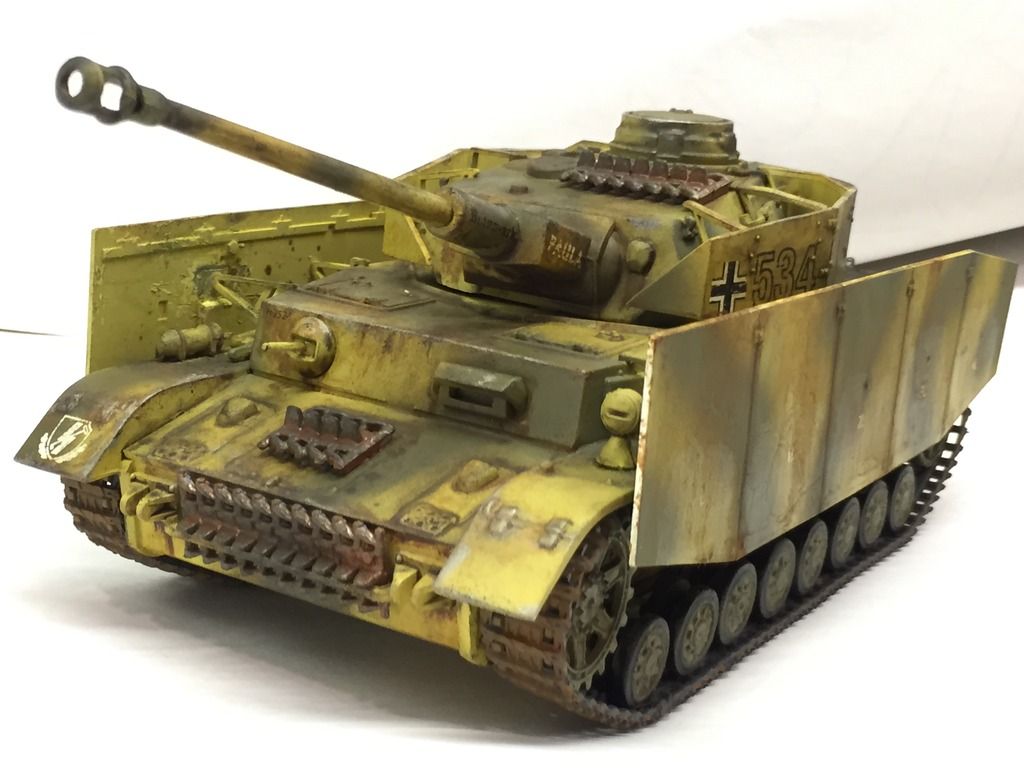
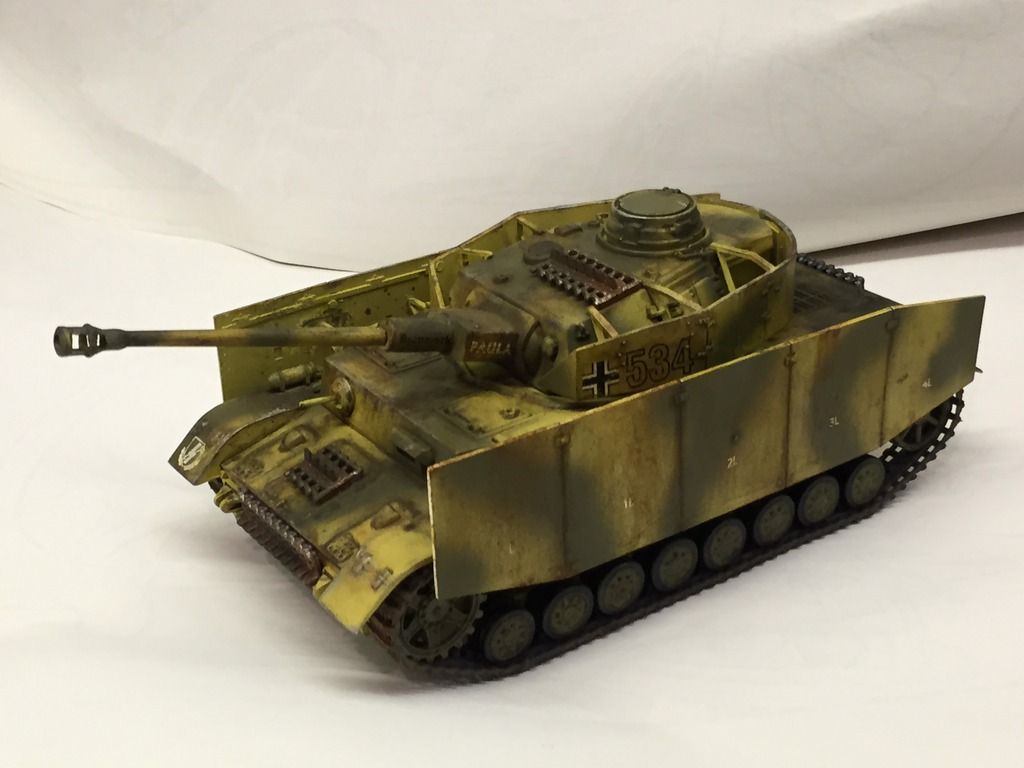
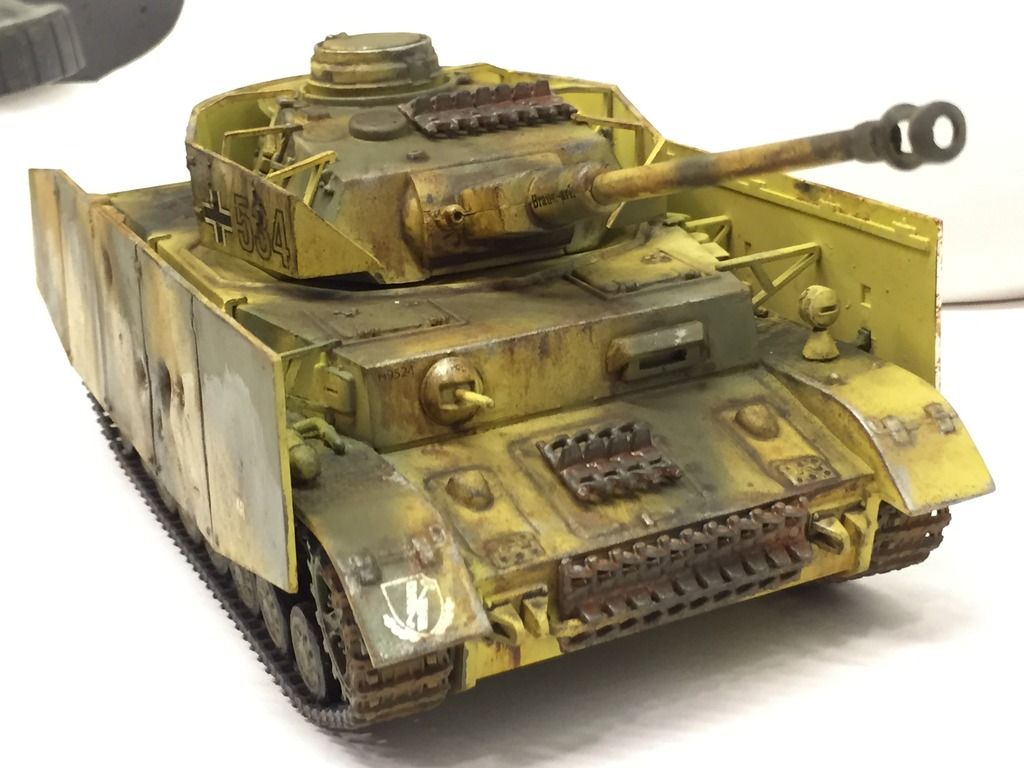
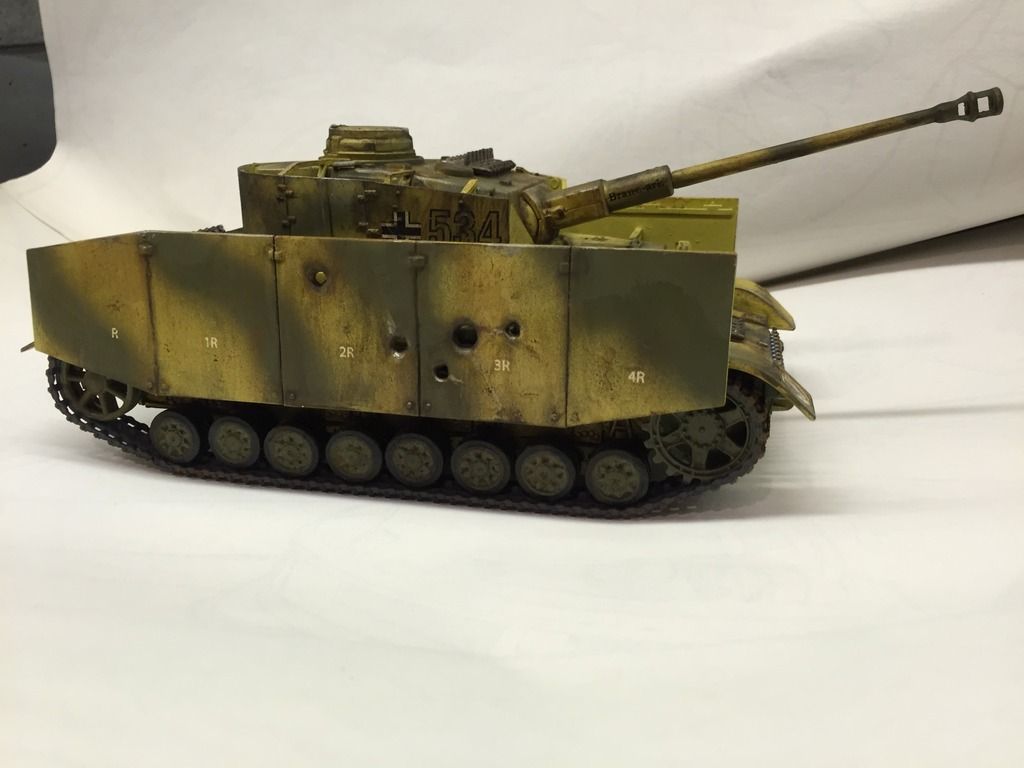
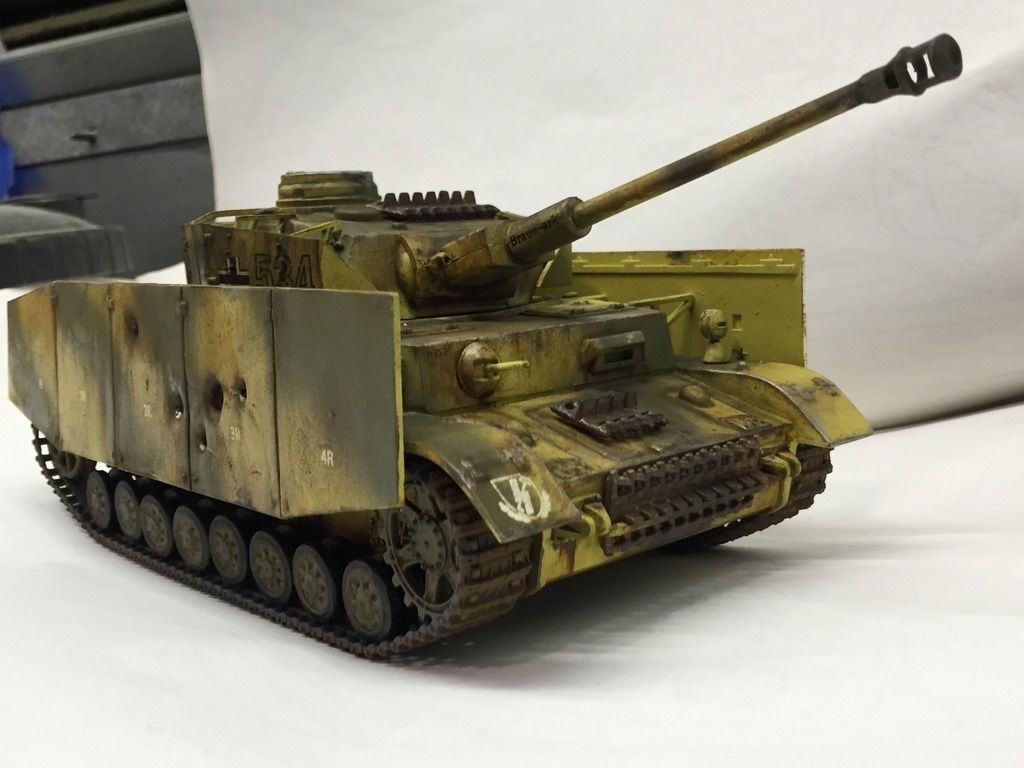
Hello everyone! I just finished my first tank! Yes it is a tired old monogram panzer IV, but I mostly bought it to try my hand at some of the techniques all you excellent pros out there are doing.(note tank has not been dullcoated yet in pictures) This tank was a tank of many firsts for me. It was the first:

First Tank I've ever built
First time I've tried camo-painting something
First time I've tried washes

First time I've dry-brushed


First time I've used pastels and or pigments.

I didn't realize how "out of scale" the armor skirts were until I was "done" but oh well.
After reading all the back and forth about "proper" tank track colors, I really struggled with that. I still don't feel they are "done" but I was pretty proud of how the tank turned out overall for being a less desirable kit, and basically a "test bed" to try some of the popular weathering techniques. I am pretty sure I did everything "out of order" but I still think it came out ok. I still plan to work on the tracks further.
I primered (duplicolor white) enamel
I painted the base coat dunkelgelb using AK interactive acrylics (late war German colors)
I painted the camo "olivegrun option 2"
I did a wash of black using oils and "odorless turpenoid"
I did some dry brushing using brown, black, silver
I applied decals
I did another wash of oils using burnt umber
I did some streaking at the same time using burnt umber as well
I dusted the exhaust and entire rear of tank with black pastels
I added extra track pieces and tried to blend them in
I plan to further paint tracks and add mig pigments to lower half of tank and tracks.
In pretty sure I did this out of order. I believe the tank should have been decaled, sealed, THEN weathered. Oh well! Please let me know your thoughts, comments, criticisms, just keep in mind this is my VERY FIRST TANK and first attempt at nearly every weathering technique. THANKS! Rudy

 [IMG]http://i1204.photobucket.com/albums/bb407/James_Rudolph/PANZER11_zpsovhqo2vy.jpg" border="0" />G]
  G][/UR


  • Member since
    June 2004
  • From: East Stroudsburg, PA
Posted by TigerII on Saturday, January 2, 2016 12:41 AM

Beautiful build. Love the camo and weathering, but I believe your 'schurzen' might be backwards.

Achtung Panzer! Colonel General Heinz Guderian
  • Member since
    July 2003
  • From: On my kitchen counter top somewhere in central North Carolina.
Posted by disastermaster on Saturday, January 2, 2016 12:42 AM
 
  Realizing this is a first build, I'm only going to comment on the finish
(I'll leave the kit corrections to the others).

 You've managed some very nice effects and y
ou're smart to use turpenoid for your oil washes, I learned that the hard way.
                                                  
 Look out guys, looks like we have some new tank painting talent here........
                                                  http://www.sherv.net/cm/emo/happy/happy-alien-cyclops-smiley-emoticon.gif
                                      (and yep, they're backwards)

 https://i.imgur.com/LjRRaV1.png


  • Member since
    April 2015
  • From: Detroit, MURDER CITY
Posted by RudyOnWheels on Saturday, January 2, 2016 12:49 AM
Aw crap youre right. the skirts are backwards. the pics in the directions are at an angle where you cant really tell, but on th decal pictures it does show them the opposite way. I also see that I need to wash the back sides of all the extra armor shields, they are too clean compared to the rest of the tank. oh well it was a great learning experience!! Thanks guys Rudy
  • Member since
    August 2005
  • From: Sydney, Australia
Posted by Phil_H on Saturday, January 2, 2016 1:58 AM

RudyOnWheels
Aw crap youre right. the skirts are backwards.

Not only backwards, but also too high. The upper brackets mounted on the sponsons should meet with the long rail on the back of the schurzen. The fender mounted standoffs fit the indentations on the back of the schurzen below the rail.


  • Member since
    March 2003
  • From: Rain USA, Vancouver WA
Posted by tigerman on Saturday, January 2, 2016 3:09 AM

This is the same kit that started me in armor some 40 plus years ago. Sniff. Aside from the sharp-eyes of my fellow members, I think you put out a solid effort for your first armor build. Solid job on the weathering. Now I think you should graduate to building some Tamiya kits before tackling some Dragon or more detailed armor manufacturers. 

   http://i7.photobucket.com/albums/y269/wing_nut_5o/PANZERJAGERGB.jpg

 Eric 

  • Member since
    January 2007
Posted by the doog on Saturday, January 2, 2016 7:41 AM

I think everyone's pretty much called out the corrections needed; I think that the finish puts my first tank in the toilet! Well done, and we'll all be waiting to see your next one!

  • Member since
    December 2002
  • From: Bury St Edmunds, Suffolk, England
Posted by Bish on Saturday, January 2, 2016 9:17 AM

Yep, thats a nice job for your first piece of armour. And i think the guys have it pretty much covered. Look forward to seeing more armour from you, and maybe a WiP thread.

That will please karl Big Smile

I am a Norfolk man and i glory in being so


On the bench: Airfix 1/72nd Harrier GR.3/Fujimi 1/72nd Ju 87D-3

  • Member since
    December 2015
  • From: Ontario, Canada
Posted by Totalize on Saturday, January 2, 2016 9:40 AM

Very nice effort for a first try. Congrats!

And as mentioned your shurzen looks like its on upside down. Just rotate them 180 degrees and you'll be fine.


David.

  • Member since
    April 2015
  • From: Detroit, MURDER CITY
Posted by RudyOnWheels on Saturday, January 2, 2016 12:14 PM
Thanks guys!!! Those skirts are super-glued on there, I think I would have to destroy the tank to get them off. I know for a fact the lower brackets are in their corresponding indentations on the skirts, as that is what I used to locate them. I kind of figured the skirting was to protect the sides of the tank and turret more than the tracks, although a blown track can mean a dead crew as well. I also thought they needed to be high up like that to clear obstacles and the ground... Maybe it's one of the kits failings? (And mine too clearly!) It means a lot to hear decent things from such prolific builders as yourselves! I think I'd like to build a tamiya half track next, maybe with an AA gun in the back and towing another or a piece of artillery..... Rudy
  • Member since
    March 2003
  • From: Rain USA, Vancouver WA
Posted by tigerman on Saturday, January 2, 2016 1:31 PM

I built the Tamiya halftrack with the 81mm mortar. It was easy (tracks arent great), but comes with many fuigures and lots of accessories. 

Going back to your Pz IV, in the pic it looks like the hull mg isn't painted. Might just be my screen.

   http://i7.photobucket.com/albums/y269/wing_nut_5o/PANZERJAGERGB.jpg

 Eric 

  • Member since
    November 2009
  • From: SW Virginia
Posted by Gamera on Saturday, January 2, 2016 4:54 PM

Rudy: She does look good! You can't just pop the skirts off without breaking anything else?

Like Eric/Tigerman to me the hull machine gun looks unpainted- you can just paint it black. If you want to be fancy then you can rub some pencil lead on a piece of paper and use your finger or a cotton swab to rub it on the gun for a metallic sheen.

"I dream in fire but work in clay." -Arthur Machen


  • Member since
    April 2015
  • From: Detroit, MURDER CITY
Posted by RudyOnWheels on Saturday, January 2, 2016 6:28 PM

Aha! Another good catch. MG needs paint.  I'll take another look at the skirts but I'm pretty sure they are not coming off, and off they do, they will break all the mounting brackets off the tank.  They have been decaled and clear coated and the decals on the skirts will be upside down and marked for the wrong sides.... I will have to do a WIP next time and get input BEFORE its all glued/painted/weathered/decaled/cleared....LuKily I can put it on the shelf and 95% of the world will never notice the skirts. 

Thsnks again fellas! Another good catch.

Rudy 

  • Member since
    January 2016
Posted by PanzerCommander on Saturday, January 2, 2016 6:56 PM

nice paint job...other than the other posts...I'll say this... cut away some of the panels and curl up the corners of the panels...hit em with a BIC lighter...they were made of crappy metal and always got bent :)


John McLaughlin


  • Member since
    October 2015
Posted by ModelMan68 on Saturday, January 2, 2016 7:06 PM

Rudy,

Very nice job...besides the minor errors it turned out beautifully. You did a nicer job on your first tank than I did. Rudy I can't wait too see more of your work. 

Bish, Bish....MY MAN!! LOL

Jeff     

a.k.a.  ModelMan68 


ON THE BENCH:  Spending Time With Family and Friends Big Smile


  • Member since
    January 2006
  • From: California
Posted by SprueOne on Saturday, January 2, 2016 7:30 PM

Hi Rudy,

It looks and reads like you had a fun time building and painting this tank. All the advice and recomendations were already covered so I'll just say that it looks great from here, esp. for a first tank. 

I wouldn't change a thing on this because it's the first one. Well maybe paint the MG but that's it. I'd display or store it but I'd keep it as is for historical sentiment. 

I blew up my first tank with firecrackers already but I kept my very second armor build. Tamiya M3A2 Half Track Smile

Anyone with a good car don't need to be justified - Hazel Motes


Iron Rails 2015 by Wayne Cassell Weekend Madness sprueone

  • Member since
    April 2015
  • From: Detroit, MURDER CITY
Posted by RudyOnWheels on Sunday, January 3, 2016 4:17 PM


Thats what happened to all the models from when I first started building 25 years ago when I was 9. Took a break til 22, then took a break until about 3 years ago. Getting a BB rifle did not help. Fire and fireworks did the rest in.  Here is my new Kit:


I think I should have listened and stopped at Tamiya Inc first, never done PE or individual linked tracks... Yikes!


  • Member since
    December 2002
  • From: Bury St Edmunds, Suffolk, England
Posted by Bish on Sunday, January 3, 2016 4:24 PM

O my lord you really are a glutant for punishment, your first Indy link tracks and you pick a Dragon 251. That is a nice kit, built that myself, but your a brave man.

First suggestion, go through the kit and remove the unused parts as indicated on the instructions.

I am a Norfolk man and i glory in being so


On the bench: Airfix 1/72nd Harrier GR.3/Fujimi 1/72nd Ju 87D-3

  • Member since
    April 2007
  • From: Schroon Lake, NY
Posted by SMJmodeler on Monday, January 4, 2016 11:15 AM

RudyOnWheels:  I admire a modeller who's not afraid to weather his builds! You tried a lot of very difficult weathering effects and did a fantastic job!  The locations, placement and amount of the weathering is logical and very well thought out.  YesYes

In the future, start your thread with an intro/ discussion of what you have in mind (goal) for the build then post a lot of pic's.  Of course you'll want to use discretion and not overwhelm us but you'll get input on stuff like the schurzen BEFORE it's too late to fix.  

Nice work, I look forward to your next project.  That 251's a doozy...interiors (open-top armor) are a real challenge!...not to mention the indies and PE!!!  If you have a few extra $$$ I'd buy another tank (Tamiya, Trumpeter or HobbyBoss) before tackling that one...just my 2 cents 

  • Member since
    December 2015
  • From: texas
Posted by DESooner on Monday, January 4, 2016 9:48 PM

Hi Rudy!

I too am back to modelling, after a break of about 35 years...I've mostly been building various Sherman and Panzer tanks up til now...currently working on my first StuG and am enjoying it. I think you will be ok with the half track you have chosen...one thing about being older is we have much more patience, even more so for those of us that are married...

I've done probably 5 tanks so far, and none of them look as good as your first. Congrats - nice tank!

JOIN OUR COMMUNITY!

Our community is FREE to join. To participate you must either login or register for an account.

SEARCH FORUMS
FREE NEWSLETTER
By signing up you may also receive reader surveys and occasional special offers. We do not sell, rent or trade our email lists. View our Privacy Policy.