SEARCH FINESCALE.COM

Enter keywords or a search phrase below:

Centurion IDF Shot build

8139 views
42 replies
1 rating 2 rating 3 rating 4 rating 5 rating
  • Member since
    November 2020
Centurion IDF Shot build
Posted by Also known as Rob on Sunday, February 14, 2021 1:45 PM

With my Valentine built the plan had been to next build a diorama for it, but .... well .... there was another box sitting there and I just couldn't resist. So the diorama is on hold, and I've been tank constucting again Smile

I've been building British Second World War Tanks and I'd decided that it made sense that the last tank in the series should be the Centurion as although it did not see active service (getting over to Europe before VE day but not getting to the front line), it does represents where British tank design got to by the end of the war.

Although a Mark 1 kit has recently become available, I managed to persuade myself that a later mark would still be in the spirit of British Tanks of World War Two, and I fanced the look of the IDF Shot version by AFV Club.

It's certainly been interesting comparing the Centurion with the other British tanks I've built this last year. The first things to build were the suspension units. I had assumed that the suspension would be along the lines of the Cristie systems in the Crusader and Centaur I've build. But they are very different, being more like Sherman easy eight suspension units to me.

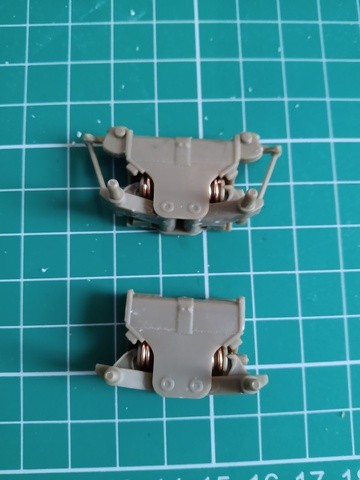
It's nice having real springs in the units so that the suspension moves realistically.

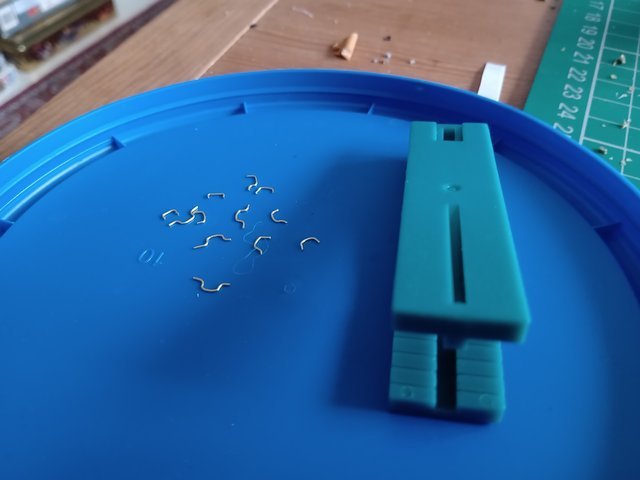
Building the hull was straight forward. I was a little worried that the upper plates wouldn't align as there are a number of panels that abutt against one another. But in fact they went together fine. My only problem was that I struggled to cut the handles off the spues in one piece, and therefore decided to use wire instead (a chance to use my new handle benders).

Making handles

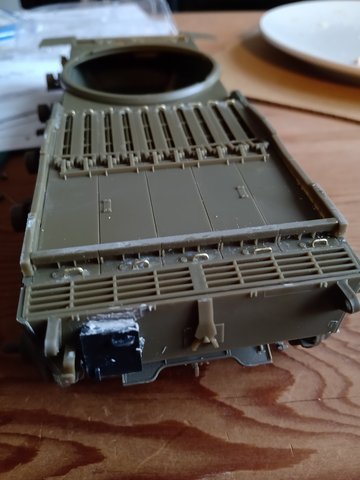
Today I have finally finished the hull build. It's not as clean as I would hope but I think with a little more preparation work it will be fine.

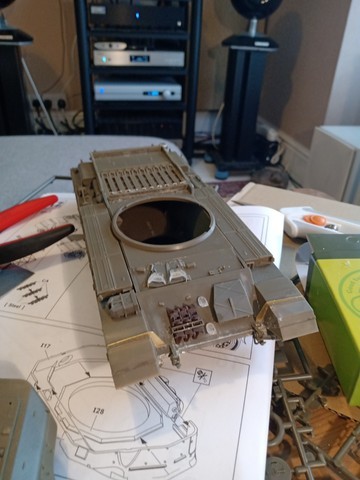
I've also started to build the turret. For me the most challenging aspect of this was that I'd bought a third party mantle cover. To fit it I had to saw off the front of the turret.


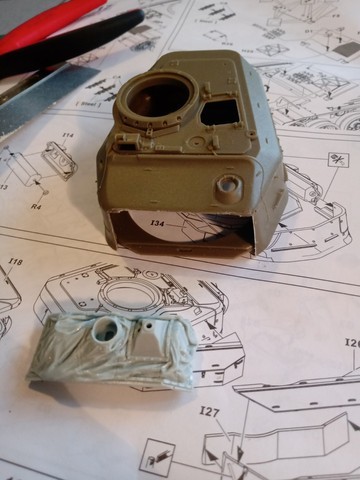
I was surprised how well that went. There is some filling to do, but in fact it wasn't too difficult to work out where to cut though the turret as the hole was square and the resin part fit very nicely. There is a little filling to do, but I expected to have to do more than I do.

I'll need to do a bit of work to hide the join around the top of the turret where the parts fit together. Looking at photos of Centurion turrets there is no seam there, so I'll need to do some filling and sanding, and apply some surface texture paint.


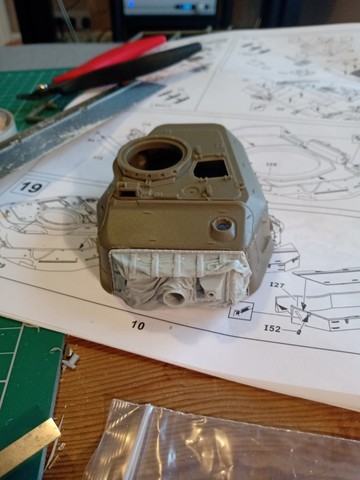
In fact the fit of the main turret segments is not brilliant - which is a little disappointing seeing how well everything else has gone together.

The fit at the front was worse than the back but fortunately the front join was cut away to fit the mantle.

Other than that, the kit has gone together very nicely. The plastic is a little softer than I'm used to. That's fine. The only issue being a slight adjustment to the pressure needed to cut through pieces. So a little bit of getting used to it needed.

An annoyance is that a lot of sprue connections are onto alignment lugs, and I have cut a few away without realising it. For example, one of the exhaust assemblies had to be placed by eye as I'd sheared the lug off in taking it off the sprue.

Overall I've been really pleased with this model. It has gone together very nicely and I'd happily consider getting another AFV Club model, and recommend this kit to anyone considering building one.

Tags: Centurion , IDF , tank
  • Member since
    September 2015
Posted by Silly_me on Sunday, February 14, 2021 2:55 PM

Good idea for a build, I just recently watched the showValley of Tears on HBO Max and it got me thinking of doing something like this.  I'll keep an eye on your work Yes

  • Member since
    November 2009
  • From: SW Virginia
Posted by Gamera on Sunday, February 14, 2021 5:39 PM

Looks good so far. Nice work on the replacement mantlet cover. I've bought a few of DEF's figures and have been impressed by the quality of them. 

"I dream in fire but work in clay." -Arthur Machen


  • Member since
    November 2020
Posted by Also known as Rob on Monday, February 15, 2021 9:33 AM

Thank you both for your kind comments.

The build is on hold for a few days. The putty I have at the moment isn't great so I've ordered some new.

This build is the first time I've used one the Trumpter Handrails jigs. It worked fine with 0.4mm brass wire. The difficult bit was drilling the holes the right distance apart, especially very close to an edge. Dealing with such small parts is at the limit of my model making skills. However, I think now I've done it, I could do a better job next time. Definitely worth persevering. 

  • Member since
    November 2020
Posted by Also known as Rob on Friday, February 19, 2021 10:52 AM

Today I've been working on the turret - mainly the join for the resin mantel and removing the seam around the join of upper turret to lower. I'm pleased with the results. It's the first time I've used both Vallejo Plastic Putty and Mr Hobby's Mr Surfacer. I really like the long thin nose of the putty tube. It makes it easy to apply small quantities precisely. The surfacer was easy to use. I started with a trimmed brush that I use for chipping, but it took a lot of cleaning, so for the second application I used a small makeup bud.

Tags: putty , surfacer
  • Member since
    May 2020
  • From: North East of England
Posted by Hutch6390 on Friday, February 19, 2021 2:49 PM

Looking good, Rob - nice job with the new handles, and the AM mantlet cover really makes a difference.  And clever use of the Mr Surfacer, too - am I right in thinking it's lacquer-based? I've got the AFV Cent Mk 3 (Korean War) in the stash & I do like the look of this one, too, so I'll just sit & take notes, if you don't mind?

Cheers,

           Hutch.

Vell, Zaphod's just zis guy, you know?


TakkaTakkaTakkaTakkaTakkaTakka


  • Member since
    November 2020
Posted by Also known as Rob on Friday, February 19, 2021 5:03 PM

Thank you Hutch.

Hutch6390
And clever use of the Mr Surfacer, too - am I right in thinking it's lacquer-based? 

Yes, it is lacquer based. I found some more information here: https://www.modeldisplayproducts.co.uk/mr-hobby---mr-surfacer

I picked up the use of Mr Surfacer to create an even cast appearance from this video (around 19min in)

  • Member since
    February 2011
Posted by GreySnake on Saturday, February 20, 2021 2:52 PM
Great work! The turret is coming along nicely with the mantlet cover.
  • Member since
    May 2020
  • From: North East of England
Posted by Hutch6390 on Saturday, February 20, 2021 4:09 PM

Thanks for the links - I think I'll invest in some of this when the time comes, looks like very useful stuff.

Vell, Zaphod's just zis guy, you know?


TakkaTakkaTakkaTakkaTakkaTakka


  • Member since
    November 2020
Posted by Also known as Rob on Sunday, February 21, 2021 9:25 AM

A little more work on the turret today. I've put the storage boxes on the side, and suddenly the classic shape has emerged. It's funny - without them it hasn't really felt like a Centurion, but with them in place the familiar shapes appear.

However, I think I've made a mistake. I thought I'd drill out the smoke dispensers and I've made a real pigs ear of it.

I've ordered some tubing (both brass and plastic) so I can scratch build some replacements. So everything is on hold until that is delivered.

  • Member since
    November 2009
  • From: SW Virginia
Posted by Gamera on Tuesday, February 23, 2021 11:40 AM

Oh very cool!!! 

Were the smoke dischargers ever covered with a tarp? It might take care of that issue to just cover them up. 

"I dream in fire but work in clay." -Arthur Machen


  • Member since
    November 2020
Posted by Also known as Rob on Tuesday, February 23, 2021 1:08 PM

Gamera

Were the smoke dischargers ever covered with a tarp? It might take care of that issue to just cover them up.  

That's an interesting idea. I'll try the scatch build, but that might be just the solution if it doesn't.

  • Member since
    November 2020
Posted by Also known as Rob on Tuesday, February 23, 2021 1:29 PM

Yes, there are pictures showing covers. For example:

Nice image here of what I'd like to have them look like if my scratch build skills are up to it: https://flic.kr/p/dZx4Td

Other options seem to be to just have the mount present without tubes:

Or just to remove them completely.

  • Member since
    November 2020
Posted by Also known as Rob on Wednesday, March 10, 2021 6:22 AM

A further update. Things are moving slowly as I tend to just have time at weekends to work on the model.

Cutting tubes for, and assembling to smoke dischargers was fiddly and a few choice words were uttered.

Assembling smoke dischargers

I'm please with the result. I think I've recovered reasonably well from my *** up of trying to drill them out.

I had Sunday afternoon free so thought that would be enough time to finish off the turret - which would mean I could move on to painting; but it wasn't to be. I hadn't taken account for just how fiddly assembly of the machine gun would be.

The ammunition bin alone took a lot of work. 

Machine gun ammunition bin

I decided to solder the first joints as this would give more strength when bending and fixing the last joints into place. I think that was a good decision, but as this was the first time I'd soldered Photo-Etch it didn't go as smoothly as I would hope. However, some careful filing and sanding ended in a good result. Bending the later folds was easier with the first joints held solidly and I finished those off with CA glue.

Machine gun with ammo bin attached


It was interesting to replace my usual strategy of accidently gluing small PE to myself with burning my fingers a few times. It's fun exploring the many ways I have of being inept.

I'm hoping to have the build completed this weekend, but there are also some intricate bins to assemble so it may take a couple of weekends. Then I can start painting Big Smile

  • Member since
    November 2008
  • From: Far Northern CA
Posted by mrmike on Wednesday, March 10, 2021 1:18 PM

Following along with interest. I have the Shot Kal version in the stash, and will enjoy having your WIP for reference - keep up the good work! 

  • Member since
    November 2009
  • From: SW Virginia
Posted by Gamera on Thursday, March 11, 2021 9:03 AM

That looks friggin' good!!! The smoke dischargers look pretty darn great. Glad to see how well they came out. 

"I dream in fire but work in clay." -Arthur Machen


  • Member since
    November 2020
Posted by Also known as Rob on Thursday, March 11, 2021 9:38 AM

mrmile - it's a very nice model that I'm sure you'll enjoy building. I could just do with smaller fingers ... and if they could be heat resistent and PE replenant too I'd be laughing.

gamera - thank you. I hope they look as good when they're painted.

  • Member since
    February 2011
Posted by GreySnake on Saturday, March 13, 2021 5:11 PM

Looking great! 

  • Member since
    November 2020
Posted by Also known as Rob on Sunday, March 21, 2021 3:37 PM

This weekend I finally completed the main build.

It's been a long time since I melted sprues to make aerials.

Melting sprues

So, I was pleases with how they came out. I'll have to see how long they last as they are butt jointed onto the mounts, and I've found them very fragile in the past.

The final parts to fix on where two cables around the back - and the bracket that holds them in place. The kit supplies string for the purpose but I failed dismally to get the ends to fit into the holes in the end loops. They kept fraying just enough to stop them going in. So hunting around my bits box I found some multi-thread brass picture hanging wire that was just the right size.

Picture hanging wire

This when twisted stayed in place and went relatively easily into the holes, and could be fixed with CA.

Twisting wire

Great I thought. I then went to fit them, and realised they were too short. And being CA fixed they didn't come apart too well. Fortunately there were a spare set of ends. So third time luck. The wire doesn't sag the way the string would, but could be bent to shape. I'm reasonably pleased with the results.

Wire cables in place

And with that the build is complete!

  • Member since
    May 2020
  • From: North East of England
Posted by Hutch6390 on Sunday, March 21, 2021 3:58 PM

That's really looking the business, Rob.  I, too, need to rediscover the art of sprue-stretching for AFV antennae, and that's a good tip with the picture wire - it looks better than the rigging line I used on my Matilda (decent cabley texture, but too thin). 

Very nice job, I'm looking forward to the paint.

Vell, Zaphod's just zis guy, you know?


TakkaTakkaTakkaTakkaTakkaTakka


  • Member since
    November 2020
Posted by Also known as Rob on Sunday, March 21, 2021 4:08 PM

This afternoon, I started work on the painting scheme. I had a couple of options with painting so though I'd try some test painting. As I've just bought a new airbrush, doing some test painting would also give me more practice with the new airbush.

I have four primers to try: IDF Sand Grey Primer, White, Grey and Black.

Four primers

I then had a couple of Vallejo IDF sand greys and a pair from Lifecolor for the main colours.

So blocks of primer with the four main colours as horizontal stripes with the Vallejo paints at the top.

The most obvious conclusion was that black primer wasn't going to work. As I like the idea of minimising the paint applied, I decided to go for the IDF sand grey primer. I think I also do a little highlighting with white primer.

Of the main colours I thought the Lifecolor paints worked best together so will go for those two.

So I had time for some priming and got a good covering of the sand grey primer on. It nicely evened up the mixed colours present on the model from the build process (bare plastic, brass and Mr Surfacer). That was most obvious for the turret.

Turret pre-painting

Turret primed

Once both the hull and turret were primed in Sand Grey, I then used a highly thinned white primer to add some highlighting. I'll be interested to see if that helps in giving a little variation to the main coats.

That's it for another weekend.

  • Member since
    November 2020
Posted by Also known as Rob on Sunday, March 21, 2021 4:10 PM

Hutch6390

That's really looking the business, Rob.  I, too, need to rediscover the art of sprue-stretching for AFV antennae, and that's a good tip with the picture wire - it looks better than the rigging line I used on my Matilda (decent cabley texture, but too thin). 

Very nice job, I'm looking forward to the paint.


Thanks Hutch.

  • Member since
    October 2019
  • From: New Braunfels, Texas
Posted by Tanker-Builder on Sunday, March 21, 2021 5:43 PM

Rob;

     The last thing you want to wish for is Heat, Cut, or Glue resistant fingers. Because of injuries sustained in my accident three and a half years ago, we've discovered I have no feeling in my Finger pads or Palms at all. Not thinking I grabbed a piece of chicken off the stove that hadn't had time to cool. three burn't fingers later we figured it out.

     I can feel a little heat on some of the sides, not many mind you. My right index finger seems to attract Knife blades. I broke an X-Acto blade this Morning. I wondered what caught on my shirt. The part of the blade that broke off was buried in the finger. I had to dig it out and C.A. it to stop the bleeding. All is well now.

    I Think? Now, how did I glue that engine to my left hand? And it's C.A. glued, too!

  • Member since
    November 2020
Posted by Also known as Rob on Sunday, March 21, 2021 5:48 PM

Tanker-Builder

Rob;

     The last thing you want to wish for is Heat, Cut, or Glue resistant fingers. Because of injuries sustained in my accident three and a half years ago, we've discovered I have no feeling in my Finger pads or Palms at all. Not thinking I grabbed a piece of chicken off the stove that hadn't had time to cool. three burn't fingers later we figured it out.

     I can feel a little heat on some of the sides, not many mind you. My right index finger seems to attract Knife blades. I broke an X-Acto blade this Morning. I wondered what caught on my shirt. The part of the blade that broke off was buried in the finger. I had to dig it out and C.A. it to stop the bleeding. All is well now.

    I Think? Now, how did I glue that engine to my left hand? And it's C.A. glued, too!


I'm not the only one who manages to glue things to themself then Big Smile

I've also discovered how good CA glue is for closing cuts. Modelling gives you the blades to make the cuts, and the glue to fix them.

Burning my fingers on this build was a new one for me.

Great to hear your still able to make models after your accident. It's such an enjoyable hobby - inspite of the hazards.

  • Member since
    November 2020
Posted by Also known as Rob on Tuesday, March 30, 2021 2:21 PM

Small update. I added the main colours to the Centurion at the weekend. So I think I'm ready to start weathering. Hopefully that will keep me occupied over the Easter weekend.

Centurion in sand grey

Centurion in sand grey just completed

  • Member since
    October 2019
  • From: New Braunfels, Texas
Posted by Tanker-Builder on Tuesday, March 30, 2021 4:12 PM

Oh Gosh;

     Don't tell me please? You Didn't glue that beautiful gun to your fingers did you? Nice work so far.

  • Member since
    October 2019
  • From: New Braunfels, Texas
Posted by Tanker-Builder on Tuesday, March 30, 2021 4:17 PM

A.K.A.R.;

          Aha a new set of letters to remember; Hey Rob, Just kidding. Now that you burned yerself ! Welcome to the Hand Burners club! I believe we number in the hundreds of thousands, although our parents and grandparent thought they taught us better!

   You are doing and outstanding job. I can't wait for the weathering!

  • Member since
    October 2019
  • From: New Braunfels, Texas
Posted by Tanker-Builder on Tuesday, March 30, 2021 4:21 PM

Hi Rob;

        I know this is going to be way late. When I stretch sprue for Antennaes I do still drill a little teensy hole in the base to put it. It seems to work better as far as unbreakability is concerned.

  • Member since
    November 2020
Posted by Also known as Rob on Wednesday, March 31, 2021 4:05 AM

Tanker-Builder
Welcome to the Hand Burners club!

Thank you. I will wear my membership badge/pin with pride.

  • Member since
    November 2020
Posted by Also known as Rob on Wednesday, March 31, 2021 4:12 AM

Thanks Tanker-Builder for the great feedback.

Tanker-Builder

I know this is going to be way late. When I stretch sprue for Antennaes I do still drill a little teensy hole in the base to put it. It seems to work better as far as unbreakability is concerned.

 
That's good advice, but the antennaes on this kit are on the top of a spike base with a very small diameter top - barely wider than the sprue antenna. To fit a wire antenna, I was going to cut the spike back to a section where it thickens to about twice the diameter. The main reason I didn't do that was to avoid having to do that cut back.
 
At the moment, the antennaes seem to be surviving well. However, I'll see how they survive over the next couple of weeks, and may have to fall back to the trim back, drill and insert option.
JOIN OUR COMMUNITY!

Our community is FREE to join. To participate you must either login or register for an account.

SEARCH FORUMS
FREE NEWSLETTER
By signing up you may also receive reader surveys and occasional special offers. We do not sell, rent or trade our email lists. View our Privacy Policy.