SEARCH FINESCALE.COM

Enter keywords or a search phrase below:

Sdkfz 250/1 Neu Premium WIP *Finished 01-13*

19837 views
104 replies
1 rating 2 rating 3 rating 4 rating 5 rating
  • Member since
    July 2004
  • From: Texas
Posted by wbill76 on Saturday, January 19, 2008 5:09 PM
Thanks Steve, appreciate your comments. Thumbs Up [tup]
  • Member since
    July 2003
  • From: On my kitchen counter top somewhere in North Carolina.
Posted by disastermaster on Friday, January 18, 2008 11:23 PM

 Whistling [:-^] I've been watching you come along on this and it has turned out Thumbs Up [tup] really well. Mischief [:-,] Of course you know I don't get too excited.........  Big Smile [:D] unless it's all beat up, he heh.

 Smile,Wink, & Grin [swg] The color for the lower (dirtied,muddy) areas looks just right to me....that's what really caught my eye. Make a Toast [#toast] I'm looking forward to your next project. 


                 Steve
 

 https://i.imgur.com/LjRRaV1.png


  • Member since
    July 2004
  • From: Texas
Posted by wbill76 on Friday, January 18, 2008 1:21 PM
Thanks IA, glad you liked it.
  • Member since
    January 2007
  • From: Iowa
Posted by IA Novice on Friday, January 18, 2008 12:18 PM
Sign - Ditto [#ditto] all the previous comments.  Nice build, and I very much enjoyed reading the thread.
The definition of insanity: doing the same thing over and over and expecting different results.
  • Member since
    July 2004
  • From: Texas
Posted by wbill76 on Thursday, January 17, 2008 9:39 PM

Thanks Chris, much appreciated!

Tread, glad you enjoyed the ride along with me. Wink [;)]

  • Member since
    September 2005
  • From: beacon falls , Ct.
Posted by treadwell on Thursday, January 17, 2008 6:05 PM
top shelf as always, BillSmile [:)]-- excellent--I always enjoy your build logs and finished product!----------treadCool [8D]


  • Member since
    August 2007
  • From: Peterborough, Ontario
Posted by Townsy11 on Thursday, January 17, 2008 6:03 PM

Very, Very nice Wbill! I love your method for mud application. Fantastic.

Chris,

"The object of war is not to die for your country, but to make the other bastard die for his."-- General George S. Patton
  • Member since
    July 2004
  • From: Texas
Posted by wbill76 on Thursday, January 17, 2008 5:42 PM

The build has been publised on Armorama with more completion photos for those interested. Wink [;)]

http://www.armorama.com/modules.php?op=modload&name=Sections&file=index&req=viewarticle&artid=1914

  • Member since
    July 2004
  • From: Texas
Posted by wbill76 on Monday, January 14, 2008 5:42 PM

 Mansteins revenge wrote:
I would like to marry your halftrack...
In the field I presume? Big Smile [:D]

T-rex, glad it worked out for you, reapplying the thinner likely dissolved the Future and let it resettle without the fog.

  • Member since
    February 2007
  • From: Calgary, Alberta, Canada
Posted by T-rex on Monday, January 14, 2008 5:18 PM

Thanks bill, but strangely i mannege to remove the clouds of the futur by reaplying another coat of tamiya thinner and it works, I didn't bother reaplying another coat of futur, it did it pupose of the decals, and it done.

I'll post the finish pictures very soon, thanks again for all your help, couldn't done it with out ya.

Working on: Trumpeter SU-152 (1/35) Trumpeter E-10 (1/35) Heller Somua (1/35)

"The world is your enemy, prince of a thousand enemy. And when they'll find you, they will kill you... but they will have to catch you first ''

  • Member since
    November 2005
Posted by Anonymous on Monday, January 14, 2008 2:22 PM
I would like to marry your halftrack...
  • Member since
    July 2004
  • From: Texas
Posted by wbill76 on Monday, January 14, 2008 1:52 PM

Tigerman, ps1scw, appreciate the comments!

 T-rex wrote:
Another Great build wbill, unfortunatly almost all hope of making my Sdkfz look good is gone, the futur did cloud up, and I can't wipe it even with a wet cotton swab, and I did it indoor this time, the cause was most likely the still wet tamiya paint tinner caot that i apply to even the paint, didn't waited long enough.

T-rex, my bet is on the Tamiya thinner reacting with the Future. Both are acrylic mediums and any un-cured thinner or flat-base would interact with it and cause it to fog. All of the base paints I use are enamels so I don't have this issue, but I always have the base coat cured for at least a day (sometimes as long as a week depending on available build time) before I seal it.

  • Member since
    June 2006
  • From: Michigan
Posted by ps1scw on Monday, January 14, 2008 12:08 PM
I really like this one.  I have a thing for these 250's. 
  • Member since
    March 2003
  • From: Rain USA, Vancouver WA
Posted by tigerman on Sunday, January 13, 2008 11:54 PM
Another quality effort there Bill. Good subtle weathering accompanies your detailed build. Nice camo job.

   http://i7.photobucket.com/albums/y269/wing_nut_5o/PANZERJAGERGB.jpg

 Eric 

  • Member since
    February 2007
  • From: Calgary, Alberta, Canada
Posted by T-rex on Sunday, January 13, 2008 11:29 PM
Another Great build wbill, unfortunatly almost all hope of making my Sdkfz look good is gone, the futur did cloud up, and I can't wipe it even with a wet cotton swab, and I did it indoor this time, the cause was most likely the still wet tamiya paint tinner caot that i apply to even the paint, didn't waited long enough.

Working on: Trumpeter SU-152 (1/35) Trumpeter E-10 (1/35) Heller Somua (1/35)

"The world is your enemy, prince of a thousand enemy. And when they'll find you, they will kill you... but they will have to catch you first ''

  • Member since
    July 2004
  • From: Texas
Posted by wbill76 on Sunday, January 13, 2008 8:21 PM

Work continued today with the weathering of the suspension and running gear but first up I dry-brushed some lightened Dunkelgelb to the hull surfaces to add some additional variation to the previous day's weathering, particularly to the markings. Once that was done, I mixed up a batch of Mig pigments using Dark Mud, African Earth, and Europe Dust in a prescription bottle cap mixed with tap water and applied this wet with a round brush. The pigment/water mixture was allowed to air-dry, which took about an hour or so, and looked like this.

This was then given some attention using various stiff-bristled brushes to remove the excess pigment and get everything looking the way I wanted it to. For the hull sides and main wheel tire sides, I used a moistened q-tip to further remove the pigment and blend it in to the finish.

The tracks were then dry-brushed lightly with Steel to bring out their details a bit more.

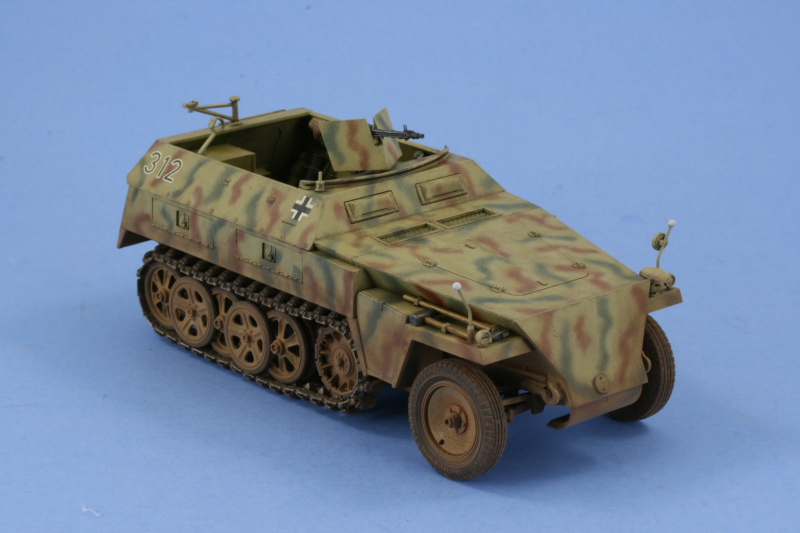
A couple of touch-ups here and there and it was off to the photo-booth for the completed photos.

  • Member since
    July 2004
  • From: Texas
Posted by wbill76 on Sunday, January 13, 2008 7:40 PM

Thanks MR!

Doog,

The heavy wear is on the interior, not much chance for wear on the exterior due to the vehicle occupants, they would've entered and exited via the rear door in the fighting compartment as a matter of course. While the popular image is of panzergrenadiers leaping over the sides into battle, their real purpose was to allow the troops to keep up with the panzer divisions as grenadiers and going over the side would've been done only in an extreme emergency as opposed to out the hatch. Also, since I've marked this one as belonging to an Aufklarungsbattaliaon, it wouldn't have been used as an infantry carrier but for forward reconnaisance, so small crew mostly interested in staying insdie the vehicle for the most part. Big Smile [:D]

As far as a figure goes, I don't usually include them since they go in the display case as stand-alone builds when done. This one could easily benefit from a guy standing up in the compartment ala the box-art though, I'm sure any number of readily available figures could be modified to do the trick if you were so inclined.

This one actually got finished today...an update later on a bit I promise. Wink [;)]

  • Member since
    January 2007
Posted by the doog on Sunday, January 13, 2008 2:56 PM

What a cute little war-buggy! Smile [:)] Looking very nice, Bill, Are you putting a figure in it as well? Seems like it could use one?

Your weathering is so subtle, Bill; very stylish and personal to your "signature look"--are you gonna do any chipping around the edges" T'would seem likely that in a vehicle with such heavy pedestrian traffic you would see some wear and chips?

It's really a great build. It must be quite something to pick up and look around the super-detailed interior!  Tongue [:P]


  • Member since
    November 2005
Posted by Anonymous on Sunday, January 13, 2008 2:49 PM

Sweet!

  • Member since
    July 2004
  • From: Texas
Posted by wbill76 on Saturday, January 12, 2008 8:42 PM

Started off today by laying down a coat of Future by airbrush, let that set for an hour or so, then applied the decal markings. The markings for my choice of vehicle were simple and no license plates required, just a pair of balkenkreuze and the vehicle numbers. These were given a dose of Solvaset to get them to snug down tight and then another coat of Future to seal them from the weathering process.

Then the weathering was applied in the form of an overall wash of Raw Umber followed by dot filters of Raw Sienna and lightened Dunkelgelb to add some variation.

The final step was a pin wash of Burnt Umber to all the raised detail and the suspension and then everything was sealed with a coat of Testor's Lusterless Flat in the rattle-can.

Next up will be some pigment treatment.

  • Member since
    July 2004
  • From: Texas
Posted by wbill76 on Saturday, January 12, 2008 2:23 PM

T-rex,

I always apply my Future indoors since it's acrylic and non-toxic (use the kitchen table in fact), so it's possible I guess if it got cold it could do what you describe.

As far as your black paint turning white or cloudy on the roadwheels, what are you using for paint and thinner?

  • Member since
    February 2007
  • From: Calgary, Alberta, Canada
Posted by T-rex on Saturday, January 12, 2008 11:05 AM

Thanks wbill, i heard from another forum that if futur is setting in a workplace too cold it clouds, that was most likely the problem then since my garage wasn't heated, and it was getting really cold in there!

Another problem with my hanomag that i have is everytime i paint the wheels black they turn out white or cloud, i don't know why it does this maybe too thinne or is it something else?

Working on: Trumpeter SU-152 (1/35) Trumpeter E-10 (1/35) Heller Somua (1/35)

"The world is your enemy, prince of a thousand enemy. And when they'll find you, they will kill you... but they will have to catch you first ''

  • Member since
    July 2004
  • From: Texas
Posted by wbill76 on Tuesday, January 8, 2008 9:55 PM

T-rex,

The purpose of the Future is to provide a sealing coat for the base coat since I paint with enamels and need an acrylic barrier between the base coat and the weathering to avoid stripping the paint. It also has the added benefit of helping decals adhere/settle without silvering and allows washes and other weathering to flow more easily and be adjusted. Once the weathering is applied, then a coat of Dullcoat lacquer is applied to remove the shine so everything has a flat appearance. It's a method I've been using now for a long time with good success.

It sounds like you might have gotten something mixed into your Future when you sprayed it? If it's straight from the bottle, it will dry clear unless you put on very very heavy layers of it.

  • Member since
    February 2007
  • From: Calgary, Alberta, Canada
Posted by T-rex on Tuesday, January 8, 2008 9:37 PM

Its a month since i've been gone and you already almost finish another model, and what a coincedence you doing a half track too, i got tamiya hanomag this winter and arounf the same progress.

A great build you got there, keep up the good work, but why are you gonna clear coat is with futur, won't that just make it shiny, since when are tanks shiny, anf the last time i use a coat of futur on a model, it dried and the LVT got all white.

Working on: Trumpeter SU-152 (1/35) Trumpeter E-10 (1/35) Heller Somua (1/35)

"The world is your enemy, prince of a thousand enemy. And when they'll find you, they will kill you... but they will have to catch you first ''

  • Member since
    July 2004
  • From: Texas
Posted by wbill76 on Tuesday, January 8, 2008 7:47 PM

Thanks Ron!

Specter,

The kit includes the PE for the grenade holders as part of the "Premium" upgrade package.

  • Member since
    May 2007
Posted by Specter on Tuesday, January 8, 2008 6:16 PM
looking sweet Wbill, is the grenade rack am?
Seth
  • Member since
    January 2005
  • From: in the tank factory in my basement
Posted by biffa on Tuesday, January 8, 2008 5:26 PM
Looking great Bill your almost there, another quality build blog, i await the final installments. 
Ron g.
  • Member since
    July 2004
  • From: Texas
Posted by wbill76 on Tuesday, January 8, 2008 2:47 PM

 zokissima wrote:
Always love seeing your work. This one came up pretty quickly.

Thanks zoran, appreciate the comments. This kit builds up surprisingly fast, even with the interior details. I started it at the end of November and, even with a couple weeks of interruption due to holidays and such, it's still come together relatively quick. All things being equal, I'll likely finish it up this weekend.

  • Member since
    July 2003
  • From: Toronto, Ontario, Canada
Posted by zokissima on Tuesday, January 8, 2008 10:29 AM
Always love seeing your work. This one came up pretty quickly.
JOIN OUR COMMUNITY!

Our community is FREE to join. To participate you must either login or register for an account.

SEARCH FORUMS
FREE NEWSLETTER
By signing up you may also receive reader surveys and occasional special offers. We do not sell, rent or trade our email lists. View our Privacy Policy.