SEARCH FINESCALE.COM

Enter keywords or a search phrase below:

Jo-Han Maverick Dyno Dons Ride-One Year Project-Complete!

18807 views
247 replies
1 rating 2 rating 3 rating 4 rating 5 rating
  • Member since
    May 2013
  • From: Indiana, USA
Posted by Greg on Wednesday, March 18, 2020 10:31 AM

Well isn't this coming along nicely. Yes

Up at the top of the page you have a pic of the real car and your kit, just red body perched on the chasis. I looked at it and initially thought the same thing as bigjim, the tires look too big, but they also look too big on the actual car. I figured once your body got all decaled up, the ratio would look the same.

It seems that is exactly what happened.

I knew you'd do this thing proud, you're not letting us down.

  • Member since
    June 2014
Posted by BrandonK on Thursday, March 19, 2020 9:19 AM

Well, I'm looking for your "flaw" and I'm not seeing it so I'll have to give you a pass on this one. It looks fantastic.

BK

On the bench:

A lot !! And I mean A LOT!!

2024 Kits on deck / in process / completed   

                         14 / 5 / 2  

                              Tongue Tied

  • Member since
    March 2012
  • From: Corpus Christi, Tx
Posted by mustang1989 on Thursday, March 19, 2020 1:38 PM

Lew: No problem buddy. I really want to get that Fairmont body but I'm going to have to wait just a bit till I get some more funds to score that along with the chassis for it. I feel your pain on missed opportunities like that bro. 

Greg: Thanks for dropping in. I guess I had a vision early on in regards to the tire/ body fit. lol. I appreciate the good word. Yes

Brandon: I thank you for your comments as well. The "flaw" is right above the wheel openings. You'll see that there is a jagged border on the bottom of the white decal above the wheel openings. In person it's quite noticeable. 


 Forum | Modelers Social Club Forum (proboards.com) 

  • Member since
    March 2012
  • From: Corpus Christi, Tx
Posted by mustang1989 on Saturday, March 21, 2020 8:57 AM

This build has been going a lot slower than a lot of my other ones just because of parts....and the money to get them. Used to I would buy everything I needed BEFORE a build. Now I'm having to spread everything out as I can afford it. Things are slowly coming together now. Sometimes it's a "one step forward and two steps backwards" gig. Like today for instance, I saw that one of the rear wheels that I shot with Molotow has cracking in the chrome finish. Dunno what happened there as the other rear wheel is ok. Guess it's a bath in oven cleaner and a re-shoot for that one though. The other thing that I've noticed was the rear bumper. There are two HUGE sink marks on the outside of the bumper where the two mounting tabs are located on the inside of the bumper. Looks like that's gonna get stripped and some body work is coming down the pike. One thing after another with this kit...………...BUT......that's modeling.


The other thing that has been hampering me is myself. Like....forgetting to paint the roof white for instance. And just yesterday I saw where I forgot to paint the tail light panel black. No biggie....just masked off and shot it semi gloss black this morning and it turned out ok.


Updated Mock up shots:


g2Vkgg.jpg


jfzlw1.jpg


9e0aaN.jpg


y5PZlM.jpg


 Forum | Modelers Social Club Forum (proboards.com) 

  • Member since
    June 2014
Posted by BrandonK on Saturday, March 21, 2020 10:58 AM

It's coming along very nicely. Looks like you are closer to the end than the beginning now.

BK

On the bench:

A lot !! And I mean A LOT!!

2024 Kits on deck / in process / completed   

                         14 / 5 / 2  

                              Tongue Tied

  • Member since
    April 2003
  • From: USA
Posted by keavdog on Saturday, March 21, 2020 7:30 PM

Bad Ass!!!!!! Love those big meats.  I want to drive it :)

Thanks,

John

  • Member since
    March 2012
  • From: Corpus Christi, Tx
Posted by mustang1989 on Wednesday, March 25, 2020 6:57 AM

Thanks Brandon and John. I've still got a ways to go with this. The interior in this car needs ALOT of help and there's plenty to do out under the hood.

Got my carburetors yesterday from Scott at Futureattractions. These are hands down the best Holley Dominator carburetors out there. 


A little clean up and prep work is all that's needed.


 Forum | Modelers Social Club Forum (proboards.com) 

  • Member since
    October 2018
Posted by PGBolt on Wednesday, March 25, 2020 7:44 AM

I <3 this thread. Great work! Although, I think the carbs are grossly inaccurate. They appear to be running #84 jets, when they should be #87. Other than that, it's terrific.

  • Member since
    August 2009
  • From: MOAB, UTAH
Posted by JOE RIX on Wednesday, March 25, 2020 10:23 AM

You all got some good stuff going on here Bro. I think those slicks are absolutely boss looking. In other words.."Nailed It!". Those carbs are really sharp looking. Those will definitely add to the overall look once you done your work on tham. You're doing fabulous work my friend, keep it up.


"Not only do I not know what's going on, I wouldn't know what to do about it if I did". George Carlin

  • Member since
    March 2012
  • From: Corpus Christi, Tx
Posted by mustang1989 on Wednesday, April 1, 2020 1:09 PM

Thanks PG and Joe. I appreciate you guys dropping in and commenting.Finished up the hood this morning. Applying white over red was NOT an easy job to do. Fought the color bleed through thing all the way BUT....I got it! 


Image


 Forum | Modelers Social Club Forum (proboards.com) 

  • Member since
    August 2009
  • From: MOAB, UTAH
Posted by JOE RIX on Wednesday, April 1, 2020 6:35 PM

Glad to see you won the battle of painting the white over red. It turned out magnifico!

"Not only do I not know what's going on, I wouldn't know what to do about it if I did". George Carlin

  • Member since
    March 2012
  • From: Corpus Christi, Tx
Posted by mustang1989 on Thursday, April 2, 2020 10:49 AM

Thanks Joe. 'Preciate that bud.Yes


 Forum | Modelers Social Club Forum (proboards.com) 

  • Member since
    June 2014
Posted by BrandonK on Thursday, April 2, 2020 4:48 PM

White over any color is nearly impossible. I try to go white first where I can. You did a great job on it, I can't tell it's the top color.

BK

On the bench:

A lot !! And I mean A LOT!!

2024 Kits on deck / in process / completed   

                         14 / 5 / 2  

                              Tongue Tied

  • Member since
    March 2012
  • From: Corpus Christi, Tx
Posted by mustang1989 on Friday, April 3, 2020 6:00 AM

Thanks Brandon! 

I'm getting pretty close to being done with the dash. I took a couple of liberties with it just to have at least a little fun. I still have the foot pedals to construct and put under it and to install a tachometer on the dash but it's pretty much where I want it. I took Macro shots against my better judgement. With that being said, the blems that show up in this pic won't be seen by the naked eye. 


zviBVK.jpg


 Forum | Modelers Social Club Forum (proboards.com) 

  • Member since
    August 2009
  • From: MOAB, UTAH
Posted by JOE RIX on Friday, April 3, 2020 8:10 AM

Absolutely marvelous dashboard Bro. The dials are exceptional. Even with the macro shot it is difficult to see any glaring blemishes. And that my friend, is the sign of a true arteest. You all dat!

"Not only do I not know what's going on, I wouldn't know what to do about it if I did". George Carlin

  • Member since
    May 2013
  • From: Indiana, USA
Posted by Greg on Friday, April 3, 2020 8:23 AM

Coming along brilliantly.

First I've seen of an itsy-bitsy carburator like that. Zowie!

  • Member since
    March 2012
  • From: Corpus Christi, Tx
Posted by mustang1989 on Monday, April 6, 2020 10:50 AM

Thanks Joe and Greg. 

Greg: I hear what you're sayin'. These are some of the best Dominator carburetors out there.

After a weekend, I've made some progress on this bad boy.

After robbing the foot pedal assemblies from the AMT 1967 Mustang kit, I cut the grossly over scale levers from the back of each pedal.

DfYPsv.jpg

qBpUpy.jpg


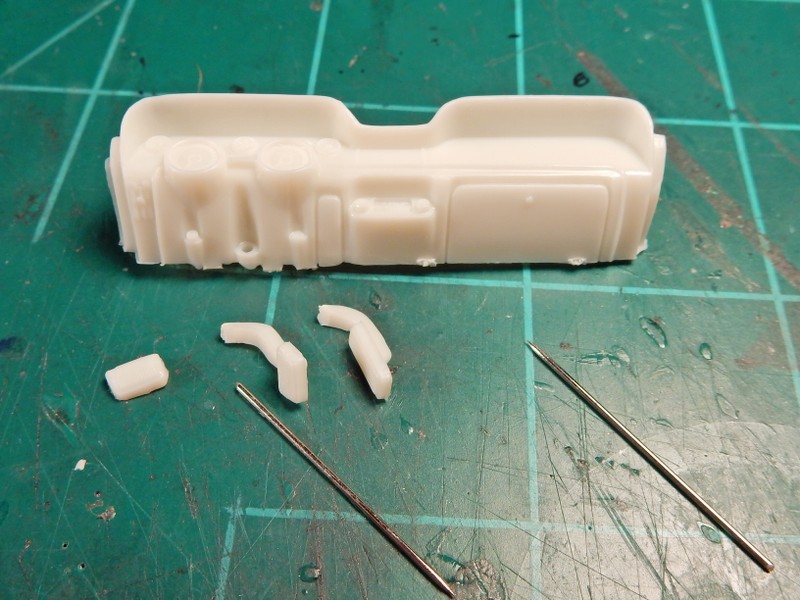
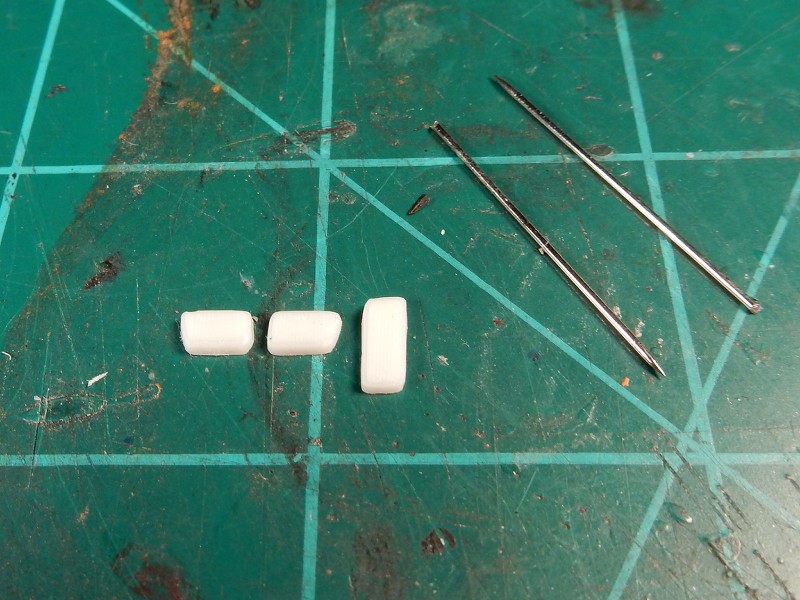
Then I formed up the levers and made some mounts on the back side of the dash in which to "swing" the pedals with...

fPa12g.jpg

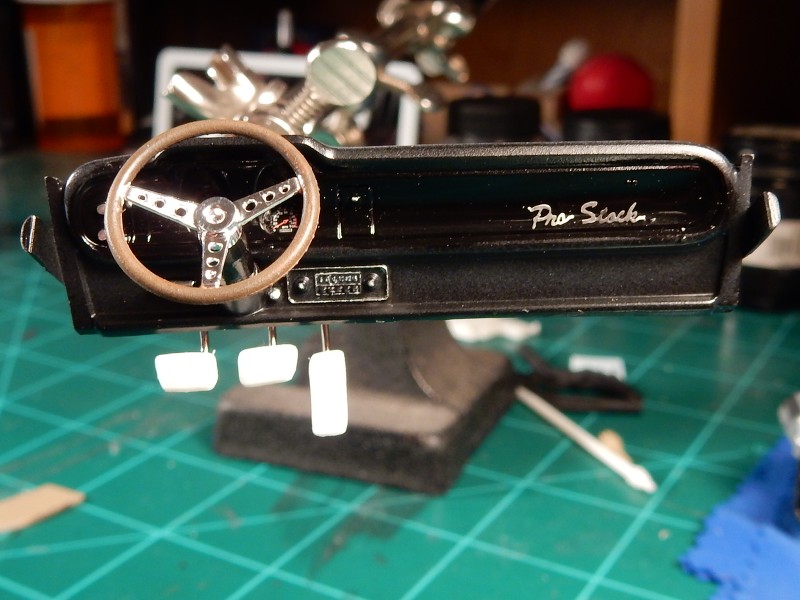
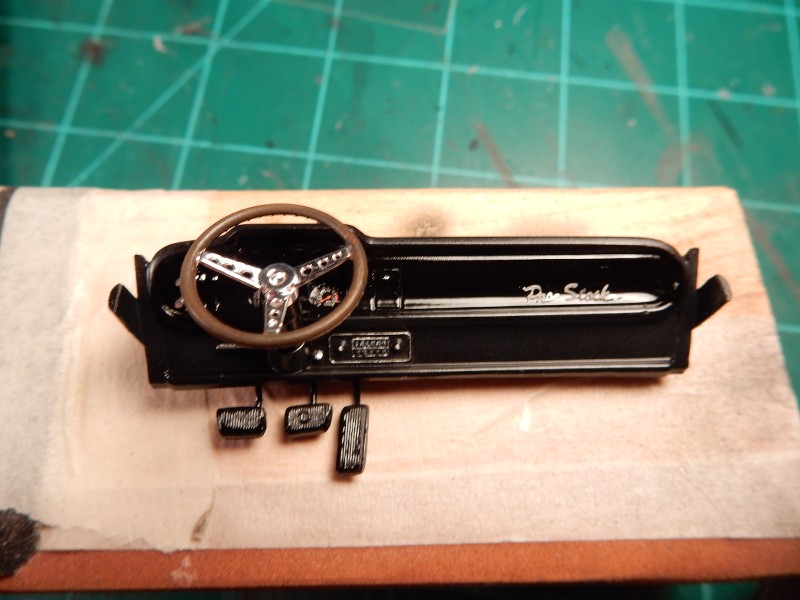
I finished this part up this morning by painting the swing levers and pedals. I also darkened the steering wheel wood areas just a tad.....

Wt5XXm.jpg


 Forum | Modelers Social Club Forum (proboards.com) 

  • Member since
    August 2009
  • From: MOAB, UTAH
Posted by JOE RIX on Monday, April 6, 2020 12:54 PM

Nice little improvement you've done there. You always have the eye for the smallest detail and it always shows in your builds.

"Not only do I not know what's going on, I wouldn't know what to do about it if I did". George Carlin

  • Member since
    March 2012
  • From: Corpus Christi, Tx
Posted by mustang1989 on Monday, April 6, 2020 4:18 PM

Thanks Joe. I appreciate the comments pal. 


 Forum | Modelers Social Club Forum (proboards.com) 

  • Member since
    August 2015
  • From: the redlands Fl
Posted by crown r n7 on Monday, April 6, 2020 4:46 PM

Yes

Stunning realistic looking dash 


 Nick.

  • Member since
    June 2008
Posted by lewbud on Thursday, April 9, 2020 2:32 AM

Nice save on the hood!  The dash looks great, and now I really need a set of those carbs.  Keep it up!

Buddy- Those who say there are no stupid questions have never worked in customer service.

  • Member since
    March 2012
  • From: Corpus Christi, Tx
Posted by mustang1989 on Thursday, April 9, 2020 7:06 AM

Thanks Nick and Lew!! 

Well I got some more done on her this week. I cut the rear and two side windows out of thin clear styrene and decaled the side windows up with racing stickers. Just waiting on those to dry so I can dunk 'em in some Future so I should be going in with those tomorrow it looks like.

Then came the moment I've been waiting for at the rear of the car. Upon close inspection of the deck lid you can see some lock studs, quick release pins and cables at the rear most corners of the lid. I received my lock pin set two days ago so I was able to get some progress done on that.

Reference shot:

Image

Progress so far. Still have to dot the 4 spots on each plate to simulate screws with some Molotow and add the cables later but here we are for now:

Image


 Forum | Modelers Social Club Forum (proboards.com) 

  • Member since
    June 2014
Posted by BrandonK on Thursday, April 9, 2020 9:08 AM

Those pins look fantastic. Certainly adds a touch more realism. Very nice.

BK

On the bench:

A lot !! And I mean A LOT!!

2024 Kits on deck / in process / completed   

                         14 / 5 / 2  

                              Tongue Tied

  • Member since
    March 2012
  • From: Corpus Christi, Tx
Posted by mustang1989 on Thursday, April 9, 2020 5:35 PM

Thanks Brandon. It was another after thought. I just happened to look a little closer after I missed the black tail light panel to see those pins back there. I quickly placed an order for the pins and once I received them I went straight to work.


 Forum | Modelers Social Club Forum (proboards.com) 

  • Member since
    April 2003
  • From: USA
Posted by keavdog on Thursday, April 9, 2020 6:48 PM

Those are really nice!  Clean install too

Thanks,

John

  • Member since
    May 2013
  • From: Indiana, USA
Posted by Greg on Thursday, April 9, 2020 6:58 PM

BrandonK
Those pins look fantastic. Certainly adds a touch more realism. Very nice.

Indeed they do. Yes

Re the brake/clutch/gas pedal levers, you don't miss a thing.

Looking at the reference shot, it looks like zero clearance between those rear tires and the fender/wheel well/whatever. I'm sure it's an optical illusion, but yikes!

  • Member since
    March 2012
  • From: Corpus Christi, Tx
Posted by mustang1989 on Friday, April 10, 2020 9:15 AM

Thanks Greg and John. 

Yeah I may raise it up one scale inch which is entirely do-able. Just enough for a small amount of clearance.


 Forum | Modelers Social Club Forum (proboards.com) 

  • Member since
    August 2009
  • From: MOAB, UTAH
Posted by JOE RIX on Friday, April 10, 2020 9:37 AM

Those deck pins are as sharp as can be. Nice addition. 

What have you got planned for the wheelie bar?

"Not only do I not know what's going on, I wouldn't know what to do about it if I did". George Carlin

  • Member since
    March 2012
  • From: Corpus Christi, Tx
Posted by mustang1989 on Monday, April 13, 2020 4:41 PM

Thanks Joe. I've got a set from the Jo-Han boxing that aint bad but I may opt for something better. So in short.....I dunno yet. Will see about that a little further down the line here.


 Forum | Modelers Social Club Forum (proboards.com) 

  • Member since
    March 2012
  • From: Corpus Christi, Tx
Posted by mustang1989 on Friday, April 17, 2020 7:25 AM

You know fellas.....every once in a while you have to negotiate a TRUE hurdle in modeling. Sometimes it's paint, sometimes it's fit and sometimes it's things like I've been going through for the past week.....the assembly process. I've been building models for a long time and lemme tell ya.....nothing....I mean NOTHING has tested my patience and my abilities as a modeler as much as this aftermarket Liberty shifter from Futureattraction. To put it lightly...this shifter looks absolutely fantastic after it's all been put together. But therein lies the hurdle.....the assembly. At 26 pieces it is one of the most intricate PE items that I have taken on yet. I kid you not....I've got every bit of 7 hours wrapped up in this thing. I had half of it pieced together one morning after spending an hour + on it and the very next day upon picking it up to continue......it all came apart. :headbang: Yeah....stuff like that and then being under the optivisor the whole time. :shocked: Eyes hurt...got a headache...got pissed off......contemplated throwing stuff and I think I made up new curse words along the way :shutup: . Feel free to contact me for the updated curse word list. :whistle:

I've still got to cut that one long pin off ( I'm leaving it in place to be able to work with it for shift rods install) and have just a little clean up left to go as far as glue smears but a little thinner and that'll go away. I felt a TRUE sense of accomplishment when I got up from the bench this morning and wanted to show that to you all.

The Liberty Shifter:

Image

Image

and to show you just how small this is

Image


 Forum | Modelers Social Club Forum (proboards.com) 

JOIN OUR COMMUNITY!

Our community is FREE to join. To participate you must either login or register for an account.

SEARCH FORUMS
FREE NEWSLETTER
By signing up you may also receive reader surveys and occasional special offers. We do not sell, rent or trade our email lists. View our Privacy Policy.