SEARCH FINESCALE.COM

Enter keywords or a search phrase below:

Revell Peterbilt Black Widow 1:25 Model Truck

23359 views
21 replies
1 rating 2 rating 3 rating 4 rating 5 rating
  • Member since
    January 2011
  • From: England
Revell Peterbilt Black Widow 1:25 Model Truck
Posted by Elizabeth Jane on Saturday, January 15, 2011 11:39 AM

Hello everyone,

It has taken a lot longer than I expected but eventually the penny dropped and I now know how to post photos using PB and Flickr. I must admit that I found a way which is nothing like as hard as some of the instructions I have read. Everyone must have slightly different problems but I found trying to use the embedded codes from Flickr and PB is the cause not the cure of the problems when posting photos.
Anyway, since I turned up here and didn't fit the standard male modelling mould I have rocked the boat slightly with a couple of people and I am sure one or two still doubt this truck really exists so it gives me great pleasure to eventually get some photos online.
I have no idea how it compares to anything else, that's why I'm expecting honest and truthful opinions and once I stop crying and calm down (joking of course, I can take it) the next model, a dumper trailer, can only be better.


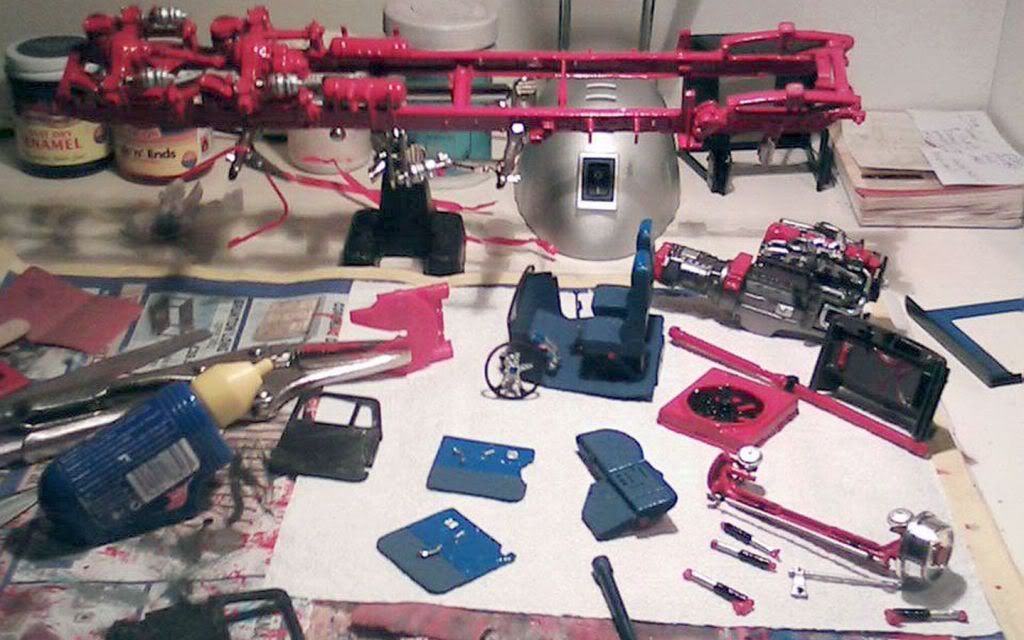
#1 Camera Phone Photo
This is the first photo I took once I decided to document what I was doing. I removed most of the twist in the chassis by glueing and clamping each single chassis leg in three stages before glueing them both back together and refitting the rear axles. It took over a week to get to this stage and I was trying to do too much at once. The steering was in a right mess after taking it apart and you can see the damage I did to the inner doors to get at the snapped hinges. The shock absorbers have been glued back together and painted, the seats are now blue, the fan is black and the steering wheel has been removed to straighten and paint.
 

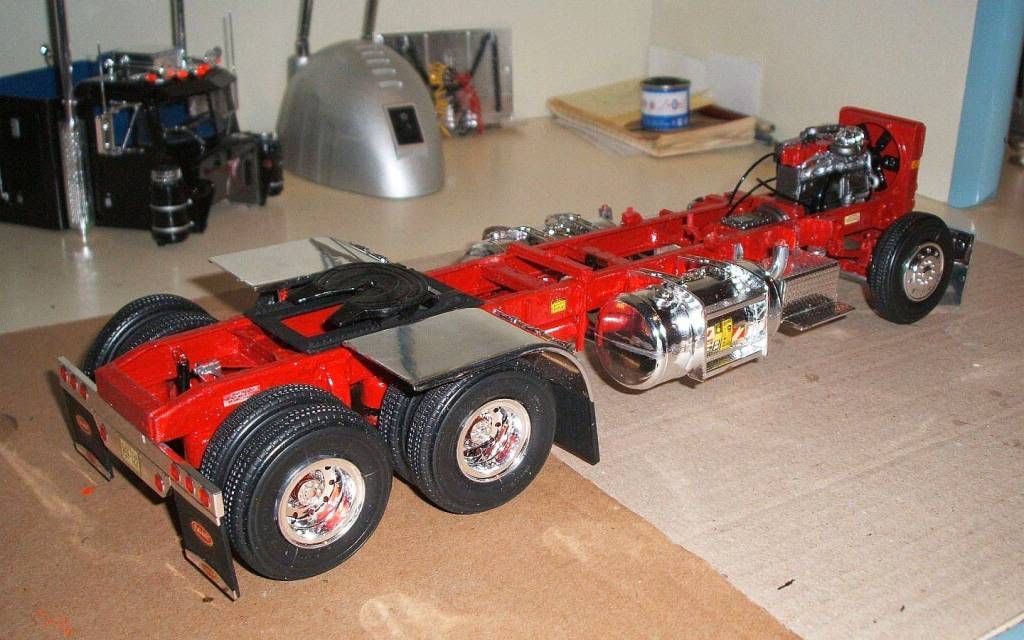
#2
The chassis is starting to take shape by now but the steering arms keep snapping. I later fix it using the same idea I had to fix the door hinges and bend two pins into right angles at the pin heads, put them through the track control arm and melt them in as new steering arms. The wheel pins have been drilled out and fitted with new pins, the engine and radiator are done and the drive shaft is back in place. I made the mistake of putting the bumpers on at this stage and very quickly realised I had no way of picking the thing up without bits falling off.


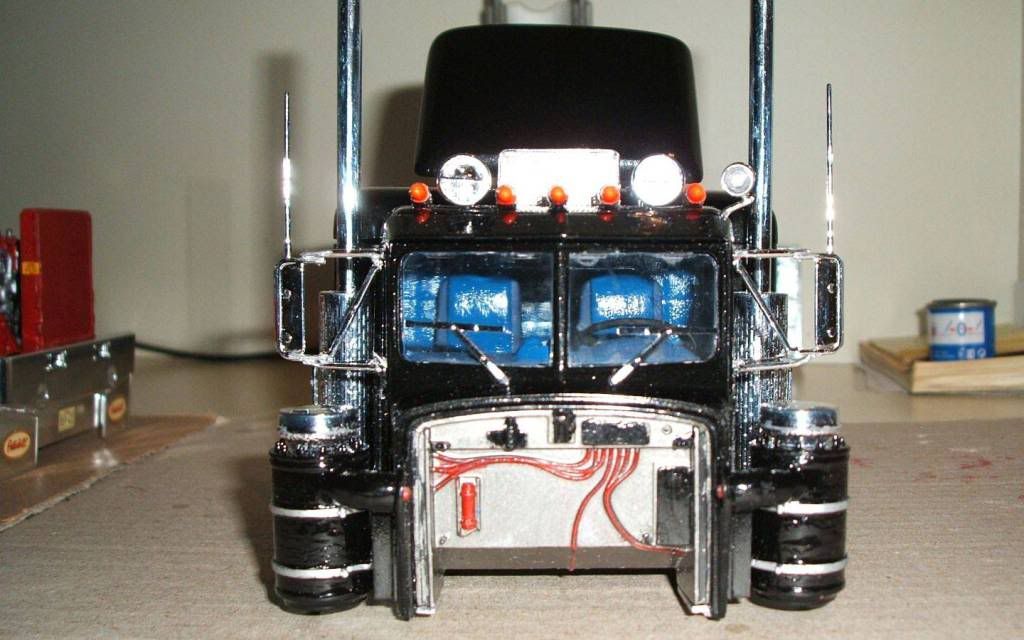
#3
The cab is almost finished, just some touch-up's needed but I never get it perfect. The glue on the glass still bugs me but my nephew was only ten when he tried to build it. I decided on metallic red for the chassis which was a deeper red than my dad originally used. The inside should have been red and brown but it isn't the 80's anymore so I used different blue's with matt black plastics and aluminium for the steering column, gear stick and window winders. The cab and sleeper roof is dark grey and it has a light blue bed (it is after all a man's truck). I bought a large can of metallic black spray for the outside and my dad showed me how to spray before I painted the cab. The temperature was below freezing in the garage so I sprayed and my dad dried used my hair drier to stop the paint from running. I didn't paint the front wheel arches, wheel centres, lower front bumper and the cooler for the roof as I wanted to keep as much chrome as possible. The engine and bulkhead are silvery bronze thanks to a touch-up brush off my dads old Nissan Sunny Drizzle. (I hated that car)


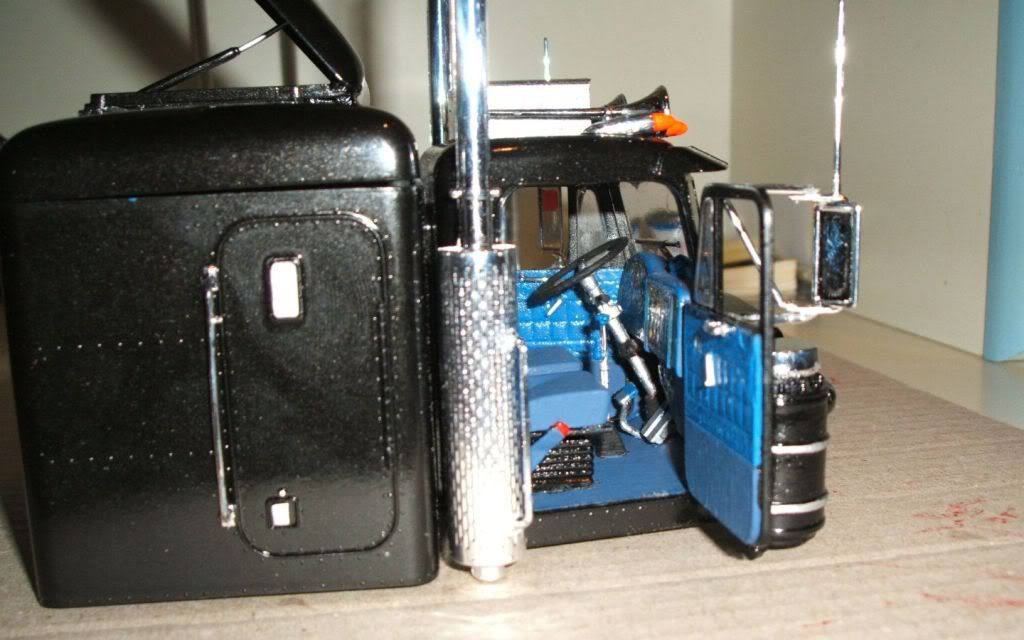
#4
The original door hinges are solid bits of glue and I spent hours making little pegs that kept snapping when I opened the door because I couldn't get them lined up. A paper clip give me the idea of cutting up a sewing needle and melting it through four plastic blocks glued to the cab. The pins are between the two half's of the doors and the blocks fit in the original hinge gap. I manage to get this door to work fine but the other door twists as it opens. It shouldn't be too much of a problem on the UK's roads though. The blue paint showing in the roof gap, the burr on the chrome hand rail, the black on the edge of the door, the lower seats and the cab floor all get corrected.
 

#5
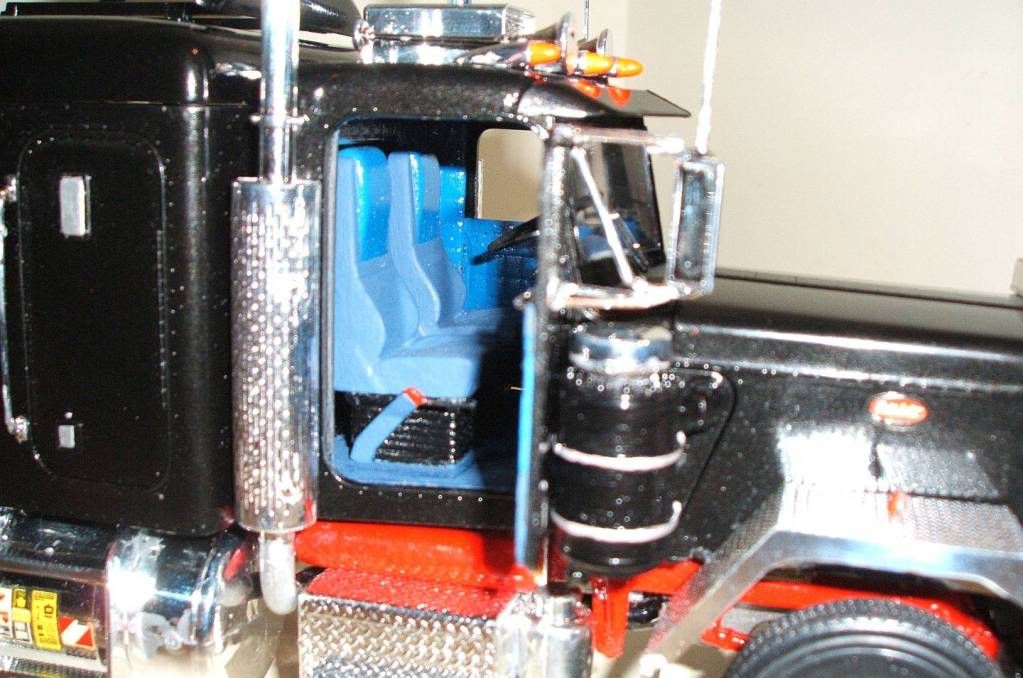
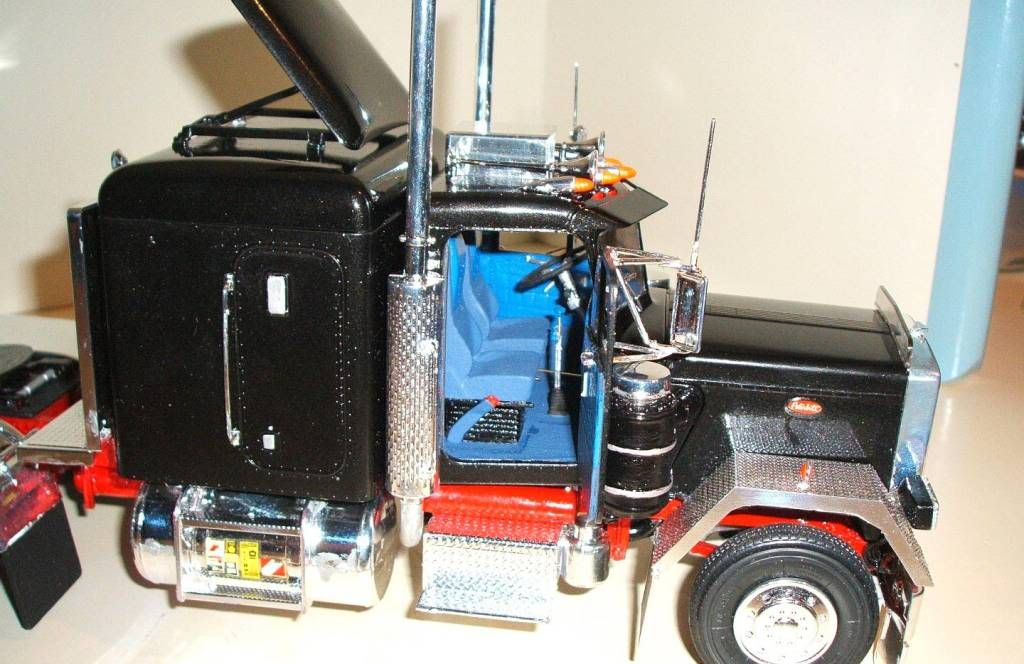
A nice photo showing the two tone blue I used on the seats. It also shows the air stacks which are painted with a brush as I forgot to spray them. I have nothing but problems trying to get a smooth finish with a brush. Even with car body polish, I usually go through the paint before I get it smooth.
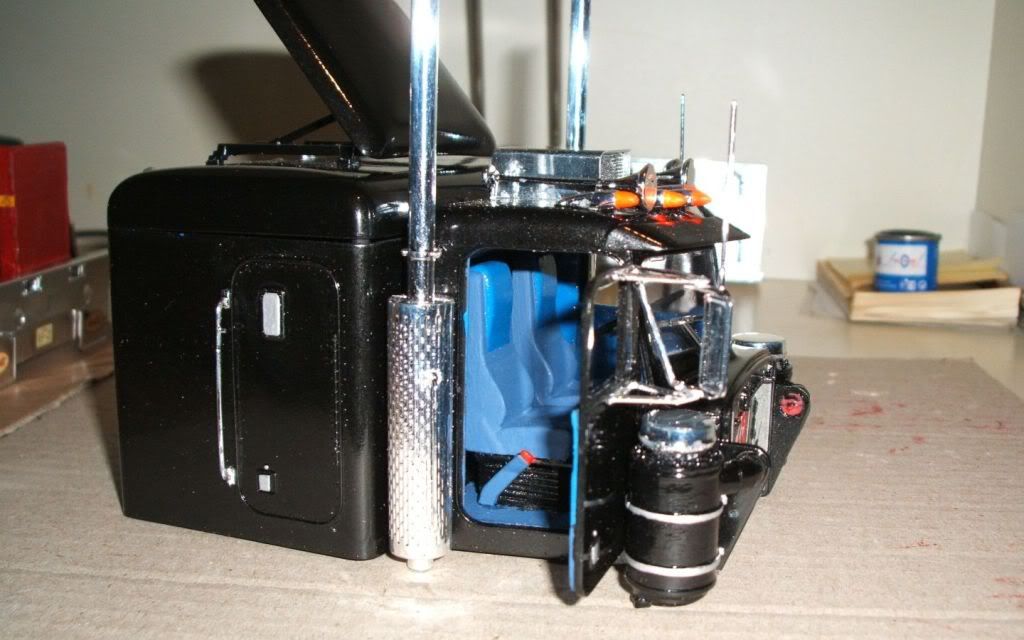
 

#6
A few pieces are missing in this photo. The whole left front wheel is gone. The radiator crown and part of the exhaust is missing and both compressor units that fit on top of the chrome steps are gone. I made a connector to hold the exhaust to the engine and an old pen got cut up and used for the two missing compressor units above the steps.
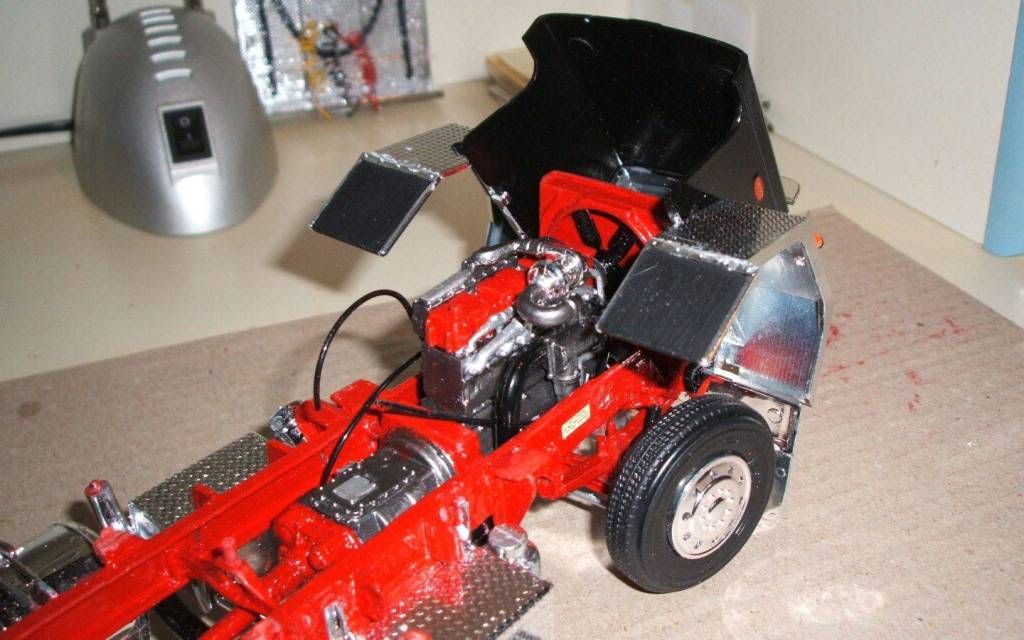
 

#7
There she is. When I saw it like that for the first time I was grinning like a Cheshire cat.
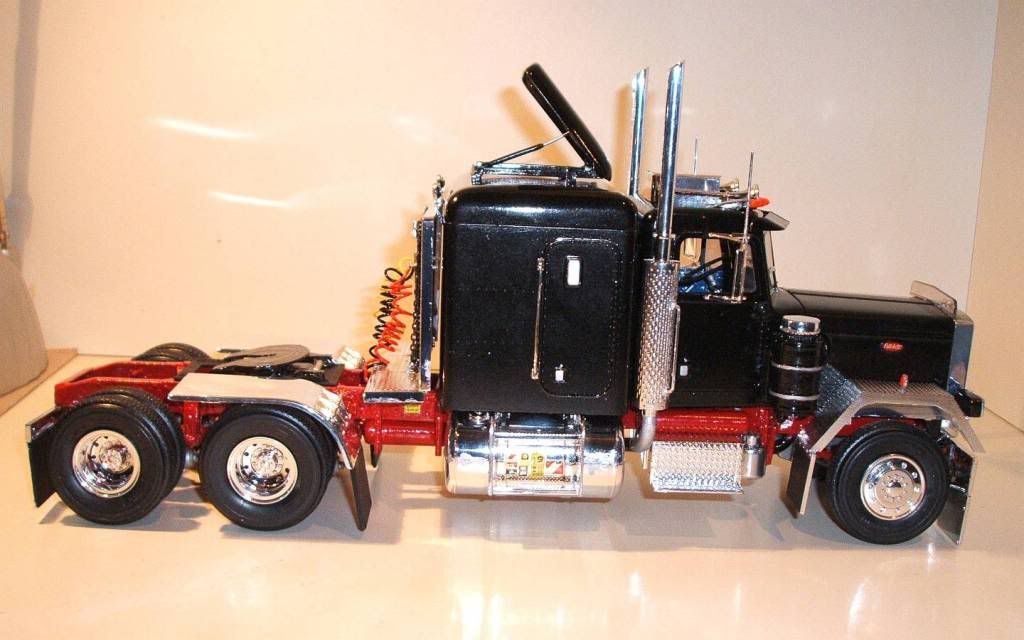
 

#8
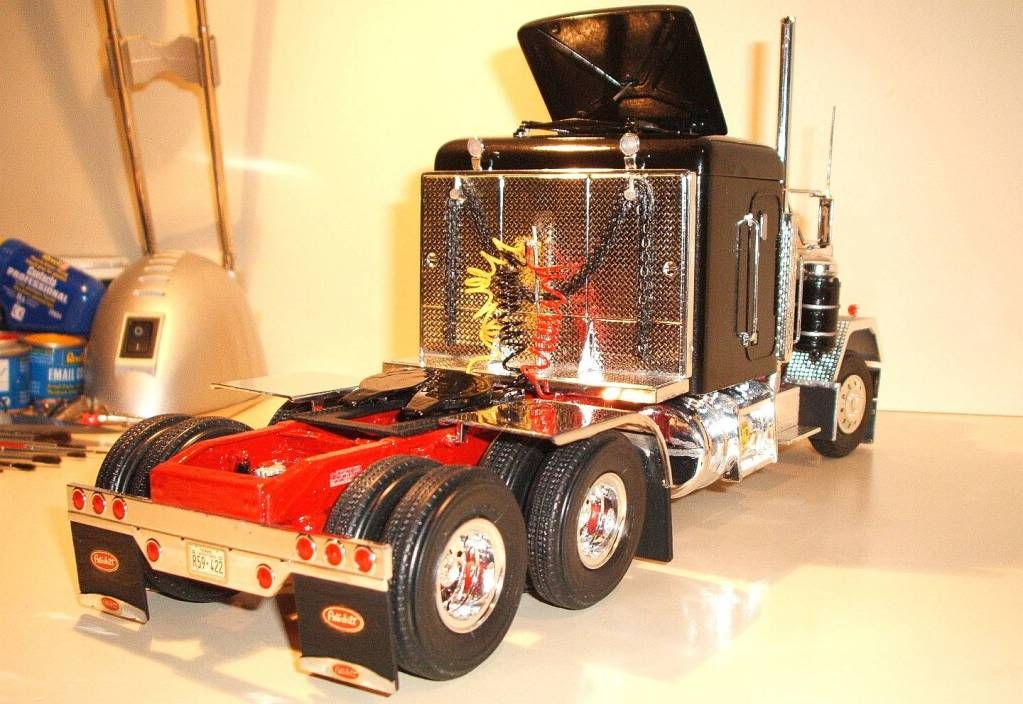
The chains and air-lines make such a difference at the back. I'm not sure if hooks for the chain were snapped off but I had to make some to hold the chain up. The fifth wheel could ether be glued in place or left loose but I didn't like that so I made a bracket underneath it so it still slides but will not come off.
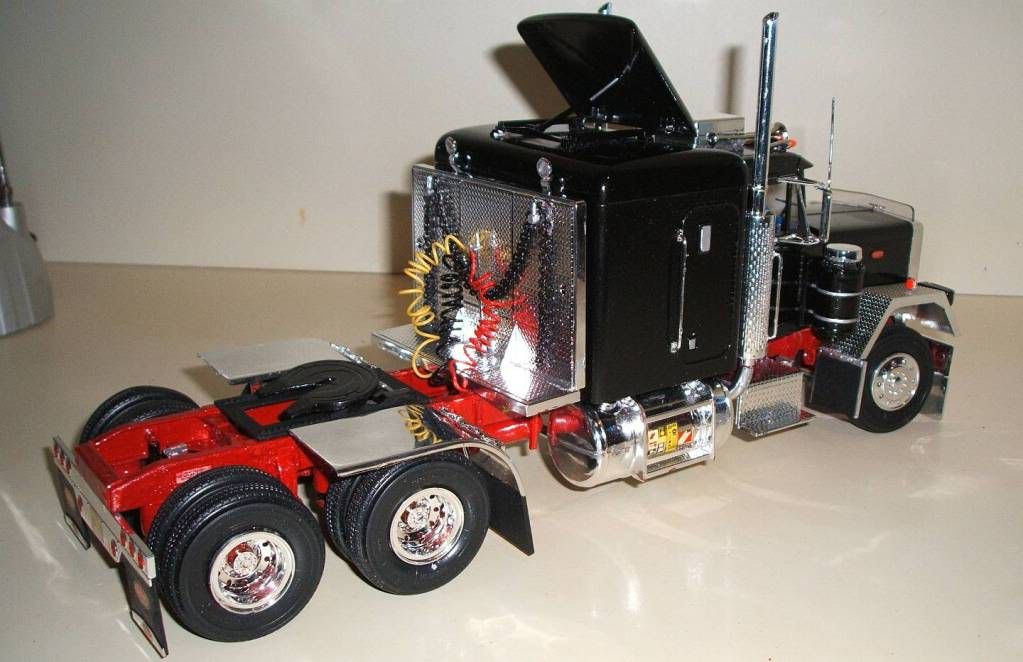
 

#9
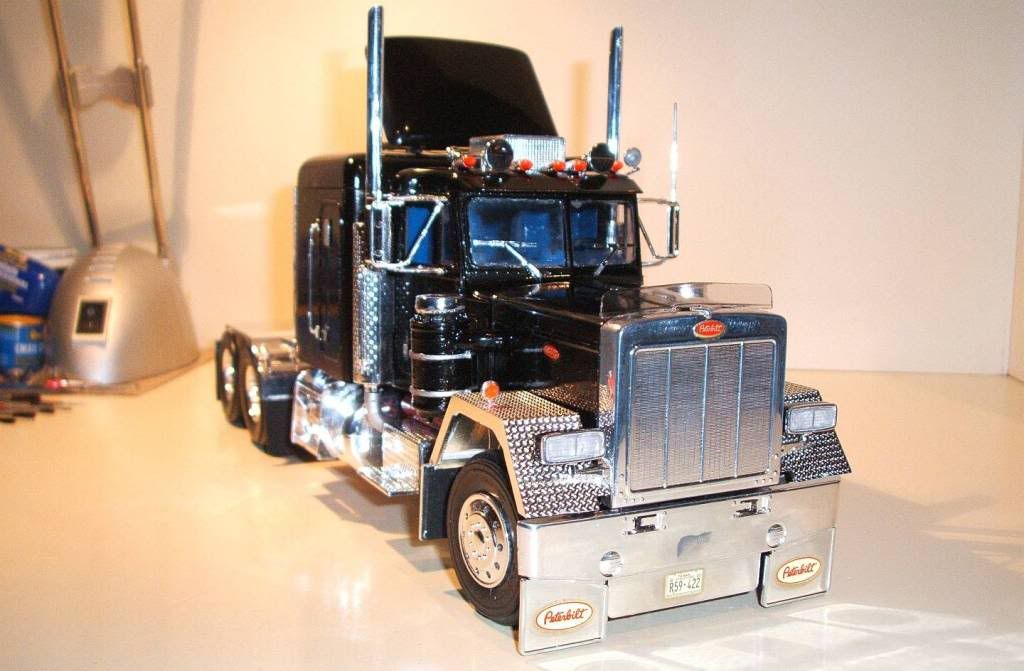
One thing I have noticed is the camera flash highlights all the little faults that you don't usually see. All the wheels now turn after the old pins got drilled out and I made new ones but you can see I didn't quite get the back wheels lined up. You can also see where I first put the front number plate, then before it dried I moved it lower down not realising it would remove the chrome. You live and learn.
 

#10
Another view inside this time with my touch-up's finished. I don't have a steady enough hand to get straight lines and the silver bands around the air stacks were done countless times. I bought a pack of Revell brushes but I find them far too soft. I try to paint something and they bend right next to the metal before I can get the paint where I want it.
 

#11
I've just realised you can still see the glue around the bottom of the seat that I will redo. The camera flash makes it look like it is scratched and chipped yet it looks fine when it's pitch black (joking).
 

#12
I now believe that the number plates are meant to go higher up on American trucks after looking at models and real trucks online. In the UK they tend to be nearer the bottom. The second wheel that is missing is hidden by the chrome mud guard and outer wheel on the left hand side.
 

#13
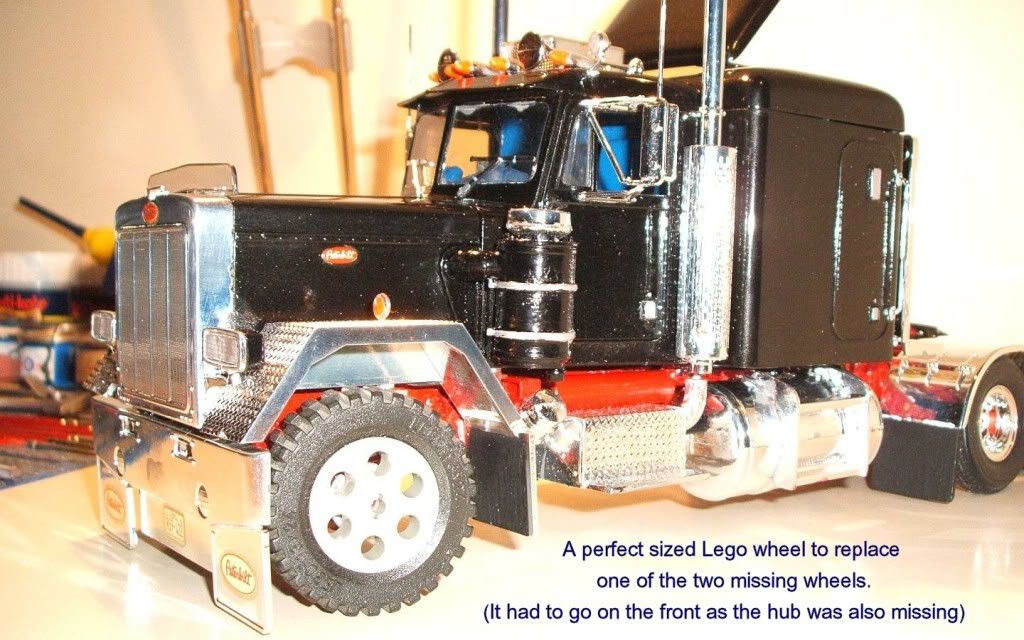
I knew if I kept looking long enough I would find a wheel I could adapt to fit the truck from the hundreds of toys my brother used to play with. The wheel is from a white technic Lego truck and on the box it says scale 1:25. There should have been 11 wheels in the box but 10 were missing. This one was used at the back to steer the Lego truck.
 

#14
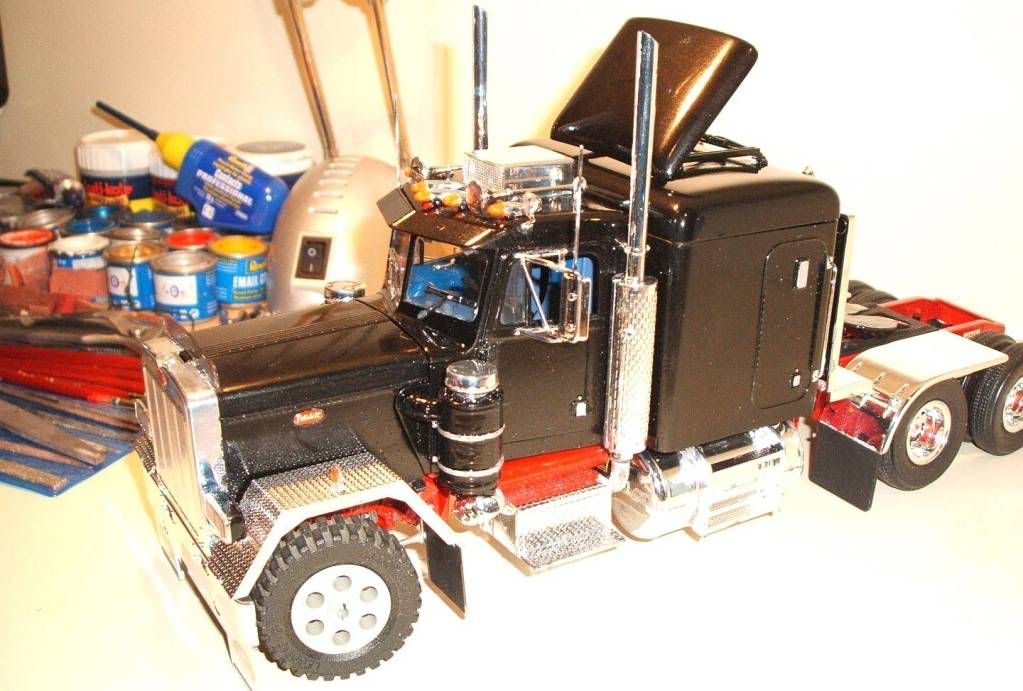
Another view of the truck showing the side everything went wrong. This is the side that I always did first as you're usually a little bit better at something the second time round. The only decals that I used were a couple on the chassis, one on the fuel tank, a couple for the dash and the Peterbilt badges. I have always liked black cars with chrome trim so that's how I kept the truck.
 

#15
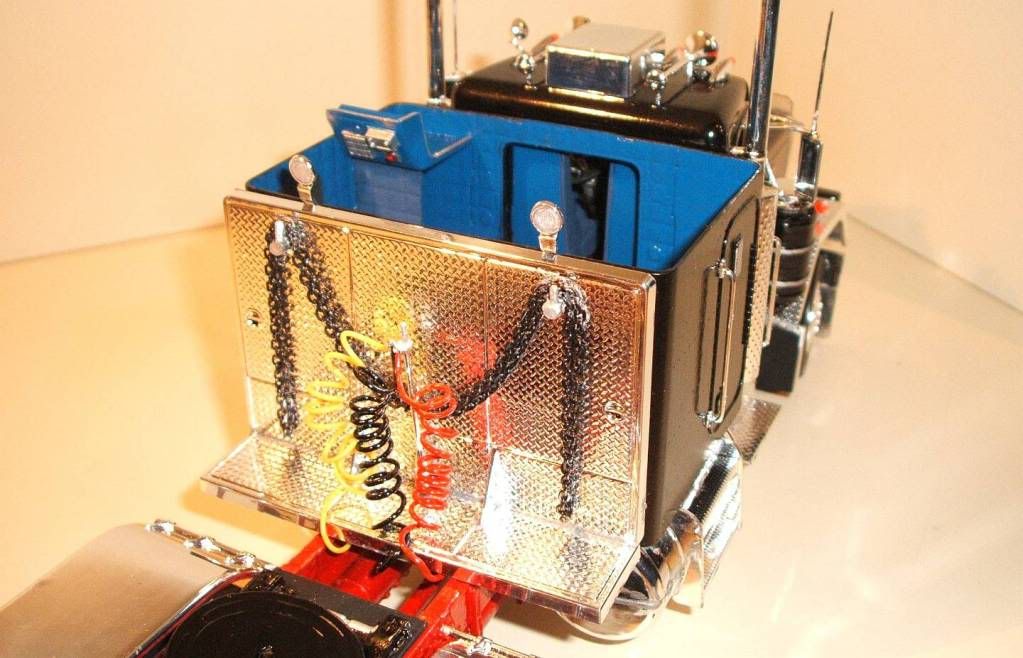
Not showing much here. Just the controls above his bed.
 

#16
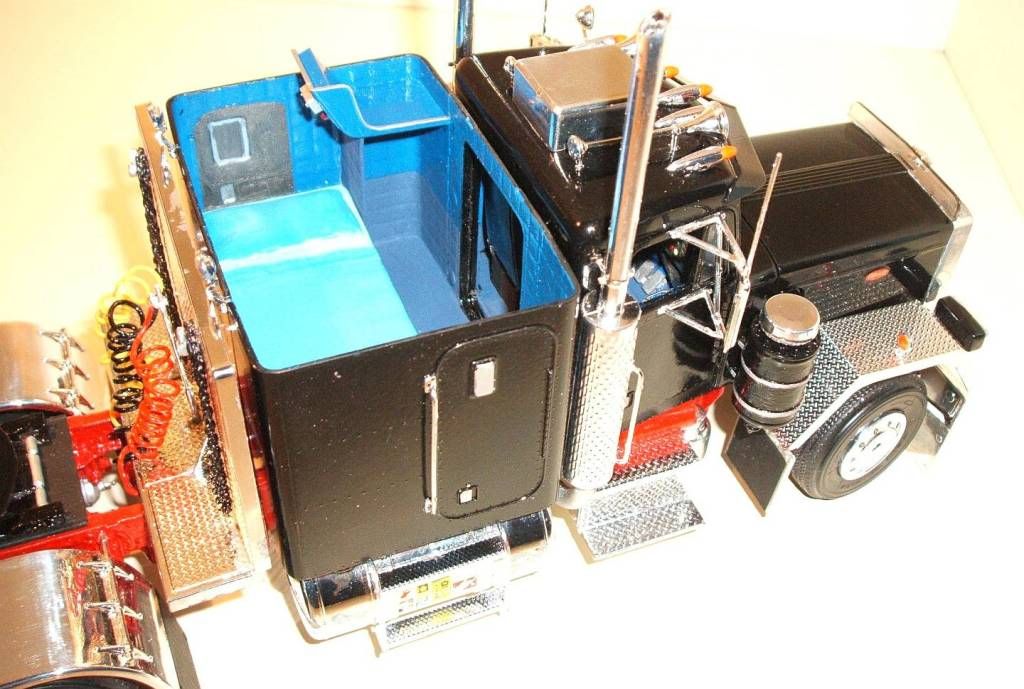
That's a proper lads bedroom. A bed, a radio and a top shelf to hide his magazines. It just needs a play station, a pizza box and some dirty clothes in the corner.
 

#17
I polished the truck with Autoglym Super Resin Polish and then waxed it with Autoglym High Definition Wax. It's the first time I have polished anything with wheels. I had to stop myself from using tyre dressing in case it marked my units in my bedroom. I've now got to find a home for the paint and tools I have acquired building this model. Most of the paint was found inside old boxes along with some stringy glue that got everywhere. I bought some liquid glue and it is so much better to use.
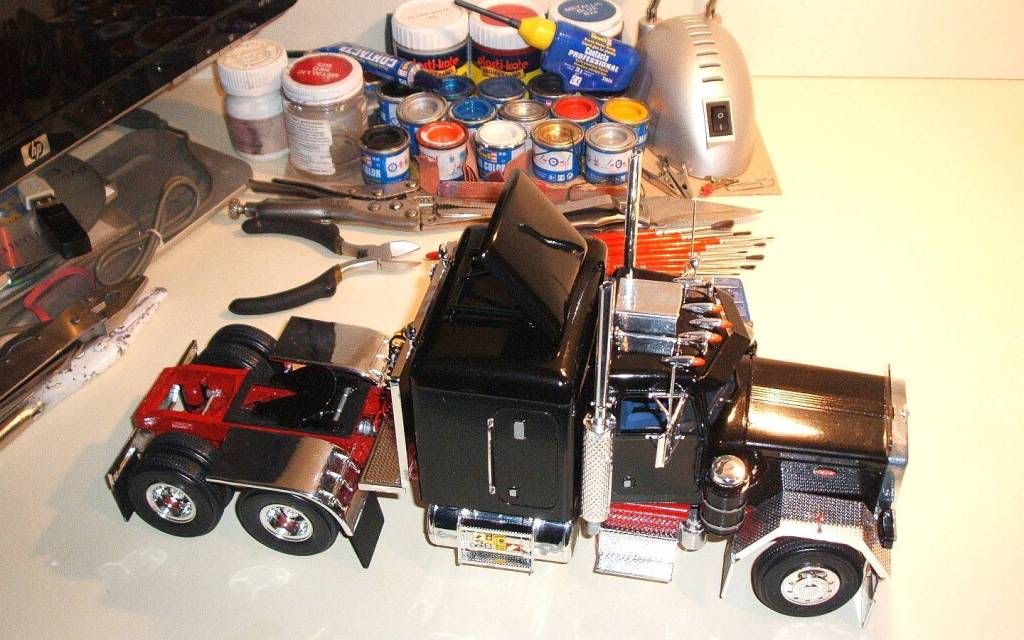
 

#18
The first time the truck has seen my bedroom as I built it on my dad's computer desk (didn't want to get my own room dirty). The front tyre looks flat on the carpet. It's now going to live on my units collecting dust. If I do build another one it could be 100 times better than this but as it came so close to ending up in the bin and due to the amount of problems I had to over come to get it looking like this, to see it sitting on my units makes me feel so much happier than if it was a new model I built. I guess I didn't build it because I wanted to start making models, I would never have went and bought one. I only built it because it was in such a poor condition after two people had failed to finish it I decided it was going to be third time lucky and I found out that all the work and time and frustration that went into building it is nothing compared to the feeling I get when I look at it everyday. To anybody else looking at it, it is just another fault ridden model, but it means the world to me and that's what really matters.
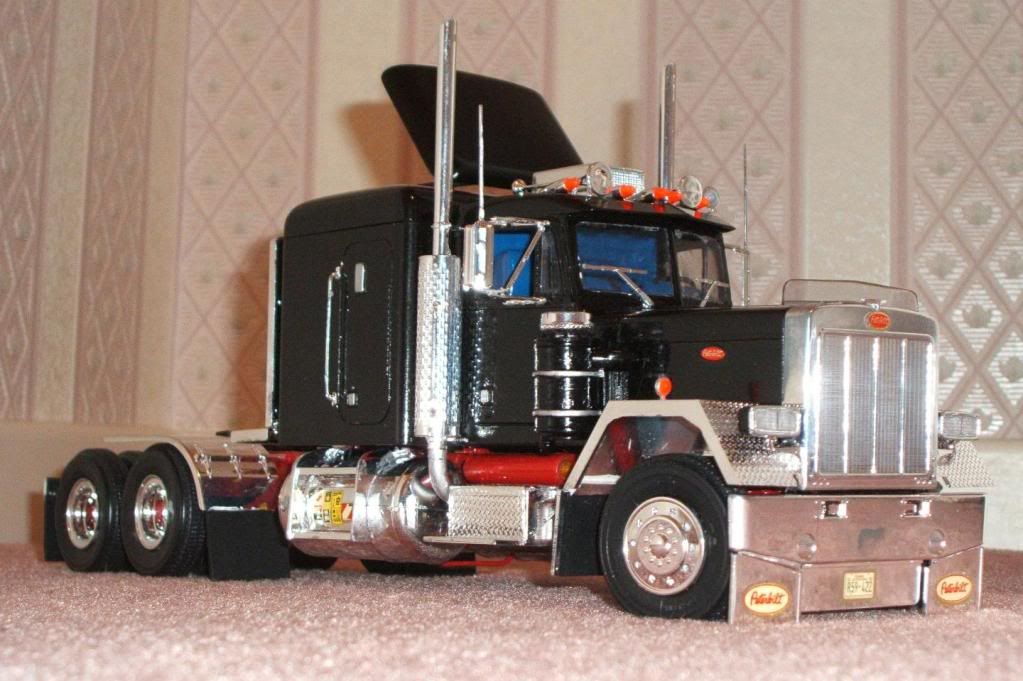
 

#19 (My Bedroom)
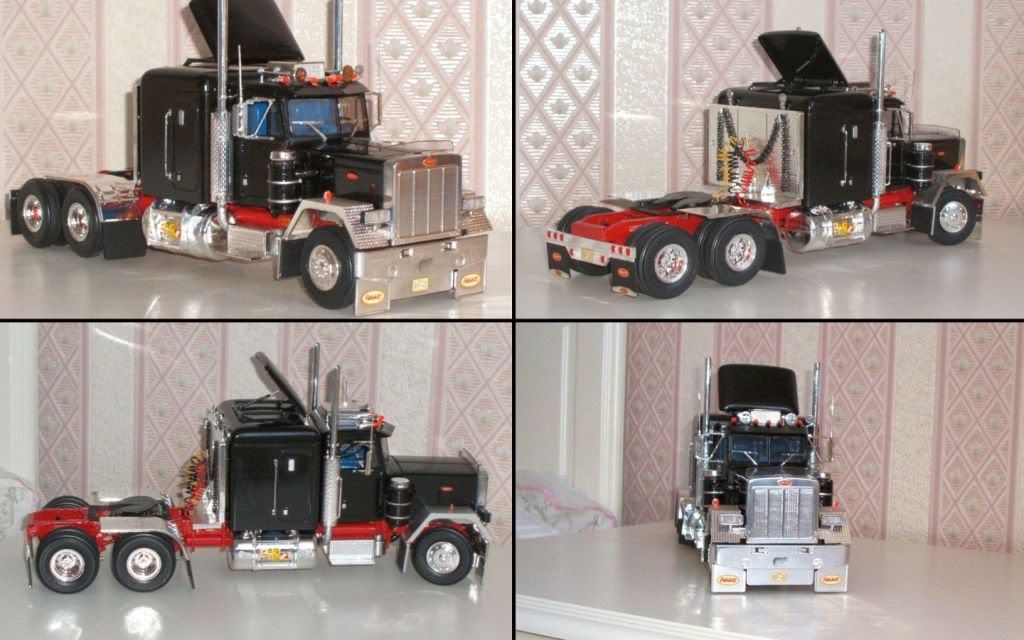
 

#20 (My Bedroom - Last)
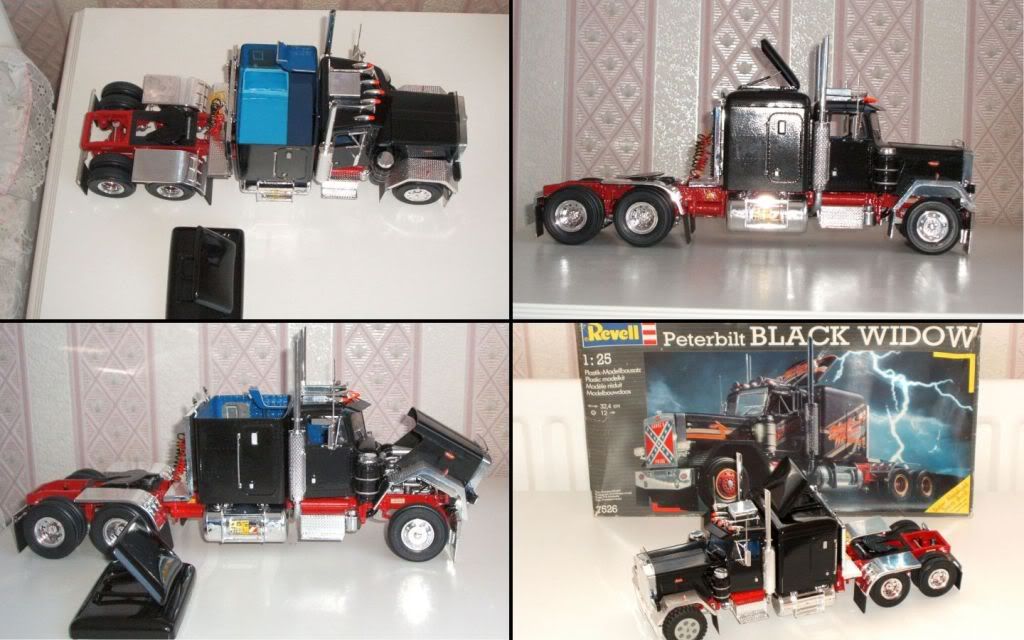
 

Elizabeth

  • Member since
    February 2010
  • From: Maine
Posted by Stage_Left on Saturday, January 15, 2011 12:41 PM

Miss Elizabeth,

I've been lurking about your posts, but now I must say WOW! I for one am most impressed. I'm a big fan of the big rigs, since my childhood, but that's only the beginning. Your choice of chassis and body colors really make this pop. Your engineering of the door hinges, wheel pins and sliding fifth wheel demonstrates real creativity, as does your detailing of the cab interior, sleeper, engine area, and with the chains and air lines behind the sleeper. This, in my opinion, would be excellent if you had started from a new kit, but you actually dismantled a model that had been started so that adds much more work to the process as you already well know.  Again, many congratulations! YesYesYes

A hint on brush painting: yes, brush strokes can always be a hazard, but I've found thinning the paint a bit with paint thinner or mineral spirits allows the paint to even out better before it starts to dry because it isn't as thick. It's a matter of trial and error, but the again maybe you already know this and the brush strokes on the air stacks are due to something else....

  • Member since
    May 2009
  • From: Poland
Posted by Pawel on Saturday, January 15, 2011 6:44 PM

Elizabeth,

it's nice to see the fotos of your truck after all this anticipation. OK, it's got its faults, but nonetheless it's always good to see a work of a dedicated modeller. Now trucks are hard models to build, but once finished they look very good on the shelf, like your machine does. I'd also like to second Stage_Left and compiment you on your choice of colours. I also think the quality of finish is good. All this, plus the omitting of some of the decals in my opinion just goes to show your excellent taste!

When it comes to brushes, my experience shows it is much better to visit an arts supply store to buy them - they have better quality, prices and selection. By the way, they also have many interesting tools and materials, too.

About the photos - it's better not to use flash when photographing models. What you want is even lighting that doesnt create lots of shadows. You can get that either by photographing at daytime in a well lit room, or using multiple light sources. Then usually the exposition times get longer and it is of advantage to have a cheap tripod to steady the camera. In return you get sharp photos showing all of the details.

It happens I'm rebuilding an old truck too, if you are interested, you can see my WIP thread here. Thanks for sharing and I wish you good luck with your next project (by the way, any plans?). Have a nice day

Paweł

All comments and critique welcomed. Thanks for your honest opinions!

www.vietnam.net.pl

  • Member since
    April 2015
Posted by spadx111 on Saturday, January 15, 2011 7:52 PM

Nice i like it.Ron

  • Member since
    April 2013
Posted by nomad68 on Saturday, January 15, 2011 8:02 PM

Elizabeth  Very nice!!  Smile  You did a great job cant wait to see what you will build next. If I had a truck front wheel I would send it to you. Anyone out there have one in the spares box?  That is the only bad thing about the model I like it very much.

Damon

  • Member since
    July 2009
  • From: lafayette la
Posted by 40.mm on Sunday, January 16, 2011 12:20 PM

elizabeth you have taken a rock and turned it into a gem....     outstanding!

http://www.vairhead.net/forum/dhg.jpg

  • Member since
    April 2008
  • From: Philadelphia PA
Posted by smeagol the vile on Sunday, January 16, 2011 12:21 PM

Ok!

a few things,

like was said, never handbrush large surfaces on autos also never hand brush metallic colors.  You can handbrush inner details, actually I prefer to do it that way, as well as handbrushing details, but I use oils for that as to not hurt the finish of the metallic or gloss.

did you use a gloss blue for the interior?  Something about it makes it seem either unpainted completly (sort of looks like bare plastic) or unfinished.  Id suggest using flat for the insides, using a gloss overcoat where needed, and hand painting the details, especially on seats.

Last is a BIG thing.  The lego wheel.  Three things about it...

first, kudos on trying to use something to replace the missing wheel, good ambition

second, if you are going to use something like legos to replace parts from a kit I suggest you invest in either alot of filler putty, like squadron, or some sculpting clay.  Use it to get rid of the lego marks, like the hole in the center and things like that.  Also, if you still have it, try using the hubcap from the the wheel that was meant to be there, or else try to sculpt something that sort of matches.

third and last with the wheel, if you use a replacement wheel like that for one side, use a second on the other mismatching looks bad no matter what the reason. 


Lastly remember, should even paint the tires and such as well, leave no plastic bare.


  • Member since
    March 2003
  • From: Western North Carolina
Posted by Tojo72 on Sunday, January 16, 2011 1:28 PM

good looking stuff Liz,I never tried my hand at cars and trucks,but they look pretty detailed.

  • Member since
    September 2007
  • From: Truro Nova Scotia, Canada
Posted by SuppressionFire on Sunday, January 16, 2011 1:53 PM

Excellent save!

All the doubters and negative comments will finally be put to rest now that you have proven yourself to be a modeler!

Further salt in the wounds is the fact you took on a warped glue bomb of a rubbish bin kit only to bring it to a new found completion and life. Funny thing is most that jumped on the bandwagon would never attempt a kit like that, yet alone take the ribbing and come back to post the results of a very tough build (restoration)

Do treat yourself to a unopened kit and enjoy a relaxing build!

The front tire replaced with a Lego one is awesome! Yes

I think you made some fans showing modeling skills, charisma & charm through it all.


http://i6.photobucket.com/albums/y211/razordws/GB%20Badges/WMIIIGBsmall.jpg


  • Member since
    December 2010
  • From: New Zealand
Posted by Rough as guts on Sunday, January 16, 2011 2:13 PM

Well done Liz, she's a beauty!!

How many Lego wheels have you got? My first thought was off-highway log haulerCool with grippy tires like that and even wheel chains. Shes a bit shiny for off-road though. Well done again.

www.kiwimodeller.com

  • Member since
    February 2003
  • From: Allentown, PA
Posted by BaBill212 on Sunday, January 16, 2011 2:32 PM

Well Elizabeth,,,  considering your starting point, this turned out very nice (flaws or not). Great effort with a good result (again, the start point was not the best now was it?).

Thanks for sharing and I'll be looking forward to viewing a project that YOU begin and finish.


All the best............

Enjoy the ride!


  • Member since
    February 2006
  • From: Smithers, BC, Canada
Posted by ruddratt on Tuesday, January 18, 2011 10:17 AM

Miles ahead of my first effort, Elizabeth (I'm suprised I can remember that far back! Wink). Your tenacity and willingness to stick with it is admirable. Welcome aboard. I'm looking forward to seeing more of your work. Yes

Mike

 "We have our own ammunition. It's filled with paint. When we fire it, it makes pretty pictures....scares the hell outta people."


  • Member since
    April 2010
  • From: Yuma, AZ
Posted by Ripcord on Wednesday, January 19, 2011 7:09 AM

Nice Job!

Mike

  • Member since
    January 2009
  • From: Edmonton, Alberta
Posted by Griffin on Wednesday, January 19, 2011 2:01 PM

Great Job on the truck. She looks amazing, not even to mention the original state. If you can't find a wheel, maybe look for a model jack stand or something similar.

Lets see a new one now. Wink

  • Member since
    May 2007
  • From: Maine
Posted by cuchulainn on Thursday, January 20, 2011 2:31 PM

Being a Big Rig Lover, and having done just what you have before, I can say WELL DONE!!! It is not easy to take a prestarted project and turn it into something! You've done a great job and were very creative!!! On another note, I DO have a spare wheel and tire that would work for you if you'd like it. Just let me know!

Southern Maine Scale Modelers/IPMS

  • Member since
    January 2011
  • From: England
Posted by Elizabeth Jane on Monday, January 24, 2011 3:30 PM

Thank you to everyone who has commented on my model.
I have taken onboard all the advice and tips you have suggested and I hope I don't fail to show improvement with my new model.

Stage_Left: There's nothing wrong with lurking, I do it all the time. The brush strokes on the air stacks are defiantly due to my lack of practise when painting. I will try adding a touch of thinners next time when I am getting problems. (Nice comments btw)

Pawel: A trip to an arts supply store sounds like a good idea. I went to a popular model shop in the UK not knowing what to expect but came away very disappointed with the choice of brushes on offer. It was take it or leave it as I had nothing when I first walked in so I bought what I could and painted my model with what I had.
I was getting frustrated with my photos, they looked fine on the camera screen but terrible on my computer. I should have took the model outside but I started standing back and using the zoom.

smeagol the vile: You do realise that I have never done anything like this before, don't you? The best way to learn is by your own mistakes and I made plenty with this model. Every step was a learning curve and until I tried something, I didn't know how it would turn out. I have no idea what oils you use (I will once I Google it) and until your comment I was really proud of the interior. I agree using gloss blue for parts of the interior was a mistake but I didn't want it all one colour and my local model shop is a 50 mile round trip if I need paint so I used what I had available. I never knew things like filler putty even existed when I was building the truck but it's comments like yours that are the most helpful and I learn the most from so I have started looking online to see what else is available.

SuppressionFire: What can I say? Fantastic comment. It puts a huge smile on my face every time I read it. I will enjoy my next relaxing build and thank you very much.

Rough as guts: I only had the one Lego wheel but I had thought of using all Lego wheels when I found the box in the loft only to open it and find just the one wheel. It was better than nothing though.

Griffin: I actually made a stand from bits of the parts frame that I used until I came across the wheel. It was meant to look like a real axle stand but turned out looking nothing like one.

cuchulainn: Thank you for the offer of the spare wheel. It is not often I come across people who are willing to help strangers but I have decided the truck is to remain in it's present condition. It is a nice gesture though.

I spent a lot of time to get the truck how it looks now and I built it using only my limited skill and the resources I had around me. I got to the point when I had done as much as I was prepared to do and was happy to say it was finished. If I change things now I will have nothing to compare my models to in years to come. I guess everyone could do things better the second time round but sometimes it is best to keep things as they are. You all have no idea how much your advice means to me as it is the only feedback I have had. My next model is a Revell Dumper Trailer which I have started but has been pushed to one side due to other commitments but I will return to it soon. I have already decided the chassis will be the same colour red as the truck but I can't decide on the colour of the main tipper or the top cover.

Thank you to all.

Elizabeth

Elizabeth

  • Member since
    May 2007
  • From: Maine
Posted by cuchulainn on Monday, January 24, 2011 6:33 PM

No problem, Elizabeth. I do think you'll find that modelers are always willing to help others out if they can! Keep on Truckin'!!! I look forward to hearing about your work again!

Southern Maine Scale Modelers/IPMS

  • Member since
    April 2008
  • From: Philadelphia PA
Posted by smeagol the vile on Monday, January 24, 2011 11:29 PM

That was exactly my reasoning in posting what I did.  Your a beginner and you did very good for a beginner, but there is always room to improve, for all of us, and pages of kudos do not help improve what so ever.  If your serious about this and want to do more, you want to improve, dont ya?


  • Member since
    May 2009
  • From: Riverton, Wyoming
Posted by Andrew Magoo on Tuesday, January 25, 2011 2:12 AM

My, My, and I thought I knew what I was doing...you seem to have overtaken me in pure endurance and force of will. An excellent job, actually better than that because of all the obstacles you faced. One bit of advice we here in the United States some times forget that not all names and titles of products as well as terminology and the same in the UK. By the way you get a big Welcome Aboard from me, Magoo


  • Member since
    October 2009
  • From: Houston, Texas
Posted by Medicman71 on Friday, January 28, 2011 11:06 PM

All I can say is WOW!! Very nice rebuild. I think you did a great job saving it. Can't wait to see your next build. Don't worry about the mistakes. You'll get better with time and practice.

Building- (All 1/48) F-14A Tomcat, F-16C Blk 30, He 129


  • Member since
    January 2007
Posted by the doog on Monday, January 31, 2011 7:43 AM

Elizabeth,

I agree with everyone who congratulates you for the tenacity, dedication, skill and creativity that youhave shown in bringing this model "back from the dead". You've certainly shown us boys a thing or two about the fairer sex, lol!

Quite a nice model you've made. It's one to be proud of, for sure, and I agree that when you get a new kit that you can start from the beginning, it will be a real treat to watch your skills in action.

  • Member since
    September 2021
  • From: Norfolk, England 🇬🇧
Posted by AB88 on Thursday, September 2, 2021 9:12 AM

Good afternoon Elizabeth Jane, 

I am not sure if this post is still live but I will give it a go. 

I have just come across this website (only registered to leave a comment but everyone seem really cool so wish I had found it sooner) researching an old kit the same peterbilt black widow, I was given in about 1988 - 1990 ish and have just found way back in storage, I was having a  sort out!

I was umming and arguing whether I should have a crack at it and having seen your example have decided to go for it. 

I agree with all of the nice things people have said and having not built a kit since I was about 18-20 years old feel confident your skill level is above my own. 

Anyway just wanted to say that.

Also if any of the other modelers are still about, I congratulate you on your feedback and hello.

JOIN OUR COMMUNITY!

Our community is FREE to join. To participate you must either login or register for an account.

SEARCH FORUMS
FREE NEWSLETTER
By signing up you may also receive reader surveys and occasional special offers. We do not sell, rent or trade our email lists. View our Privacy Policy.