SEARCH FINESCALE.COM

Enter keywords or a search phrase below:

30 year old Monogram Challenger Re-Build Finished

11073 views
63 replies
1 rating 2 rating 3 rating 4 rating 5 rating
  • Member since
    March 2012
  • From: Corpus Christi, Tx
30 year old Monogram Challenger Re-Build Finished
Posted by mustang1989 on Saturday, October 19, 2013 2:33 PM

I have a Monogram Challenger that I built 30 years ago when I was about 14 or so that is in the middle of repairs. I built it for my little brother back then and then as years went by and he moved from home, got married and had his own family it stayed at my parents house. I took it from my parents house and cleaned it up a bit  and glued some parts that fell off over the years back on and gave it back to my brother around 5 years ago as a Christmas present. Long story short it ended up in the bedroom closet covered up by clothes and other stuff and got knocked off of the top shelf by my nephew. We ended up finding the hood and a wheel/tire assy that was lost for a little bit out of the fall and I pieced it back together. It's still missing the hood scoop from the hood and the rear spoiler but I managed to glue everything back on and repair everything else that was damaged during the fall. Now before I turn this into a "brother bashing session" let me tell you that my brother is a top notch guy. Its just that models aint his thing. Hes got a wife and two kids and he so busy he looks like a one legged man in a butt kicking contest. With that said, I took the model home and I bought another kit in which to replace the missing parts with. I am going to put this thing back to its unmodified original condition but here she sits proudly once again. This time it aint going to be given away. I just can't part with it again.  Anyways I didn't paint it with anything more than a gloss coat when I originally built it and aside from the decals wrinkling a little the finish came out PERFECT! The gloss coat was applied from a can for cryin' out loud! One of my only regrets is how the decals all came out. The interior was detailed great for a 14 year old. All you have to do is put a visor on and you can read the gauges. Of course I didn't need glasses or a dang visor when I originally built it. LOL.


 Forum | Modelers Social Club Forum (proboards.com) 

  • Member since
    November 2003
  • From: State of Mississippi. State motto: Virtute et armis (By valor and arms)
Posted by mississippivol on Saturday, October 19, 2013 3:32 PM

That's really cool! The old builds are the best.

  • Member since
    March 2012
  • From: Corpus Christi, Tx
Posted by mustang1989 on Sunday, October 20, 2013 7:02 AM

Man they are aren't they? Thanks Mississippi! I'm sure I'll open up a WIP thread on this when I restore it.


 Forum | Modelers Social Club Forum (proboards.com) 

  • Member since
    June 2010
  • From: Australia
Posted by OctaneOrange on Thursday, October 31, 2013 10:29 PM

do what i did, tell him you'll keep it for him. i get he's not into models. might be too late for your brother, but maybe his kids will like it (as unlikely as that sounds). Now an important question, are you going to make a NEW 70 dodge challenger? you know, so you can see how far you've come.

  • Member since
    March 2012
  • From: Corpus Christi, Tx
Posted by mustang1989 on Friday, November 1, 2013 5:42 AM

 Hey Octane Orange! I tried to get his son into it a little. He was into ships so I got him a Prinz Eugen kit. It was pretty primitive but I got him a reference book and a few paints all for Christmas around 3 yrs ago. My brother and his family are WAY busy people. It didn't go anywhere. If me and my family were to live closer it might have stood a chance. I've got my son here to pass it down to though. Heh heh!

As far as this Challenger I am simply repairing what is messed up and may refinish the body and try the decals again and oh yeah, replace the missing stuff. I may tinker with the idea of a new Challenger body if that's what you are talking about.


 Forum | Modelers Social Club Forum (proboards.com) 

  • Member since
    October 2012
  • From: Mt. Washington, KY
Posted by Geezer on Friday, November 1, 2013 6:26 AM

great story and neato model.

www.spamodeler.com/forum/index.php 

Mediocraties - my favorite Greek model builder. 


  • Member since
    March 2012
  • From: Corpus Christi, Tx
Posted by mustang1989 on Friday, November 1, 2013 9:43 PM

Thanks Lyle! I'm looking forward to restoring it back to the build that it was pre-drop era!!


 Forum | Modelers Social Club Forum (proboards.com) 

  • Member since
    November 2008
  • From: Central Florida
Posted by plasticjunkie on Saturday, November 2, 2013 7:32 PM

Great story Mustang! It's great to hold on to some of the older stuff we had when we were younger years ago . Even though it's not a car, I still have my Bandai 1/24  Jagdpanther I built in 1977. I will eventually re do it and improve it up with better details.

 GIFMaker.org_jy_Ayj_O


Too many models to build, not enough time in a lifetime!!

  • Member since
    March 2012
  • From: Corpus Christi, Tx
Posted by mustang1989 on Monday, November 4, 2013 10:16 PM

Thanks PJ! Bandai..................now that's a name in modeling I haven't heard for a long time!


 Forum | Modelers Social Club Forum (proboards.com) 

  • Member since
    June 2003
  • From: Cavite, Philippines
Posted by allan on Monday, November 4, 2013 10:32 PM

As tough as the real thing.  :)

No bucks, no Buck Rogers

  • Member since
    March 2012
  • From: Corpus Christi, Tx
Posted by mustang1989 on Wednesday, November 6, 2013 6:05 AM

Thanks for the comments  Allan!  It's gotta be to survive everything its been through! lol


 Forum | Modelers Social Club Forum (proboards.com) 

  • Member since
    March 2012
  • From: Corpus Christi, Tx
Posted by mustang1989 on Monday, November 17, 2014 5:12 AM

I have a little "lag" time between now and Jan 1st to tinker a bit so I've brought this one out of hiding to "restore" it to its original condition to when I first built it and maybe add a couple of things to it. It's been a LOOONG time since I've done anything in the car model department. I managed to scarf up an additional kit to help me with the missing parts. I'll see if I can work any magic here.


 Forum | Modelers Social Club Forum (proboards.com) 

  • Member since
    March 2012
  • From: Corpus Christi, Tx
Posted by mustang1989 on Tuesday, November 18, 2014 5:15 AM

So this is where we are as of now. Not really in all that bad of condition for a 32 year old build that has survived falls and being displayed out in the open with no case or cover. She cleaned up rather nicely I think. I should have taken the "before" pics when half of the suspension was in pieces and two of the wheels were broken off.

The fresh air intake is missing, I think its somewhere still in my brother's closet .....soooooo, we're starting from scratch on the whole hood. I didn't really care for the paint job on the original hood anyways.

and we're cleaned up, trimmed up and primed this morning. I'll be ready for paint hopefully by tomorrow.

I've still got plenty of work to do on this thing. I have to paint and re-install the missing rear spoiler, add the "Six Pack" decal to the air cleaner, re-install the missing brake master cylinder,  add side rear view mirrors, add black to the exhaust pipe outlet area, straighten up that crooked azz L/H rear wheel and some other minor things to get this thing whipped back into shape by Thanksgiving hopefully. There are things that I wished I would have done differently during the original construction of this build but hey, I was only 14. lol 


 Forum | Modelers Social Club Forum (proboards.com) 

  • Member since
    March 2012
  • From: Corpus Christi, Tx
Posted by mustang1989 on Wednesday, November 19, 2014 9:11 AM

Alright, I just couldn't stand it anymore. I started looking at the decals, the decals, the DECALS! I just felt the need to fix it and why not? I have another kit, soooooooooooo................................................


 Forum | Modelers Social Club Forum (proboards.com) 

  • Member since
    May 2009
  • From: Poland
Posted by Pawel on Wednesday, November 19, 2014 3:51 PM

Hello!

I've had that feeling many times, man! That's why I rebuilt several of my old models in the last years. I also have the Challenger, built it about twenty years ago, it's a great car! Funny thing, Monogram forgot the shocks on the rear axle - I added them in my model after seeing the real thing in Australia. Good luck with your (re) build and have a nice day!

Paweł

All comments and critique welcomed. Thanks for your honest opinions!

www.vietnam.net.pl

  • Member since
    March 2012
  • From: Corpus Christi, Tx
Posted by mustang1989 on Wednesday, November 19, 2014 4:00 PM

Thanks pawel! I've got about a month and a half. I'm sure I can pull a rabbit outta the hat!


 Forum | Modelers Social Club Forum (proboards.com) 

  • Member since
    March 2012
  • From: Corpus Christi, Tx
Posted by mustang1989 on Thursday, November 20, 2014 8:51 AM

Thanks Pawel,

I progressed on to the decal/ clear coat removal process.


 Forum | Modelers Social Club Forum (proboards.com) 

  • Member since
    March 2012
  • From: Corpus Christi, Tx
Posted by mustang1989 on Monday, November 24, 2014 11:20 AM

Update time! Sheesh it's been a while since I've posted anything on this build here. So the next step was to get this sucker polished back down to the bare plastic using different grades of sanding/ polishing pads. I took the next level of sanding down to 3200 grit and progress upward to 12000 grit.

Starting point is here:

all the way up to the 12000 grit here:

and then after that and cleaning everything up it was time for the gloss coat on last Friday:

Finally got a real close look at it today to see a speck in the middle of the drivers door and a paint run on the R/H rear quarter. Will have to do some repairs. Yuk! Crying


 Forum | Modelers Social Club Forum (proboards.com) 

  • Member since
    May 2009
  • From: Poland
Posted by Pawel on Monday, November 24, 2014 1:55 PM

Hello!

Is it staying in clear-coated plastic? Good luck with your build and have a nice day

Paweł

All comments and critique welcomed. Thanks for your honest opinions!

www.vietnam.net.pl

  • Member since
    March 2012
  • From: Corpus Christi, Tx
Posted by mustang1989 on Monday, November 24, 2014 2:20 PM

The answer is yes. In staying true to the initial build I will leave it this color as it's the about the red it's supposed to be. The engine will get a drastic change though.


 Forum | Modelers Social Club Forum (proboards.com) 

  • Member since
    August 2009
  • From: MOAB, UTAH
Posted by JOE RIX on Monday, November 24, 2014 11:56 PM

Your Challenger restoration is really awesome Joe. What a great project. Pretty amazing that it held up so well given it's history. You're just the person to do a right justice job on it.

"Not only do I not know what's going on, I wouldn't know what to do about it if I did". George Carlin

  • Member since
    March 2012
  • From: Corpus Christi, Tx
Posted by mustang1989 on Tuesday, November 25, 2014 4:12 AM

Thank you Joe. Yeah this thing has been through alot sto say the least. More on the way soon.


 Forum | Modelers Social Club Forum (proboards.com) 

  • Member since
    March 2012
  • From: Corpus Christi, Tx
Posted by mustang1989 on Tuesday, November 25, 2014 2:31 PM

Okay. Here's what I took out of the car. It's actually a fairly cool build if youre 14 years old in the 80's! lol

 This is what the real thing is supposed to look like:

I think there's a little change that needs to happen here, soooooooo..................................................

We start over:

What is it with Monogram's two piece engine / transmission assys? A BIG and NASTY gap that needs some real attention here.

I puttied the crap out of it and  moved on to primer. My approach here is similar to what I do with military modeling. I start off with a  black primer to make sure the shadows in the nooks and crannies are going stand out some.

and then start making acrylic orange passes until I get the color that I want.

First few passes:


Things were starting to get a little better on the bottom end but still had some seam work to do. The chrome oil pan and transmission were appealing in the teen age years but are not accurate which is what I'm after in my...........um.................40's.

a few more passes with the orange are starting to bring it to a more acceptable shade of orange.


 Forum | Modelers Social Club Forum (proboards.com) 

  • Member since
    May 2009
  • From: Poland
Posted by Pawel on Tuesday, November 25, 2014 3:35 PM

Hello mustang1989!

I like what's happening with the engine here - good luck with it and have a nice day

Paweł

All comments and critique welcomed. Thanks for your honest opinions!

www.vietnam.net.pl

  • Member since
    March 2012
  • From: Corpus Christi, Tx
Posted by mustang1989 on Tuesday, November 25, 2014 4:44 PM

Thanks pawel! I had a couple of seams and gaps here and there that I've filled since the pics but its still coming along.


 Forum | Modelers Social Club Forum (proboards.com) 

  • Member since
    August 2009
  • From: MOAB, UTAH
Posted by JOE RIX on Wednesday, November 26, 2014 1:57 PM

Sweet looking work on the engine Joe. That bugger is going to look sharp when you're done with it.

"Not only do I not know what's going on, I wouldn't know what to do about it if I did". George Carlin

  • Member since
    August 2007
  • From: back country of SO-CAL, at the birth place of Naval Aviation
Posted by DUSTER on Wednesday, November 26, 2014 2:20 PM

Great job of work on that engine, but you are really sure about that classy chrome oil pan ? It came with the kit so it must be accurate --- isn't it??

Steve

Building the perfect model---just not quite yet  Confused

  • Member since
    March 2012
  • From: Corpus Christi, Tx
Posted by mustang1989 on Wednesday, November 26, 2014 2:52 PM

Thank you Joe!

Steve: LOL .... That Chrome Silver paint job I put on that thing was dam near chrome for sure......but still it must have been accurate!!! ?????


 Forum | Modelers Social Club Forum (proboards.com) 

  • Member since
    March 2012
  • From: Corpus Christi, Tx
Posted by mustang1989 on Wednesday, December 3, 2014 6:27 AM

Ok so we continue on with the engine. I was at the point of deciding whether or not to add power steering to this thing:

But I opted out because I've seen a ton of 340 Challenger engine bays without P/S and I don't feel like adding P/S lines at this point. Got other plans though for detail.

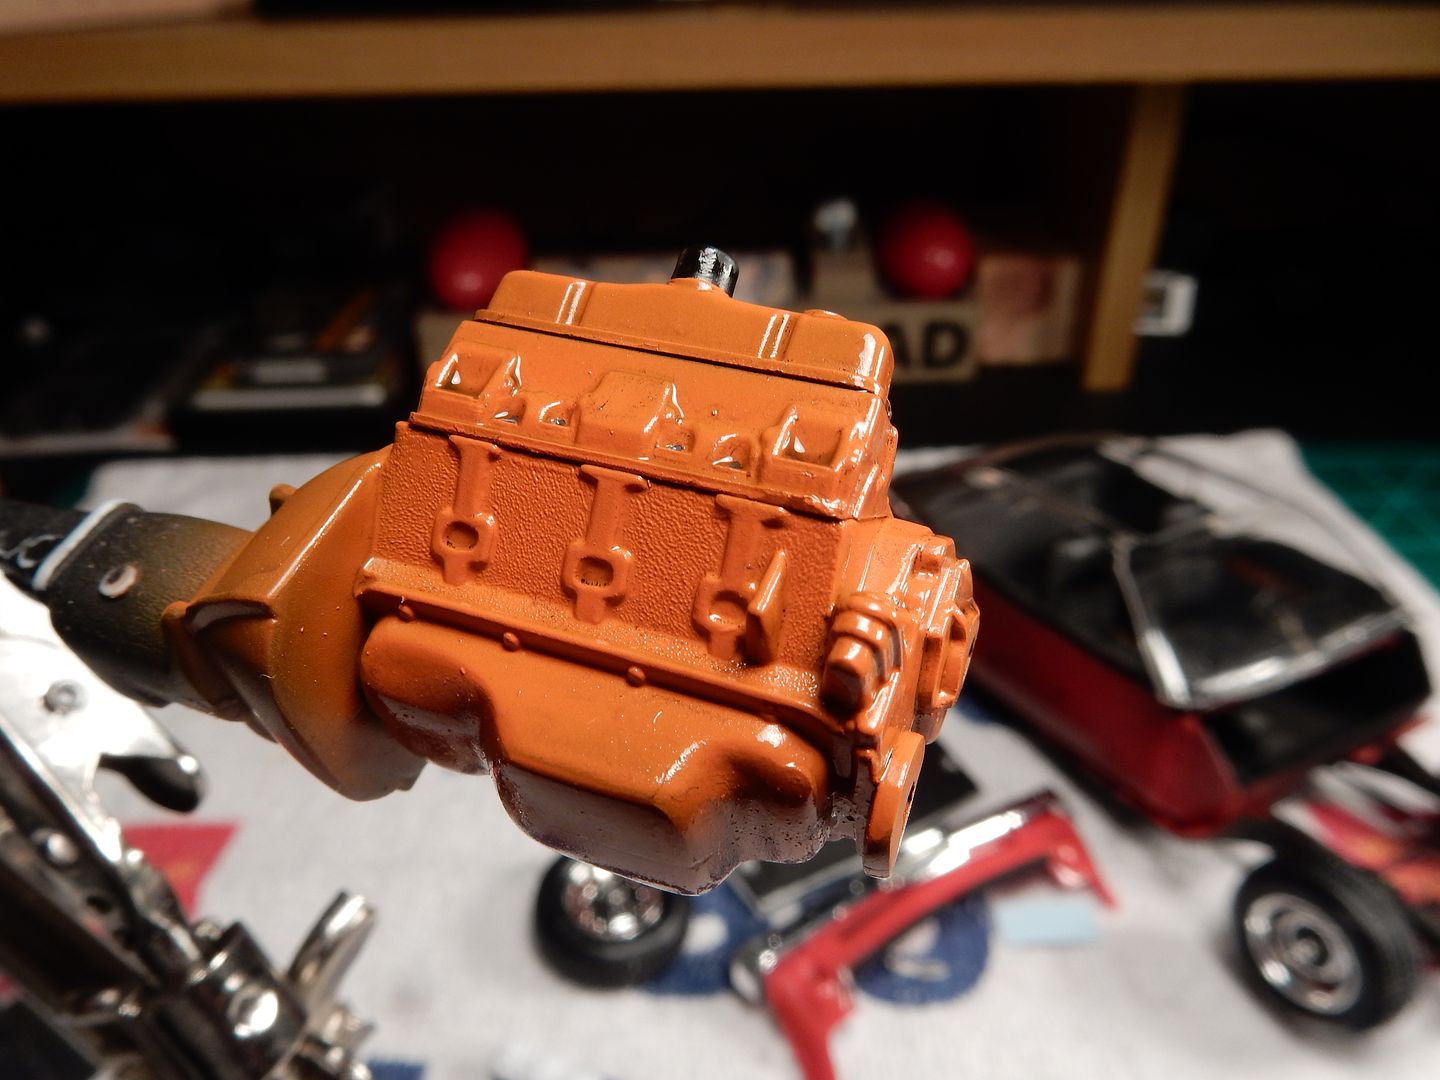
 Here I painted up the rocker covers that USED to be chrome:

and installed them:


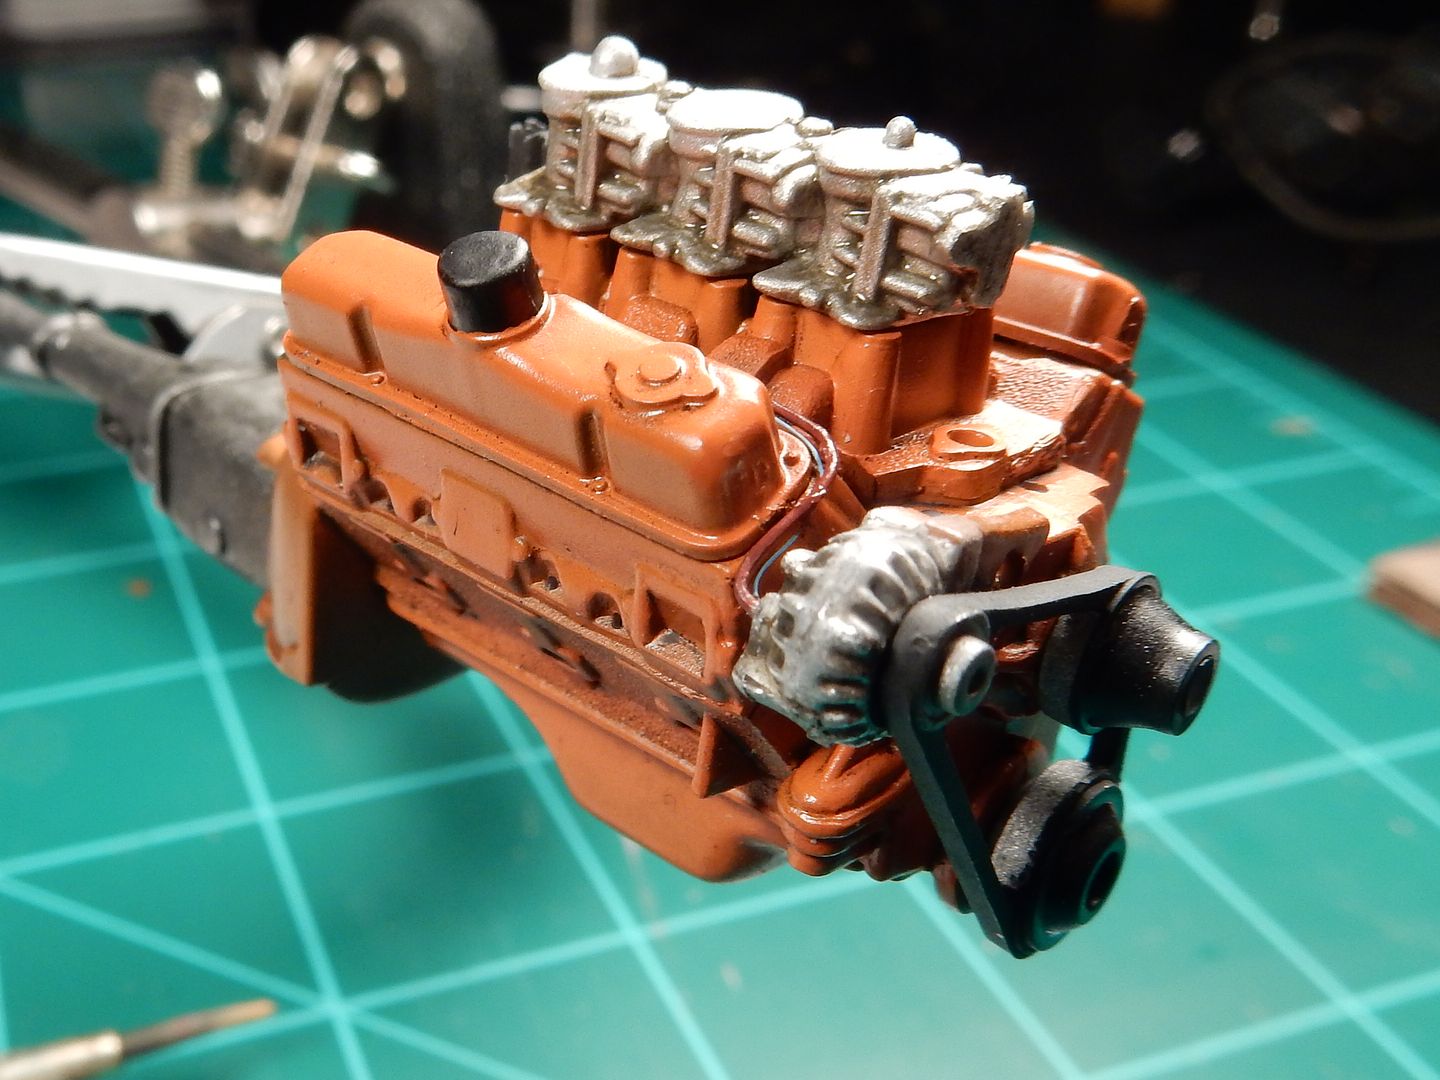
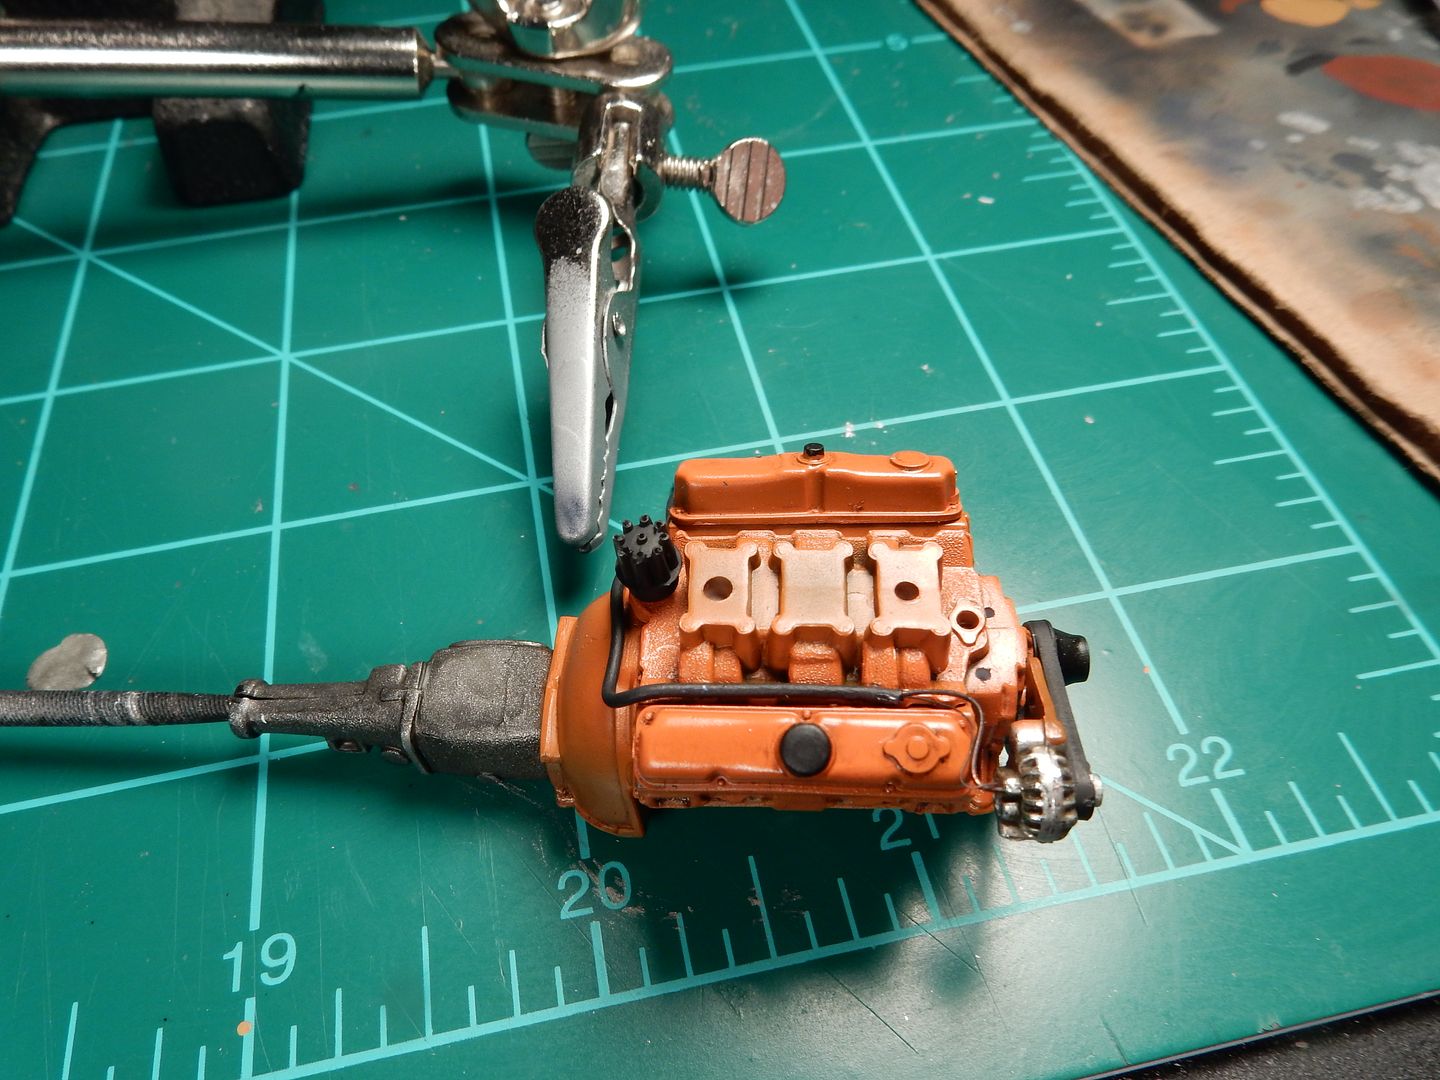
and treated the whole engine to a light coat of dark wash to give it that slightly used look and to highlight detail and painted some of the detail on the rocker covers

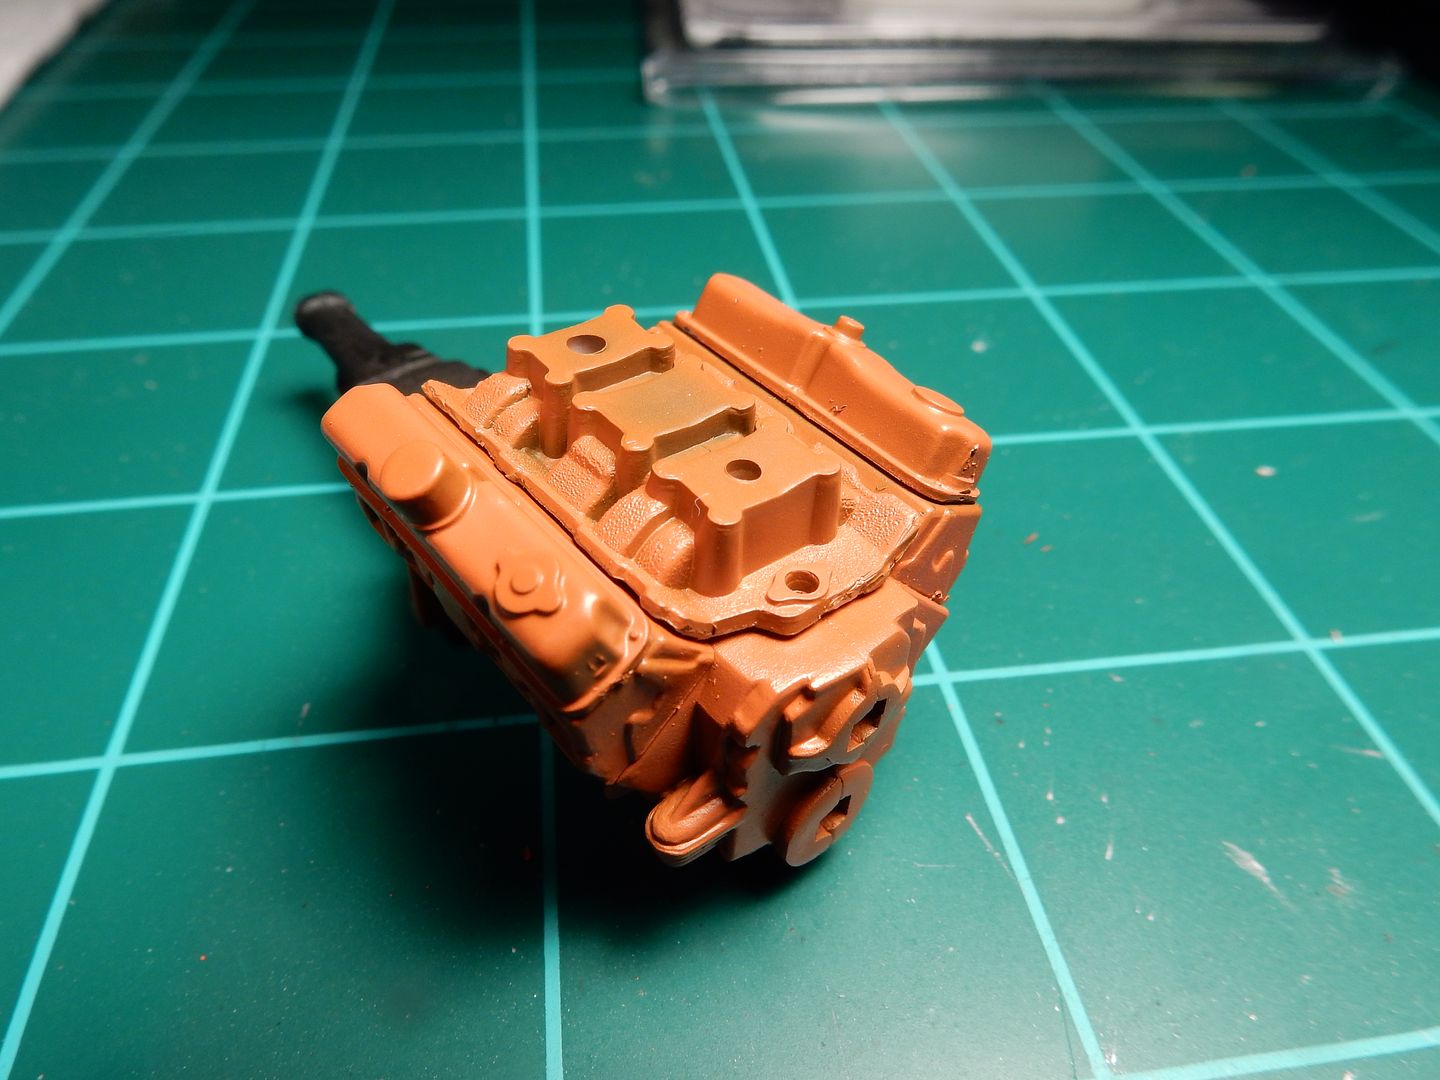
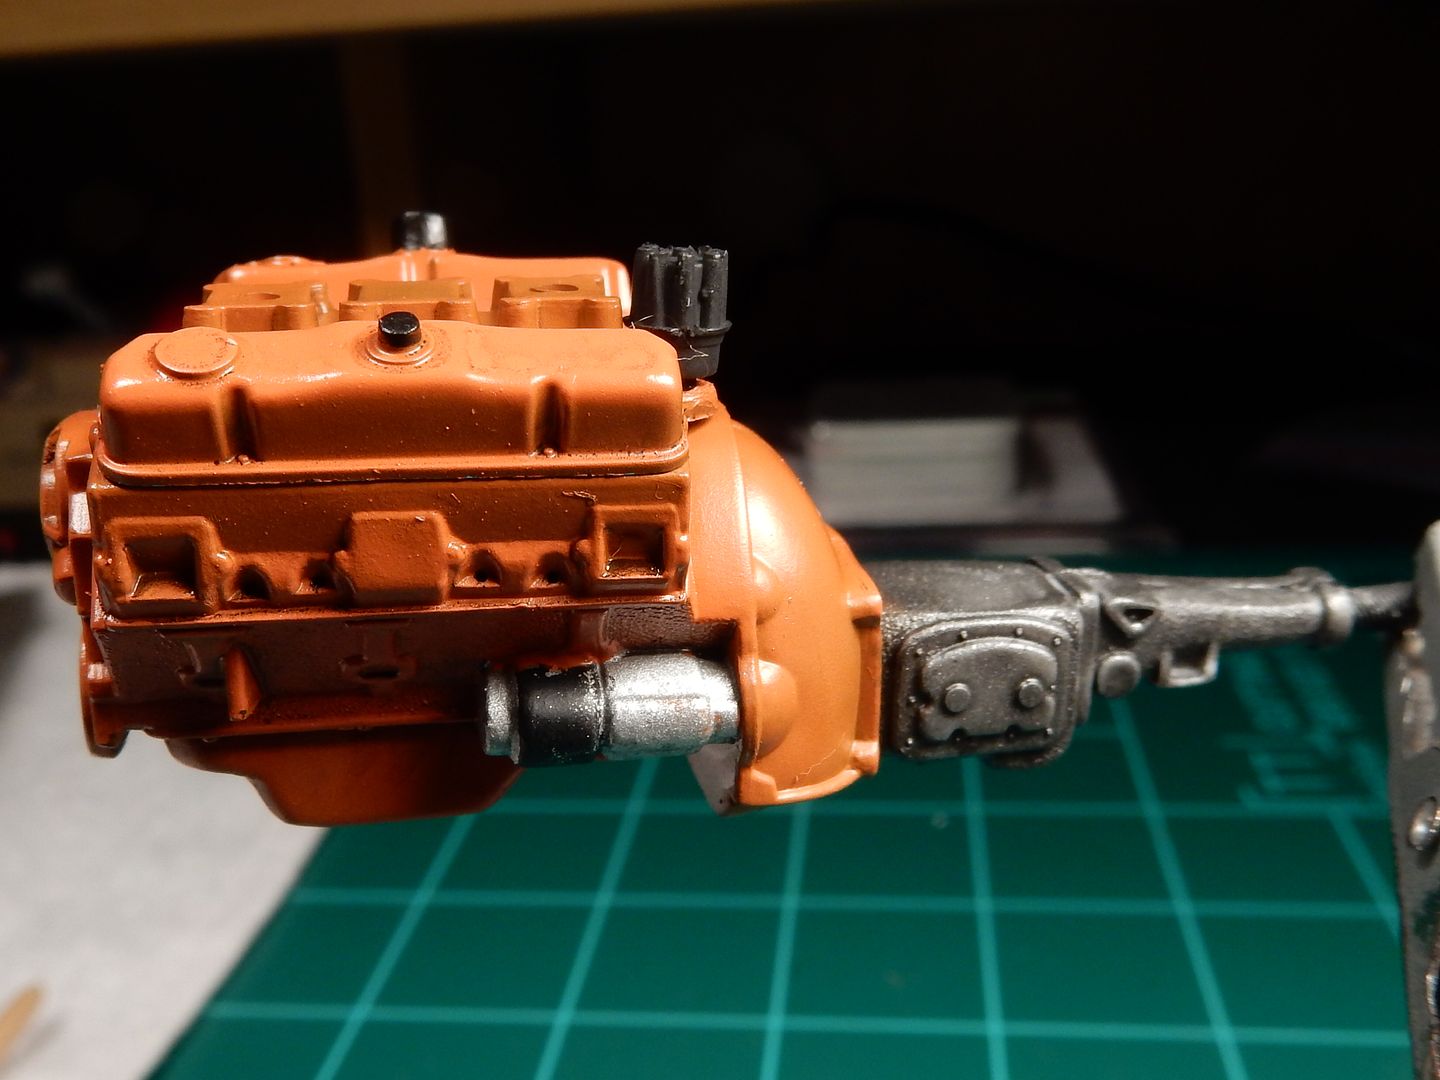
Here I've got the starter, transmission bellhousing and transmission painted up and weathered.

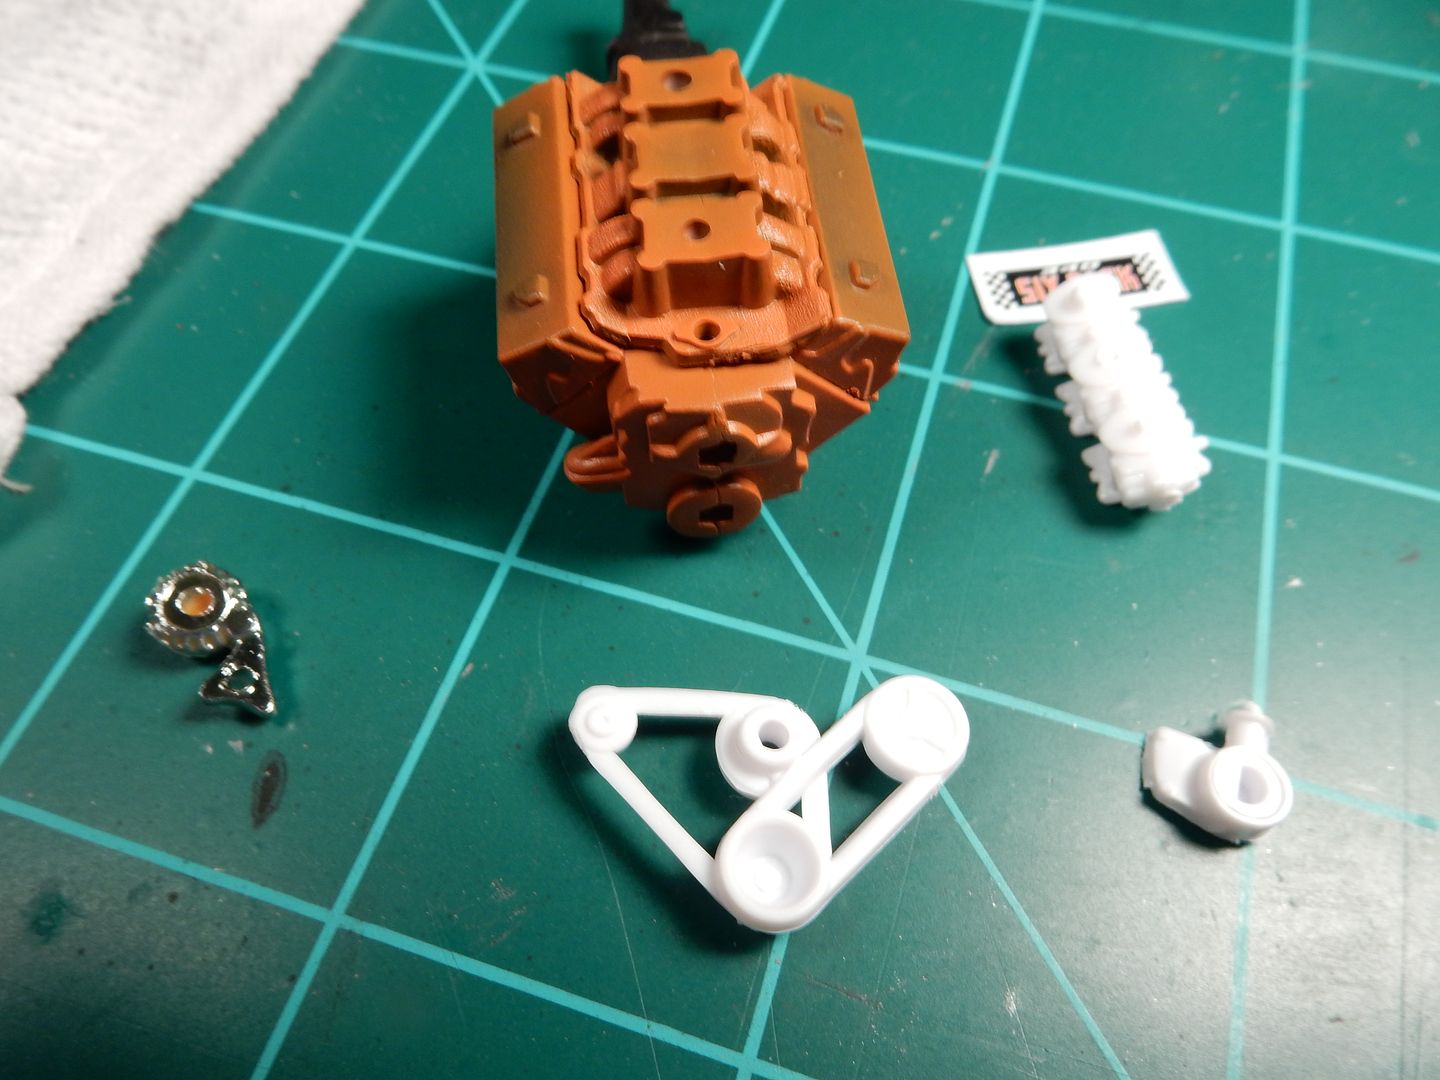
I started installing a wire harness and initially used heat shrink to contain the alternator ckts but the heat shrink was WAY too big.

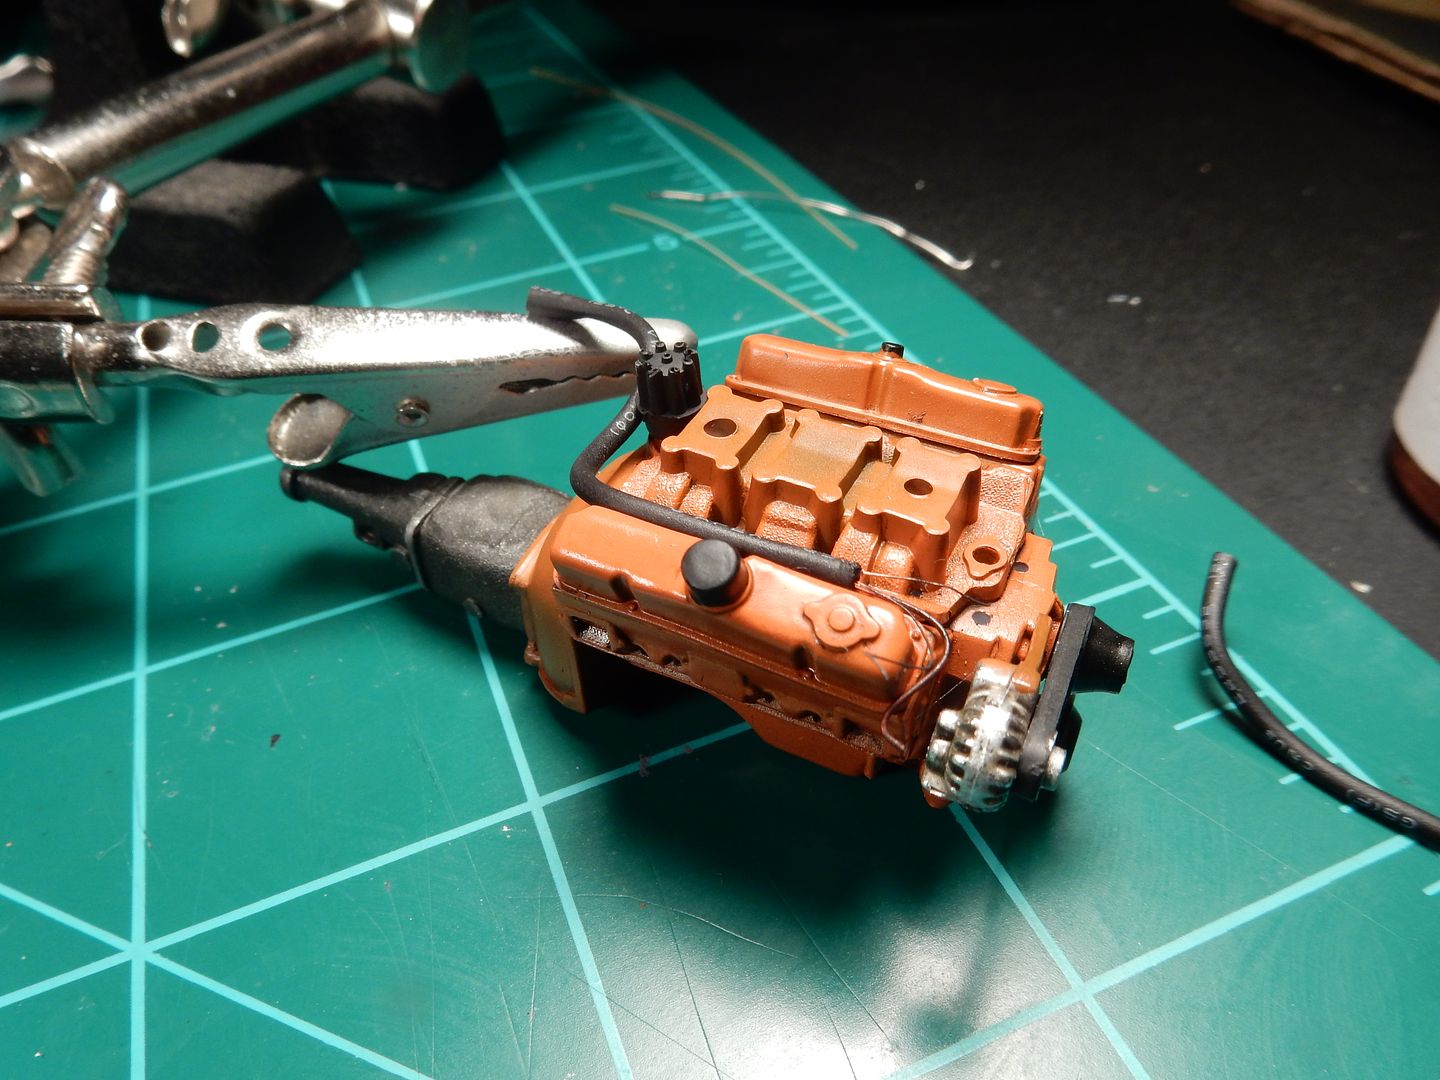
So I opted for the usage of telephone wire insulation with the core stripped out. The alternator is from a newer version of the Revell Challenger that there's no way in Hell that I'll ever build. It has a mounting bracket on it so I get to display and alternator that's not suspended in animation on the belt. I painted the belt and pulleys flat black and applied future over the pulleys for that gloss look and dry brushed ground up black pastel over the belt for the dead flat look on the belt.  I inserted the alternator output and field wire into the phone wire insulation and painted the insulation black for the wire shrouding. I also drilled holes for the heater hoses and spark plug wires that will go on here. 

 Then I painted the carburetors a mix of aluminum tinted with some gold and applied a light wash over these prior to installation. Here the wash is still wet but dried with just the right amount of shadowing.


 Forum | Modelers Social Club Forum (proboards.com) 

  • Member since
    August 2009
  • From: MOAB, UTAH
Posted by JOE RIX on Wednesday, December 3, 2014 6:53 PM

Whoa! Magnificent work on the engine Joe. Love the wiring harness. That is bad A.

"Not only do I not know what's going on, I wouldn't know what to do about it if I did". George Carlin

JOIN OUR COMMUNITY!

Our community is FREE to join. To participate you must either login or register for an account.

SEARCH FORUMS
FREE NEWSLETTER
By signing up you may also receive reader surveys and occasional special offers. We do not sell, rent or trade our email lists. View our Privacy Policy.