SEARCH FINESCALE.COM

Enter keywords or a search phrase below:

Making a Set of Scale Hood Hinges

6438 views
15 replies
1 rating 2 rating 3 rating 4 rating 5 rating
  • Member since
    March 2012
  • From: Louisville, KY
Making a Set of Scale Hood Hinges
Posted by Builder 2010 on Tuesday, July 17, 2018 7:20 PM

Due to the success of cobbling together a set of "scale-like" non-operable hood hinges for my Ford Fairlane GTA out of styrene, I was asked by the owner of our local hobby shop, Scale Reproductions, Inc., if I could make a set for the car he's building. Brian Bunger, besides running one of the finest hobby shops I've even been in, is one heck of a fine model builder (probably why the shop is sooooo good), and he's building a replica of the 1958 Chevey Impala coupe that was featured in "American Grafitti". He even simulated tuck-and-roll upholstery using 1/2 round strips of Evergreen Styrene.

Like the GTA, I searched eBay to see if someone was selling a 1:1 set of '58 hinges and there were many. And I was able to find a great pictue clearly showing all the linkages and their relationship.

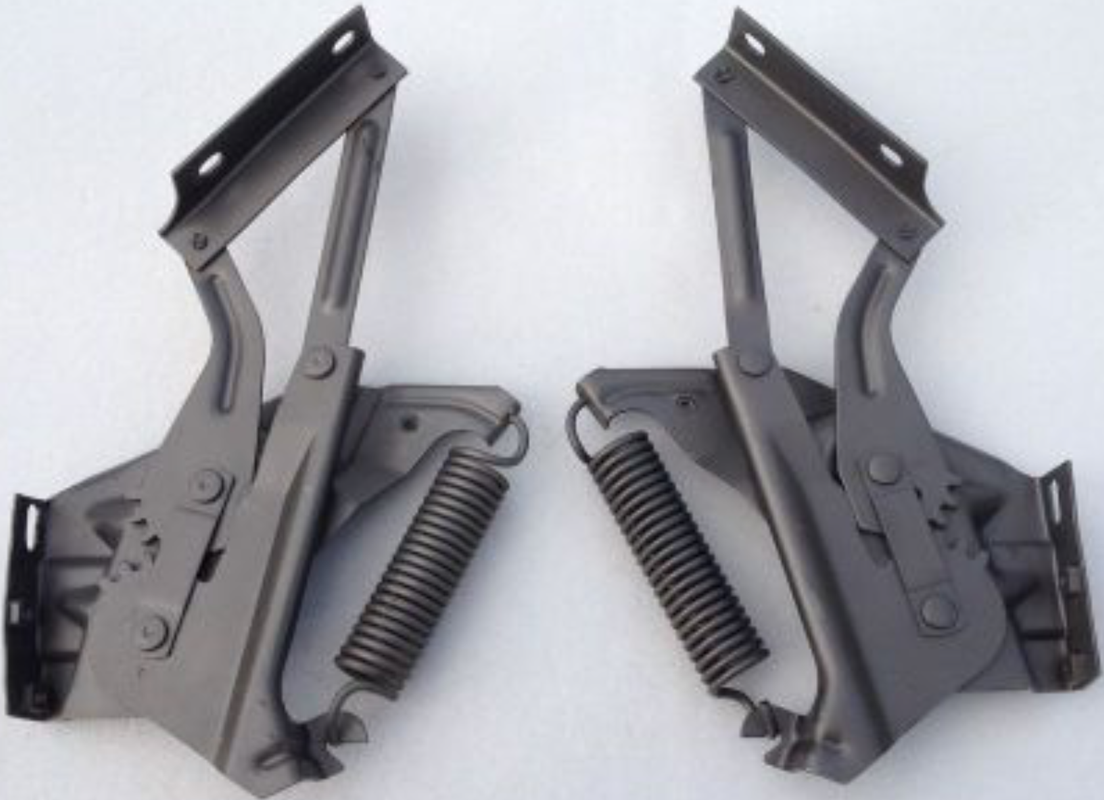
Unlike the Ford's, the Chevy hinges bolt to the firewall and not the fender, and have a bracket with a 90° bend. There is also this interesting gear-tooth mesh between the two big swing arms WHICH I AM NOT MODELING IN 1:24. 

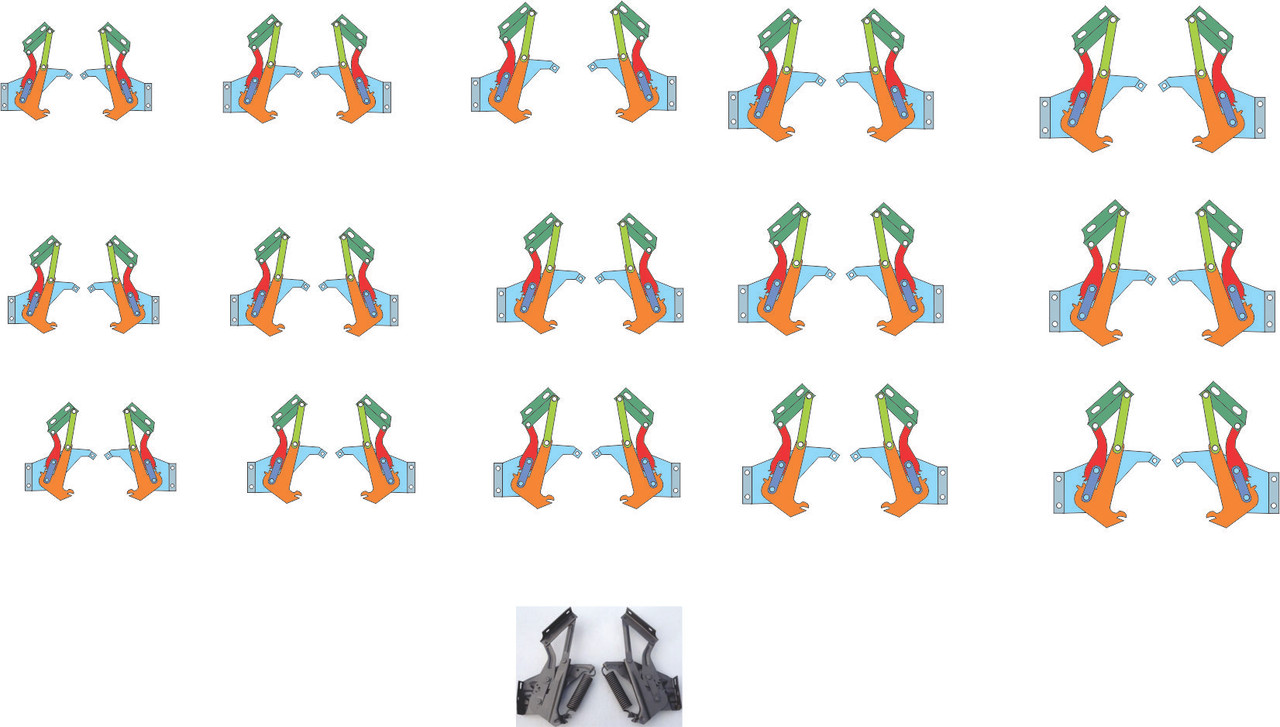
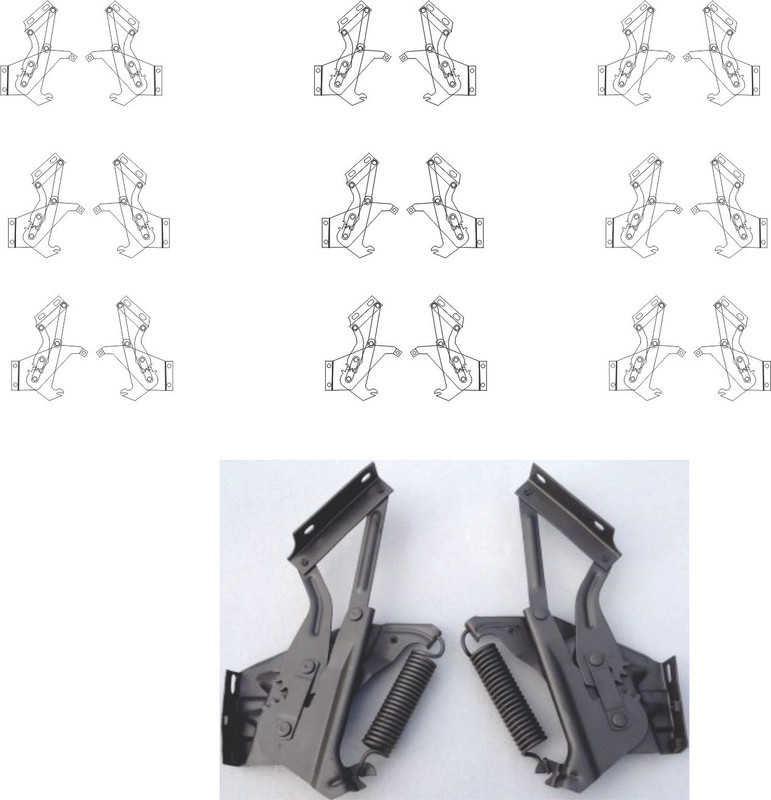
I imported the image into CorelDraw and drew the various pieces over the drawing. But I first had to decide on how big it was going to be. There was no way to be sure, so I guessed that the overall width was 8", and using that dimension drew some guidelines at that scale distance in 1:24, and shrunk the JPEG to fit between those lines. I drew all the pieces making different layers do I could draw them one on top of the other.

I drew each piece in color so I could clearly see how the elements overlap.

I then made two versions slightly bigger by 10% each and then another two reduced by 10%. I printed out this sheet of right and left hinges and worked with Brian to pick the size that most closely would work in the model. Luckily, the hood has simulated bolts where the bracket would attach. We just had to pick the set of drawings where the bolt holes on the drawing (taken from the real hinges) matched the model hood. It turns out that the second largest was the closest size. In the drawing, angle brackets are laid out flat to properly locate the holes. They're also drilled in the flat and then folded.

I didn't draw the springs and I may not add them to the model since they would be too small to be working and if not working, would impede the hinge motion. That said, I'll bet there's a miniature spring out there that could work. Perhaps I do some research. I could make a dummy spring and if the hood is not going to close, that could work. Round-wound guitar strings would work as fake ones.

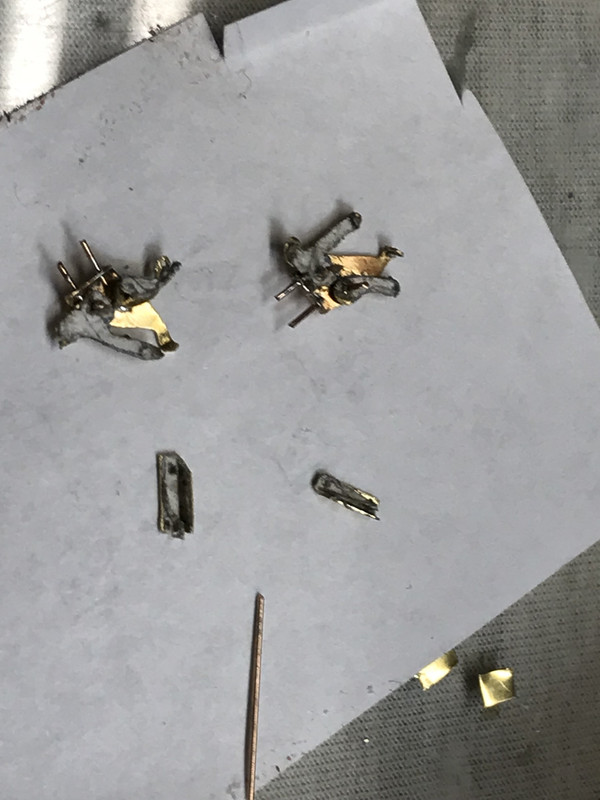
To build the real hinges, I printed multople copies of the correctly-sized hinge since it takes a few to build the whole hinge. Each overlapping piece has to be cut out using the drawing as a guide and that destroys the drawing that lies below.

I put some pressure sensitive adhesive on the drawing's back and cut them out for sticking them to some 0.010" brass sheet. First thing I do when making these small parts is to accurately center punch each hole location for that part. You have to pay attention that you're picking holes that actually lie on just that part. I then drilled them with a #76 drill. I was using my carbide drills, but was having trouble with the cutting edges shattering. Brass is tough to drill, not because it's hard, but because it's gummy. I grabs drills. High speed steel is forgiving, but carbide is not. When it grabs, it often shatters the edge. I'm using 0.010" phosphor bronze wire for the pins. These are soldered on one end to stabilize the assembly.

After drilling, I cut the pieces out. If the part is basically rectangular, I use a nice pair of Xuron photo-etch fret scissiors. For the curved pieces I use a very fine tooth jeweler's saw on a bench hook of my own construction. Rule of thumb: you need a blade with fine enough teeth so that two are lieing on the material's cross-section. Someday, I'll buy a real hardwood, jeweler's bench hook for using a jeweler's saw. The main bracket and the top brackect have a right-angle bend in them. I used my little, Small-Tools Hold-n-Fold to make the bends on the large piece and a pair of old Vice Grips which makes an excellent bendng break for modeling in metal. 

Here's the result of today's work. The paper is still attached to the small arms and gets pretty grubby during the process, but the main pins are in place. There're two more small arms; one goes across the two main pins and acts as a guide for the arms, and the other is the fourth link that forms the parallelogram. I've soldered pins on the bracket that will go into holes on the firewall to reinforce the fixture to the car. I won't pin the hood since it would impossible to drill the hood for the pins without passing right through. If CA doesn't hold well enough epoxy might work (or J-B Weld), but it would have to be supported overnight to cure properly.

  • Member since
    January 2015
Posted by PFJN on Tuesday, July 17, 2018 7:22 PM

Hi,

Those look great Smile

1st Group BuildSP

fox
  • Member since
    January 2007
  • From: Narvon, Pa.
Posted by fox on Tuesday, July 17, 2018 9:26 PM

Bow Down Bow Down Bow Down  You found a couple of 6 inch high people to build this for you, come on, admit it.Wink

Jim  Captain

 Main WIP: 

   On the Bench: Artesania Latina  (aka) Artists in the Latrine 1/75 Bluenose II

I keep hitting "escape", but I'm still here.

  • Member since
    August 2007
  • From: back country of SO-CAL, at the birth place of Naval Aviation
Posted by DUSTER on Wednesday, July 18, 2018 1:26 AM


WOW somehow seems almost inadequate.  A Great job of research and development. 


Steve

Building the perfect model---just not quite yet  Confused

  • Member since
    May 2018
  • From: Louisville KY
Posted by DMX512 on Wednesday, July 18, 2018 9:38 AM

Builder 2010

Outstanding work!

I completely agree regarding Scale Reproductions. Brian, Martin and the rest of the gang are great folks running a top notch hobby shop. I stop in a couple of times a week just to look around and chew the fat if I am not in actual need for something.

Sorry if this shows up as a double post. I responded yesterday and I can not see my post.

  • Member since
    March 2012
  • From: Corpus Christi, Tx
Posted by mustang1989 on Wednesday, July 18, 2018 2:02 PM

Builder 2010
I didn't draw the springs and I may not add them to the model since they would be too small to be working and if not working, would impede the hinge motion. That said, I'll bet there's a miniature spring out there that could work. Perhaps I do some research. I could make a dummy spring and if the hood is not going to close, that could work. Round-wound guitar strings would work as fake ones.

This is really some ground breaking good stuff you've got going on here Builder!

As far as springs go for display purposes, light bulb filaments from a light bulb might be a good idea as well.


 Forum | Modelers Social Club Forum (proboards.com) 

  • Member since
    March 2012
  • From: Louisville, KY
Posted by Builder 2010 on Wednesday, July 18, 2018 6:16 PM

Well thank you all, but you should reserve accolades until they're finished....Wink

I was able to finish them today. The first one went really nicely, although I went through 4 -0.021" carbide drills before I finished drilling all the holes. 

As I noted, I soldered the phosphor bronze pins on one end, and the, after clipping them to about 1/32" exposed, squished the ends with a Xuron Needle-Nosed Pliers to captivate the moving part. This works for really small structures, but the extended pin can bind in the mechanism. In the prototype, the rivets are pretty flat so they don't do that.

Here's number one.

For hinge number 2 I tried to actually rivet the pins after cutting them even shorter and hammering them with a jeweler's ball peen hammer. It worked only once. The second one I did broke the pin out of the side of the brass bar since the hole was too near the edge and didn't have the strength to handle the hammering. I had to re-drill a new hole a little further up on the part, re-solder a new pin and do it again. I tried one more time to rivet and this time didn't work either so I went back to deforming the pin to widen it more than the hole diameter. 

Then I had to put the final piece on... the angle bracket that ties the hinge to the hood. There are four possible ways to put this part on, (which had both pins already soldered in place.) The first time I put it together AND squished the pins, I had it reversed front and back. I had to cut the pins, de-solder them, re-drill the holes to open them, and then solder on another pin.

Then I put it together again, and this time had it revesered up and down. Again I had to got through the entire excercise. Needless to say, when I got it together I checked it out BEFORE securing the pins. DOH! Should have done that the first time!

I finally sprayed all sides with Tamiya gray primer. The overall height of the model hinge is about 1/2".

I experimented with some low E guitar string to simulate a counter-balance spring, and it could work if you didn't want it to move, since even though it looks like a properly sized spring on the outside, there's a honking piece of music wire on the inside that precludes it from working as a spring. The spring is fully compressed when the hood is open and stretched fully when the hood is closed.

The mechanism really is NOT functional even though all the parts move and are properly sized in relation to each other. That's because it lacks those gear teeth to synchronize the two opposing arms. As a result the thing is a bit floppy and doesn't open to the correct orientation without manipulation. And it's very flexible. My holes and pins allow very free motion. I've contacted my patron and told him he'll have to leave the hood open and glue it in that position if he wants the hinges to look right. I imagine you could get the hood closed, but I couldn't guarentee the alignment.

One more thing... you can see all the stamped forms on the surface of the prototype arms to give them greater stiffness. This feature was impossible to replicate on the gauge of brass I was using and adds to more flexibility on the model. The real hinges would be quite rigid in the cross-wise direction.

I'll be bringing them to Brian tomorrow night as I attend my first meeting of the Military Modelers Club of Louisville which Brian invited me to attend. I'm looking forward to it and will be bringing my Trumpeter 1:32 TBM-3 Avenger for "Show and Tell". He said that members run clinics periodically and I may run one of soldering. While I'd love to bring either the Missouri or the Essex, but I don't like moving them at all. I may do so to enter their yearly contest.

  • Member since
    May 2013
  • From: Indiana, USA
Posted by Greg on Wednesday, July 18, 2018 6:39 PM

Yes, and thanks for sharing.

  • Member since
    March 2013
Posted by LonCray on Thursday, July 19, 2018 10:56 AM

Man, here you are bemoaning the fact that your hinges don't actually work like real 1:1 hinges, and I'm still happy when I don't have paint drips all over.  I'm not even worthy!  

  • Member since
    May 2018
  • From: Louisville KY
Posted by DMX512 on Thursday, July 19, 2018 11:32 AM

Builder 2010

Outstanding work!

I completely agree regarding Scale Reproductions. Brian, Martin and the rest of the gang are great folks running a top notch hobby shop. I stop in a couple of times a week just to look around and chew the fat if I am not in actual need for something.

Sorry if this shows up as a double post. I responded yesterday and I can not see my post.

  • Member since
    June 2010
  • From: Australia
Posted by OctaneOrange on Saturday, July 21, 2018 9:03 PM
They look good considering their size. I tried a similar idea but its impossible without scale nut and bolt to get the motion. I doubt you'd get them to work, but you could do like on some models, where the hinge stays in the 'open' shape, but you drop it through a slot in the fender to close it, meaning it doesn't have to compress. I think that's the only way to get both open and closed shapes.
  • Member since
    May 2018
  • From: Louisville KY
Posted by DMX512 on Tuesday, July 24, 2018 10:00 AM

OctaneOrange

I saw the hinges that Builder2010 made for the owner of our local hobby shop and they do, in fact, articulate quite nicely.

  • Member since
    March 2012
  • From: Corpus Christi, Tx
Posted by mustang1989 on Wednesday, July 25, 2018 9:55 PM

Un...............believable!! Thank you for sharing that with us here Builder.


 Forum | Modelers Social Club Forum (proboards.com) 

  • Member since
    July 2012
  • From: Douglas AZ
Posted by littletimmy on Sunday, July 29, 2018 7:35 PM

Check the model RailRoading section . You should be able to get a set of Kaydee N scale coupler's , use the spring's off of those. They might be just the ticket.

They also sell just the spring's in a small envelope.

https://www.walthers.com/knuckle-spring-for-standard-head-couplers-pkg-12

 Dont worry about the thumbprint, paint it Rust , and call it "Battle Damage"

  • Member since
    June 2014
  • From: New Braunfels , Texas
Posted by Tanker - Builder on Wednesday, August 15, 2018 11:56 AM

You Know .

 They are not that hard and as far as the geared face That's what a file is for .

   Now that I grumped at you , here's what I have to really say . What an awesome and realistic job you have done . Could you build these to sell ? Why ? I want a set for my 58 !I see a place for home-made springs there .

 There is a tool that is available from Micro - Mark that allows you to do that . the biggest thing is keeping them in place ! 

  • Member since
    March 2012
  • From: Louisville, KY
Posted by Builder 2010 on Wednesday, September 12, 2018 3:23 PM

Haven't checked my thread in a while. Thanks to all for the great comments. If I were to make them for commission, I'd have to figure a way to handle some parts of the job with less hassle.

I'm still waiting for my patron to install them is his spectacular 58 Chevy Impala. He's the owner of one of the best hobby shops in the country AND is a wonderful scale modeler himself. Maybe that's why it has one of the best plastic kit departments I've ever seen. I originally lived outside of Philly and there were some very fine hobby shops. They're all gone. When the time came to retire near a couple of our grandkids in Louisville, I already knew about Scale Reproductions, Inc., and had been there with my grandkids, and was very happy, that at least, this part of my life would actually get better moving away from where I was born. I've just lately joined the Military Modeler's Club of Louisvile based on my patron's suggestion. I don't need their workshop sessions to much since my shop is so well equipped, but I really appreciate meeting like-minded people with AMS* like me.

When the hinges go into the model, I will post them here.


*Advanced Modelers Syndrome

JOIN OUR COMMUNITY!

Our community is FREE to join. To participate you must either login or register for an account.

SEARCH FORUMS
FREE NEWSLETTER
By signing up you may also receive reader surveys and occasional special offers. We do not sell, rent or trade our email lists. View our Privacy Policy.