SEARCH FINESCALE.COM

Enter keywords or a search phrase below:

WALL-E

8543 views
62 replies
1 rating 2 rating 3 rating 4 rating 5 rating
  • Member since
    October 2008
  • From: Georgia
WALL-E
Posted by Rigidrider on Thursday, March 8, 2018 10:51 AM

Morning all... Not sure if this belonges in Sci-Fi or scratch building (or both) so I'll post in both. A little bit ago, my grand kids and I were watching my favorite Pixar movie, WALL-E. One of the grand daughters knowing I like building models asked me to build Wall-e. So, after thinking about it for awhile, studying some pictures I thought, Why not. So here is my attempt at Scratch building, Wall-E. By the way, their favorite scene is when he finds the bra and isn't sure what it is , so thats the dio I'll shoot for.

Well, heres what I have gathered to begin with, Toys and such are from a local Thrift second hand Store, Wood dowels and paint from Home Depot, Misc Plastic sheet I've had laying around for awhile.

Going to start with his head, and eyes...Cut all the shapes of the eyes from sheet plastic and will shape all together on belt? disc sander to try and keep a uniform shape and size.

This old plastic tissue box cover will serve as the basis of his body to build on. When trying to cut with a jig saw, I had to experamint a bit, at first I was cutting with too fine a blade and cutting too fast(?) and the cut would just reweld its self behind the blade as it passed by. lol... Settled on a coarser cut blade and slowed down both the travel and the speed and it started cutting much better.

Well, thats about it for now. Thanks for looking...

Doug

When Life Hands You A Bucket Of Lemons...

Make Lemonade!

Then Sell It Back At $2 Bucks A Glass...

  • Member since
    April 2013
  • From: Eleva, Wisconsin
Posted by Greatmaker on Thursday, March 8, 2018 12:01 PM

That is so cool good luck!


  • Member since
    November 2009
  • From: SW Virginia
Posted by Gamera on Thursday, March 8, 2018 2:39 PM

Very cool! 

Looking forward to seeing how you proceed here. 

"I dream in fire but work in clay." -Arthur Machen


  • Member since
    October 2008
  • From: Georgia
Posted by Rigidrider on Friday, March 9, 2018 7:08 PM

Evening all! Well after a bit of doctoring this morning, I got home and had most all day to work on Walle... Little more progress...

OK, I got the pieces to start the "eyes" with. The belt / disc sander did a super job shaping the plastic I had cut for the eyes. These little ole kids binoculars will work just fine for the assy, there was another set of toy binocs I'll use for outer lenses and the articulation point for the neck is from a toy telescope also from the thrift store.

had to trim the back ones to go over some irregularities on the back but other then that, they fit perfectly.

The little plastic discs I'm cutting with a drill press and a whole saw set are going to be the articulation joint to raise and lower the neck, the other is for the head to attach to the neck and allow the head to pivot and move up and down.

And they are epoxied in place.

And the neck is together, and that it for now... Thanks again for looking! Take care...

Doug

When Life Hands You A Bucket Of Lemons...

Make Lemonade!

Then Sell It Back At $2 Bucks A Glass...

  • Member since
    October 2008
  • From: Georgia
Posted by Rigidrider on Friday, March 9, 2018 7:43 PM

Great Maker... Thanks! I'm going to need it!

Gamera... Thank you sir! Again, if it comes out any where near how I see it in my mind, it'll be ok... Problem is I'm thinking a step or two ahead of what I'm working on at the time, and I tend to forget where I was! Lol...

Thanks again...

Doug

When Life Hands You A Bucket Of Lemons...

Make Lemonade!

Then Sell It Back At $2 Bucks A Glass...

  • Member since
    January 2006
  • From: California
Posted by SprueOne on Saturday, March 10, 2018 4:13 PM

Super interesting project. Nice scratch-find-fitting of the thrift store parts. Idea Yes

 I'm especially interested in seeing the tracks and running gear go together. Subscribed.


Anyone with a good car don't need to be justified - Hazel Motes


Iron Rails 2015 by Wayne Cassell Weekend Madness sprueone

  • Member since
    October 2008
  • From: Georgia
Posted by Rigidrider on Saturday, March 10, 2018 6:12 PM

Thank you Sprue one... That is the only thing I'm going to have to order. At this time its a bit down the road of the build, But so far I've not been able to source any broken construction toys the right size, so I found some 1/16 scale Lepoard Tank track from a source in China on E Bay. Its ordered and on the way. By the measurements given it will make an acceptable size track. Now, the drive assy... well that like everything else I will attempt to fabricate myself... I think it'll be OK. Thanks for the interest!

Doug

When Life Hands You A Bucket Of Lemons...

Make Lemonade!

Then Sell It Back At $2 Bucks A Glass...

  • Member since
    October 2008
  • From: Georgia
Posted by Rigidrider on Sunday, March 11, 2018 6:43 PM

OK, a little more progress...

I got his neck completely asyembled and epoxied, then painted..

Ang getting his eyes painted pre assy.

And thats about it for now, More in a bit... Hope everyone had a good weekend! Thanks for looking...

Doug

When Life Hands You A Bucket Of Lemons...

Make Lemonade!

Then Sell It Back At $2 Bucks A Glass...

  • Member since
    June 2014
  • From: New Braunfels , Texas
Posted by Tanker - Builder on Monday, March 12, 2018 7:44 AM

I Say !

 You are doing a bang up job there .I s he going to have any weathering ? I bet you'll get is as good as what you have now . T.B.

  • Member since
    November 2009
  • From: SW Virginia
Posted by Gamera on Monday, March 12, 2018 11:48 AM

Oh wow, you're making great progress there. Nice work Doug! 

"I dream in fire but work in clay." -Arthur Machen


  • Member since
    October 2008
  • From: Georgia
Posted by Rigidrider on Monday, March 12, 2018 7:28 PM

Tank Builder... Thank you for the interest. Yes sir, my hope and intent is to make him look like he did in the movie. I hope...

Cliff, Thanks! Yeah so far its not been too difficult, but the tough part is going to be in the body. The way I'm thinking, he will need to be constructed kinda like a submarine, with an inner and outer hull, the way I intend to attach the arms and "legs". At least thats what I'm thinking... Any way, heres todays update.

I apologize I got carried away and forgot to take pictures, but I think you can see how I did this.I cut and shaped two sheets of .010 plastic sheet to wrap completely around the eye shapes, glued with regular ole cement. You can see the left side is still in the raw, but I painted it in Model Master Non buffing steel metalizer and let dry. It dries extremely fast being a lacquer and I use a bit hotter thinner then most thinners. Then using Ameracana brand latex paints (available at Hobby Lobby reasonable priced) I allpied layers of raw sieana, burnt sieana, raw umber, and burnt umber in layers to simulate in this case a light rusting. The little "patch " on the side is (in the pictures I have) some type of inspection access cover. Again, just a shaped strip of .010 plastic sheet glued down. I also added the three small screws per the pictures in the lens area and dirtied a bit with a thin mix of nato black through the air brush.

And later tonight I'll try to get the other one done. Thank you and take care!

Doug 

When Life Hands You A Bucket Of Lemons...

Make Lemonade!

Then Sell It Back At $2 Bucks A Glass...

  • Member since
    May 2013
  • From: Indiana, USA
Posted by Greg on Monday, March 12, 2018 7:47 PM

Your creativity is really showing here, Doug. Yes

  • Member since
    October 2008
  • From: Georgia
Posted by Rigidrider on Tuesday, March 13, 2018 10:19 AM

Thanks Greg... You know I love building kits, but now and then, I just like to try something diffefent that requires a bit more effort. Any way... Stayed up till about 2 finishing what I could on the eye/head assy...

The other eye is finished painting ans I've started rusting and weathering on the neck.

I've cut, shaped and folded the two shields above the eyes from an old lasagna tray lid, then painted the same. The pieces along the sides of the eyes were the left over pieces of the second set of toy binoculars, and mounted after drillind a series of vent holes in them.

And the head is finished enough for now to mount to the neck. There will be a bit more later to do, but for now it will be OK. Thanks for looking, I start the body section next.

Take care all!

Doug

When Life Hands You A Bucket Of Lemons...

Make Lemonade!

Then Sell It Back At $2 Bucks A Glass...

  • Member since
    November 2009
  • From: SW Virginia
Posted by Gamera on Tuesday, March 13, 2018 12:10 PM

Coming along great, love the rust effect you've got going there. 

"I dream in fire but work in clay." -Arthur Machen


  • Member since
    October 2008
  • From: Georgia
Posted by Rigidrider on Thursday, March 15, 2018 12:42 PM

Thanks Cliff... You know... Just pouring over the pictures I've printed off and trying to figure out what comes next is taking the bulk of the time on this, but hey... I'm enjoying doing it. Thanks again! 

Well... The body (again) will be built kind of like a submarine with an inner and outer hull. The original body piece needed to be strengthend to take the weight of the arms and legs when mounted. The octoganal pieces at the top of the picture are the rear area where it appears his rear door slides, Kind of like the back of a Trash truck. The side pieces are the square pieces lined off for cutting. This plastic sheet is a piece of .220 plastis from a local window shop I found for about 5$ in their seconds rack. It is much stronger and will easily support the added weight. The 5/16 sq tubing is already glued down and will serve as a stand off for the outer pieces.

The side have been prepared and glued in place. The rectangular cuts are where the clevis fot the arm will mount in order for it to slide. This one will not slide but will be in a fixed position. The deep scribing lines are where the body seperates when it opens to release the crushed load. Again, mine will not open, but with proper painting I should be able to make appear as if it would.

The rear door slide pieces in place and the trim and ribbing in place. And its time to allow this to set... More later, Back in a bit!

Doug

When Life Hands You A Bucket Of Lemons...

Make Lemonade!

Then Sell It Back At $2 Bucks A Glass...

  • Member since
    November 2009
  • From: SW Virginia
Posted by Gamera on Friday, March 16, 2018 7:44 AM

Again, very cool Doug! 

"I dream in fire but work in clay." -Arthur Machen


  • Member since
    May 2013
  • From: Indiana, USA
Posted by Greg on Friday, March 16, 2018 7:57 PM

Doug, I could spend a lifetime and not figure out how to get as far as you already have!

  • Member since
    October 2008
  • From: Georgia
Posted by Rigidrider on Saturday, March 17, 2018 9:35 AM

Thanks Cliff, Thanks Greg... Well it just takes a little study time and patience(which I have little of) But I have to have, to be able to figure him out! 

Any way... A bit more progress...

I find that having it all 1 color I can see my progress a bit better, so after priming I decided to start work on the back side. The upper sliding door and handle are in place made with .093 plastic, square tubing and two sizes of rectangular plasti struct for strengthening ribbing. A piece of 3/16 aluminum tubing makes a convincing hinge (I hope) The corner bump guards I supposed were a tough rubber of sorts, but these are going to be shaped and made fron a piece of 1-1/2 wood corner trim, shaped on the belt/disc sander. The inner compartment door is again .093 plastic with popcicle sticks evenly spaced to simulate ribbing .

These pieces will make the "legs" that mount underneath and attach the tracks too. They were alot more mechanical looking in the pictures, but these were about the same shape and will not be very visable when mounted. They are the hind leg pieces from a robot dog, again found at the local thrift store. I have mixed and filled the cavities with a plaster /sand mix to add weight for additional stability when mounted.

And this is how I intend them to mount when needed.

And the front side about ready to finish. Again the corner guards shaped and in place, The stand offs glued down where the speaker plate, and the solar charge display will mount, along with the recess on either corner where the hands tuck in when he pulls himself into a cube shape. And thats about it for now. more later, and Thanks for the interest and for looking! 

Doug

When Life Hands You A Bucket Of Lemons...

Make Lemonade!

Then Sell It Back At $2 Bucks A Glass...

  • Member since
    October 2008
  • From: Georgia
Posted by Rigidrider on Monday, March 19, 2018 8:07 AM

Morning! More WIP from yesterday...

OK, The trim around the top is a poly vinal 11/16 corner trim, shaped and sanded thinner on the belt sander, The arm clevis slots, show in some pictures to be a rubber(?) type debris/weather stripping and in some a hair type. I could find neither that I thought I could use, so I glued strips of .010 X .250 plastic on both top and bottom then trimmed with a 1/16 round plastic piece. 

The disc near the back is a pivot pin cap, where his body would pivot back to open, when the load is deposited. I used super glue gel around the disc to simulate welding.

A back side view, I still need to make 2 small cylinders , 1 on either side of the hatch, but will wait until arms are made, which are also cylinders and do all 4 at the same time. Thanks again for looking...

Doug

When Life Hands You A Bucket Of Lemons...

Make Lemonade!

Then Sell It Back At $2 Bucks A Glass...

  • Member since
    November 2009
  • From: SW Virginia
Posted by Gamera on Monday, March 19, 2018 11:12 AM

Wow, you're making great progress there Doug! Yes


Ah one day I'll have to try scratchbuilding a 1/6th or so figure of one of my favorite robots- HK-47... 

"I dream in fire but work in clay." -Arthur Machen


  • Member since
    October 2008
  • From: Georgia
Posted by Rigidrider on Tuesday, March 20, 2018 5:57 PM

Evening all!

Thanks Cliff... Hes coming along. I just have to try not to get too far ahead with my thinking and forget where I'm at now! lol... Any way,

I got some paint on him today. Krylon makes a very close what I call "School Bus Yellow" and for all intents... I think it'll do just fine.

There are several areas where I thought water and such would collect and likely cause a heavy rust condition, so I took a mist of lacquer thinner through the air brush and wrinkled the paint. I'm not real concerned with the "Finish and coverage" being Wall-E is around 700 yrs old. Hes going to be as you know fairly dirty and rusty any way.

Well apologizes, but I got carried away with the front door and had it made, installed and painted before taking a picture. The front door was made from an old lid from a Lasagna tray, thin and light weight material, but strong enough to work with. I left enough over hang to be able to "Fold" the edges all around to give it a bit more strength. Every picture of Wall-e I've seen has a dent in the door. Mine is a tad low, but I think it'll be OK. Any how, we'll let this set until morning and do some more work then if possible! Thanks again for looking and Take care!

Doug

When Life Hands You A Bucket Of Lemons...

Make Lemonade!

Then Sell It Back At $2 Bucks A Glass...

  • Member since
    December 2002
  • From: Bury St Edmunds, Suffolk, England
Posted by Bish on Wednesday, March 21, 2018 3:54 AM

Just catching up on this and thats some very impressive work there Doug.

I am a Norfolk man and i glory in being so


On the bench: Airfix 1/72nd Harrier GR.3/Fujimi 1/72nd Ju 87D-3

  • Member since
    October 2008
  • From: Georgia
Posted by Rigidrider on Wednesday, March 21, 2018 5:26 PM

Thanks Bish! Your kind words are appreciated... A bit more today,

Starting on the front, The speaker louvers are an old modem box, cut, sanded, reglued and shaped to fit, then a red button added for the record function. The solar disply is a piece of .093 plastic, clear, painted on the back side as close as I could mix to chartruce green, after drying, I flipped it over, taped off the bars, and painted flat black. When dry enough, I lettered with some dry transfer letters. The little sun symbol is a dot of air brushed yellow, and the sun "rays" are kill marks from a luftwaffe decal sheet with the national markings cut off.

OK, his name is applied bvia a piece of 2in masking tape with the name laid out on it with striping tape about 3/32 in, then cut with a new #11 blade and sprayed black. The circle was laid out the same but with a circle cutting compass, sprayed white, then when dry, the letter was laid out and resprayed with red. The rest is trimmed out as close as I could using the pictures as a guide.

And thats about it for now... Thanks for looking!

Doug

When Life Hands You A Bucket Of Lemons...

Make Lemonade!

Then Sell It Back At $2 Bucks A Glass...

  • Member since
    January 2006
  • From: California
Posted by SprueOne on Wednesday, March 21, 2018 9:09 PM

Your resourcefulness, skills, and rate of progress are inspiring.


Anyone with a good car don't need to be justified - Hazel Motes


Iron Rails 2015 by Wayne Cassell Weekend Madness sprueone

  • Member since
    December 2002
  • From: Bury St Edmunds, Suffolk, England
Posted by Bish on Thursday, March 22, 2018 3:11 AM

What really impressers me is the imagination to see something and thing that could be used for such and such. That is amazing work Doug.

I am a Norfolk man and i glory in being so


On the bench: Airfix 1/72nd Harrier GR.3/Fujimi 1/72nd Ju 87D-3

  • Member since
    October 2008
  • From: Georgia
Posted by Rigidrider on Thursday, March 22, 2018 8:55 PM

Sprue one, Thank you so very kindly for the encouragement and kind words. I do  try not to get too long winded, but there are sometimes things I can explane to help, or just maybe give ideas to like so many that I learned from over the years.

Bish... Also... Thank you kindly. You are one of the first folks that I had any dealings with when I joined the forums, and I do hold your comments and such, in high reguard. Like many folks, I learned over my near 50 years of working (professionely) in my career, many ways to do things correctly, incorrectly and to get you by. I apply much of that to my hobby of choice! lol... Thank you kindly...

Any way, I started to make his arms today, which are the cylinders mentioned earlier, and my blasted band saw broke. So... Until the parts to repair it arrive in a day or two, I'm going to attempt to make an acceptable Hal, his little cockroach buddy. 

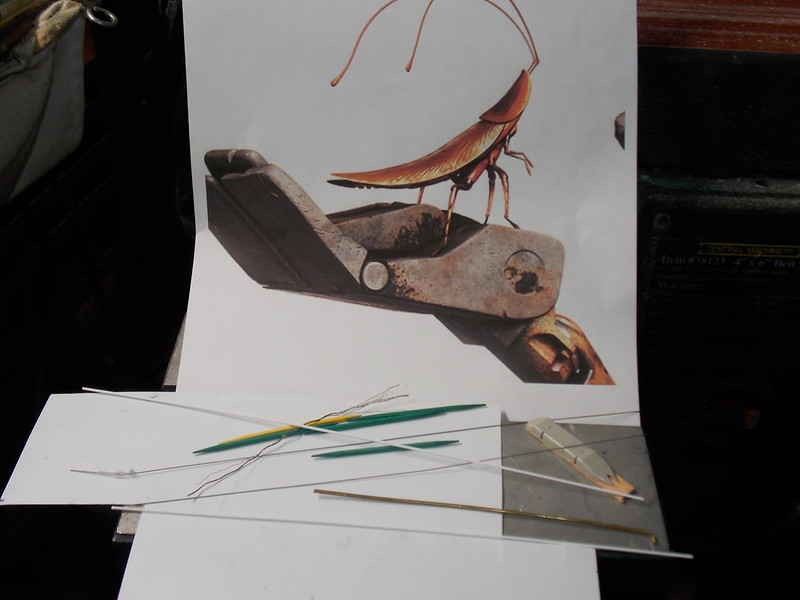
OK, I think what I've rounded up here will do...

OK , to start I'm using a trimmed popcicle stick and some old spare part box airplane parts to make the body, and some tooth picks for legs. The legs are glued together and on with one of those "Ultra Violet" epoxy deals you order on the TV. Just put a bit of the clear epoxy on the joint and shine the supplied ultra violet light on it and it sets hard and fast. Very handy.

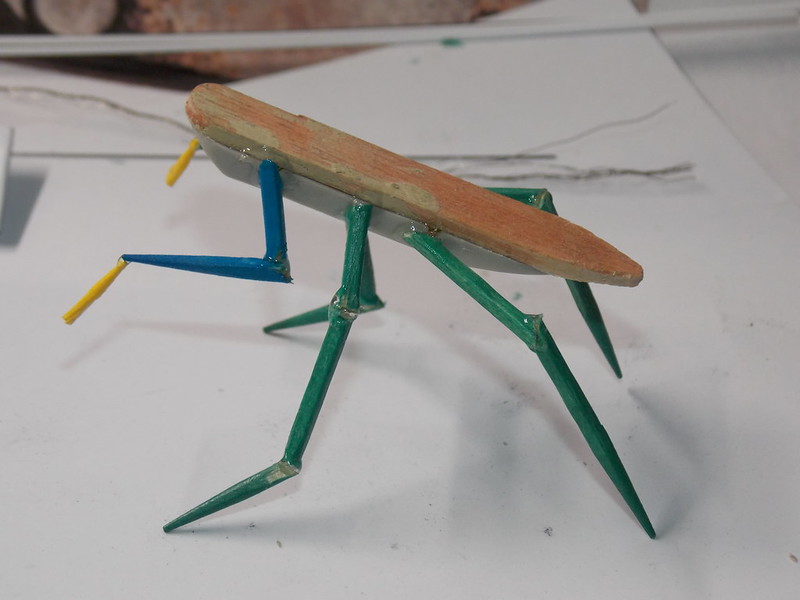
Got his little ole front legs on..

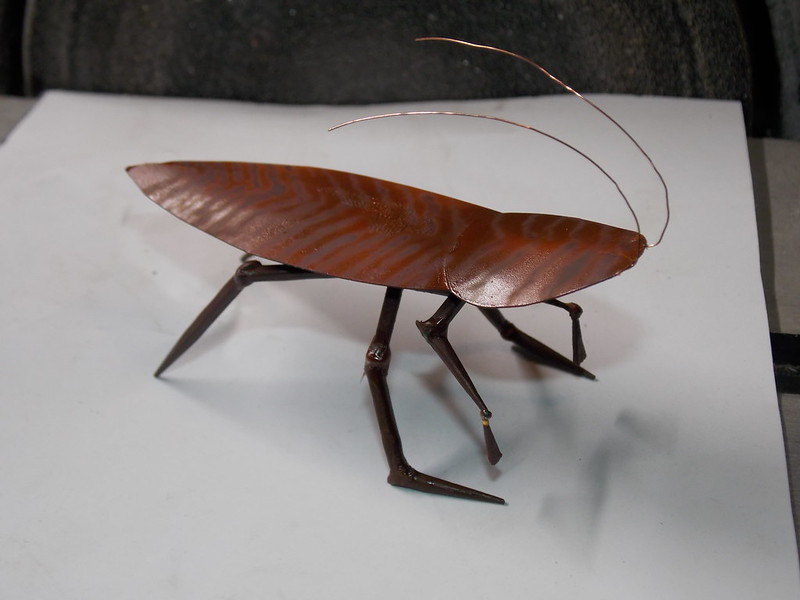
And some folded .010 plastic for the head and wings, a dab of paint airbrushed on, some copper wire for the feelers, and I believe hes about done.

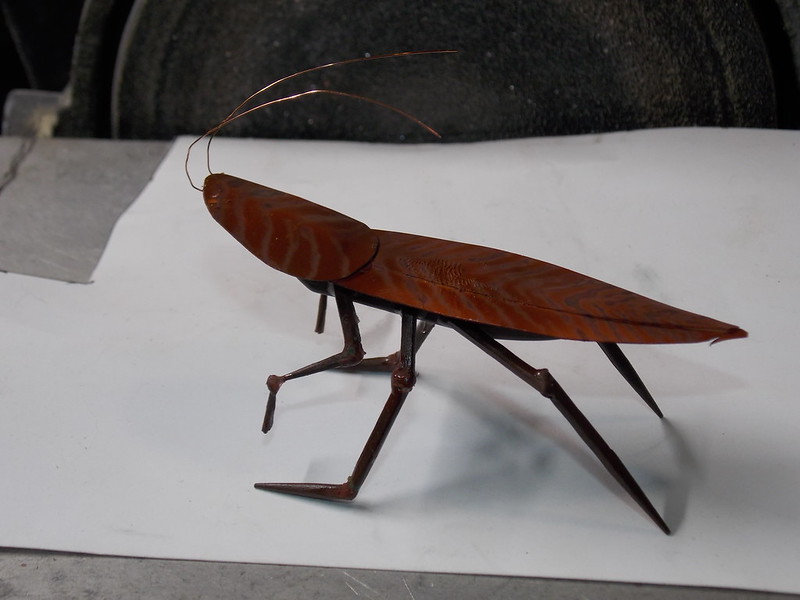
And hes done... Well, I wanted to start on the tracke when the track arrives tomorrow (per the tracking number) but with the saw being down, maybe I can start the rusting and weathering. Thanks all... Take care...

Doug

When Life Hands You A Bucket Of Lemons...

Make Lemonade!

Then Sell It Back At $2 Bucks A Glass...

  • Member since
    November 2009
  • From: SW Virginia
Posted by Gamera on Saturday, March 24, 2018 10:18 AM

Oh awesome job there on Hal!

"I dream in fire but work in clay." -Arthur Machen


  • Member since
    October 2008
  • From: Georgia
Posted by Rigidrider on Saturday, March 24, 2018 1:53 PM

Thank you Cliff... I mean , where would Wall-e be without his buddy! lol...

Well, My band saw parts haven't made it yet, so yesterday I started the rusting, chipping and wearhering. I was up at about 05:00 this morning with coffee at hand finishing up what I could on the body...

And thats about where we're at for now... Have a good weekend all! Thanks again...

Doug

When Life Hands You A Bucket Of Lemons...

Make Lemonade!

Then Sell It Back At $2 Bucks A Glass...

  • Member since
    April 2003
  • From: USA
Posted by keavdog on Saturday, March 24, 2018 3:14 PM

Nice job!  I found this poked around online. Lifesize rc wall-e


https://www.google.com/amp/s/www.theverge.com/platform/amp/2013/8/5/4590092/pixar-wall-e-life-sized-robot-replica?source=images

Thanks,

John

  • Member since
    February 2018
Posted by RinnyR on Saturday, March 24, 2018 3:50 PM

Doug, blown away tracking this project. Truly amazing and inspiring! Thanks for taking us along for the ride!

JOIN OUR COMMUNITY!

Our community is FREE to join. To participate you must either login or register for an account.

SEARCH FORUMS
FREE NEWSLETTER
By signing up you may also receive reader surveys and occasional special offers. We do not sell, rent or trade our email lists. View our Privacy Policy.