SEARCH FINESCALE.COM

Enter keywords or a search phrase below:

Anyone Up for a Star trek Group build?

31679 views
137 replies
1 rating 2 rating 3 rating 4 rating 5 rating
  • Member since
    September 2003
  • From: USA
Posted by Prince of Styrene II on Friday, May 29, 2009 9:02 AM
Oh yea, far better than mine ever was!  She's looking brilliant!

"Hold the weapons, Daddy. I'm going to go get my monkeys." The Dutchess of Styrene

  • Member since
    August 2005
  • From: vernon hills illinois
Posted by sumpter250 on Wednesday, May 27, 2009 12:11 PM

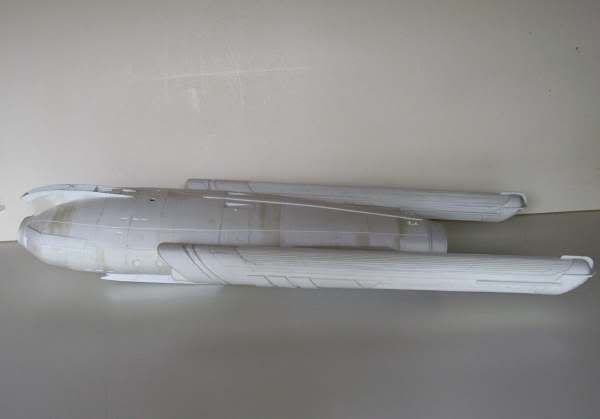
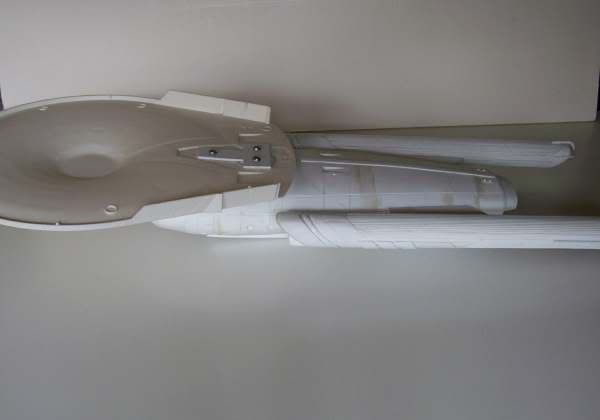
This shot is the secondary hull, with warp nacelles attached; 

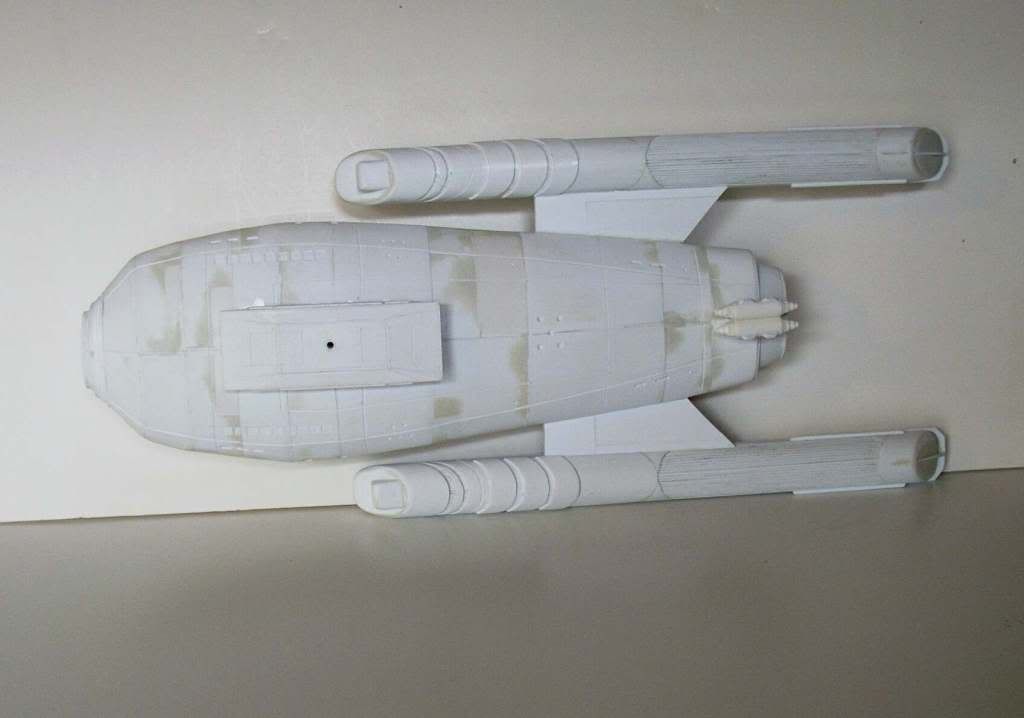
Bottom view of secondary hull and nacelles; 

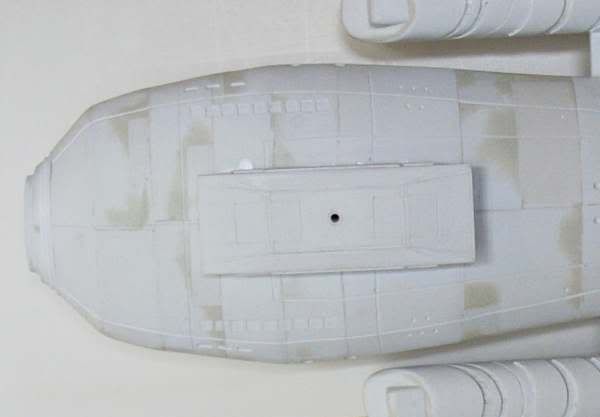
The hole in the center of the photon torp bay, is for the 1/8" steel rod that supports the model on the display base. You can also see the 18 "windows" of the botanical section; 

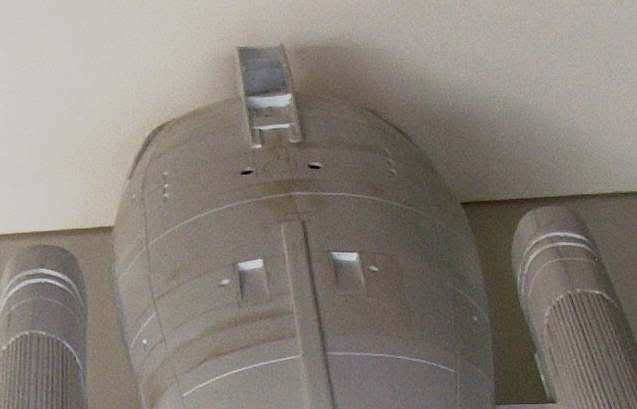
This is the top view, looking forward, of the secondary hull, and warp nacelles; 

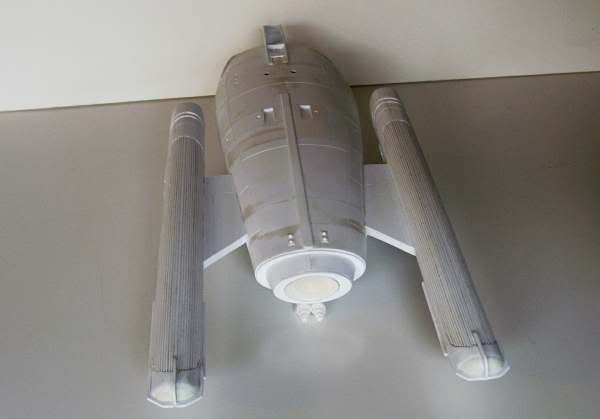
The two holes aft of the pylon in this shot, are for the screws that will attach the prinary hull's lower section, to the secondary hull. There is a third screw hole between the horizontal, and vertical pylon cross braces. This is the last shot of the secondary hull, by itself. I will be permanently attaching the primary hull, and begin detailing it.

Primary hull lower half, with styrene "reinforcements" and the three mounting screws; 

This closeup shot shows the screws in place with the reinforcements;  


Lead me not into temptation ..................I can find it myself

  • Member since
    August 2005
  • From: vernon hills illinois
Posted by sumpter250 on Wednesday, May 27, 2009 1:36 AM
One of these years, I really need to get my____ to wonderfest!

Lead me not into temptation ..................I can find it myself

  • Member since
    January 2003
Posted by Archangel on Tuesday, May 26, 2009 10:38 PM
Not much to update so far. I only have just started  to get some of the parts going together. I am doing a Romulan ship from the Adversary Set since the BOP needs more work then I can give it after Wonderfest.
  • Member since
    August 2005
  • From: vernon hills illinois
Posted by sumpter250 on Monday, May 18, 2009 11:38 PM
I will take that as very high compliment indeed!

Lead me not into temptation ..................I can find it myself

  • Member since
    September 2003
  • From: USA
Posted by Prince of Styrene II on Monday, May 18, 2009 11:34 PM
I bow to your superior Kodiak build!  Far better than mine ever was.

"Hold the weapons, Daddy. I'm going to go get my monkeys." The Dutchess of Styrene

  • Member since
    August 2005
  • From: vernon hills illinois
Posted by sumpter250 on Monday, May 18, 2009 11:21 PM

Some progress; the secondary hull has panel lines scribed in, the warp nacelles are just a few details away from being complete. Fairly soon now I'll be able to attach the primary hull, and begin detailing there. I'm not looking forward to "first primer", where I finally "see" all the defects, and blemishes.......but......they won't get fixed unless I can see them soooo....

shot from above the starboard quarter. 

Aft nav deflector, built up from a plastic spoon. 

upper secondary hull details. 

low angle starboard quarter. 

Starboard side. 


I spent the better part of Sunday doing the full scale drawing of the three tube(forward, and aft) photon torbedo bay, which will mount under the forward part of the secondary hull. The warp nacelles used almost forty strips of .030" X .030" styrene strips....Evergreen Styrene will be "green" for a bit longer now! What use I've made of the Apoxie Sculpt, has come out well! I still have some learning to do with that medium. I'll ask the dumb question for the day- is there a specific Aztec pattern for each class of vessel?.....or can I just "fake it"? There's not a lot of photo reference for the Kodiak Class Battleships.

I'm looking at a possible "Command Cruiser" for my next kitbash Star Fleet vessel. There's a couple of others that are interesting, and I have a few kits in stock. 

Lead me not into temptation ..................I can find it myself

  • Member since
    August 2005
  • From: vernon hills illinois
Posted by sumpter250 on Saturday, May 9, 2009 12:49 PM
Nothing like throwing a little "junkbuild" in with the scratch. :) :)

Lead me not into temptation ..................I can find it myself

  • Member since
    September 2003
  • From: USA
Posted by Prince of Styrene II on Saturday, May 9, 2009 9:52 AM
That is looking superb!!  And I love the idea for using the Wendy's spoons!  Fabulous!!  Oddly enough, for my Kodiak build, the main deflector was the protective cap you find on top of deodarant!

"Hold the weapons, Daddy. I'm going to go get my monkeys." The Dutchess of Styrene

  • Member since
    August 2005
  • From: vernon hills illinois
Posted by sumpter250 on Friday, May 8, 2009 4:29 PM

A little progress:

Here's the secondary hull and warp nacelles. The description in Jackill's, states "the extended secondary hull, is attached directly to the primary hull".  there is a small "pylon" that seems to be indicated in the drawings, that is what has been modeled.

Here, again everything placed together:

and finally, here are the two pylons with megaphasers, that are the end supports for the "wing" and upper photon torpedo tubes(seen in the above photo in the "Reliant" mode), and the forward, and aft deflector housings. The actual deflector, are cut from the bowls of "Wendy's" plastic spoons! (the chili, and baked potato were good, the inspiration even better)


Lead me not into temptation ..................I can find it myself

  • Member since
    September 2003
  • From: USA
Posted by Prince of Styrene II on Saturday, April 25, 2009 11:39 PM
Nice!  Looking really good & I like the bomber, too.

"Hold the weapons, Daddy. I'm going to go get my monkeys." The Dutchess of Styrene

  • Member since
    August 2005
  • From: vernon hills illinois
Posted by sumpter250 on Saturday, April 25, 2009 11:37 PM

Progress at last! Here's the secondary hull, and warp nacelles with a skin of styrene.

The small craft is a 1:555 scale two man heavy fighter bomber, and is the original. I've built it in 1:72, and in 1:48

this is the 1:48 version


Next up is to fill in the gaps and voids with Apoxie sculpt. What would be the best "solvent" fro use with the Apoxie sculpt. I've used Squadron green, and white, with Testors liquid plastic cement as a solvent, but I haven't used the Apoxie sculpt before. 

Lead me not into temptation ..................I can find it myself

  • Member since
    September 2003
  • From: USA
Posted by Prince of Styrene II on Friday, April 10, 2009 11:29 AM
Darn fine progress there, sumpter!!

"Hold the weapons, Daddy. I'm going to go get my monkeys." The Dutchess of Styrene

  • Member since
    January 2003
Posted by Archangel on Thursday, April 9, 2009 8:07 PM
Just getting started with the kitbashing of the Warbird from the 3 ship adversary set. No pictures yet but I'll try to get them on soon. It's not going to be that much of a change to the kit. Just leaving the lower part off and changeing the head and hopefully I'll have new engines to mount sometime before this group build is done.
  • Member since
    August 2005
  • From: vernon hills illinois
Posted by sumpter250 on Thursday, April 9, 2009 11:47 AM

Well, look on the bright side, soon you'll be able to recreate the Kodiak in 1/1000!!

Or.....scratchbuild it in 1/530............whoa, did I just say that!

 In this first photo, the partially skinned secondary hull, and the beginnings of the warp nacelles. The nacelles started with 0.9xxxx" Estes rocket body tubes. I've started layering on the styrene, and will "bulk up" the ends before shaping them, and adding detail.  

in this photo, I keep the project "assembled" as I go, it helps maintain proportion, and keeps me focused on the end product. I will try to include this positioning of parts, right up to the end. the supports used to hold thing in place will eventually become the "jig" for the final assembly, so that everything stays in the right relationship to the other parts.

Lead me not into temptation ..................I can find it myself

  • Member since
    September 2003
  • From: USA
Posted by Prince of Styrene II on Thursday, April 9, 2009 9:00 AM

 sumpter250 wrote:
Taegu is coming along well! I'll ask the dumb question,what is Aves? Is that Apoxie Sculpt?

Thank you!

Yes, Aves is the company that makes Apoxie Sculpt.  I was just too lazy to type two words! Big Smile [:D]

The Enterprise E kit is a 1/1400 scale kit. I was really hoping to build in 1/537 (1/530, 1/550) scale to go along with Farragut, Firestone, and eventually Kodiak.

Well, look on the bright side, soon you'll be able to recreate the Kodiak in 1/1000!! Cool [8D]

"Hold the weapons, Daddy. I'm going to go get my monkeys." The Dutchess of Styrene

  • Member since
    August 2005
  • From: vernon hills illinois
Posted by sumpter250 on Wednesday, April 8, 2009 1:48 PM

Taegu is coming along well! I'll ask the dumb question,what is Aves? Is that Apoxie Sculpt?

The Enterprise E kit is a 1/1400 scale kit. I was really hoping to build in 1/537 (1/530, 1/550) scale to go along with Farragut, Firestone, and eventually Kodiak.

Speaking of Kodiak, I finally gave up on individual plates for the secondary hull. Instead, I'm wrapping sections top centerline to bottom centerline, covering two to four frames, depending on the severity of curve and part shape. The secondary is about half "skinned". I'll sand smooth all the joints, and putty where necessary, and then scribe in the plate boundries, and "inlet" any of the detail that goes deeper than the thickness of the hull material. The forms for the engine nacelles will be Estes rocket body tubes (0.9xxxxx" dia.). I'll wrap them in styrene same as the hull. I'll try to get a progress photo up tonight.

Lead me not into temptation ..................I can find it myself

  • Member since
    September 2003
  • From: USA
Posted by Prince of Styrene II on Wednesday, April 8, 2009 11:10 AM

Here's a couple pics.  Not much, but I'm liking how the shuttlebay is turning out.

http://i239.photobucket.com/albums/ff5/Prince_of_Styrene_II/USS%20Taegu/saucer_sand.jpg

I filled the saucer's rim with Aves & sanded down. You can see some Aves on the far side to be sanded.


http://i239.photobucket.com/albums/ff5/Prince_of_Styrene_II/USS%20Taegu/shuttlebay1.jpg

Taking a cue from the Intrepid class, I decided to add an off-center shuttlebay & EVA door along with a landing pad platform, which still needs to be glued on. The outer wall & grooved door is two layers of sheet. The top still needs to have the Aves sanded down. 

"Hold the weapons, Daddy. I'm going to go get my monkeys." The Dutchess of Styrene

  • Member since
    September 2003
  • From: USA
Posted by Prince of Styrene II on Tuesday, April 7, 2009 2:19 PM
Just a quick post before I jet off to work to say that I've been working on my build.  Worked on sandign down the saucer edges, the joint between the neck & the saucer & working on building a shuttlebay door & landing strip ala Voyager.  Looking good so far.  I'll try to snap off a few shots tonight after work.

"Hold the weapons, Daddy. I'm going to go get my monkeys." The Dutchess of Styrene

  • Member since
    September 2003
  • From: USA
Posted by Prince of Styrene II on Sunday, April 5, 2009 11:13 AM

Here's Cult's page in his hobbyshop so you can see the box art.  $22 is about your average price.

http://www.culttvmanshop.com/shop/product.php?productid=16854&cat=361&page=3


"Hold the weapons, Daddy. I'm going to go get my monkeys." The Dutchess of Styrene

  • Member since
    August 2005
  • From: vernon hills illinois
Posted by sumpter250 on Sunday, April 5, 2009 10:40 AM
Sweet! By the time I've finished Kodiak, I should have been able to save aside enough for two of them.........yeah, I should be careful what I wish for!

Lead me not into temptation ..................I can find it myself

  • Member since
    September 2003
  • From: USA
Posted by Prince of Styrene II on Sunday, April 5, 2009 8:22 AM
 sumpter250 wrote:
I also found this, the "Kodiak B":

shipschematics.net/startrek/images/federation/battleship_kodiak_upgrade.jpg I would need two Enterprise "E" ( "Nemesis" ) kits to bash this one. Are these available?

Yes they are!  Round 2 (formerly Polar Lights) has re-released the E-E within the last 2-3 months.  You can find them at you friendly neighborhood LHS.

"Hold the weapons, Daddy. I'm going to go get my monkeys." The Dutchess of Styrene

  • Member since
    August 2005
  • From: vernon hills illinois
Posted by sumpter250 on Saturday, April 4, 2009 2:40 PM

Found this, yesterday. It's the Jackill's drawing, on the shipschematics.net site:

shipschematics.net/startrek/images/federation/battleship_kodiak.jpg 

I also found this, the "Kodiak B":

shipschematics.net/startrek/images/federation/battleship_kodiak_upgrade.jpg I would need two Enterprise "E" ( "Nemesis" ) kits to bash this one. Are these available?

Lead me not into temptation ..................I can find it myself

  • Member since
    August 2005
  • From: vernon hills illinois
Posted by sumpter250 on Tuesday, March 31, 2009 2:04 PM

Wow. I am amazed. Not in a million years could I do something that cool. Excellent work.

Well, there you have it, I knew there had to be some benefit for living over a million years!

Thanks! the best is yet to come.......I've done the "woodwork" before, adding the styrene skin, that is totally new territory, and I'll be inventing the "technique" as I go. For those interested, the original drawing for this project is in Jackill's Star Fleet Reference Manual, ships of the fleet, Vol II. the conversion factor is 3.572 X the Jackill's drawings. I used the width of the primary hull, of the Reliant kit, and the drawing to determine sizes. (Oh No! Highschool math!!, having some real use???!!!!!)

Lead me not into temptation ..................I can find it myself

  • Member since
    May 2008
  • From: Wherever the hunt takes me
Posted by Boba Fett on Tuesday, March 31, 2009 11:06 AM
Wow. I am amazed. Not in a million years could I do something that cool. Excellent work.

  • Member since
    September 2003
  • From: USA
Posted by Prince of Styrene II on Monday, March 30, 2009 3:57 PM
Great ribbing there!!  Looking forward to the rest of your progress.

"Hold the weapons, Daddy. I'm going to go get my monkeys." The Dutchess of Styrene

  • Member since
    August 2005
  • From: vernon hills illinois
Posted by sumpter250 on Monday, March 30, 2009 1:19 PM

The easy part is done, the patterns have been cut out and assembled into the subframe of the Kodiak's secondary hull. Once the glue has thoroughly set, I can begin "fairing in", sanding the high spots off, and adding the taper to each of the frames. The hard part? applying the styrene "skin". I have to go back to the Jackill's drawings, and begin laying out the hull panels, on the actual hull, to determine the individual sizes for the "plates" (this is going to be......fun?)

The picture shows the major components, in their basic relationship to each other. The warp nacelles are from the Reliant kit, and will have to be replaced with scratch built parts made up from the drawings.

Lead me not into temptation ..................I can find it myself

  • Member since
    August 2005
  • From: vernon hills illinois
Posted by sumpter250 on Saturday, March 28, 2009 4:24 PM

Well, I stated I was in, so this is the final commitment.......

The drawings have been glued to sheets of 3/32" Basswood. I now have to cut out each pattern, and assemble the subframe. Once that is done, I can start adding the styrene stringers, and then begin the (hopefully) plate-on-frame secondary hull construction. I say "hopefully", because I've never tried this method of construction. What I intend, is horizontal styrene strip "stringers", that will provide support,and attachment points for styrene, cut-and-formed individual hull plates. The overall size and shape of the hull seems to be "smooth enough" to permit this, and I believe I can get the proper shape, in styrene, by using this method. You'll know soon enough if it fails.


Lead me not into temptation ..................I can find it myself

  • Member since
    September 2003
  • From: USA
Posted by Prince of Styrene II on Tuesday, March 17, 2009 10:37 AM
No pictures yet, but I did a bit of work on my ship last night.  There's some holes on the neck's side that needed filled, which I did with scrap styrene & Aves.  I also trimmed down some other greebles to add some hull shape to the neck as well.  When I sand down the Aves, I'll post some pics.

"Hold the weapons, Daddy. I'm going to go get my monkeys." The Dutchess of Styrene

  • Member since
    August 2005
  • From: vernon hills illinois
Posted by sumpter250 on Friday, March 13, 2009 12:14 PM

.......stuff/master3a_100.jpg

Once I actually start the project, I'll have to copy that to my signature......or.....when you see that in my signature,....you'll know I've actually started working on the project! :) :) 

Lead me not into temptation ..................I can find it myself

JOIN OUR COMMUNITY!

Our community is FREE to join. To participate you must either login or register for an account.

SEARCH FORUMS
FREE NEWSLETTER
By signing up you may also receive reader surveys and occasional special offers. We do not sell, rent or trade our email lists. View our Privacy Policy.