SEARCH FINESCALE.COM

Enter keywords or a search phrase below:

The Endless Nausicaa Model Thread

57667 views
335 replies
1 rating 2 rating 3 rating 4 rating 5 rating
  • Member since
    May 2011
  • From: Honolulu, Hawaii
Posted by Real G on Monday, July 5, 2021 12:24 PM

Okie-dokie, we had more progress over the weekend.  Fabrication of the canopy gave me concerns because of the extensive framing.  I had thought about cheating by making an eggcrate latticework filled with clear UV resin.  This would allow for precise shaping while providing a robust structure that could take a lot of abuse.

Most of the assembly was banged out in one evening.  I re-did the forward section framing a bit, but I am happy now.  The canopy still needs a few frames below the "belt line" and a bottom strip to allow integration with the fuselage.  But so far, so good.

The rear panel will have a pair of MG positions ala Ju-88, and the roof will have an open gun position.

“Ya ya ya, unicorn papoi!”

  • Member since
    May 2011
  • From: Honolulu, Hawaii
Posted by Real G on Monday, July 5, 2021 12:15 PM

Tanker-Builder

Hi;

     Every time I look at that ship I am waiting for those BIG Muscular looking wings to Flap! That thing is awesome!


Ha ha!  Nah TB, the sound you are hearing is metal fatigue!  Surprise

“Ya ya ya, unicorn papoi!”

  • Member since
    October 2019
  • From: New Braunfels, Texas
Posted by Tanker-Builder on Monday, July 5, 2021 10:24 AM

Hi;

     Every time I look at that ship I am waiting for those BIG Muscular looking wings to Flap! That thing is awesome!

  • Member since
    November 2009
  • From: SW Virginia
Posted by Gamera on Friday, July 2, 2021 4:11 PM

HURRAH!!! Yes

"I dream in fire but work in clay." -Arthur Machen


  • Member since
    May 2011
  • From: Honolulu, Hawaii
Posted by Real G on Thursday, July 1, 2021 1:18 PM

So the landing gear sponsons are finally permanently attached!

It's a seemingly insignificant step, but it is a milestone.  I was feeling pretty good about it, so decided to start roughing out the canopy, something I dreaded doing.

I used an old business card to make a template to establish basic dimensions.  The template represents the mid-level set of horizontal framing, which is where the canopy is widest.  It overhangs the fuselage to provide downward facing windows.  The current plan is to build up the framing like an eggcrate, paint it black, then fill the recesses with UV resin to form the window panes.  That's the plan, Ripley.

“Ya ya ya, unicorn papoi!”

  • Member since
    May 2011
  • From: Honolulu, Hawaii
Posted by Real G on Wednesday, June 30, 2021 1:10 PM

Thanks for stopping by Tanker-Builder, glad you are enjoying the ride!  Yes, the Bakagalas is strange - it looks like a bobtailed Me-321 Gigant made out of hand wrought pig iron.  Lessons learned from this project will be applied to other equally weird closet projects from 30 years ago.  I'll need to speed things up, since I don't think I have 33 more years left!

“Ya ya ya, unicorn papoi!”

  • Member since
    October 2019
  • From: New Braunfels, Texas
Posted by Tanker-Builder on Wednesday, June 30, 2021 7:51 AM

Bacagalas in Vegas?

      That sounds Ominous. Is that some kind of modelers Disease? Wherein All the models are strange 100% scratchbuilt Spaceships the likes of which I have never seen before but totally love watching being Built!!

 I mean c'mon what's not to like, no love, here?

  • Member since
    May 2011
  • From: Honolulu, Hawaii
Posted by Real G on Tuesday, June 29, 2021 5:02 PM

Armornut,

I am steaming full power to get this thing across the finish line.  The next milestone is permanently attaching the landing gear sponsons, which after inspecting them last night, appears to be doable this week.  After that, the canopy is the final hurdle to overcome.  Well, that and some more grills, patches, and lots and lots of rivet decals!

I'm debating whether or not to lower the "Dome of Secrecy" during the final finishing steps, but that would just be hyping.  Big Smile

Edit:  I'll be off work for the last four days before Zero Hour, so a blackout may be inevitable, since I don't have a computer at home.  Surprise

“Ya ya ya, unicorn papoi!”

  • Member since
    March 2007
  • From: Northeast WA State
Posted by armornut on Tuesday, June 29, 2021 3:13 PM

   Groovy maan groovy, looking forward to seeing this come to fruition. Maybe in Vegas but definitly here. Hang onto the *** Real G.

we're modelers it's what we do

  • Member since
    May 2011
  • From: Honolulu, Hawaii
Posted by Real G on Tuesday, June 29, 2021 1:34 PM

Thanks Gamera, but those compass hole-pokes have to go!  The consistency of the spacing was highly inconsistent as I got progressively more bored!  Stick out tongue

I was thinking about how to make half-moon recessed foot wells that lead up to the forward fuselage doors, and had a brain fart last night.  What I thought was a diffcult problem was, as that guy Ryan George would say, "super easy, barely an inconvenience".

I took an 0.040" styrene rod and notched half the tip.  It was set into a hole drilled into the fuselage and cemented in place.  Just have to sand them flush with the fuselage.  There's an easy way and a hard way to do things.  I usually try the hard way first, but not this time!  Big Smile

“Ya ya ya, unicorn papoi!”

  • Member since
    November 2009
  • From: SW Virginia
Posted by Gamera on Tuesday, June 29, 2021 10:42 AM

I dunno, it all looks very cool to me G!

"I dream in fire but work in clay." -Arthur Machen


  • Member since
    May 2011
  • From: Honolulu, Hawaii
Posted by Real G on Monday, June 28, 2021 1:33 PM

I don't have much to report on, just been busy filling and sanding away 33 year old rivet divots to make way for the waaaay nicer Archer rivet decals.

While the putty dries, I have been dropping in more vent details and drilling out windows.

Yes, one of the windows was off, so it had to be plugged and re-drilled.  I'm a measure one-cut twice kind of guy.

I was thinking about how to make small fairings and hit upon the idea of using the tip of a small electronics screwdriver.  By heat plunging the screwdriver tip, I was able to easily make teeny oval fairings.

I used a razor blade to slice off the tip, and after a small amount of sanding on a 600 grit board, it was ready to use.

Hmmm... maybe a little over scale?  Perhaps I'll dig around and locate a bit of brass strip and file the tip down to make a smaller tool.

“Ya ya ya, unicorn papoi!”

  • Member since
    November 2009
  • From: SW Virginia
Posted by Gamera on Tuesday, June 22, 2021 7:16 PM

Very cool! Hope you keep on the jazz! 

"I dream in fire but work in clay." -Arthur Machen


  • Member since
    May 2011
  • From: Honolulu, Hawaii
Posted by Real G on Tuesday, June 22, 2021 3:06 PM

Thanks Gamera!  All the old rivets are now filled in and ready to be sanded.

Heh-heh, that rear door outlline was wa~ay off, so it had to be filled.  Embarrassed

Things will move faster once the sponsons are attached.  I am super jazzed that the model horsepower is once again flowing!

“Ya ya ya, unicorn papoi!”

  • Member since
    November 2009
  • From: SW Virginia
Posted by Gamera on Monday, June 21, 2021 6:22 PM

Great progress there G, enjoying watching the updates. 

"I dream in fire but work in clay." -Arthur Machen


  • Member since
    May 2011
  • From: Honolulu, Hawaii
Posted by Real G on Monday, June 21, 2021 1:20 PM

Another bit of work I was dreading was the filling of the rivet holes that were made 33 years ago.  They were not consistent, plus now there are really cool raised rivet decals.  Funny thing is that in several scenes from the movie, they are truly "baseball-sized"!  Surprise  Thinned putty was carefully painted over the rivets to begin the elimination process.

It went better than expected.  I'll do the right side tonight and sand them out tomorrow.  This work needs to be completed before the landing gear sponsons are permanently attached.

I made up some surface panel and grill detail this weekend, so I will begin adding them.

“Ya ya ya, unicorn papoi!”

  • Member since
    May 2011
  • From: Honolulu, Hawaii
Posted by Real G on Friday, June 18, 2021 12:37 PM

Ah yes, the old Star Trek scale debate.  Over on another forum, they are already playing out the usual sausage size contest over the scale of the recently announced 1/350 USS Grissom.  It will no doubt generate pages and pages of arguments, but I think they miss the point.  Like Tim Allen's character in "Galaxy Quest" said, it's just a movie - there is no ship, there is no quantum drive, no switching to auxilliary, etc, etc.  It's just a movie prop.  And the interior sets don't necessarily HAVE to match the miniature.  It's film fiction.  They need to get over it.  Super Angry

Okay to be honest, I took a look at the Polar Lights 1/350 K'Tinga, and yes, the "cobra" deck and connecting neck are too low for the crew to walk upright.  Yeah, OK.  But I will not engage in endless debate over why the stated scale, interior sets, etc cannot be resolved absolutely, perfectly forever and ever.  It's just a model kit.  And I still like it.  Big Smile

But back to the Bakagalas.  I was mildly surprised that a compromise scale unifying all the aircraft in the movie was possible at all, but it seems to work out.  And I like it.  Stick out tongue

“Ya ya ya, unicorn papoi!”

  • Member since
    November 2009
  • From: SW Virginia
Posted by Gamera on Friday, June 18, 2021 11:29 AM

Very cool! I wasn't sure if there was maybe a manga with blueprints or something like that you were using. Awesome that you made your own drawings!

And it's not the only subject with wildly varying scale. Someone calculated that the Klingon Bird of Prey on Trek would have to exist in eight different sizes to match what's been seen on screen. And yeah I know there's supposed to be two types- the B'Rel class scout and K'Vort class cruiser but that's still only two sizes.

"I dream in fire but work in clay." -Arthur Machen


  • Member since
    May 2011
  • From: Honolulu, Hawaii
Posted by Real G on Thursday, June 17, 2021 1:08 PM

Armornut - No problemo.  When it comes to quirky humor, I am ALWAYS there!  Big Smile

Gamera - There were no plans that I could find, nor were there any official dimensions, so yes I "winged" it!  Back in 1988 I made these sketches:

The sketches were freehanded with the focus only on getting the proportions about right.  I just decided on a desired span for the finished model and went with that.  I had originally decided the scale was 1/200, but I recently cross checked a bunch of stills from the movie and came up with a wingspan of 570 feet, making the model 1/250.

Anime is maddeningly difficult to pin down size, since they will often increase or decrease size for dramatic effect.  But I used the 1/72 Tsukuda/Bandai Nausicaa Gunship for reference, and calculated how large it would be in order to fit within the cargo hold, as seen in the movie.  When scaled to 1/200 I was dismayed to learn it would not fit!  So I just "moved the goal post" and set the scale to 1/250, which would allow a properly scaled Gunship to fit.

While performing the cross check, I calculated the Tolmekian Corvette would have a span of around 135 feet, and the Pejite Barge was around 160 feet.  What this means for me is that 1/72 models as I originally planned were out of the question, and they would be 1/144 scale instead.  At 1/250 scale, they would be too small for my taste.  I might keep the Pejite Gunship at 1/48, but I am inclined to match the Nausicaa Gunship in 1/72.  So many projects, so little time.

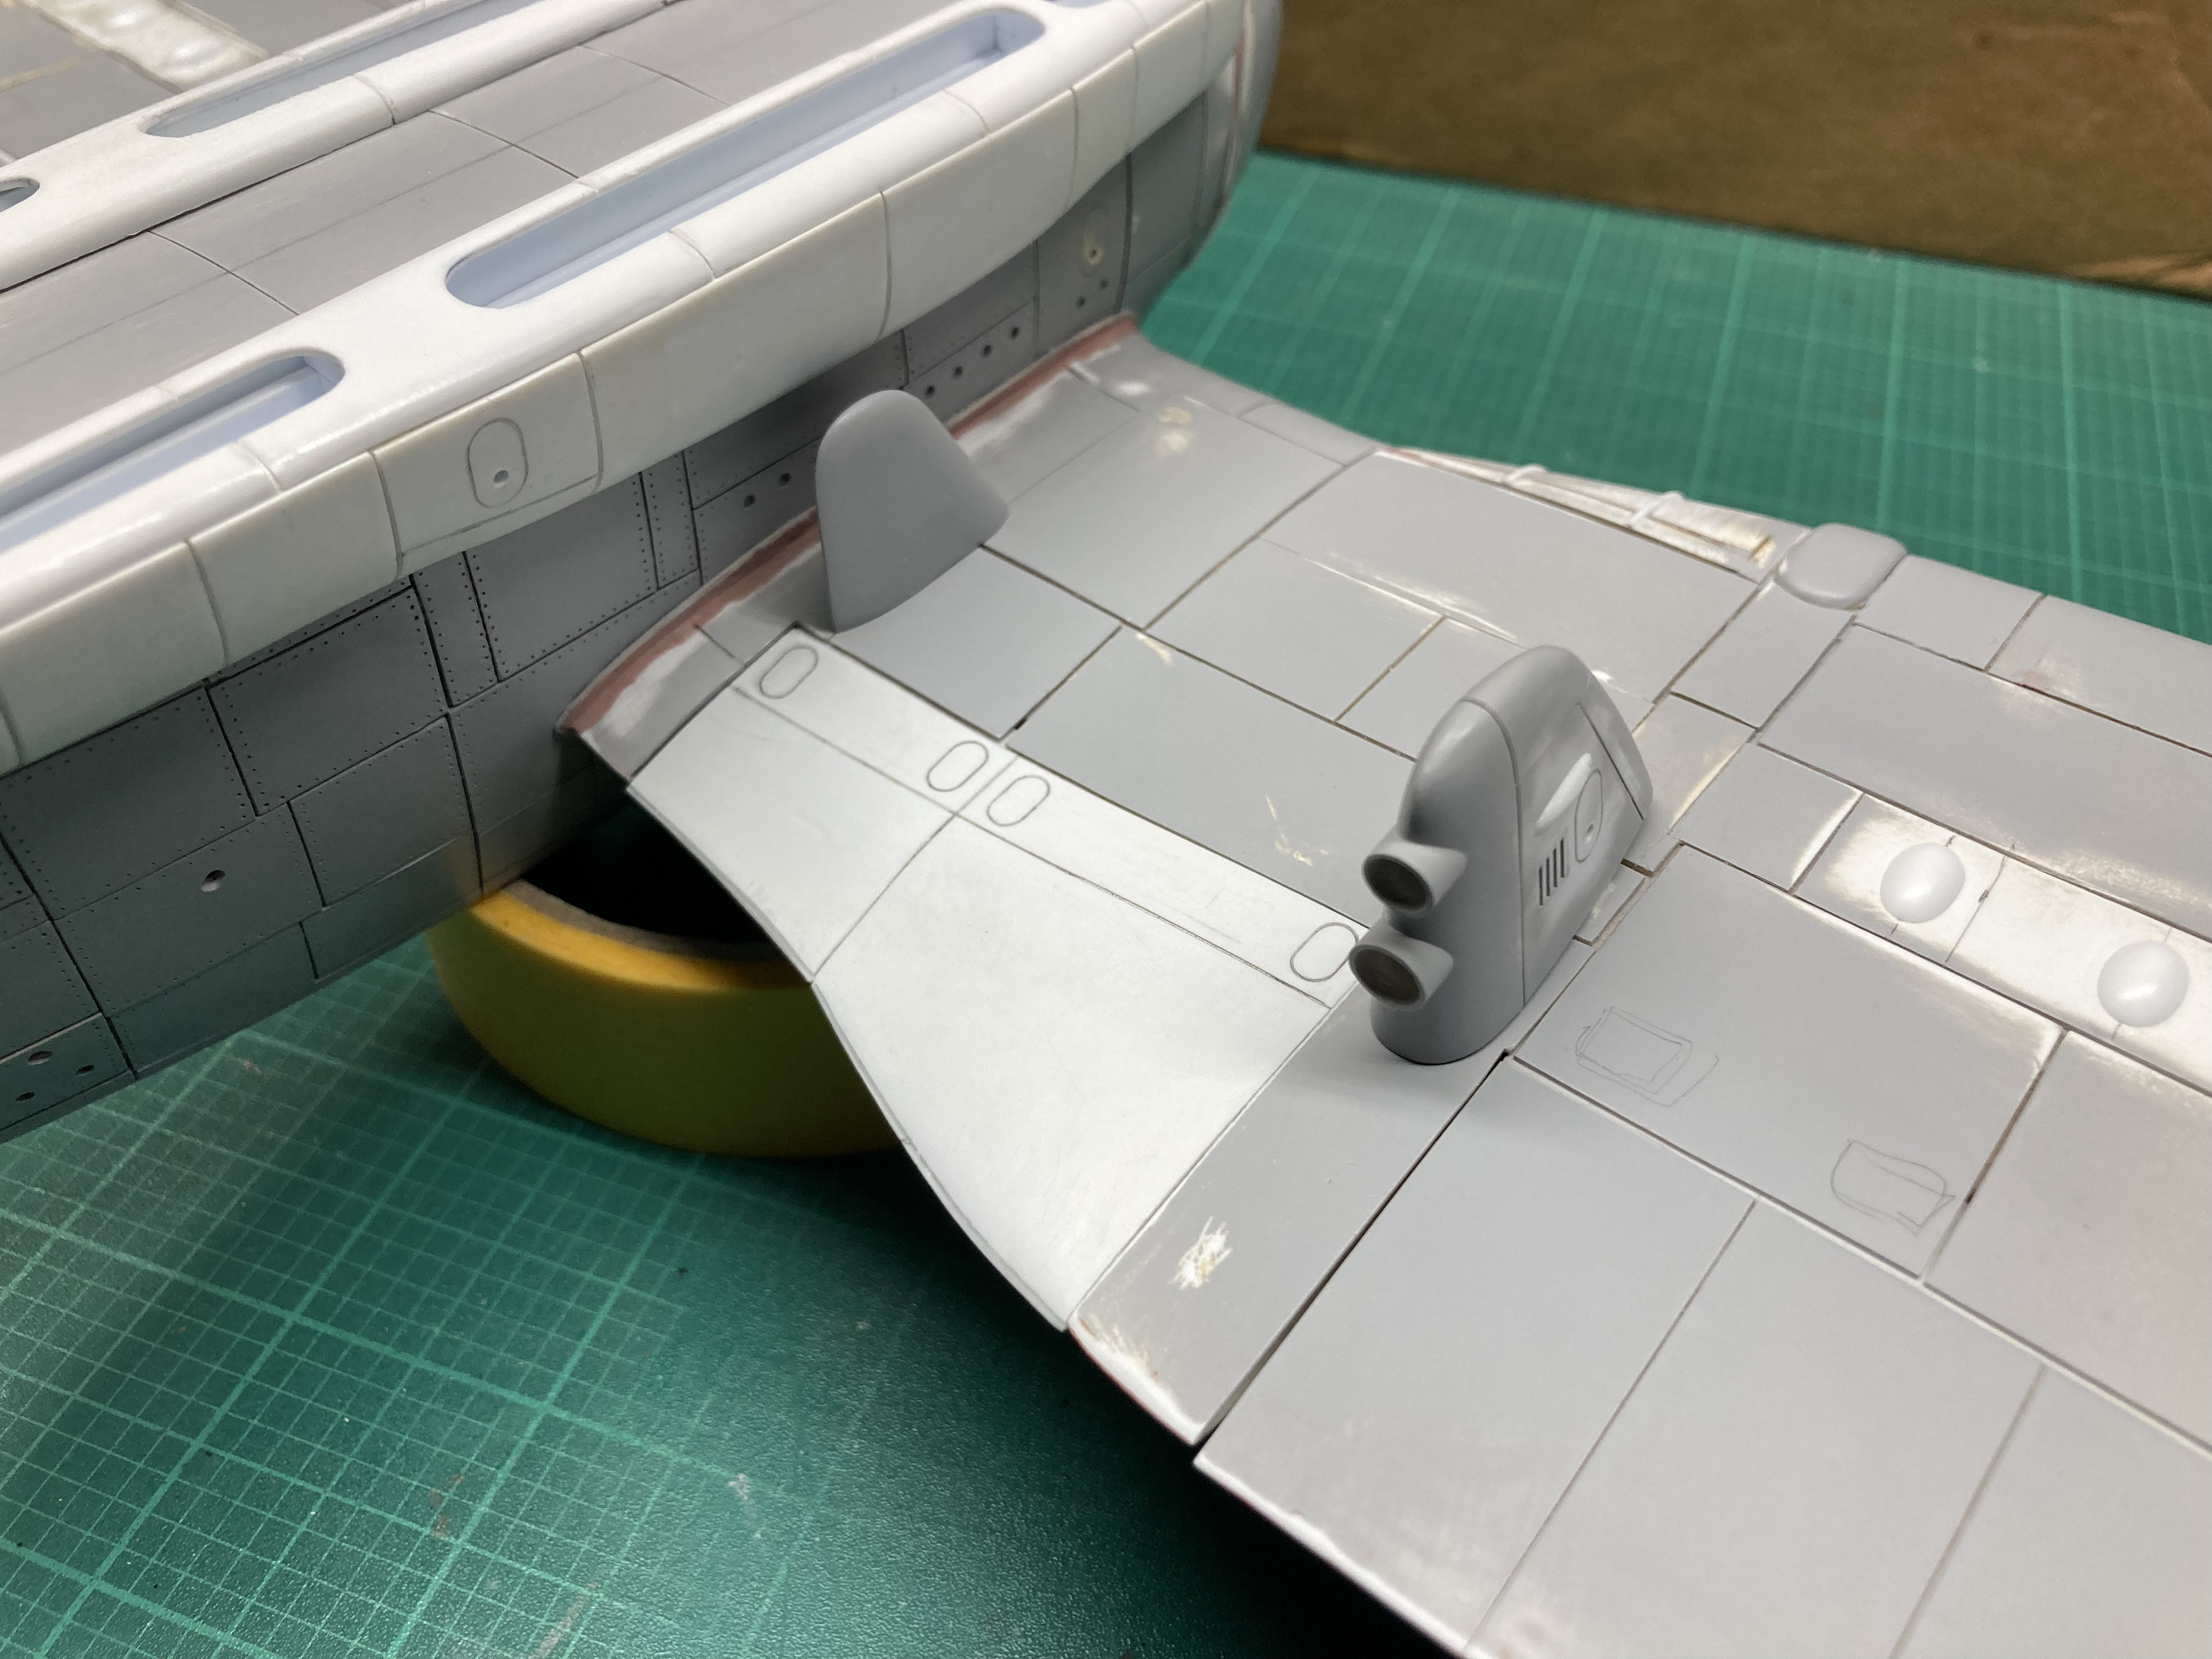
In the mean time, the freight train continues forward.  Pesky project-torpedoing underside of inboard flap, now properly covered:

“Ya ya ya, unicorn papoi!”

  • Member since
    November 2009
  • From: SW Virginia
Posted by Gamera on Thursday, June 17, 2021 11:22 AM

Looks fantastic Real G!!!

I mean scratchbuilding is hard enough but do you have any plans? I assumed you were winging it (to pardon the pun) just from screenshots from the anime? That's why I'm so impressed!

"I dream in fire but work in clay." -Arthur Machen


  • Member since
    March 2007
  • From: Northeast WA State
Posted by armornut on Wednesday, June 16, 2021 6:02 PM

    Whew, you had no idea how much I thought that joke would failZip it!.Thanks for seeing the humor I intended.

we're modelers it's what we do

  • Member since
    May 2011
  • From: Honolulu, Hawaii
Posted by Real G on Wednesday, June 16, 2021 5:04 PM

Heh-heh, I identify with that Moorish Idol from "Finding Nemo"!  Especially when he reveals his overly complicated escape plan.  I thought "OMG, that's EXACTLY how I think!"

“Ya ya ya, unicorn papoi!”

  • Member since
    March 2007
  • From: Northeast WA State
Posted by armornut on Wednesday, June 16, 2021 3:56 PM

   Whoo Haa Sharkbait Whoo Haa sharkbait, now you must pass mount wannahackaluggie. Look forward to seeing it in Vegas but don't rush it....to much time involved.

we're modelers it's what we do

  • Member since
    May 2011
  • From: Honolulu, Hawaii
Posted by Real G on Wednesday, June 16, 2021 1:41 PM

Detailing of the inboard flaps has commenced.

Gotta make some heat press forms for needed new fairing shapes/sizes, and some grille insert strips for the wing detailing.  Still mulling the best way to do the "finger" trailing edge things.

They are oval in cross section, and must have the wing fairing go over them.  I have another Wily E. Coyote idea, so I will do one to see if it works.  Notice I'm not following the drawings exactly, since the plating pattern was done many years ago.  Embarrassed

“Ya ya ya, unicorn papoi!”

  • Member since
    May 2011
  • From: Honolulu, Hawaii
Posted by Real G on Tuesday, June 15, 2021 4:00 PM

"Bakagalas" does not exactly roll off the tongue.  Stick out tongue  Yeah, I'm feeling the Force returning.  I'm so glad it's back.

And yes, if all goes well this will be at Vegas!

I have to make it my best, as this project took so long and caries a lot of personal emotional weight.  Plus there is the duty to uphold the reputation of the "Hawaii Mafia".  Surprise

“Ya ya ya, unicorn papoi!”

  • Member since
    March 2007
  • From: Northeast WA State
Posted by armornut on Tuesday, June 15, 2021 3:49 PM

     Rome wasn't built in a day either my friend. Glad to see the lumpy bumpy whatchamacallit fall into place for ya. No disrepect on the name, just to lazy to page back Embarrassed. Will this be in Vegas?

we're modelers it's what we do

  • Member since
    May 2011
  • From: Honolulu, Hawaii
Posted by Real G on Tuesday, June 15, 2021 1:24 PM

A milestone victory has been reached.  I took an alternate approach to skinning the flaps and it worked like a charm.  3 years ago, I hastily tried to fit a single piece of sheet plastic to a convex/concave curvy flap with predictably disastrous results.  It killed my spirit and the flaps sat untouched until last night.  Time cures all stupidity I think, because when I took another look at it, it occurred to me that if a strip of sheet plastic was first glued onto the relatively flat leading edge of the flap, there would be less curved area to negotiate.  And it worked!  Hooray.

So what this means is that the basic airframe is finally 100% complete (sans a small bit of savage filling and sanding).  Thusly, gentle readers, henceforth progress will be actually visible to the casual eye.

The plan is to get all the ugly wubblies sorted by this weekend, and a light coat of primer applied to create a uniform base.  The surface details will be 100% made up, as the animation frames from the movie are frustratingly inconsistent.  The trick is to get a visual balance to create a pleasing "rhythm" of detail.

“Ya ya ya, unicorn papoi!”

  • Member since
    May 2011
  • From: Honolulu, Hawaii
Posted by Real G on Monday, June 14, 2021 9:53 PM

Thanks Gamera!

But it pales compared to some of the other threads on this forum when it comes to technical expertise and precision.  The Lola T-70 comes to mind right away.  I primarly use low tech methods to make what I need, a carryover from my earlier days.

But progress is being made, and the big engineering issues are falling one after another.  I'm going to try to tackle those pesky inboard flaps tonight, the very ones that stymied the build in 2018.  I'm aiming to substantially complete construction by the end of the month, and spend July covering the entire model with rivet decals.

And being the kind of guy that gets easily distracted, I was thinking of follow-on projects.  I had wanted to do the Tolmekian Corvette next, which would use the same construction techniques as the Bakagalas (with learned improvements).  While studying images from the movie, I noticed my initial size estimates were off.  The Corvette is larger than I originally guessed - it is more like a Boeing 707 than a 727, so the planned scale will be 1/144 versus 1/72.  But the tandem wings will still be around 12" across.

I'm still undecided if the Pejite Gunship will remain at 1/48 scale or downsized to 1/72, to match the Tsukuda/Bandai Valley of the Winds Gunship kit.  Gee, if I make the Pejite Barge, that makes 5 kits - enough to enter a "Collections" at a future Nats!  Around 2051 or so if I take as long to do them!

Ha ha, but back to the task at hand!

“Ya ya ya, unicorn papoi!”

  • Member since
    November 2009
  • From: SW Virginia
Posted by Gamera on Monday, June 14, 2021 8:40 PM

Fantastic job there Real G! One of the best scratchbuilding treads on this forum! 

"I dream in fire but work in clay." -Arthur Machen


  • Member since
    May 2011
  • From: Honolulu, Hawaii
Posted by Real G on Monday, June 14, 2021 2:51 PM

I had made some grill detail by assembling them in strip form and cutting segments as needed,  I only now realize I should leave them slightly proud of the airframe skin to add panel detail.  Should have done that with the engine modules.  Oh well, live and learn.

I had thought long and hard about how to make the fuselage gun ports, and this popped into my head Saturday night.

By cutting the windows out while still attached to the sheet, it is easy to hold without fear of crushing the part.

It still needs a clear window, a baseplate, and of course a gun, but I am happy with the result.

And the landing gear sponson bottoms finally got plated over.  I had heed and hawed about how to trim the pieces to exactly fit the already installed side plating, worried about wasting a whole plastic sheet in case of a botched attempt, and fretted over other needless concerns.

I did lose one of my gloves though, and had to resort to an oven mitt.

Before:

After:

The second to the last engineering hurdle is to plate the underside of the concave inboard flaps.  And finally the canopy.  Stay tuned...

“Ya ya ya, unicorn papoi!”

JOIN OUR COMMUNITY!

Our community is FREE to join. To participate you must either login or register for an account.

SEARCH FORUMS
FREE NEWSLETTER
By signing up you may also receive reader surveys and occasional special offers. We do not sell, rent or trade our email lists. View our Privacy Policy.