SEARCH FINESCALE.COM

Enter keywords or a search phrase below:

K’tinga from Polar Lights: The slog continues

14034 views
110 replies
1 rating 2 rating 3 rating 4 rating 5 rating
  • Member since
    May 2011
  • From: Honolulu, Hawaii
Posted by Real G on Wednesday, June 17, 2020 12:28 PM

Gamera,

Yeah, it’s been a while.  My modeling has been kind of dormant the past couple of years due to, among other things, spending more time with my cat.

He had become very ill a few years ago and lost all his hair and skin on his head and neck.  He looked like a drowsy zombie cat from a horror movie.  We thought he was a goner, but despite the vets not knowing what he had, he recovered by himself.  I figured that was life #8 he had used up, so I tried to dote on him and do whatever I could to make him happy for his remaining years. Well, he took full advantage of that, expecting me to be with him, constantly patting his butt!

I also started developing age related health problems around the same time, so between that, my cat, and regular work and house chores, I found little energy for modeling.

With the passing of my cat this year, I found myself with time to build.  I decided to fight sadness by getting back to the bench and actually finishing stuff.  I knew I needed to really  start learning modern weathering techniques, so that was also a motivation to get back in the game.  I also resumed the heavy yard work, so I think a lot of it was psychological.  Yeah, blame the cat.

So here we are in 2020 with some rattle cans, looking for that perfect Klingon green.  Oh yeah, I gotta get those impulse engines to full power - I recently bought a soldering iron, and I have the LEDs, so I’m ready!

Q’pla! 

“Ya ya ya, unicorn papoi!”

  • Member since
    November 2009
  • From: SW Virginia
Posted by Gamera on Wednesday, June 17, 2020 11:21 AM

I was wondering what happened to her. Didn't think it'd been this long though. 

Interested in seeing how the difference in paint works out. I mean- after all it's a Klingon ship, they aren't interested in pretty ships- battle scars and patched paint are sexy to them. 

"I dream in fire but work in clay." -Arthur Machen


  • Member since
    May 2011
  • From: Honolulu, Hawaii
Posted by Real G on Tuesday, June 16, 2020 12:45 PM

Necro thread!  Well, I just build very slowly.  Embarrassed   Trying to fix that now.

Anyway, I was thinking about the overall color, and I felt the green I chose might not be gray enough.  So I went looking for a substitute and decided to give Tamiya's Field Gray in the rattle can a try.  I peformed a color test by spraying a part and comparing it to a part that was painted in the other color.

It was hard to tell what difference there was, so I sprayed both colors onto some business cards.  The Gunze paint really soaked into the cardstock, making the whole exercise pointless.  I'll use sheet plastic next.

But after using oil paint to start weathering the Bandai mini Blockade Runner, I realized that the model's color will change considerably, so maybe the choice of green it moot.

“Ya ya ya, unicorn papoi!”

  • Member since
    November 2009
  • From: SW Virginia
Posted by Gamera on Saturday, July 6, 2019 8:02 AM

Looks good G. I've gotten so I attach parts as soon as I cut them off the sprue- I've mixed up and lost way too many parts at this point. Glad to hear you were able to save yourself without too much muss and fuss. 

"I dream in fire but work in clay." -Arthur Machen


  • Member since
    May 2011
  • From: Honolulu, Hawaii
Posted by Real G on Friday, July 5, 2019 12:08 PM

Gamera,

Others have helpfully informed me that the knobby clear things should be painted over except for the rectangle area facing the rear of the ship - nice and easy!  I was cautioned to take pains to effectively light block the area.

For the warp nacelle "tail light", I put a small swatch of aluminum foil attached with Future to light block the exposed area.

https://flic.kr/p/2gqZdmc] [/url]K’tinga-74 by N.T. Izumi, on Flickr

https://flic.kr/p/2gqZsuD] [/url]K’tinga-75 by N.T. Izumi, on Flickr

Note mismatch on the nacelle halves!

https://flic.kr/p/2gqZsn4] 
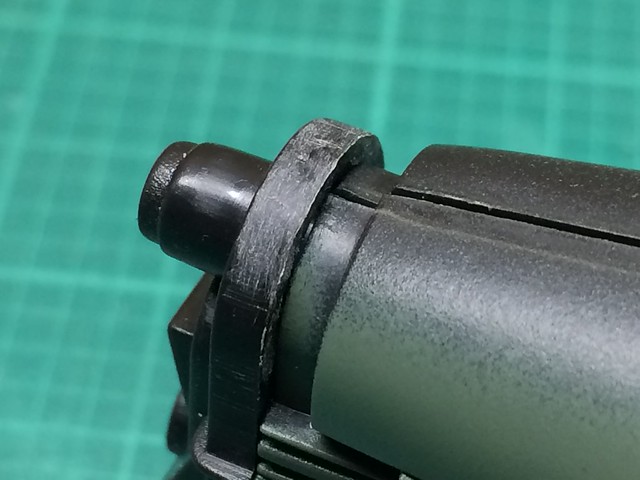
[/url]K’tinga-76 by N.T. Izumi, on Flickr

I was able to work on the model yesterday, and reached a milestone of sorts.  The warp nacelles and the side bars on the hangar deck have had their LEDs permanently attached and the parts glued together.

https://flic.kr/p/2gqZsdb] [/url]K’tinga-77 by N.T. Izumi, on Flickr

I must confess to a horrifying mistake - boys and girls, when they tell you read the instructions, they mean READ THE INSTRUCTIONS.  I didn't pay attention to which light conductor went into each nacelle, so of course I switched them.  The parts are handed, so while they do sorta fit switched around, they fit better the right way.  I didn't realize this until the glue was on the first nacelle - what tipped me off was that the nacelle end cap's opening for the tail light is slightly offset.  So I took a deep breath and pried the nacelle apart.  Fortunately there was little damage, so it's just more putty work to eliminate the scars.

It's starting to come together now.  Once all the LEDs that must go in beforehand are installed, it'll be all assembly and filling/sanding.


“Ya ya ya, unicorn papoi!”

  • Member since
    November 2009
  • From: SW Virginia
Posted by Gamera on Thursday, July 4, 2019 7:46 AM

Cool! Nice to see such an easy fix! 

As to the weird thingees on the forward hull I'd seen them on the smaller kits and just assumed they were the forward disruptor mounts. I'd guess though that they were some sort of light used to light the model? Something like the registry lighting used on UFP ships though I'm guessing in this case they're not pointing at KDF insignia, the ship's name or anything like that. 

"I dream in fire but work in clay." -Arthur Machen


  • Member since
    May 2011
  • From: Honolulu, Hawaii
Posted by Real G on Monday, July 1, 2019 11:28 AM

Several people building this kit have suggested wrapping the aft warp nacelle light conductors in foil to improve brightness.  So out of curiosity I tried it - and it yielded the best results over all my tinkering!

https://flic.kr/p/2gos9tB] [/url]K’tinga-69 by N.T. Izumi, on Flickr

It was easy, like wrapping a leftover chicken wing.  I am humbled that such an easy fix made things better!   You just have to push the side lights through the foil as you wrap.

One of the last bits of lighting remaining to be looked at were these two small weirdly shaped bits that fit under the "cobra" head of the bridge.  I needed my magnifyer visor to be able to verify orientation of the parts, as they are kinda hard to see due to being molded clear and they have a funny shape.

https://flic.kr/p/2gosqXd] [/url]K’tinga-72 by N.T. Izumi, on Flickr

https://flic.kr/p/2gos9mY] [/url]K’tinga-70 by N.T. Izumi, on Flickr

I had problems jamming the LED in place until I realized that LEDs are made with a flat side to indicate polarity (I had read about it recently; I didn't know it before).  With the flat side facing outward, the LED fit in place. albeit very tightly.

Here is one of them lit up.

https://flic.kr/p/2gosPBc] [/url]K’tinga-73 by N.T. Izumi, on Flickr

The parts have what appears to be two small "bulbs", but I think there is supposed to be a strong floodlight pointing aft towards the main hull.  There is a flat surface facing the correct direction, but the instructions make no suggestions for painting.  Anyone know the answer?

“Ya ya ya, unicorn papoi!”

  • Member since
    November 2009
  • From: SW Virginia
Posted by Gamera on Wednesday, June 19, 2019 11:18 AM

The back-up lights of a warrior!!! 


All joking aside nice work G!

"I dream in fire but work in clay." -Arthur Machen


  • Member since
    May 2011
  • From: Honolulu, Hawaii
Posted by Real G on Monday, June 17, 2019 1:18 PM

I just could not live with the impulse engine lights, so I have decided to bite the bullet and add two more LEDs.  Luckly I had two spare LEDs that were the right size and color, so I'll just have to suck it up and learn to solder.

I did a light check on the warp nacelles, and wondered if the brightness needed to be bumped up.  Polar Lights provides a neat clear molded arm that simultaneously conducts lights to the four side lights and one rear light.

https://flic.kr/p/2gfy3mi] [/url]K’tinga-64 by N.T. Izumi, on Flickr

So I tried painting the inside of one nacelle chrome to see what a difference it would make.

https://flic.kr/p/2gfy33n] [/url]K’tinga-65 by N.T. Izumi, on Flickr

Although from this pic it looks like a big improvement, it is not.

https://flic.kr/p/2gfy3fw] [/url]K’tinga-66 by N.T. Izumi, on Flickr

Hard to tell huh?

https://flic.kr/p/2gfxwNK] [/url]K’tinga-67 by N.T. Izumi, on Flickr

So bottom line, you don't really need to do anything to the nacelle lights.  But there is a light leak because the nacelle end cap has a hollow, allowing the clear arm to peek out.

https://flic.kr/p/2gfxwEJ] [/url]K’tinga-68 by N.T. Izumi, on Flickr

But it will be easy to fix, either a small swatch of foil painted black on the outside, or some heavy black paint.


“Ya ya ya, unicorn papoi!”

  • Member since
    March 2007
  • From: Northeast WA State
Posted by armornut on Sunday, May 26, 2019 12:51 AM

 Good, now full impule power and then we can bring the Federation to its knees!! Unless they offer Klingon Fried Tribbles....then perhaps negotiations are in order.

we're modelers it's what we do

  • Member since
    May 2011
  • From: Honolulu, Hawaii
Posted by Real G on Saturday, May 25, 2019 8:24 PM

Lighting trials appear to be at an end.  I was not happy with the impulse engines, since the kit LEDs are puny, and yet create stubborn hot spots.

https://flic.kr/p/2g1LjSZ] [/url]K’tinga-59 by N.T. Izumi, on Flickr

I was trying a bit of everything and stuck a piece of tape over the LED to see what it would do.

https://flic.kr/p/2g1LkhH] [/url]K’tinga-60 by N.T. Izumi, on Flickr

And it worked!  The tape bounced light around the well and the translucent yellow color helped even up the light intensity, especially around the outer edges of the well.

Before:

https://flic.kr/p/2g1LFs2] [/url]K’tinga-61 by N.T. Izumi, on Flickr

After:

https://flic.kr/p/2g1LESU] [/url]K’tinga-62 by N.T. Izumi, on Flickr

Now to cobble together something permanent.

“Ya ya ya, unicorn papoi!”

  • Member since
    March 2007
  • From: Northeast WA State
Posted by armornut on Thursday, May 9, 2019 4:11 PM

Ka'Pla!! It is a good day to die commander. Lol.

we're modelers it's what we do

  • Member since
    May 2011
  • From: Honolulu, Hawaii
Posted by Real G on Thursday, May 9, 2019 9:08 AM

Surprisingly, I have already thought about that one!  It’s actually quite simple - prepaint around the windows and apply strips of masking tape that correspond to the width of the black bands of the window surrounds.  The barbeque grill is treated similarly, but with just a big blanket of tape over the grille.

So you see, the Federation will not be able to stop us.

“Ya ya ya, unicorn papoi!”

  • Member since
    March 2007
  • From: Northeast WA State
Posted by armornut on Thursday, May 9, 2019 4:25 AM

 Pardon me for asking.....how the heck are ya gonna mask all those beautiful well lit windows and BBQ grill?  I know my house will be struck from the high anels on Kronos for such an un warrior like observation.....a chance I'm willing to take??..however command e the question stands.

we're modelers it's what we do

  • Member since
    May 2011
  • From: Honolulu, Hawaii
Posted by Real G on Wednesday, May 8, 2019 12:59 AM

Well the Klingons have Gah?  It looked like Chinese beef noodles the first time I saw it on ST:TNG, but it devolved into earthworms in Chinese beef noodle sauce.

I mean, what self-respecting Klingon eats Earthworms?  The Klingon kind are so much better, and they fight back!  They are spicy, have thick hard heavy skin and hairs, and the venom from their mandibles are to die for.  Because there is no antidote.

Thanks for looking in guys!  Parts will be glued soon!

Q’pla!!!

“Ya ya ya, unicorn papoi!”

  • Member since
    November 2009
  • From: SW Virginia
Posted by Gamera on Tuesday, May 7, 2019 9:11 PM

Not sure what 'noodley' is in Klingonaanse. G'noodley???

She's awesome looking in any language though!!!!

"I dream in fire but work in clay." -Arthur Machen


  • Member since
    March 2007
  • From: Northeast WA State
Posted by armornut on Tuesday, May 7, 2019 2:44 PM

    Should I add "noodley" to my Klingon vocabulary?? Lol.

       Looks really cool. I almost picked one up at Hobbytown a few weeks ago to expand my skills by following your WIP. Decided I needed to eat and keep my wife lol.

   Ka'Pla!

we're modelers it's what we do

  • Member since
    May 2011
  • From: Honolulu, Hawaii
Posted by Real G on Tuesday, May 7, 2019 1:30 PM

I got a little work done last night, light blocking the blanking plates, painting the backsides of the clear window bands, and installing the command bulb window belt line.

https://flic.kr/p/25daLDX] [/url]K’tinga-55 by N.T. Izumi, on Flickr

https://flic.kr/p/2eC1hYu] [/url]K’tinga-56 by N.T. Izumi, on Flickr

The belt line segments don't fit 100% (and yes I got the mixed up part numbers on the instructions sorted - the two front pieces will actually only fit reasonably well one way), so I'm using stretched sprue from the kit to fill gaps.  The plastic goes all noodly when treated with liquid cement, so it can be easily pushed into nooks and crannies.

The windows need a bit more clean up, and I hope to get this done soon so that proper kit construction can commence.

“Ya ya ya, unicorn papoi!”

  • Member since
    May 2011
  • From: Honolulu, Hawaii
Posted by Real G on Monday, May 6, 2019 5:47 PM

I got a little work done this weekend when the guys came over for our monthly get together, a.k.a. craft day.  Big Smile

Blanking plates were cut and fitted above and below the command bulb window belt line to help conserve every photon from the feeble LEDs.

https://flic.kr/p/2eAAApW] [/url]K’tinga-51 by N.T. Izumi, on Flickr

I'm a measure once cut several times kind of guy, but did think about accessing the torpedo tube components.  The lower blanking plate was made from two pieces so that the torpedo clear lens and reflector could be added as a last step before closing up the bulb.

https://flic.kr/p/2fNmyd6] [/url]K’tinga-54 by N.T. Izumi, on Flickr

The small posts are to elevate the LEDs because the way Polar Lights has them is too low.  What the heck.

It is a little premature to perform a lighting test, but I could not resist.  The clear kit window inserts need to be painted gloss white on their backsides, and the window openings still need to be drilled out.  It looks terribly dull right now, but hopefully things will "brighten up" after all the necessary work is done.

https://flic.kr/p/S2QsRR] [/url]K’tinga-52 by N.T. Izumi, on Flickr


“Ya ya ya, unicorn papoi!”

  • Member since
    May 2011
  • From: Honolulu, Hawaii
Posted by Real G on Tuesday, April 30, 2019 5:20 PM

Thanks guys!  I'll try to step it up, as I still have lots of GBs to do as well...  Embarrassed

“Ya ya ya, unicorn papoi!”

  • Member since
    May 2013
  • From: From the Mit, but live in Mason, O high ho
Posted by hogfanfs on Tuesday, April 30, 2019 9:43 AM

Real G,

Wow! Some really great progress! 

 Bruce


 On the bench:  1/48 Eduard MiG-21MF

                        1/35 Takom Merkava Mk.I


  • Member since
    November 2009
  • From: SW Virginia
Posted by Gamera on Monday, April 29, 2019 9:02 PM

Ohhhhhhhhhhh, it looks great to me!!!

"I dream in fire but work in clay." -Arthur Machen


  • Member since
    May 2011
  • From: Honolulu, Hawaii
Posted by Real G on Monday, April 29, 2019 5:21 PM

The permanent sheet plastic blanking plates for the "cobra" section have been installed.

https://flic.kr/p/RW2eYv] [/url]K’tinga-42 by N.T. Izumi, on Flickr

https://flic.kr/p/RW2gyp] [/url]K’tinga-44 by N.T. Izumi, on Flickr

https://flic.kr/p/TykJDs] [/url]K’tinga-48 by N.T. Izumi, on Flickr

https://flic.kr/p/2fBQ5MA] [/url]K’tinga-46 by N.T. Izumi, on Flickr

The kit's clear window band was painted gloss white to diffuse the LED hot spots.  Flat white was found to block too much light.  The resulting brightness is not all that great, but once all the interior surfaces are painted white, it should be adequate.

The dome atop the rear bridge tower posed another little challenge - the LED is seated below the window line and is pointing straight up.  Left as is, the windows do not look uniformly lit, i.e. the ones on either side are dim when viewed head-on.

The outside lower half of the clear red window disk was painted flat white to create a broad diffuse reflective surface, while the plastic kit dome's underside was painted with the Molotow chrome pen in an attempt to reflect as much light back onto the window disk as possible.

https://flic.kr/p/2fCb1FE] [/url]K’tinga-49 by N.T. Izumi, on Flickr

https://flic.kr/p/2fGR2Bp] [/url]K’tinga-50 by N.T. Izumi, on Flickr

It seems to work!

“Ya ya ya, unicorn papoi!”

  • Member since
    November 2009
  • From: SW Virginia
Posted by Gamera on Monday, April 22, 2019 5:37 PM

Looks pretty darn good from here!

"I dream in fire but work in clay." -Arthur Machen


  • Member since
    May 2011
  • From: Honolulu, Hawaii
Posted by Real G on Monday, April 22, 2019 5:12 PM

Here are some piccies as promised.

https://flic.kr/p/2eeaG74] [/url]K’tinga-37 by N.T. Izumi, on Flickr

https://flic.kr/p/TtNeMf] [/url]K’tinga-38 by N.T. Izumi, on Flickr

https://flic.kr/p/2eeaYXt] [/url]K’tinga-40 by N.T. Izumi, on Flickr

https://flic.kr/p/RREu8P] [/url]K’tinga-39 by N.T. Izumi, on Flickr

I drilled out the windows on the starboard foward belt and port rear belt, so I was not able to show the full effect in one shot.  I will do so once the permanent blanking plates are in place.

“Ya ya ya, unicorn papoi!”

  • Member since
    November 2009
  • From: SW Virginia
Posted by Gamera on Monday, April 22, 2019 11:16 AM

Ohhhh sounds glorious! Looking forward to the photos! 

Qapla' 


"I dream in fire but work in clay." -Arthur Machen


  • Member since
    May 2011
  • From: Honolulu, Hawaii
Posted by Real G on Monday, April 22, 2019 4:55 AM

I finally got around to doing a light test on the lower command “bulb”!  I used some junk mail cardstock to make top and bottom plates to focus as much of the feeble LED light to the +270 degrees of windows.  I cut a strip of folder paper to act as a diffuser right behind the window openings.

I think it works - the lit windows are visible with the room lights on, but not JJ Abrams bright.  With the lights low, the windows have a nice bluish glow, again not Xenon strobe bright.

I think I am finally done with the light tests.  Proper sheet plastic plates will be made and installed.  Now where do I get some Klingon makeup and an outfit?

Oh sorry no pics; I’m using my phone and still have wacky Flickr compatibility issues.  Tomorrow.  Pinkie promise.

“Ya ya ya, unicorn papoi!”

  • Member since
    May 2011
  • From: Honolulu, Hawaii
Posted by Real G on Sunday, April 7, 2019 4:58 PM

Gamera

Thanks as always for the advice G!

I'd probably try to light her myself. That much I can manage- it's electronic stuff like the spinning Bussard collectors on the fore ends of the nacelles on the original Enterprise that I can't build on my own. Just wiring up lights I can I can pull off.


You will be better off with a superior lighting system I think.  And you will have saved money in the process.  Just guessing here, but I imagine if you were to source the components individually, they would not total the lighting kit’s MSRP.

“Ya ya ya, unicorn papoi!”

  • Member since
    November 2009
  • From: SW Virginia
Posted by Gamera on Sunday, April 7, 2019 4:11 PM

Thanks as always for the advice G!

I'd probably try to light her myself. That much I can manage- it's electronic stuff like the spinning Bussard collectors on the fore ends of the nacelles on the original Enterprise that I can't build on my own. Just wiring up lights I can I can pull off.

"I dream in fire but work in clay." -Arthur Machen


JOIN OUR COMMUNITY!

Our community is FREE to join. To participate you must either login or register for an account.

SEARCH FORUMS
FREE NEWSLETTER
By signing up you may also receive reader surveys and occasional special offers. We do not sell, rent or trade our email lists. View our Privacy Policy.