SEARCH FINESCALE.COM

Enter keywords or a search phrase below:

Sloop-of-war, PELICAN model scratch build.

9269 views
71 replies
1 rating 2 rating 3 rating 4 rating 5 rating
  • Member since
    September 2012
Posted by GMorrison on Friday, December 20, 2019 7:19 PM

Good to see you back at the helm, Anthony!

Phsaw! Two years? My Airfix Victory has been on the ways nigh on ten years now.

 Modeling is an excuse to buy books.


  • Member since
    December 2006
  • From: Jerome, Idaho, U.S.A.
Posted by crackers on Friday, December 20, 2019 11:01 PM

 Yes, that is a bad habit I have when a project gets boring, I put it aside until the modeling sprit catches hold. I promise to finish to the bitter end.

Now, to continue, to make a spritsail to attach to the spirit sail yard. Since no sail arrangement were on the Hahn ship plan, I had to make a guess of what a sprit sail would look like on the bowsprit model. This was acomplished by for cutting out a paper spritsail and attaching it to the bowsprit.

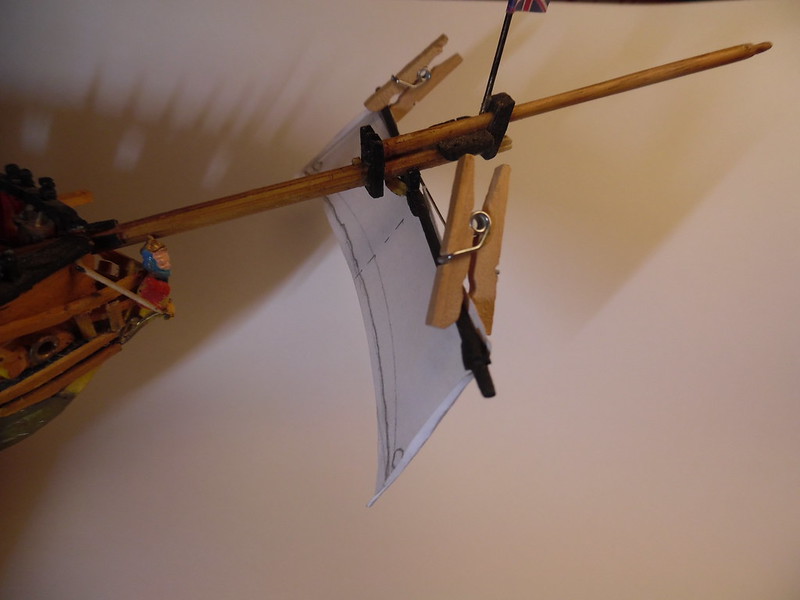
Here, the paper sail is attached to the bowsprit to see if it looks correct.


From the spritsail template, a silkspan sail is cut out and ready to have reef points attached to this sail.

Here are the materials needed to make reefpoints. A upper template to make holes where the needle will be inserted with thread. A lower template that will serve as a guide for the reefpoints position and of course a needle and thread, in the case a light brown upholstery thread, which is stronger than regular sewing thread.

To make reefpoints, two templates are required. The top one is to locate on the sail where the reefpoints are to be located by placing the template on the sail and punching out holes on the sail surface. The second template is place below the punched out holes where a light brown thread will be stitched to simulate reefpoints.

With needle ready, the reefpoints will be attached.

Anthony V. Santos

  • Member since
    December 2006
  • From: Jerome, Idaho, U.S.A.
Posted by crackers on Wednesday, January 22, 2020 9:10 PM

This template is where small holes will be punched in to receive a needle and thread on the surtface of the silkspan material.

Below where the holes have been punched in on the silkspan surface, a second template is added to receive the woven thread that will become the sail reefpoints. The needle is inserted into the holes threaded into the vertical slots and brought back to the next hole, then broughtg back to the next vertical slot. This process is repeated until the right side of the sail is reached. The thread is cut in line with the edge of the sail and glued so as not to unravel.

I should have mentioned the the second template is held in place on the sail with two paper clips on each side of the silkspan sail, so that the template will not slide off the sail. The reefpoint ends are snipped off with a sharp razor blade at the bottom of the template. When the template is removed, the reefpoints will hang in all directions. At the tip of a small dowel, glue is attached so the this glue to applied to the ends of the reefpoints, so that the reefpoint will hang in a vertical direction downward.

This is how the reefpoints should look on the silkspan sail before the sail is attached to the spritsail yard. Notice that the reefpoints almost hang down in a vertical position. In the real world of past sailing ships, reefpoints probably did not stay in a vertical position, but flapped around when the energy of the wind hit on the back of the sail.


Anthony V. Santos

  • Member since
    December 2006
  • From: Jerome, Idaho, U.S.A.
Posted by crackers on Wednesday, January 22, 2020 9:55 PM

My next task after reefpoints are in place, is to have footropes attached. Not an enviable place for persons with height anxiety phobia when trying to furl a sail. The material for the footropes is black thread soaked in glue, the excess glue is squeezed out and the thread is allowed to dry. The dryed black thread is stiff as a wire. From the plan, the footropes are made out with a compass divider and tied to the scotch taped spritsail yard. The footrope on the yard is tied and glued. The bottom ends arer carefully glued using a tipped dowel to apply the glue. I piece of white computer paper serves as a background to highlight the procedure.

Here is the completed footrope attachment.

The completed spritsail yard.

My next building of the PELICAN will be the both anchors attachment before the bowsprit is fixed to the hull.


Anthony V. Santos

  • Member since
    December 2006
  • From: Jerome, Idaho, U.S.A.
Posted by crackers on Saturday, January 25, 2020 11:46 PM

The starboard anchor is now in place followed by the port bower anchor later. On sailing ships, their anchors were securted against the shop's bows. The large ring above the wooden stock was hoisted clear of the water through lines rove into the catheads. The fluke end of the anchor was hoisted up by tackles located on the foremast. Once cleared, the anchor was lashed by ropes, or later chains, to the fore rail. The large hemp hawse was rove trough deck rings to the hatch opening covered the hawse cable locker where the cable was stored in a coil.

Hauling, or weighting anchor was a laborious work The hauling was done by messenger lines, or ropes attached to the cable and a capstan. As the anchor crew turned the capstan, the messinger lines were tied and untied as the cable was fed into the hawse locker and coiled into loops by crew inside the locker.

Now that the bower anchors are secured, it is time attach the bowsprit to the hull and do the first rigging of the ship model.


Anthony V. Santos

  • Member since
    September 2012
Posted by GMorrison on Saturday, January 25, 2020 11:53 PM

Anthony, your work is a pleasure. You have so many techniques for detail.

Harrumph- punch a second hole below the reef line for the thread to make the knot.

Might I ask, in envy, where did you learn these things?

Bill


 Modeling is an excuse to buy books.


  • Member since
    December 2006
  • From: Jerome, Idaho, U.S.A.
Posted by crackers on Sunday, January 26, 2020 12:27 AM

I have a whole library of reference books, which I refer to quite often. One of the best reference book is "Rigging Period Ship Models",by Lennarth Petersson. By detail drawings, the author shows clearly how standing and running rigging is belayed to masts, yards and sails. Now that the PEDLICAN is to be rigged, this book will remain by my side.

Happy modeling    Crackers   Smile


Anthony V. Santos

  • Member since
    December 2019
Posted by JLavender on Sunday, January 26, 2020 4:35 AM
This book is extremely important for rigging any ship. If it’s not in here, it’s not worth modeling!
  • Member since
    December 2006
  • From: Jerome, Idaho, U.S.A.
Posted by crackers on Sunday, February 9, 2020 12:57 PM

Now that the bowsprit is attached to the foredeck and the martingales rigged as well as the bobstays, the foremast can now be put in place.

Anthony V. Santos

  • Member since
    December 2006
  • From: Jerome, Idaho, U.S.A.
Posted by crackers on Sunday, February 9, 2020 1:11 PM

The foremast is now ready after the top gallent mast is added, the caps, top mast trestle trees and the lower cap. The lower trestle tree is set aside ready to be attached to the low mast. The black bands on the lower mast are wooldings, which were tarred ropes wrapped as bands to prevent the mast from splitting when under stress.

Anthony V. Santos

  • Member since
    December 2006
  • From: Jerome, Idaho, U.S.A.
Posted by crackers on Sunday, February 9, 2020 1:32 PM

The shrouds are now ready for placement. The purpose of the shrouds was to provide lateral support to the mast as well as a ladder for the crew to gain access the upper portions of the mast. The shrouds were secured by deadeyes that had tarred rope lanyards to tighten the shroud should the shroud become slack. Here, a template is provided to make evenly placed foot ropes on the shroud. The foot ropes are secured to the shrould by passing a needle through the shround and secured at the end of the shroud by a clove hitch. A tip of glue is attached to the shrould if the foot rope be lose.

Happy modeling   Crackers  Smile

Anthony V. Santos

  • Member since
    March 2018
  • From: Chicago suburbs
Posted by Luvspinball on Monday, February 10, 2020 1:55 PM

Almost there, Crackers, as I am just attaching channels and rails.  Nice work.  Can't wait to see her done.  I have two wooden boats in my stash, but only peeked in the box and sealed them back up so as not to be tempted.

bob

Bob Frysztak

Luvspinball

Current builds:  Revell 1/96 USS Constitution with extensive scratch building

JOIN OUR COMMUNITY!

Our community is FREE to join. To participate you must either login or register for an account.

SEARCH FORUMS
FREE NEWSLETTER
By signing up you may also receive reader surveys and occasional special offers. We do not sell, rent or trade our email lists. View our Privacy Policy.