SEARCH FINESCALE.COM

Enter keywords or a search phrase below:

The 1/350 Pola "The Hard Way" WIP ~ The Ship that Must Be Built

46063 views
46 replies
1 rating 2 rating 3 rating 4 rating 5 rating
  • Member since
    October 2007
  • From: Inland Northwest
The 1/350 Pola "The Hard Way" WIP ~ The Ship that Must Be Built
Posted by Summit on Saturday, September 19, 2009 3:52 PM

Another forum member Aaron (sfcmac) and I thought we would try our hand at building the Hobby Boss 1/350 Heavy Cruiser Pola kit. We got the kit's for around $18.00 and was well aware of the age and "crude by todays standards". But hey the both of us like a challenge to bring out our scratch building skills. Aaron decided to build his as the GORIZIA Thumbs Up [tup]

Photobucket

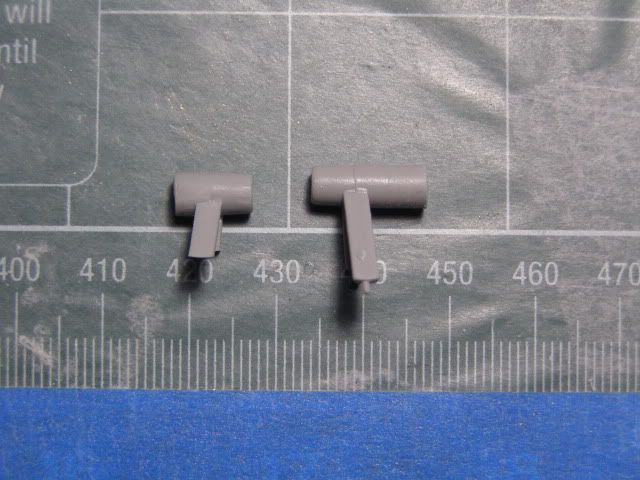
The first thing I encounter'ed was the angle of the "screw's and shafts" it looked like this kit could be used to stir cocktails or a cake mix... The kit supplied color pic of the ship shows the shafts horizontal not coming down at a 60* angle.  

Aaron told me that was from the old days when the kit was motorized ... I rebuilt the shafts from aluminum tubing and brass tubing bushings.

The shaft housing on the left is the modified one

Photobucket

Not sure why where the screw shaft went through was two different lengths ~ so it was easier to shorten the other then make the other longer.

Photobucket

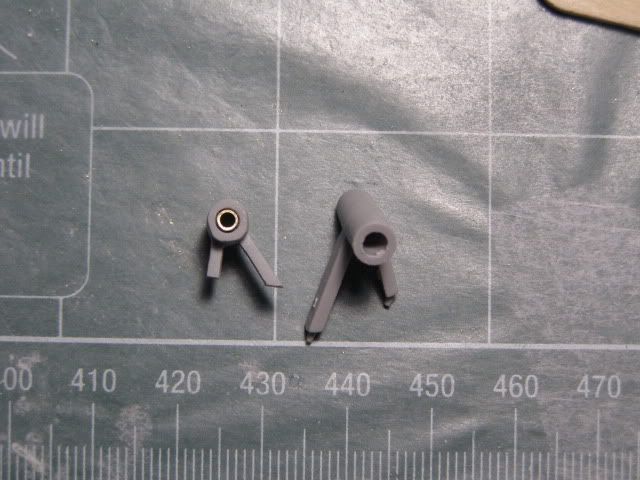
OK, I was much happier with thisPhotobucket

Photobucket

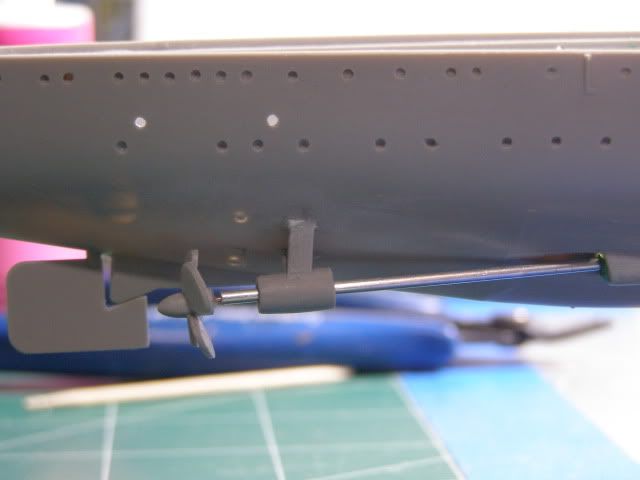
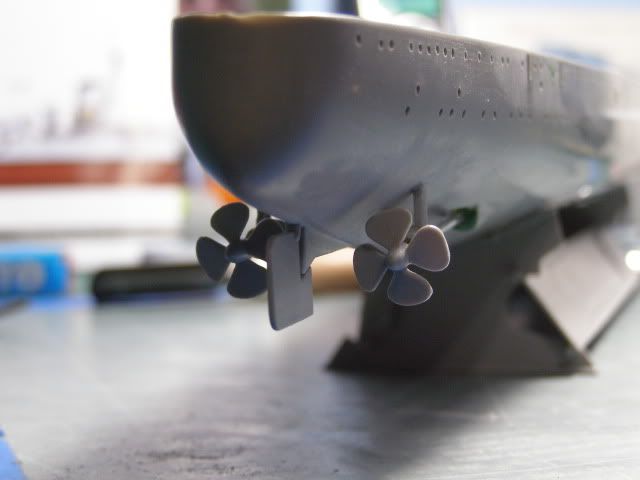
Although Aaron mentioned the screws looked like 4 bladed window fans, So being the Great Guy he is he robbed a set from a 1/350 Arizona kit for the both of us to use. Captain [4:-)]

One thing we both seemed to agree on that there was no Shortage of ejector pin marks on this kit. It reminded me of a Trumpeter Aircraft kit - Pin holes on every surface detail . (couldnt have them hidden on the bottom ) So lots of scraping and filling on almost every part. Arron re'floored some of his pieces.

My pin mark removal tools, a flat chisel knife blade and a "popsicle stick" sawed off for a sanding block.

 There was 10 pinmarks on the one deck shown Photobucket

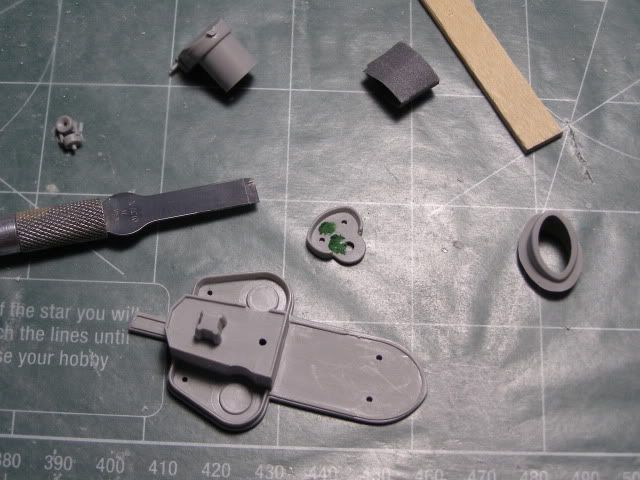
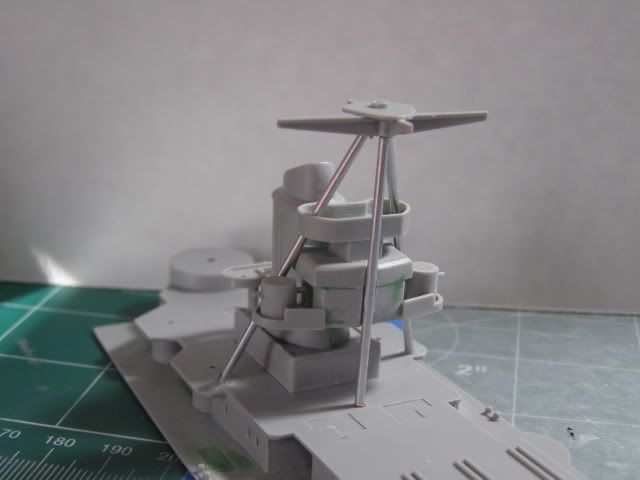
 Day Four on the build I made it to the structure, I filled a large gap with pieces of styrene.

Photobucket

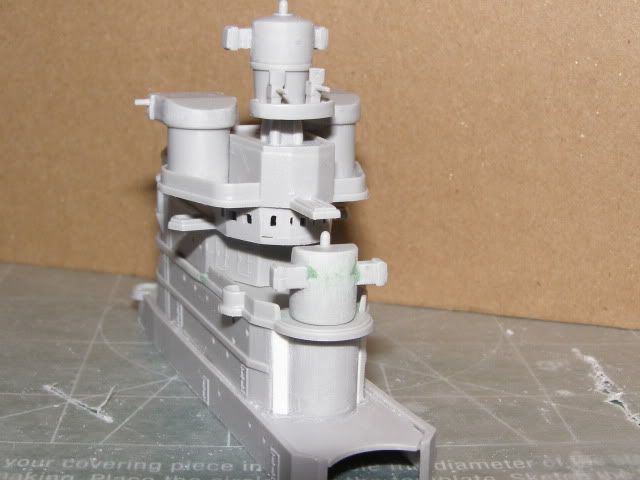
Lots of fun stuff to do like drilling out spotlights are also a bonus of this kit Smile [:)]

Photobucket

Well Aaron was unhappy with the kit structure. So after many PM's and following his lead more scratch building - Deck Supports !

Photobucket

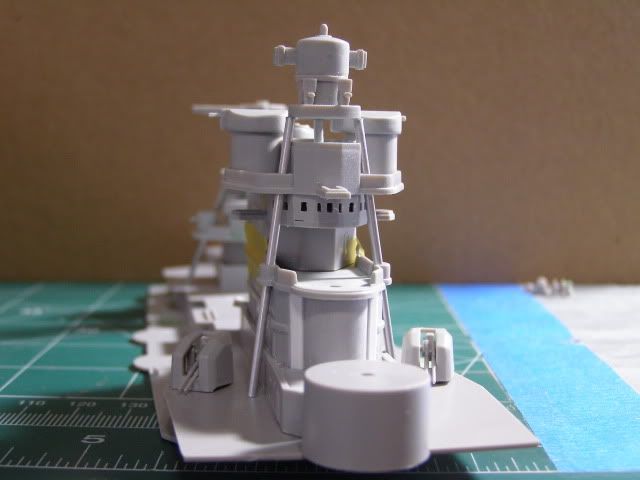
Well if you do one you have to modify the other

Photobucket

Photobucket

Photobucket

So just as I think I am making progress Aaron brings up the subject of the "anchors" Whistling [:-^] A" little oversized " he mentions.....Confused [%-)]

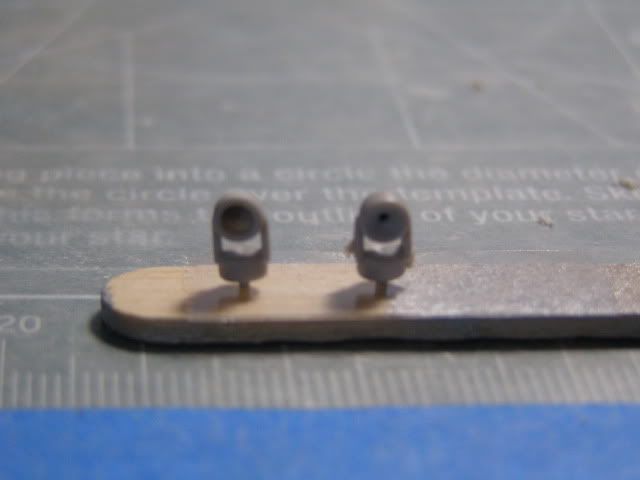
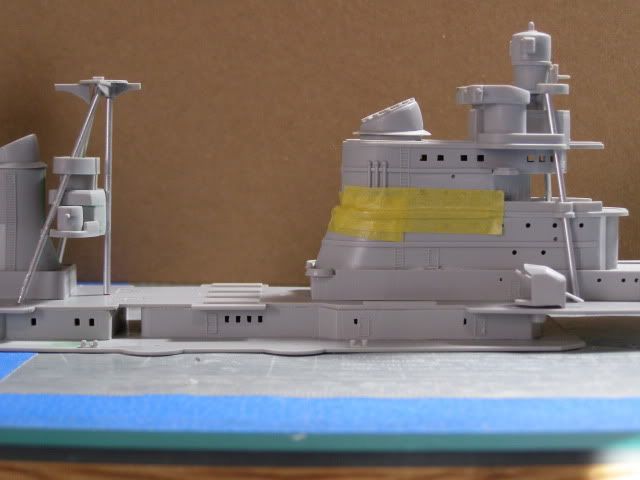
 Oh look  "pin marks" on the off side - whats up with that ?Photobucket

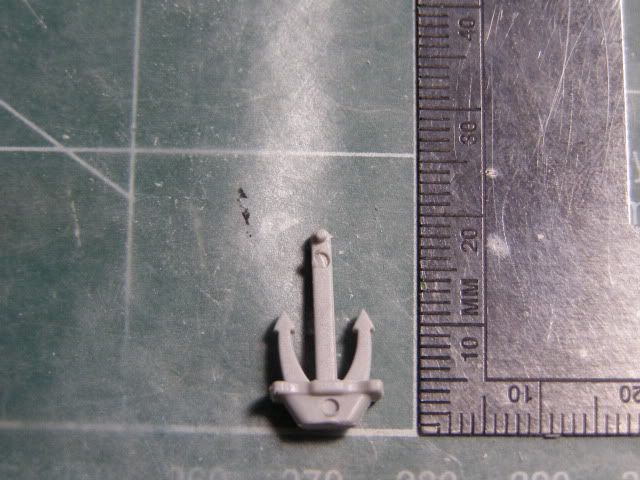
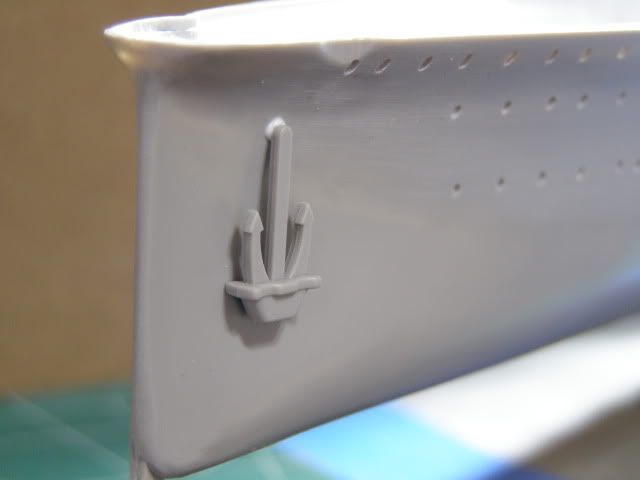
Tacked to the vessel

Photobucket

So does anyone know of "aftermarket anchors" or have some old kit ones laying about that would be better replacements ?

 Now where is that GORIZA  Wink [;)]


Sean "I've reached nearly fifty years of age with my system." Weekend GB 2008
  • Member since
    October 2004
  • From: League City, Texas
Posted by sfcmac on Saturday, September 19, 2009 4:19 PM

HA HA ! I told him if he was brave enough to post the Pola on the forum I would be crazy enough to join him. So here goes nuthin.

 I had built this kit way WAY back in the day when it still had the motorization feature and believe it or not was marketed as a Trumpeter kit. Guess it is Hobby Boss now but still the same kit without the motor stuff.

 Since Sean is building his as the Pola I decided to try for the Gorizia sister ship as it has a cool paint scheme.

This requires some major surgery to the superstructure.

Comparing pics of the ships in profile you can see some major differences such as how the forward stack is separated on the Gorizia as oppossed to being built in on the Pola.  This may have been built up later but I have no pics of the Gorizia in that config so chop chop!

I'll try not to repeat Sean's comments but here is my version of the reworked prop screws still in rough cut mode.

The rough start of the reworking of the forward superstructure.

Then smoothing out the works and redoing things like the fire direction thingies to match the pics I have better.  Adding the tripod supports was a real PITA but they show in the photo's . Much like the Japanese Pagoda mast structures in look.

 You can see them in the picture and on the box art but they are not in the model.

Well  hope this is a little different from the norm. I have seen post mentioning this model but none showing them built up?  Anyone been through this before?

Hey Sean!?! What are we gonna do about the life rafts or should I say absence of them? Make a Toast [#toast]

  • Member since
    September 2003
  • From: South Central Wisconsin
Posted by Daywalker on Saturday, September 19, 2009 10:39 PM

AHA!!!  So this is where you two have been hiding.  Quite a kit to build, bummer about the ejector pin marks.  I noticed on the more recent Tamiya kits they are starting to emulate the Chinese with LOTS of pin marks in conspicuous places! Yuck [yuck]

Sean- Nicely done on those prop shafts- bravo! 

Good on you Aaron for supplying those Arizona 'blades.  I see what you mean about the "pagodas", pretty conspicious feature of the ship, and they didn't include anything to replicate them?  Boo.

You guys are really making me want to build a ship model now.  

Frank 


  • Member since
    January 2006
Posted by EPinniger on Sunday, September 20, 2009 2:51 PM
Good luck with your builds! Looks like you've both made very good progress so far on improving the kit.

Converting Pola to Gorizia will be quite a challenge given the differences in both the forecastle shape and superstructure/bridge layout. The Italian manufacturer Tauro produce 1/400 scale kits of all 4 Zara-class cruisers, including Gorizia; MHM/HobbyBoss copied and scaled up Tauro's Pola as the basis for their 1/350 kit. The Tauro kits are still in production, but availability in the USA is probably very limited.
  • Member since
    February 2004
  • From: Weymouth, Dorset, UK
Posted by chris hall on Sunday, September 20, 2009 3:11 PM

I built the Tauro 1/400 Pola some 10 years ago. I used GMM's generic WW2 warship etched set, and did a lot of scratchbuilding, especially around the secondary and smaller armaments, and the masts and yards. Think I got off easier than you guys have with the Copyboss effort.

One point I did notice, Aaron, was the hull below the waterline. Tauro's instructions, which are probably more reliable than Copyboss's, have the anti-fouling in green, not red. Might be  worth looking into before it becomes too difficult to do something about it.

Cheers,

Chris.


Cute and cuddly, boys, cute and cuddly!
  • Member since
    January 2006
Posted by EPinniger on Sunday, September 20, 2009 3:23 PM

It might be worth checking this thread on Modelwarships.com; there's some useful information as well as links to some colour archive photos which are good reference material.

Regarding the lower hull anti-fouling colour, I hope Modelwarships member "RNFanDan" won't mind me quoting him here:

I have some information that may help but in full disclosure, I am writing from memory here, and at this time cannot locate the necessary documentation to back my words. I did some research into this very issue of red vs. green RM ship antifouling paint, a couple years ago or more. I was heavy-duty into Regia Marina ships around that time, and especially interested in modeling those wearing the green antifoul.

The main thing I learned from it all, was that the green paint was produced primarily by a factory not far from Trieste and the CRDA/Stabilimento Tecnico (and possibly other) shipbuilding facilities there. The factory produced a new kind of antifouling paint, pigmented green, developed specifically for the Italian navy.

Because of its experimental nature, its use seems to have been limited--with exceptions--to ships built at Trieste-area shipyards. However, especially during the war, RM ships were almost certainly repaired, refitted, and maintained at any available yard. It is therefore quite possible that red-hulled ships would have the green applied while at a Trieste yard, if such was included in the work to be done.

It is known that the factory's formula was very successful, and that it was used on the reconstructed Giulio Cesare. When that battleship was transferred to the Soviets after the war, it had lain idle and unmaintained for several years after the Italian Armistice. It was in bad repair all round, but much to the surprise of the Soviets, the hull was remarkably clean and free of growth below the waterline.

I am certain that Vittorio Veneto and Roma, both built at Trieste, had this green formula applied to their lower hulls. As to RM cruisers, it is known that Fiume was in green by wartime, but I do not believe Pola was--I'd be tempted to use red for her, in the absence of further evidence to the contrary.

I built Tauro's Fiume earlier this year, and painted the lower hull green; I used Revell's acrylic "Bronze Green" which looked like a reasonable match for colour drawings showing the green colour, though I don't know how accurate the latter were. The above quote suggests Pola had conventional red anti-fouling paint, but I have no idea at all about Gorizia!

  • Member since
    October 2004
  • From: League City, Texas
Posted by sfcmac on Sunday, September 20, 2009 4:05 PM

Hey I really appreciate the info fellows.  I checked out that think and am checking the pics for details. There are many I did not have .  I think the fellow in his memory may have mistaken the Pola and the Zara. From what I have been able to fine in some very old books. Janes Warships of WWII extc. It seems the Pola had the green primered hull and the other 3 sisters were of a more traditional red primer.  Something about when it was refitted with the solid forcastle. Location probably or the choice to compare the Green's effectiveness with her sisters. Just a bit of conjecture to try to reason it out.

The Gorizia I am doing in red.  Yes the Superstructure and Forecastle are a challenge.  It is good practice to see if I can pull it off using such and older kit. (but that is what makes it fun and affordable) Thumbs Up [tup]

 Above else it is about enjoying the hobby right?  Thanks for the info I am all over it! Thumbs Up [tup]

  • Member since
    October 2007
  • From: Inland Northwest
Posted by Summit on Sunday, September 20, 2009 6:02 PM
 sfcmac wrote:

Hey Sean!?! What are we gonna do about the life rafts or should I say absence of them? Make a Toast [#toast]

Im on it, made a jig up and been making them all morning. Made enough for both of us and then some...

Photobucket

Photobucket

Wow EPinniger thanks for looking and and providing the links. Those "Life" pics are full of details....Blindfold [X-)] 

Sean "I've reached nearly fifty years of age with my system." Weekend GB 2008
  • Member since
    October 2004
  • From: League City, Texas
Posted by sfcmac on Monday, September 21, 2009 12:31 AM

 Well I think those scratch built lift rafts are da BOMB! Well done!  I am working on the Anchors and will have some in the mail tomorrow to replace the fishhooks that are in the kit.

Ok It's oficial I have lost my mind and  scouring through the new pics I picked out details that I thought relievant to the Gorizia.

Spent all evening on just one side of the forcastle again.  I Built up the back side as close as I could without getting to ridiculas then added the bracing in areas that showed. Extended some walkways as a correction and added small sliver cuts of thin white styrene to kinda give an impression of stairways or ladders at least I hope so when painted.


 Not as good as a kit designed molding but not too shabby considering it is scratched and I don't have much practice on boats. 

 I also ground away the round deck extensions under the secondary guns. The Pics don't show them and the sides are flushed from every photo I have seen so poof they are gone.

Well calling it a night for now. Thumbs Up [tup]

  • Member since
    August 2006
  • From: The Great State of Wyoming
Posted by wyoroy on Monday, September 21, 2009 11:37 AM
Sean & Aaron, great work guys.

Roy (Capt. Wyoroy FAAGB/USNFAWGB)

John 3:16

  • Member since
    October 2004
  • From: League City, Texas
Posted by sfcmac on Wednesday, September 23, 2009 5:53 PM

 Wow I never released that there were such detail differences in the 4 sister ships.  You really never notice some of them until you start really staring at the stuff and trying to figure out how to make that?

Looking at specific pictures of the Gorizia I think I have the forecastle as close as I can using the kit parts. Really done so much to it I could have started over and built it all from scratch as most of it is anyways.

A lot of little touch ups to do to try and make it flow now. Spot painting, erasing pencil marks extc.


Although still kinda rough cut it is starting to come together and look like a ship. The only Photo etch I used is the Verlinden 1/350 rail sets that I have been relentlessly chopping up to make 2 and 1 rail details in the right place. The Yard arm was all scratched and the fire direction tower heavily modified to look like what was on the Gorizia.

Here you can see some modified brass railing to make the bar around the stack.

 Gonna clean up what I can and decide what to tackle next on it.

  • Member since
    March 2007
  • From: Carmel, CA
Posted by bondoman on Wednesday, September 23, 2009 6:09 PM
Those are fine models, gents. I do however think you are going to wish you'd painted all that brass before you installed it. Very nice- I'm getting motivated to finish mine.
  • Member since
    October 2007
  • From: Inland Northwest
Posted by Summit on Wednesday, September 23, 2009 6:54 PM

Aaron - The forecastle looks Fantastic, all those little extras have really made your kit standout ! The railing around the stack - Thumbs Up [tup]

I am still working in piles of sub~assemblies..  I noticed that the deck extensions on the Pola drawing were not "half moon" shaped so I cut them off and replaced them.

 Photobucket

About the only other real progress that stands out was some color sprayed on the lower hull.

 Photobucket 

Roy - Thanks for looking in Smile [:)]

Bondo - Thank you ! How goes the build on the San Francisco ?

Sean "I've reached nearly fifty years of age with my system." Weekend GB 2008
  • Member since
    October 2004
  • From: League City, Texas
Posted by sfcmac on Wednesday, September 23, 2009 9:06 PM

 bondoman wrote:
Those are fine models, gents. I do however think you are going to wish you'd painted all that brass before you installed it. Very nice- I'm getting motivated to finish mine.

Oh sure now he tells me? Confused [%-)]  Jump on in Bondo! We need more Italian ships!  They are beautiful boats and probably the best handling ocean going designs of their time!  Pity that more companies haven't  created some of the Beautiful Battle ships , cruisers and even destroyers, The artistic camo schemes I think are fantastic.Pirate [oX)]

  • Member since
    March 2007
  • From: Carmel, CA
Posted by bondoman on Wednesday, September 23, 2009 9:18 PM
Well, I'm midbuild on the USS San Francisco, and he did come from Assisi.....
  • Member since
    September 2003
  • From: South Central Wisconsin
Posted by Daywalker on Thursday, September 24, 2009 10:52 AM
Excellent work fellas!  Lots of fantastic details here.  So, how is it working with the PE railings?

Frank 


  • Member since
    October 2007
  • From: Inland Northwest
Posted by Summit on Thursday, September 24, 2009 11:21 AM

I didnt like the molded in deck rails / overhangs for the Life boats so I used a razor saw and sanding stick to make them go away.

Photobucket

I made this new wooden deck up out of some .020" styrene first try, the "Scribing Gods" were with me..

Photobucket

Now the fun part of making lumps of plastic to look like lifeboats Wink [;)]

Sean "I've reached nearly fifty years of age with my system." Weekend GB 2008
  • Member since
    April 2009
  • From: Chapel Hill, NC
Posted by Leonidas on Thursday, September 24, 2009 12:12 PM
Really great work going on here guys. Keep the updates coming! Smile [:)]
  • Member since
    October 2004
  • From: League City, Texas
Posted by sfcmac on Friday, September 25, 2009 5:49 PM

Hey thank you everyone for the comments and views. This has really turned into a fun and enjoyable challenge to be sure! Party [party]

I need to pay more attention to what Sean is doing as I totally missed that the kit had the rear main mast wrong as well. It is also a tripod to the first tier at least so chop hop again.

Also modified and mounted the auxillary boats. Didn't want to get to crazy now.

I found so old 1/350 AAA guns that I modified ( a little) They are very Little and replaced the kit ones and added the missing four that were on the Gorizia.

Replacement anchor chain courtesy of Sean!Thumbs Up [tup]

Here are a few more zoom and flash piccies that make things look a bit gloosy and fouled. From the table it is really looking sharp. I think the Camera must give the optivisor view.  I have been noting flaws I see to correct. Mostly hobby knife clean up and painting but on the whole it looks good.

Here are the positions of the 8 PE guns. Aft mast guns.


Forward Forecastle guns.


Stern buggers


and the forward behind the gun guns on perforated platforms with sprue supports.


Well now to tackle the Cranes and life boats!

  • Member since
    October 2004
  • From: League City, Texas
Posted by sfcmac on Friday, September 25, 2009 6:58 PM

Ok here is the start of the crane.

  • Member since
    September 2004
  • From: Vernon, BC, Canada
Posted by razordws on Friday, September 25, 2009 11:58 PM
Sean, Aaron, looking good guys.  Your putting a lot of work into these kits Thumbs Up [tup]Thumbs Up [tup]

Dave

  • Member since
    October 2004
  • From: League City, Texas
Posted by sfcmac on Saturday, September 26, 2009 12:07 AM

Hmmmm tough crowd tonight. Black Eye [B)]

 While I really like how the PE stuff adds to the look for the smaller forward crane for the aircraft which is not included in the Pola kit. I decided to go the old fashioned route. Spares box yielded and old crane from a kit long ago sunk in the river as a child no doubt.   Looking at the drawing provided  for the markings and colors ,which is much more accurate than the model itself, It seemed to be the right size. Close enough for me. Thumbs Up [tup]

 Now to spruce it up just a little with some 1/350 scratching.

I like the PE hook on the  big crane so to make my own I took some of my Pe rail cutting scraps and took a single rail cut in 1/2.  Then I simply bent it around a dowel made from stretched sprue and made the hook.

I then took the same sprue dowel and cut two cross sections small as I could to give round plastic pulleys.

 Using the shap small tip of the knife to pick up the small cross sections I trapped the hook between them and applied liquid cement to melt the whole thing together. Use  only a little or it will disolve the whole pulley!

 To really make things thin and interesting I stretched already stretched sprue to get the ultimate in this styrene but used the medium sized stuff as it was easier to work with and sturdy enough to build with.

 Put it all together and you have a not so bad scratched crane ready for painting and mounting.

Just to make it interesting I did all of this in the dark with my bare hands and standing on my head.  ( At least it felt that way! )

  • Member since
    October 2004
  • From: League City, Texas
Posted by sfcmac on Saturday, September 26, 2009 12:10 AM
 Sorry Dave musta posted at the same time!  Anyways Thanks and somehow, Yes even in the ship forum this has got to be your fault!!!!! Laugh [(-D] Ever since Ritchie talked me into that 1/72 PE for the Swordfish!!! Wink [;)]
  • Member since
    October 2007
  • From: Inland Northwest
Posted by Summit on Saturday, September 26, 2009 12:34 AM

Fantastic Crane Aaron Approve [^] Thumbs Up [tup]... My question is how many pulleys did you lose ? On my Lifeboat crane I have lost over half a dozen to places unknown to me in my Hobby Room. They all dissapeared by the sound of a Tweezer snap  Taped Shut [XX]

 I need to get some more progress posted- eh tomorrow will work for that..Whistling [:-^]

Sean "I've reached nearly fifty years of age with my system." Weekend GB 2008
  • Member since
    August 2006
  • From: The Great State of Wyoming
Posted by wyoroy on Saturday, September 26, 2009 8:50 AM
Aaron, great work on the crane.

Roy (Capt. Wyoroy FAAGB/USNFAWGB)

John 3:16

  • Member since
    October 2004
  • From: League City, Texas
Posted by sfcmac on Tuesday, September 29, 2009 7:50 AM

I am overdue for an update here so I shall try to show a bit more progress. Sean and I undertook this project thinking it was going to be an easy quick practice to hone our skills for bigger and better kits. So far we both have worked all month on it finding little ways to improve on this old kit.

I made a very small flag pole that looked in scale with the live photo's he supports are 1 rail of PE railings cut in 1/2.

Then I turned my attention to the forward deck. Figured it was time to start nose to tail and get it all together.

Sean's anchor chain looks perfect to me! He also suggestested small boxes to mark where the chain originates at the deck! Brilliant!

The anchors are cast copies of the Banner Arizona kit. Modified to look like the photos of the actual ship again. Small stretched sprue placed into drilled holes and forced down into them made a good anchor lock with which the anchors lock onto and hug as in the pics again.

A piece of scrap PE from the Trumpeter Swordfish was cut. (tough stuff ) to shape and used to  elevated the catapult platform slightly.

I used this great picture as my reference. Notice the platform which the aircraft sits on to ride the catapult?

Using some scrap railings again I bent and formed the platform into shape and painted it semi gloss black.

The little details are starting to add up and make a good visual difference.

The aircraft was kinda lifeless and bland in my eyes. So going in blind as I had no idea of the type I started detailing it.

The great fellows over at the RA GB helped me to ID this recon plane as the RO-43.

They are a great bunch of fellows over there! Bondo and Guy jumped on this question before I could spell airplane.Bow [bow]

So I kept on detailing the 1/350 recon RO-43 Drilled out crew compartments added floats and some struts with the scrap PE railings again. Good stuff! 1000 uses!

Notice the tail stripes? Wrong way they should be vertical! Did this at 3AM and Sir Bondo didn't let me get away with it!

Looking much better especially after I fixed the tail.

Getting there bit by bit. Sean's scratch build life rafts are awesome!  None in the kit were given and his match up perfect to the pics. Thumbs Up [tup]

This project is a massive team effort and I really appreciate all the help and comments. You all are the best!

  • Member since
    October 2007
  • From: Inland Northwest
Posted by Summit on Tuesday, September 29, 2009 11:57 AM

Hey Aaron - What happened to this being an OOB Build ?  Your Goriza looks very busy with all the scratchbuilt additions.. Thumbs Up [tup] Yours looks ready to deploy and mine is still dry docked on the bench.

I also rebuilt the life boat crane... The kit's boom wasnt to my liking so with some wire, aluminum tubing and stretched sprue here is my replacement.

Photobucket

 Started adding some railing to the structure, also used a 7 mm length of a "soda straw" to hide the button tab under the forward secondary gun..

Photobucket

And lots of masking and painting as my hand is hardly steady enough for brush painting.

Photobucket

Photobucket

Photobucket

This mornings progress the stripes for the "candy cane" forward deck .

Photobucket

Now to start adding the little details..Thumbs Up [tup]

Sean "I've reached nearly fifty years of age with my system." Weekend GB 2008
  • Member since
    September 2003
  • From: South Central Wisconsin
Posted by Daywalker on Tuesday, September 29, 2009 8:20 PM

Man, you guys are good!  Scratchbuilt details?  Custom painted 1/350 aircraft?  Real anchor chains?  PE parts? Shock [:O]

Love that little plane Aaron.  And Sean- that striped fore deck- YOWZA!!!

Seriously, this is good stuff.  No, I mean REALLY good stuff.   Keep it up fellas, good to know who to come to when I build a ship. Bow [bow]

Frank 


  • Member since
    October 2004
  • From: League City, Texas
Posted by sfcmac on Wednesday, September 30, 2009 12:39 AM

 Hey thanks Frank!  Your doing tanks now! Heaven help us if you invade the ship forum!!!! Laugh [(-D] Jump in the water is fine!

Sean that candy strip marking looks good enough to eat!

 I got some good work done today though, the ship is rigged and spot painting mostly done except for some lighter gray.  Maybe some railing touch ups.  Really going to pre paint the big round the hull jobbers.

Still thinking about where to put the life boats on mine. The location on the ship has no boats in my pics of the Gorizia but maybe farther up with the hoist in a stowed position as far as I can tell.

Hmmm still thinking on it.


You can start to see how the roughness and little oopsies are being cosmetially covered with details that grab your eye.  A bit more and it should almost pass as a ship? LOL!

Got another idea!

I was putting on my rails when I realized I forgot the straw tip you mentioned for the secondary guns!  Finding Dee's left over diet soda I stole her straw!  Why do people chew straws? But I found an unchewed area and went for it!


Then It dawned on me I have hollow plastic shafted pointy Q-tips! So I did the same thing!


Why would he do that tou ask? Well paint then red. Add some white. and presto!


 Life savers!  A little big. Not much I think they will pass on the rails if not overdone!


Whatcha think?


  • Member since
    June 2008
Posted by lewbud on Wednesday, September 30, 2009 12:09 PM

Sean,

I think you're falling a bit behind, get crackin sir!

Mac,

Looking good.  Would've never thought about using the qtips as life preservers.

Buddy- Those who say there are no stupid questions have never worked in customer service.

JOIN OUR COMMUNITY!

Our community is FREE to join. To participate you must either login or register for an account.

SEARCH FORUMS
FREE NEWSLETTER
By signing up you may also receive reader surveys and occasional special offers. We do not sell, rent or trade our email lists. View our Privacy Policy.