SEARCH FINESCALE.COM

Enter keywords or a search phrase below:

"Rite of Passage" the 1/96 Constitution

60928 views
155 replies
1 rating 2 rating 3 rating 4 rating 5 rating
  • Member since
    November 2016
Posted by Kilo 66 on Wednesday, January 30, 2019 12:24 AM

 The answer to your question can be found starting at about :40 or so here:

https://www.youtube.com/watch?v=mQSBxQiLSyQ

 The video shows a simulated loading of a "cold" 24-pounder by the crew of USS Constitution, including use of the rearmost line to haul the gun inboard sufficiently to allow for initial loading, as you surmised.

  • Member since
    May 2018
Posted by Richwood7 on Wednesday, January 30, 2019 12:08 AM

Question:  I understand the need to pull the cannon back after a shot due to its recoil.  But I do not see any means to pull the cannon back to load the first shot!  It seems to me there neds to be some metal ring at the tail end of the cariage, attached via a rope to a pully so as to pull the cannon back to clean and reload.  Else you would need someone on the outside of the ship to load it!  Where are the attachment points, are they put in just before combat so as not to interfere with foot trffic behind the guns?  Any answers?

  • Member since
    November 2016
Posted by Kilo 66 on Thursday, November 24, 2016 10:07 PM

Such superb crftsmanship as this, so cleanly executed, is always insipring.

  • Member since
    January 2012
  • From: Atlanta Metro, Georgia
Posted by fright on Monday, November 14, 2016 3:58 PM
arnie60 - can youtell me, did you make the buckets for your deck or were they purchased? If so, who from and what was the size? Your build looks very nice! Thanks for sharing these photos.

Robert O

  • Member since
    January 2012
  • From: Atlanta Metro, Georgia
Posted by fright on Thursday, November 10, 2016 11:28 AM

Arnie60 - really nice work! Did you use the eye bolts that came with the ship on the bulwarks for the guns? Do you remember what size drill bit used for the eye bolt holes? Thanks for your post and for any tips!

Fright


Robert O

  • Member since
    January 2012
  • From: Atlanta Metro, Georgia
Posted by fright on Wednesday, September 28, 2016 9:53 AM

Arnie60 - can you tell me where did you locate your barrels and crates or were they handmade? Your work on this model is fantastic!


Robert O

  • Member since
    April 2016
  • From: Russia, St.Peterburg
Posted by kirill4 on Thursday, June 9, 2016 2:45 AM

Good day Arnie,

Yuor job is nice!  I like it very much!

but, looks like there is smthng big wrong with your anchors...at least, it looks like on the fotoes You posted...???Tongue Tied

pleased to hear ,why they assembled like this? all parts in one plain...

  • Member since
    June 2012
Posted by arnie60 on Wednesday, June 8, 2016 4:26 PM
The steps are in my build log, but just to clarify, the gun deck was assembled and the veneer glued on before placement. The spar deck was assembled and glued to the hull and then the veneer was attached. All the steps for the hammock cranes are in the log as well.
  • Member since
    January 2012
  • From: Atlanta Metro, Georgia
Posted by fright on Tuesday, June 7, 2016 9:14 AM

Arnie - did you install gun deck before you adheered the venner to the deck? Thank you for mentioning ScaleDecks' site. After attempting puttying seams and two attempts at coloring, I saw your deck and ordered a set for my build. I also love your hammock nettings with hammocks! Would you be willing to share your steps on that one? This is my 1st try at building a sailing ship and, like many, I thought I'd start with a piece of history. Your build is really amazing in both research and in realism! Compliments to the chef!!!  Thank you.

Robert O

  • Member since
    February 2015
  • From: UT
Posted by ageofsail on Friday, December 18, 2015 3:46 PM

Sorry for the months late response Arnie but summer got in the way. At any rate, thanks for the advice, following your lead and Force9's build plan, I went ahead and ordered Blue Jackets rigging plans as well as deciding to build and rig the channels from scratch, and so ordered their dead eyes and blocks as well, they just arrived Wednesday, wow! Talk about detailed plans! That said, is your experience thus far with Syren accurate in relation ship to Blue Jackets cordage guide or is scale an issue? I'm leaning toward going with their plans as correct and ordering based on that assumption I would just like your input if you don't mind. Thanks, Dan

  • Member since
    June 2012
Posted by arnie60 on Wednesday, April 22, 2015 8:42 PM

Dan;

I forgot that I do have this chart which may help.

You have to fudge it on some of the sizes, but at that scale not really noticeable.

  • Member since
    June 2012
Posted by arnie60 on Tuesday, April 21, 2015 8:17 PM

First off, I think I can say w/ certainty the line from Syren will be totally accurate in measurement. Chuck has a penchant for detail and accuracy. I can't vouch for Artesania and the accuracy of their line size which may account for the discrepancy in sizes. As well it may be that Artesania is using millimeters instead of inches.  I have never used their cordage so I don't really know.

Now as to the sizes that I am using for rigging, well...I have been using the rigging plans from BlueJacket (well worth the money I spent on them!)which lays out each lines appropriate size in the rigging steps, so I haven't needed to make a list, which would be rather extensive.

Example: The fore and main shrouds call for 9.5" diameter line which equals about  .03" for 1/96 scale.  

A couple of resources you can use for this are Longridge's "The Anatomy of Nelson's Ships" which will give you a general guide for ships of that period, and Marquardt's "Anatomy of the the ship, the 44-gun frigate USS constitution" I would also recommend Lennarth Peterson's "Rigging Period Ship Models" for clear depictions of how each part is rigged.

Hope this helped some.

  • Member since
    February 2015
  • From: UT
Posted by ageofsail on Tuesday, April 21, 2015 2:15 PM

I have a question Arnie, I just purchased some Syren cordage, not much, just enough to get started on some of the lower rigging and replacing the lower sheet lines I already pre-installed with some good stuff.

When I finished my Cutty Sark recently I had purchased some .050, .025, & .015 Artesania Latina thread and was VERY disappointed in the quality, and the stuff that came with my Connie kit is a joke and will no way be used. As I had told you recently I was planning on following your suggestion regarding running rigging from Syren, and will probably follow Evans suggestion regarding CIM cordage for standing.

That said, I ordered some .054 & .035 original tan which arrived yesterday. Boy was I in for a surprise! First off, the quality is amazing, it truly is some quality stuff. However, the scale difference is off the charts.I had assumed .054 From syren would be about the same size as the Artesania stuff but it's huge by comparison! The .035 is actually very slightly larger the the Artesania .050. see the photo below:

So here is my concern, I will be using probably 4-5 sizes of tan cordage and I am curious what size you are using, unless I'm off base here, this .054 is waaay out of scale for this build and I am tempted to use .045 for the lower lines but I don't want to order it and have it be too large also. The .025 looks like it would work but still looks slightly undersized. This especially becomes an issue regarding have too small a size standing rigging which needs to be at leas the same size or larger on the lower part of the ship. I am thinking for the lower rigging .045 standing and running but I'm gun shy about it being too big when it arrives.

Any thoughts? What size are you using? Oh and Evan and Professor Tilley, please feel free to weigh in on this, I want the rigging to be the highlight of the ship so I want to make sure I get it right, I've always used kit supplied cordage but never again!

Thanks in advance,

Dan

  • Member since
    June 2012
Posted by arnie60 on Thursday, April 2, 2015 10:56 AM

Thank you Dan.

Good luck on your build, and if I can help in any way, just let me know. And yes ...(SIGH!) I am looking forward the the finished photos too.

  • Member since
    February 2015
  • From: UT
Posted by ageofsail on Thursday, April 2, 2015 10:46 AM

Hi Arnie, this is my first reply to you but I have been following your build long before I even signed up here, your work is amazing! I am in the fairly early stages of my version of the Constitution ( cs.finescale.com/.../164251.aspx ), my 4th 1/96 Revell kit, and have been referencing your blog for my build as well as Force 9's EXCELLENT build and just wanted to drop you a note to say thanks for this blog, it has given me some good pointers, especially the method you used to hang cordage off the pinrails. I've tried other methods in the past with nowhere near as good a result.

Again, great job, looking forward to the finished photos!

Happy modeling!

Dan

  • Member since
    December 2003
  • From: 37deg 40.13' N 95deg 29.10'W
Posted by scottrc on Thursday, January 22, 2015 11:43 AM

Sorry, Arnie, I didn't mean the rigging layout in the Revell kit, but how the boom is attached, and its really no fault to the kit, but because I am no longer a fan of plastic masts and spars after building in wood.  

  • Member since
    January 2015
Posted by rdiaz on Thursday, January 22, 2015 2:58 AM

Speaking of the Hull model, one thing that I noticed in the easy build kit is that the head rails are quite simplified, but then I looked at the Hull model and realized they actually look like that. It looks as if the head rails on the 1/96 model are based on a different source...

  • Member since
    June 2012
Posted by arnie60 on Wednesday, January 21, 2015 8:01 PM

I am quite pleased that others are finding my log helpful. I know I owe a lot to other modeler's logs that have helped me, so its nice to know I am giving a little back.

Scottrc;

Actually, the Revell instructions are pretty good. One could argue that they are in fact quite reliable based on the idea that the details of a ships rigging could vary substantially from one Captain to the next, and my understanding is that the entire model was based on the Hull model.  

The nice thing about "contested facts" is that no one can say definitively whose right or wrong. All we can do is form an opinion and back that up as best we can. The reason this is a good thing, IMHO, is that it offers some license in our representations, which I have taken advantage of on several occasions. And more than once in the favor of aesthetic reasons rather than adherence to accuracy.

Or put more simply, its your model. It's not going to end up on my mantel, but yours. Make it the best for you.

  • Member since
    December 2003
  • From: 37deg 40.13' N 95deg 29.10'W
Posted by scottrc on Wednesday, January 21, 2015 1:26 PM

Great tutorial on how you did the Spanker and Gaff.  I will want to look at doing it this way on my kit since I do not like the plastic booms nor how they are set per the kits instructions.

  • Member since
    January 2015
Posted by rdiaz on Wednesday, January 21, 2015 3:37 AM

I thought I'd use my first post to tell you that the work you're doing on this model is amazing.

I'm just starting with the "quick build" 1/150 version and plan to add as much detail to it as I can - your work will be very inspirational in the process. Congrats, she's looking great!

  • Member since
    June 2013
Posted by RobGroot4 on Monday, January 19, 2015 4:22 PM

Happy to help, beats watching paint dry!

Groot

"Firing flares while dumping fuel may ruin your day" SH-60B NATOPS

  • Member since
    June 2012
Posted by arnie60 on Monday, January 19, 2015 12:25 PM

Thanks Groot! Doh! Had no idea there was white decal paper, although, the 15 seconds it took to spray the foil from a rattle can was not a big deal.

  • Member since
    June 2013
Posted by RobGroot4 on Saturday, January 17, 2015 3:54 PM

When you redo your flag since you are printing it yourself, Testor's makes both clear and white decal paper for inkjet printers.  The white paper is pretty much solid white so you'll have to trim carefully around the edges, but it should save you a step.  

Your ship really looks awesome!

Groot

"Firing flares while dumping fuel may ruin your day" SH-60B NATOPS

  • Member since
    July 2010
  • From: Tempe AZ
Posted by docidle on Saturday, January 17, 2015 10:55 AM

Arnie,

All I can say is DANG! That is some impressive scratch building.

Steve


  • Member since
    June 2012
Posted by arnie60 on Saturday, January 17, 2015 1:49 AM

Spanker Boom and Gaff

(spank her boom and gaff ?) [groan!]Confused

This is probably premature in the process, but I could not see a strong reason not to go ahead and rig the spanker boom and gaff and put up a visible goal line so to speak

I followed the BlueJacket plans of course, and replaced both kit pieces w/ scratch built wood ones.

The hardest part was fabricating the throats of each piece. According to the plans I needed to taper the yards then 'flatten' the ends (ensuring that they are parallel was tricky) and laminate additional wood to the flattened pieces to form the throat.

Once that was done, I had to form the throat by drilling a pilot hole in the correct location and then use successively larger bits until I got a hole 1/8" in diameter to fit the tri-sail mast that I replaced the kit part w/ a 1/8" dowel, after which I used a rat tail file to shape and finish the hole. That done, I cut off the excess at the ends to open the throat.

I used .08 in. line for the bandings.  All things considered, they came out pretty good. I originally wanted to leave them stained like the masts to further showcase the wood, but they are in fact yards, not masts, and all the yards are black. 

Here is a side by side of the kit pieces w/ the scratch pieces before I painted them black. The kit pieces were so flimsy, and the spanker was warped on the sprue.

And the final product.

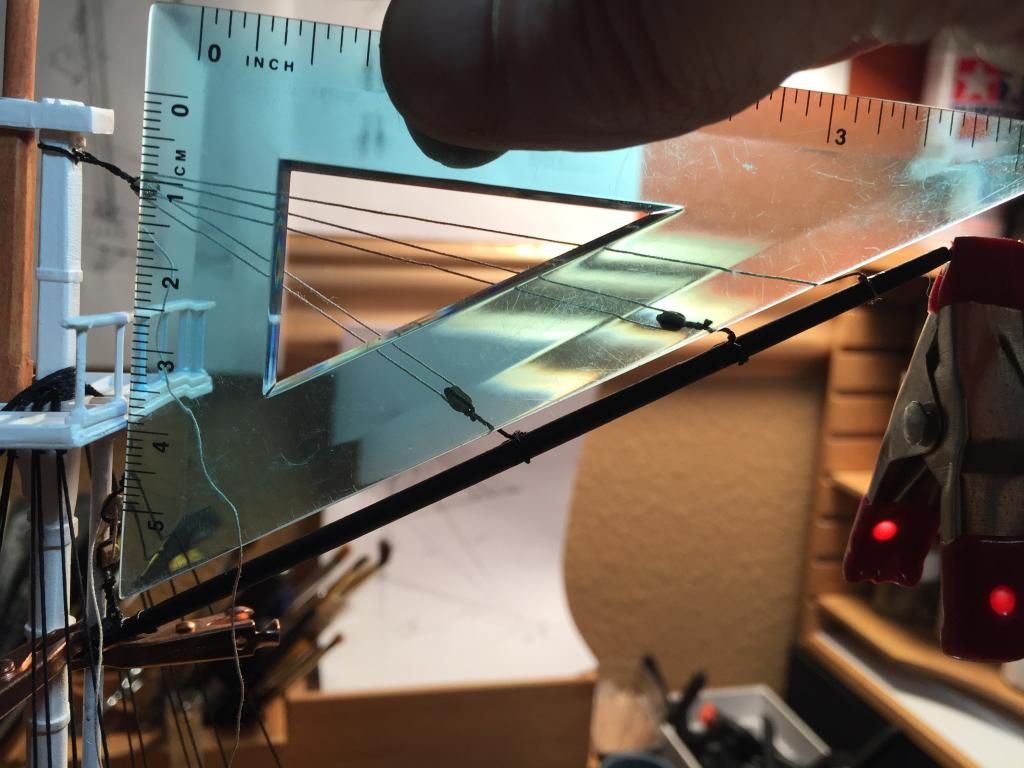
The rigging proved to be a little bit tricky. You can see that I had to use some ingenuity and balance w/ my clips to get the gaff rigged. The small copper clips I picked up from RadioShack for a pittance. They are non serrated, tiny, and really quite strong. Can't tell you how handy they have proven to be.

One aspect of the gaff is that it needs to be set at a 60 degree angle to the mast, meaning the throat had to to angled accordingly. There is no way in hell to tell if you are filing something at 60 degrees by sight alone, so I had to file some, fit and test, using a 30/60 triangle to approximate by. It came out close enough in the end.

Rigging the spanker top lifts had some quirks as well. Got out the big boys for this. The clip at the end of the spanker is from Home Depot, and I use these and the cooper ones more than any of the plastic ones I picked up from the LHS for three times the cost. 

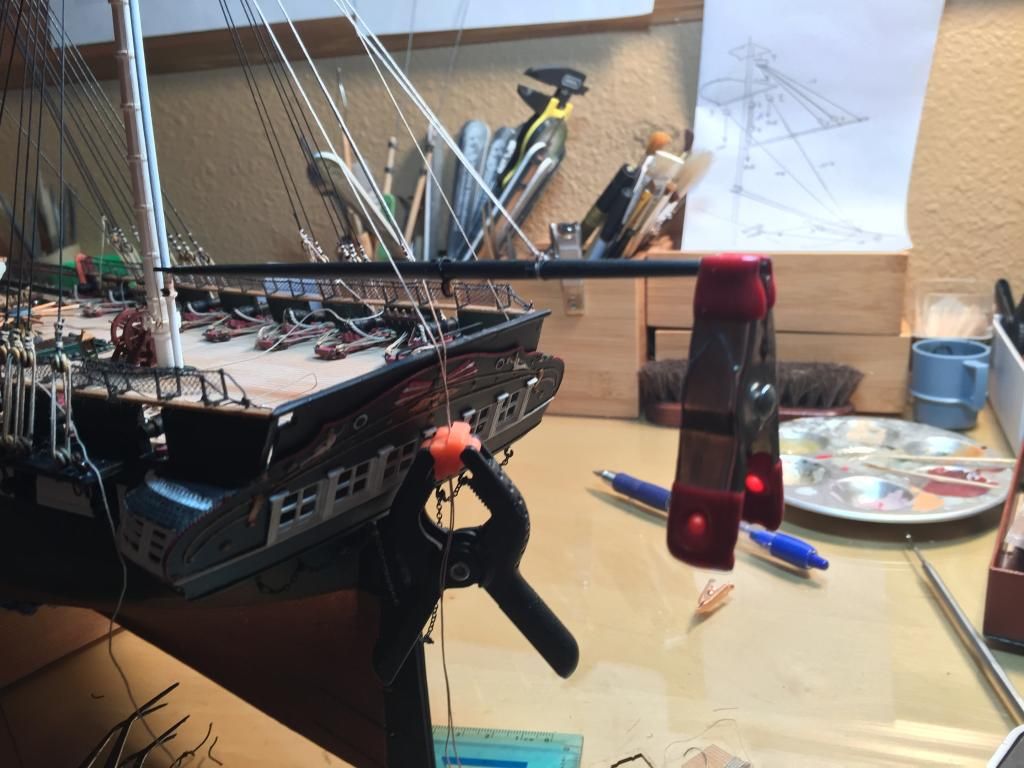
And finally, rigged, and all in place. [ I have been continually surprised at how closely the Revell rigging instructions mirror the instructions from Blue Jacket, so if you went with Revell alone, you would be well within the "correct" rigging. (caveat: I haven't compared it to the rigging for the sails since I am not bothering w/ any of it)]

I am continually enraptured w/ all the geometry that occurs here. [You can see the rigging diagram I made from the BJ instructions in the background.]

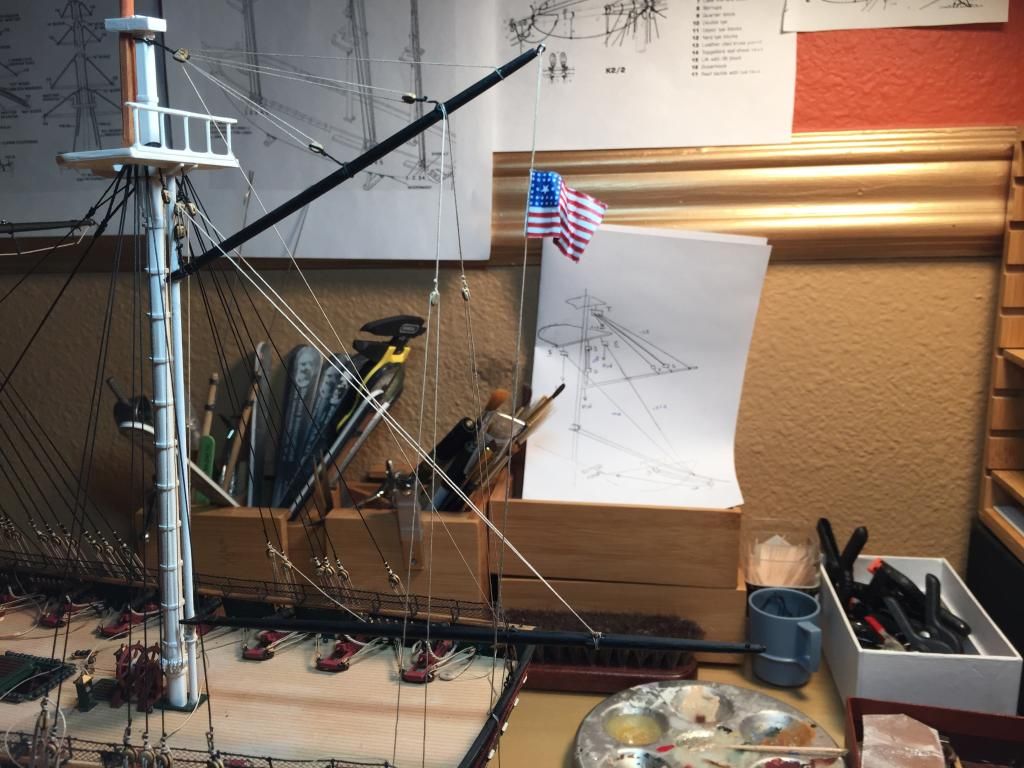
The flag was an interesting adventure in discovery as well.

I have said that I plan on staging her after her 1856 overhaul, so I had to do a little research about flags for that period. And there are, as it turns out, just about as many different styles of American flags for the period, and so many other periods also, as there are stars (and stripes) in the sky.

The flag I chose here is one that was used by the Navy from around 1778 - 1780. This particular style is called Trumbell with the large center star in a square canton. In the 1850s there were a total of 31 stars.

I picked up a very cool trick from somewhere, which I wish I could take credit for, on how to make flags that look more realistic, and finally got the chance to try it.

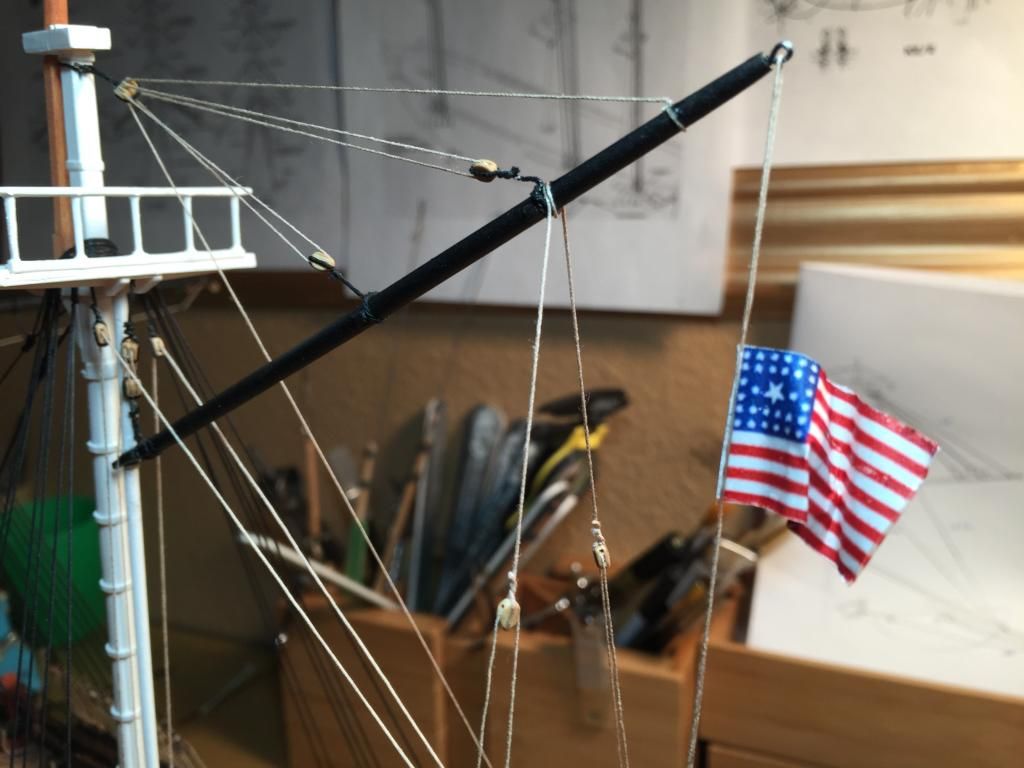
The trick here is aluminum foil if you hadn't guessed or didn't already know.

This was just sheer genius from my perspective, since it's so simple.

Make a set of mirror image decals. Attach one to each side of a piece of tin foil. Shape as you like.

Well... there was one problem that has been belabored to death. The stripes are white, and you can't print white from a printer, so you get a flag w/ red and clear stripes, which would give you red and silver stripes once attached to the foil.

Solution. Spray a light coat of white on the foil before applying the decals.

I am going to have to redo this one, since dull-coat really is not the right way to set decals for transfer, and you can see its a bit ratty.

Anyway... that's about it for now. Hope some of this may have helped and/or edified.

  • Member since
    May 2003
  • From: Greenville, NC
Posted by jtilley on Tuesday, December 30, 2014 3:42 AM

That book - at a bargain price - is a real find. Most copies of it I've seen advertised on the Web have been hideously expensive.

I was lucky enough to pick up all the volumes of the Conway's History of the Ship series one by one, as they were being published. (There are twelve volumes in all.) Whenever a question of when something was introduced, or just what some word means, comes up, those books are the first places I check. They aren't exactly new any more, but I know of no other works that do as good a job of summarizing the current scholarly thinking about the history of ships.

Some of the volumes cover subjects that just aren't covered in any depth elsewhere. The Age of the Galley is the best and biggest treatise on ancient naval architecture I've seen. But all the volumes are good. And each contains an annotated bibliography to steer you in the right direction if you want to pursue something in more depth.

For a while the whole series was available in paperback. But now even the paperback copies are expensive. Like I said, Arnie lucked out.

Youth, talent, hard work, and enthusiasm are no match for old age and treachery.

  • Member since
    June 2012
Posted by arnie60 on Tuesday, December 30, 2014 12:06 AM

Evan;

As always, your comments and input are greatly appreciated. I was pretty much hoping that,considering your extensive knowledge base, you would chime in on the Mizzen stay and give us the "correct" setup,especially in my having some doubts about the verisimilitude of my compromise. I am very much looking forward to your next post on your own build. Much of the direction I have taken here was inspired by your penchant for qualitative work.

As an aside. I picked up a (to me) simply wonderful book by chance in an out of the way bookstore the other day for $14.


Conway's History of the ship "The Line of Battle" The sailing warship 1650-1840 ISBN 0-7858-1267-9

Chronicling the evolution of the sailing warship in quite some detail w/ copious references, drawings, paintings and photos that clearly relates the why as well as the how of all aspects of development, including decorations, Fireships and Bomb vessels (which I had never heard of before), oared warships and support craft are covered as well. What I found particularly edifying was the sections on Naval Tactics (where now I no longer mistakenly understand what a "ship of the line" actually means) and seamanship as it pertains to how these incredibly huge square rigged vessels maneuvered w/ surprisingly remarkable speed and extreme finesse.  This book may well be known already to many of you, but I wanted to recommend it for others like myself who are still "new to the game" as it really, really puts things in perspective and answers a ton of questions I have been dancing around for some time.

  • Member since
    June 2010
  • From: Irvine, CA
Posted by Force9 on Monday, December 29, 2014 6:37 PM

Arnie -

Catching up on your fine build... Love the anchor, the rope coils, and the Bentinck shrouds!  Your solution for the mizzen stay is a nice compromise.  The Hull model shows the stay essentially blending into the "shark's mouth" that straddles the mast with no lanyards as suggested by the BJ Manual... Really tough to do at this scale.  I very much like your approach with the open heart, etc.

Now that I'm back at it with my own build, I'll be keeping up on yours for more insight as you proceed.

Great work!

Evan

  • Member since
    May 2004
  • From: Mount Bretherton Model Aircraft Observatory
Posted by f8sader on Sunday, December 28, 2014 9:59 AM

So impressed, every time I see this!

Lon-ski

JOIN OUR COMMUNITY!

Our community is FREE to join. To participate you must either login or register for an account.

SEARCH FORUMS
FREE NEWSLETTER
By signing up you may also receive reader surveys and occasional special offers. We do not sell, rent or trade our email lists. View our Privacy Policy.