SEARCH FINESCALE.COM

Enter keywords or a search phrase below:

"Rite of Passage" the 1/96 Constitution

61006 views
155 replies
1 rating 2 rating 3 rating 4 rating 5 rating
  • Member since
    June 2012
Posted by arnie60 on Sunday, May 4, 2014 4:09 AM

Thanks Steve;

The chain is 21 links per inch. .

From what I could discern from various resources is that chainplates varied from ship to ship, in part based on what was available in the area where they would be fitted or re-fitted. The use of single flat or round iron bars (as she is currently configured) came into popular use around the late 1830's.

I seriously thought about redoing the starboard, but once you have set the shrouds and the fighting platform and jeers, it is pretty much a done deal and there is no going back w/ out trashing a whole lot of good work as well. Hind sight tells me I should have rigged the deadeyes before I ever attached the main jack and platform..The upside of making mistakes like this is that the lesson is usually painful enough that you are going to do your damnedest not to repeat it.

  • Member since
    July 2010
  • From: Tempe AZ
Posted by docidle on Sunday, May 4, 2014 2:46 AM

Arnie,

She is coming along nicely and I love the chains; how many links per inch did you use?  I know how frustrating it can be when doing rigging and it is not coming out as well as you would like.  Heck, I have taken down rigging that I was not happy with.  It can be a major pain but I know that it would be bugging me until I did something about it.  Just my two cents worth.  You are doing a bang up job that you can be proud of.  Thanks for posting the pictures since I, like so many others, have this kit in their stash and I am learning a great deal from your WIP.

Steve


  • Member since
    June 2012
Posted by arnie60 on Saturday, May 3, 2014 6:57 PM

Shake, shake, shake yer booty.

I have had little to no time to work on my build this past month and a half, and w/ my shaky hands keeping me from working quicker, things are moving at a snails pace just now. I am hoping to get more time coming up soon.

Anyway...here is the progress since my last post. 

This is the starboard side and my first run on doing the shrouds and chainplates which did not come out as nice as I would have liked. You can see that in spite of using a jig for the deadeyes that they did not come out perfectly even, but pretty close, and the tie offs are rather sloppy and uneven as well. The port side came out much cleaner. I guess that I will be staging the model so that it is viewed from the port side.

I also added the BlueJacket airports. It looks so crisp and finished w/ the brass that I doubt that I am going to paint them and fall back on my argument that I am staging her after her 1858 overhaul. New airports seem reasonable enough.

The above is the port side (much cleaner - by the time I get to the portside mizzen mast, they should be nearly perfect) and I have begun running the rat lines. I ran w/ a clove hitch for the first two courses, but fell back on a simpler overhand knot. Looking at them, I can't tell the difference and it goes considerably quicker. Still, it is quite tedious and my palsy slows me down even more. Meh...no hurry.

I also managed to rig the topmast shrouds on the starboard side. You can see the port side is just tacked for now. The running rigging that you see above the jeers are the lifts for the main jack. I will only be adding the braces and halyards and no clew or bunt lines as these pertain to the sails which I am also leaving off. I figure I have definitely exceeded my skill and ego on this one and am calling it a win just to finish w/. only that much done.

This is a shot of the futtock and betnick shrouds that are rigged on the starboard. These proved to be quite challenging. Addding the futtock stave made from brass rod was actually really quick and easy which led me into a false sense of ease. Attaching the futtock shrouds to the stave and then the tails to the thimble was an interesting puzzle in vector calculus so as to get all of them to have the right tension on them. Note that the port side is not done yet. I am saving it for a day when I am already frustrated and angry (joke).

Okay

That''s all I have for now. Hopefully I am freeing up some more time to work on her this month.

Until then.

  • Member since
    June 2012
Posted by arnie60 on Thursday, April 10, 2014 11:58 AM

Thanks for the Kudos everyone.

Evan... the deadeyes are walnut and are actually model shipway products, which fortunately a relatively close by hobby ship carries a decent supply of. My experience w/ ordering from Model Expo has often ended up w/ me often getting a " on back order" notice instead of what I ordered. Granted, none of those items were from model shipways. I have a considerable amount of cordage that I ordered from BJ which has been working out fine for the standing rigging, but all my blocks and running rigging are from Syrene. (BJ supplies totally white cordage for that, which a lot of is pre- waxed, so even if I were up to dying it all, the pre-waxed lines won't take the dye. Syrene is a bit spendy, but so totally worth the money to me.

  • Member since
    June 2010
  • From: Irvine, CA
Posted by Force9 on Wednesday, April 9, 2014 11:12 PM

Looking very good for a first timer!  It is clear that you are focused on the details - even if you are your own harshest critic.  

The deadeyes look great - where did you source yours?

Keep on keeping on!

Evan

  • Member since
    November 2012
Posted by abishag98 on Monday, April 7, 2014 5:37 PM

Awesome job, as always Randy!

  • Member since
    March 2006
Posted by TD4438 on Sunday, April 6, 2014 11:50 PM

What a work of art.

  • Member since
    June 2012
Posted by arnie60 on Sunday, April 6, 2014 10:46 PM

First some pics, then a hopefully not long winded synopsis.

Well, as can be seen, I have most of the lower foremast rigged including the stays. Running the shrouds was actually the easiest and fastest part of the whole process. You can see in the next to last pic that I only rigged the first and second shroud and the rest are just tied down in anticipation of needing access to the pin rails. I followed the BJ plans on this where there are only 9 shrouds total. The first shroud is a single rather than a pair and is rigged w/ blocks instead of deadeyes. Its designated as a "swifter". Not sure what that means or why it was rigged differently than the other shrouds. If anyone has knowledge of this I would be glad to be informed about it. You probably notice that I cheated somewhat w/ the chain plates which I was agonizing over how to do them. While perusing Longridge for ideas, there was an illistration using regular chains. I had some left over chain from the rudder and some extra belaying pins which I nipped the heads off of, drilled holes and used them to attach the chain to the backing link. I used a small piece of brass wire to connect the chain to the deadeye strop and used CA to secure it. The connecting loop is not soldered, but you really cant see it since the gap is to the back. I am going to have to order some more chain.

In the first pick you can see where I attached the forestay and fore preventer stay. My research showed several different locations, This is what I settled on. The snaking turned out to be a real pain. I finally ended up using CA to stiffen each run to maintain an even spread. All in all it turned out pretty good. Oh..and the mouse for each stay is way, way out of proportion. I used some miliput to make them, but somehow did not realize that I was making them way to big.

The next shot shows the jeers, sling and horses for the yard. I chose not to use black for them solely for asthetics.  Rigging the jeers and the sling was quite arduous and you will note that I did not take any real close ups so that you can't see my mistakes, The hardest part was getting the jeers sling on the masthead right. I had to run the jeers line up and run a turn of the sling around the jeers strop line which I then weighted down with a clamp so that I could adjust the "hang" of the sling for each side. Again, not ever going to be in a museum, so they came out good enough. The next pic gives a top down view showing the yard sling as well. The two blocks w/ black line running aft are for the main topmast stay and preventer which run down to a set of blocks and lanyards attached to an eyebolt on the deck next to the fore mast.

The third pic shows the hearts and stay collars. I ordered the BJ britania metal hearts and really wish I had gotten wooden ones instead. They just did not want to blacken or hold paint. I finally ended up soaking them for 10 minutes in blacken it, then spraying on some dull-coat. Still not happy w/ the results, but now its done and looks okay. The lanyards are, through my own lack of focus, the wrong size. They scale out to 3.5 inch, but should have been 6. I may go back and rectify them at the point where it is just annoying me too much.

Overall, my work is coming out a bit more sloppy than I would like, but I have to take into account that I have never attempted to do this kind of rigging before and I don't know all the ins and outs of making things work right and I am constanly jumping between reference materials, checking and rechecking. My office floor is strewed w/ plans and open books and notes. So it is all going very slowly whilst I figure out how and then undo and fix the things that I did wrong. I am hoping that by the time I finish up with the fore mast from bottom to top, I will have a much better handle on how to go about this and the rest will go much quicker.

As always, I welcome input, suggestions, and considerate criticisim. 

  • Member since
    June 2012
Posted by arnie60 on Thursday, March 20, 2014 1:26 PM

Thanks to all of you for the kudos. I can hardly wait to see the foremast up and rigged myself. Kind of on hold waiting for some cordage and deadeyes to be shipped. Hope to have something more to show in the next week or two.

  • Member since
    December 2012
Posted by rwiederrich on Thursday, March 20, 2014 7:53 AM

Great job Arnie...I too enjoy quality rigging detail applied to plastic models.  Foregoing the plastic Dead eyes and Bull eyes.  Nice work indeed.

Rob

  • Member since
    July 2010
  • From: Tempe AZ
Posted by docidle on Thursday, March 20, 2014 1:33 AM

Arnie,

Beautiful rigging work!  I can hardly wait to see the foremast rigging.  I am going to have to pick up a set of the BlueJacket plans when I start my 1/96 Connie.

Steve


  • Member since
    June 2012
Posted by arnie60 on Wednesday, March 19, 2014 10:27 PM

Thanks David;

I've seen your work and have no doubt that you will more than rise to the occasion.

  • Member since
    March 2012
  • From: Marysville, WA
Posted by David_K on Wednesday, March 19, 2014 5:42 PM

Great work, Arnie!  Your Constitution is very elegant, and I only hope I can come close to that level of awesomeness when I finally get around to opening mine!

Well done!

        _~
     _~ )_)_~
     )_))_))_)
     _!__!__!_         
     (_D_P_K_)
   ~~~~~~~~~~~~~
    ~~~~~~~~~~~

Current Project:  Imai/ERTL Spanish Galleon #2

Recently Finished: Revell 1/96 Cutty Sark

Next Up:  ???


  • Member since
    June 2012
Posted by arnie60 on Tuesday, March 18, 2014 12:45 PM

As hoped, I did get to finish up rigging the bow this weekend. I followed the BlueJacket plans for the jib guys, which meant adding two eyebolts to each cathead. Adding the pin rail to the bow allowed me to belay the sprit sail yard lifts so that the lines are straight and clean looking. The BJ plans calls for fairleads on the bowsprit, but I decided to leave them off.

Now its on to the foremast and the channels for the shrouds.

  • Member since
    November 2012
Posted by abishag98 on Friday, March 14, 2014 4:54 AM

As always, extraordinary work Randy! You're an inspiration to all us tall ship modelers. Thank you sir!

  • Member since
    June 2012
Posted by arnie60 on Friday, March 14, 2014 12:38 AM

LET THE RIGGING BEGIN!

I have fair amount of touch up etc, to do on the spar deck, but it is all just a matter of maybe 2-3 hours of work, so I decided to go ahead and get started on the rigging. I really wished that I could wait on stepping the bowsprit until last because of the limited work space that I have. Turning her around and around with that jib boom and flying jib boom sticking way out there means a broken something just waiting to happen. But it really is THE starting place for the rigging.

I scoured a number of resources as well as my BlueJacket plans to do my best to make sure that I got all the fittings and sequence right. Needless to say, none of them agree entirely. I found that the "Anatomy of a Ship - The 44 Gun Frigate - USS Constitution" by Marquardt to be the most helpfull in giving me a nice clean picture of the rigging its self, and the BlueJacket plans for the fittings and rope sizes.  I have made some allowances and compromises in deference to my skill level (first time rigging at this level of detail) and the constraints of the Revell kit, but am not at all displeased w/ the outcome so far.

Gammoning the bowsprit in place was quick and easy, specially since I had had the foresight to only tack on one side of the bow rails instead of gluing it permanently in place, making it easy to access the rigging points and apply the frapping.

I then started off the rigging with the bow sprit bobstays and shrouds. I used 3/32" deadeyes for the bobstays and 2.5 mm bullseyes for the shrouds. [ to the best of my interpretation, bullseyes and thimbles are essentially the same thing]

I initially used a piece of brass wire as a guage to set up the length of the rigging for the lanyards.

I later figured out that it was actually easier and quicker to just use a set of dividers and make adjustments to the lanyard until the length matched.  I cheated a bit and instead of seizing the strops, I just twisted the wrap around, a tiny drop of CA, and snipped off the short end. You have to get real close to tell that they haven't actually been seized.

The hardest part here was getting the fittings placed right on the bowsprit and at the knight head.

Nothing close to perfection here, but.... by the time I get done with the rigging on this build, I should be a lot closer to that ideal?

Next on the docket was the martingales. These called for 1/8" single blocks on the sprit and booms, and deadeyes at the knight head (shown above)

Ideally the martingales should be perpendicular to the water line but I just had to much fear in my heart that they would break if I forced them any more than I did [one of those kit constraints].

I still need to run the jib boom guys and sprit sail lifts before I move on the the foremast, but I am hoping to get most, if not all of that done this weekend. Apologies for the quality of the pics. Although my new Iphone has a much better camera, it still leaves a lot to be desired. Must admit that I am really pumped up at this point since doing the rigging at this level was one of my main reasons for choosing this model to begin with. Still, I can see that I far, far underestimated how long this was going to take, and my original project completion date of February of so has come and gone and I still have a long ways to go.

Axiom: the first thing to break is invariably the one that was the most difficult to do.

  • Member since
    February 2014
Posted by Smitty on Monday, March 3, 2014 2:03 AM

Beautiful work as usual, Arnie. You continue to inspire!


Work in progress: Revell 1/96 USS Constitution

  • Member since
    June 2012
Posted by arnie60 on Sunday, March 2, 2014 11:57 PM

Thanks Evan;

I had that same problem w/ the eye bolts. surprisingly not w/ the hammock cranes. I had to go back, wash off and re-blacken the eye bolts. that seemed to work pretty well. some I just left a little rusty for effect and since they would not be in direct line of sight areas. That front curve on the netting proved to be a biotch and is still not to the best of my liking, but from view distance looks pretty damned good.

I am in the process of trying to figure out the correct blocks etc to use on the bow rigging. Have to say that the BJ plans are not all that insightful. Any idea if the blocks coming off the catheads are deadeyes of thimbles? I am guessing thimbles.

Looking forward to your next post.

And thanks for the Kudos Wendyl :)

  • Member since
    June 2010
  • From: Irvine, CA
Posted by Force9 on Sunday, March 2, 2014 2:46 PM

Very nice work Arnie...

You may be the first documented case of a Revell kit utilizing the BJ PE hammock cranes!  I used Blacken-It on the ring bolts on my gun deck.  Even with a pre-bath in Acetate, I still got some with a "rust" effect instead of a clean black.  I'll have to get better before using on the hammock cranes.

Great progress!

Evan

  • Member since
    November 2012
Posted by abishag98 on Saturday, March 1, 2014 2:31 PM

Your work is so clean and pristine! Absolutely extraordinary! Thanks so much for sharing these photos with us. They're inspiring, at least for guys like me who can barely assemble a kit out of the box. Thank you sir!

  • Member since
    June 2012
Posted by arnie60 on Saturday, March 1, 2014 1:52 PM

Installing the hammock cranes

I started working on the channels and realized that the deadeyes were too large, so while waiting for new ones to arrive i set to work on the hammock cranes, which I was going to leave until nearly last, but decided what the heck.

I had figured this was going to be a quick and easy install, but of course it proved to be more difficult than I had thought.

I fortuanately had the BlueJacket PE for the stanchions so i did not have to worry about working w/ delicate plastic parts.

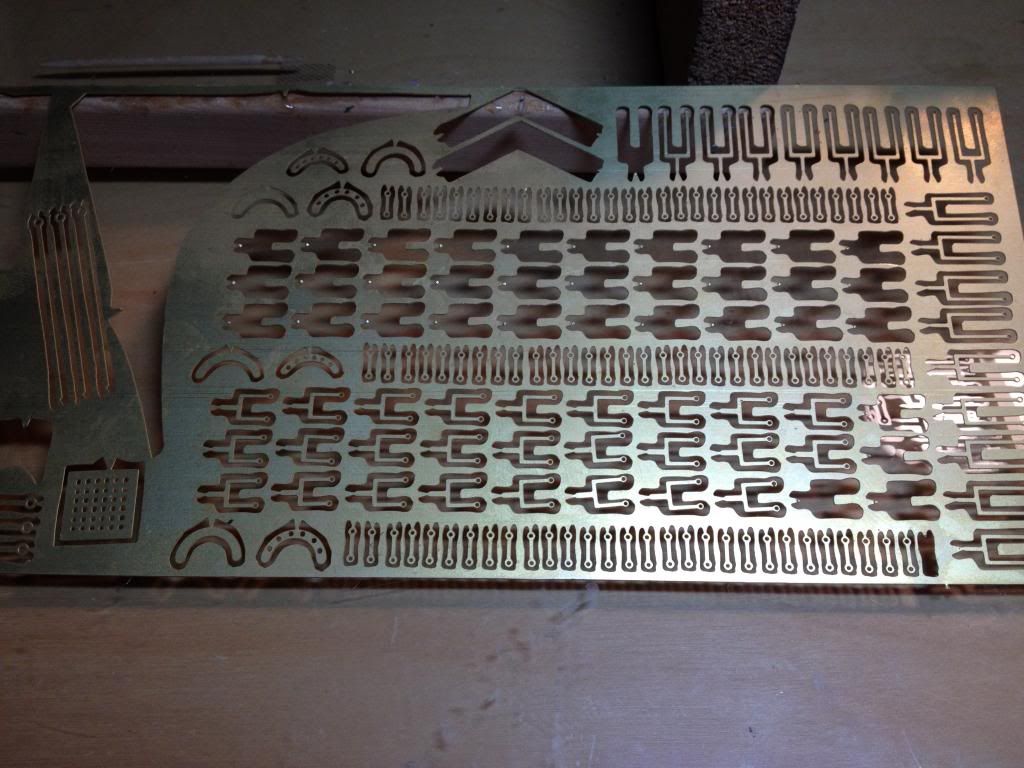
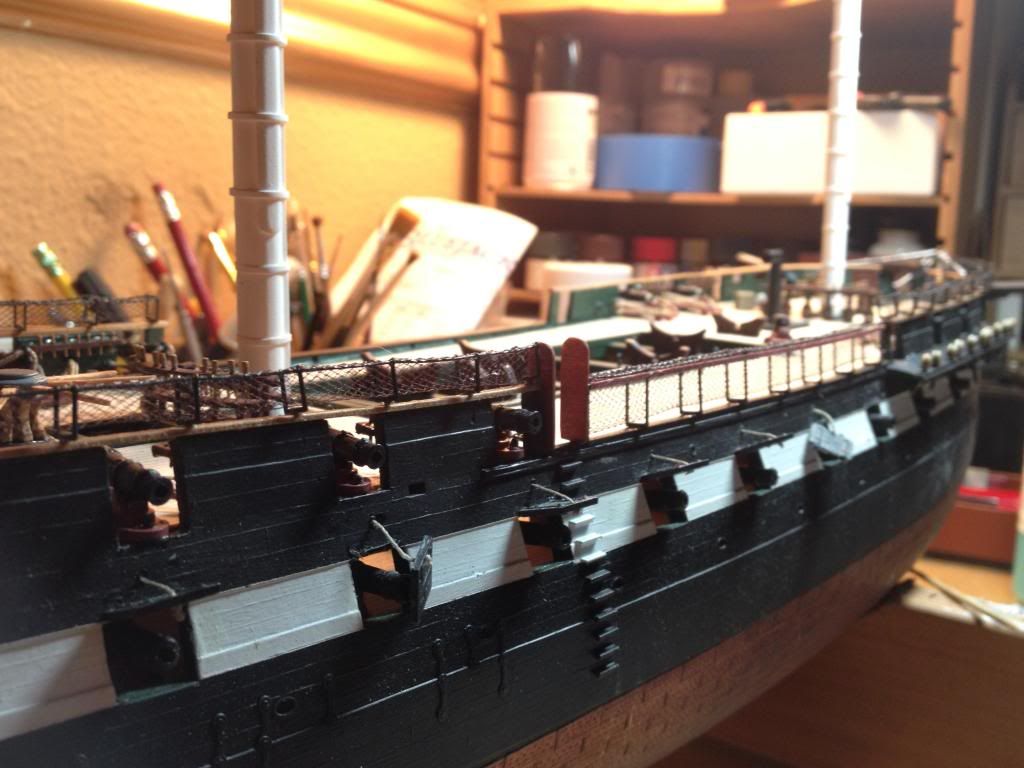
Installing the stanchions went pretty smoothly. I used the original plastic rails to mark out where they should be placed and drilled new holes for them.

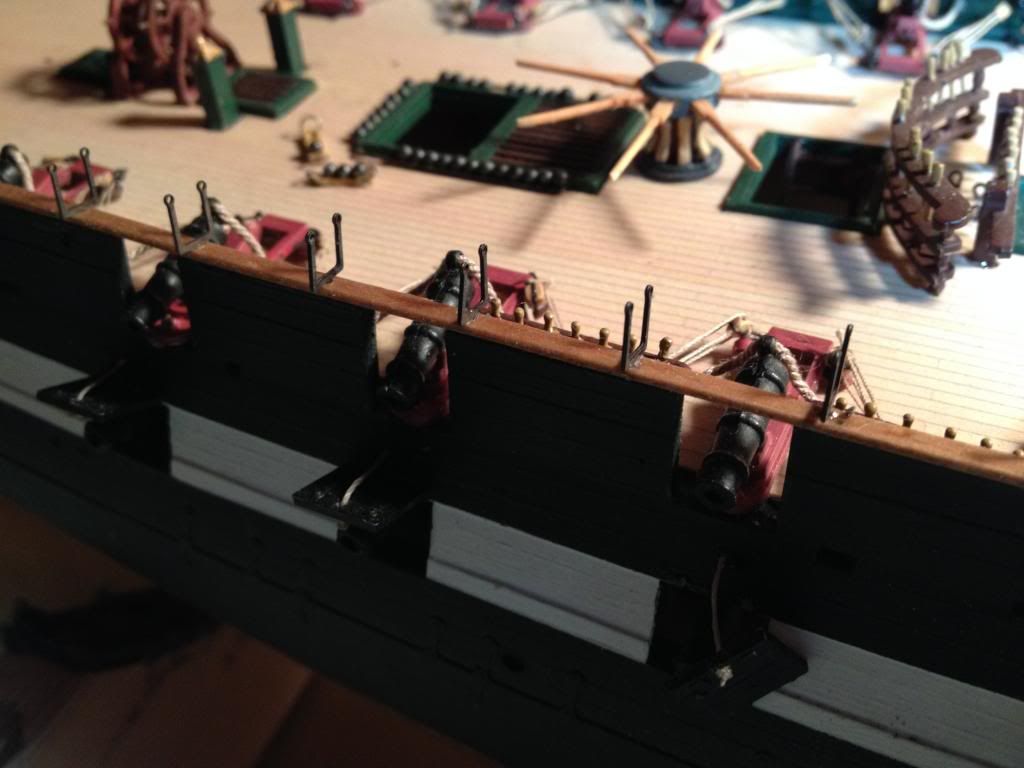
Rather than paint them, I used blacken-it on them, glued them in and then ran the "cables"

I looped the cable around the forward end and added an eyebolt to tie them down at the aft end. I did the same for the forward cranes except adding a tie down at the bow.

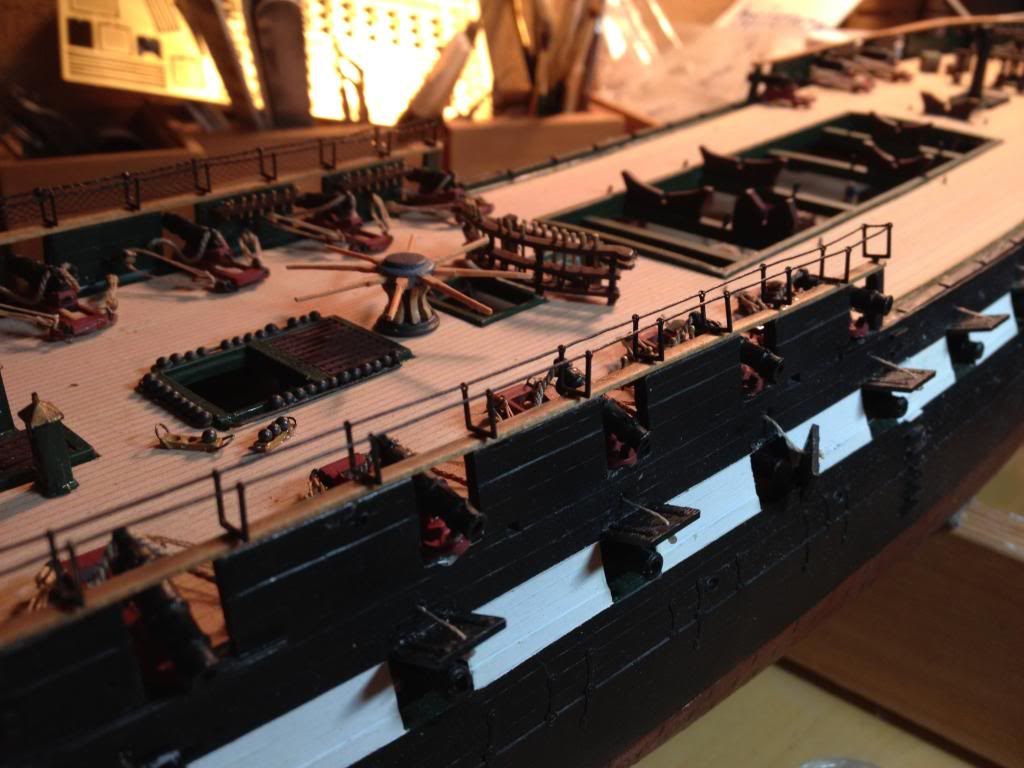
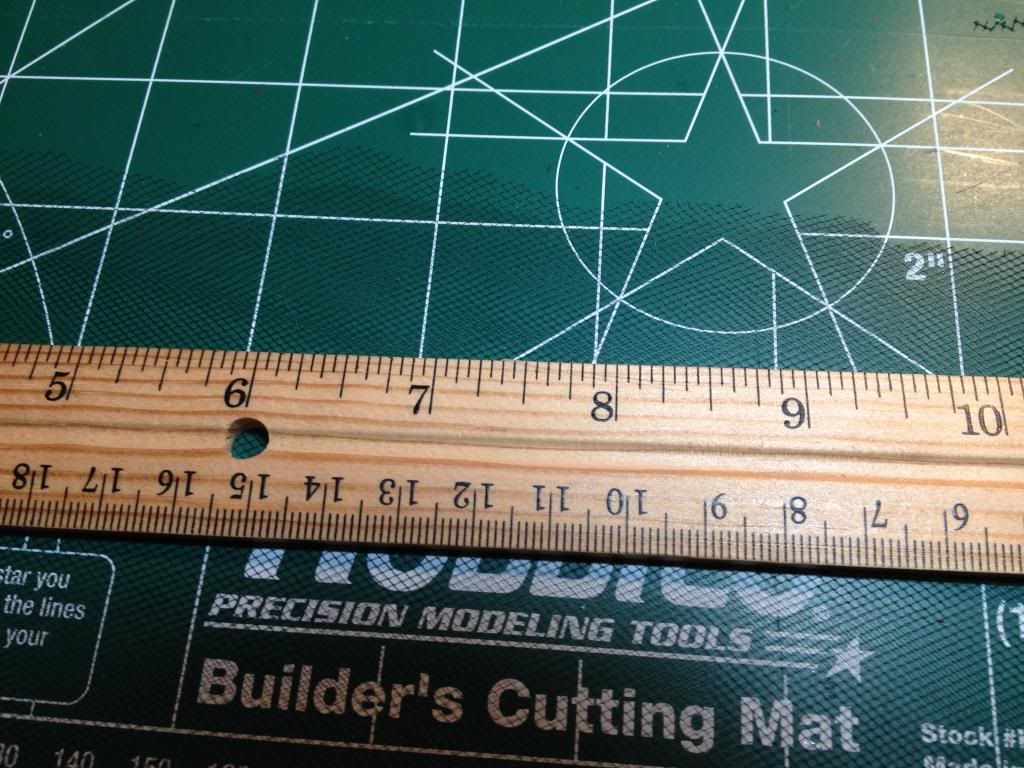
Adding the netting took some figuring and finegaling. I used some toile (pronounced twahl) that I pick up at a local fabric store. I got the smallest mesh that they carried and it seems to work well for this scale. What I ended up doing was using a ruler to cut a swath the same width as the ruler which proved to be plenty wide enough.

I then just laid it on top after running a thin coat of CA along the cable on one side

. The tricky part was then getting the mesh to stick to the cable. I found the best way was to use the back end of my tweezers to gently tap it down and then after it set to go back over it with another coat of CA.

The next step was to use the back end of my tweezers again to gently and carefully push down the netting in between the stanchions. Using a piece of dowel to hold it down I then repeated the gluing process on the other side.

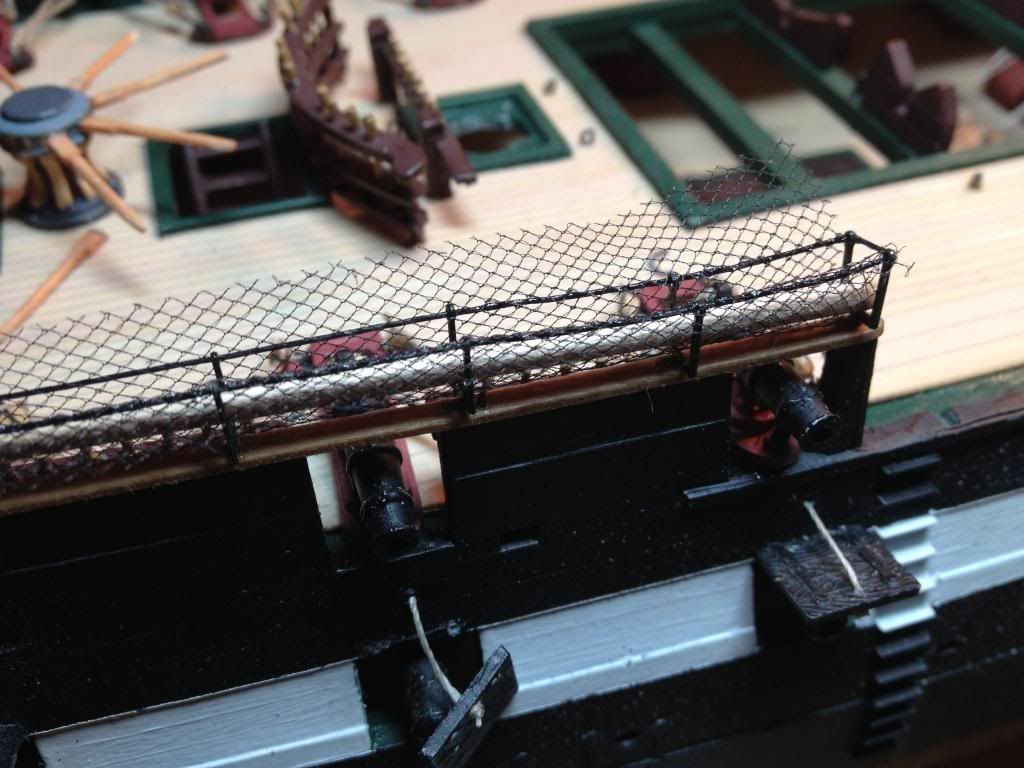
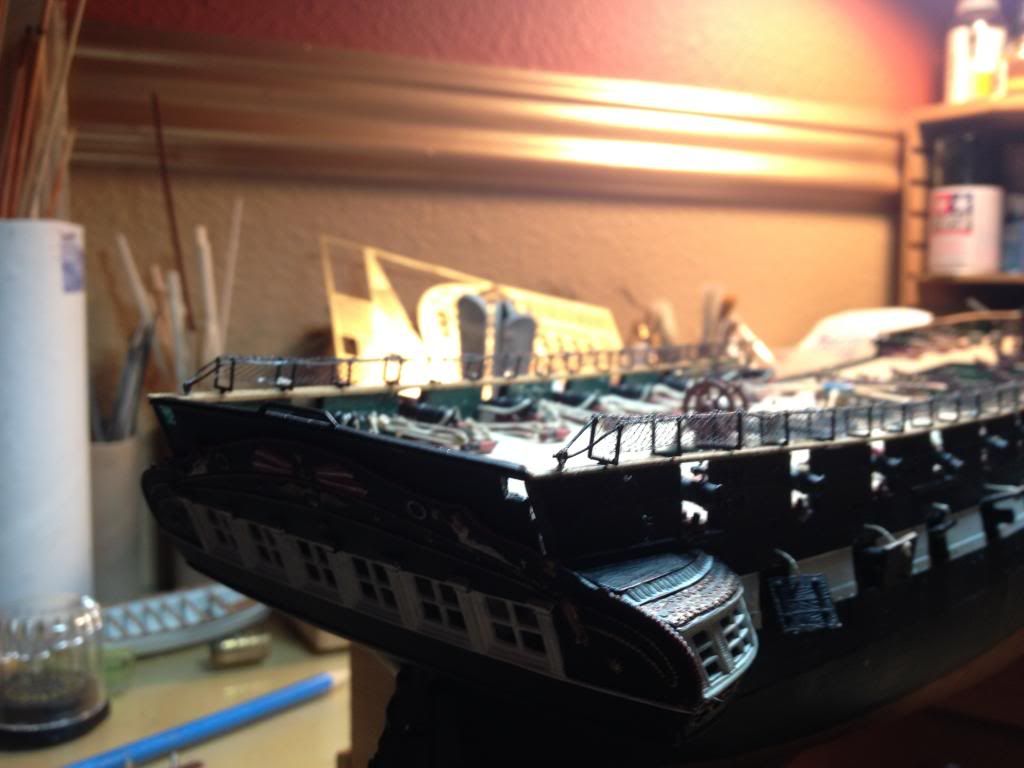
Once that set, I went back with my xacto knife and very very carefully trimmed off the excess. It did not come out as perfect as i would have liked, but the results are more than acceptable.

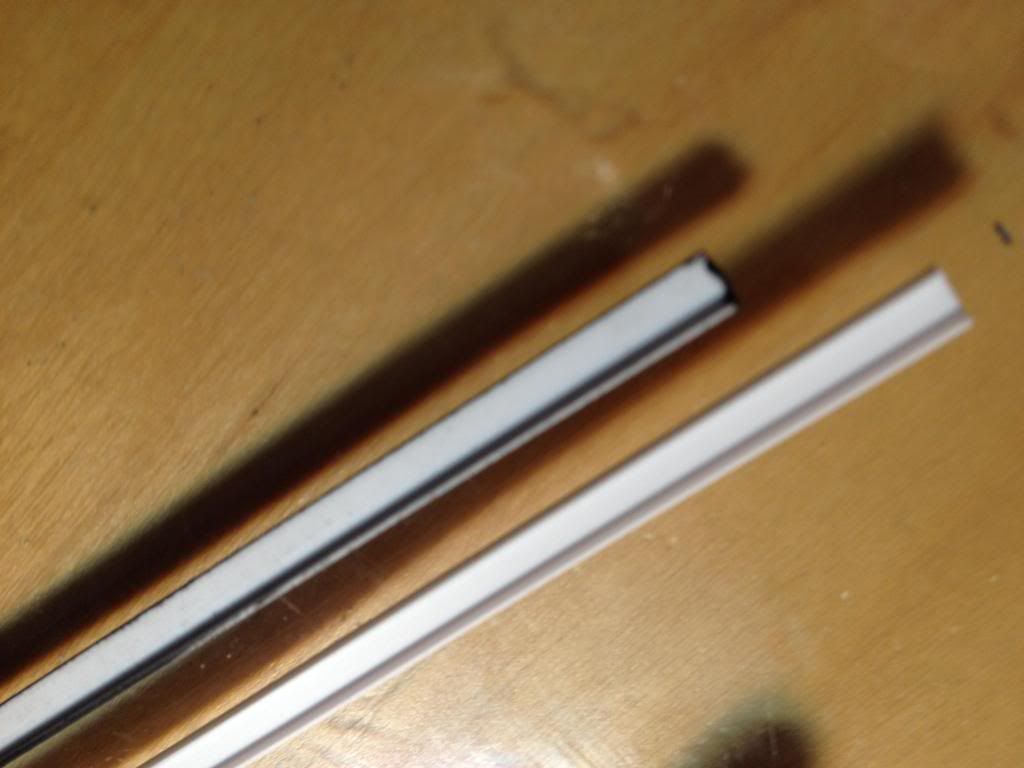
For the mid ships I had to find a way to deal w/ the "grooves" designed to hold the kits pieces.

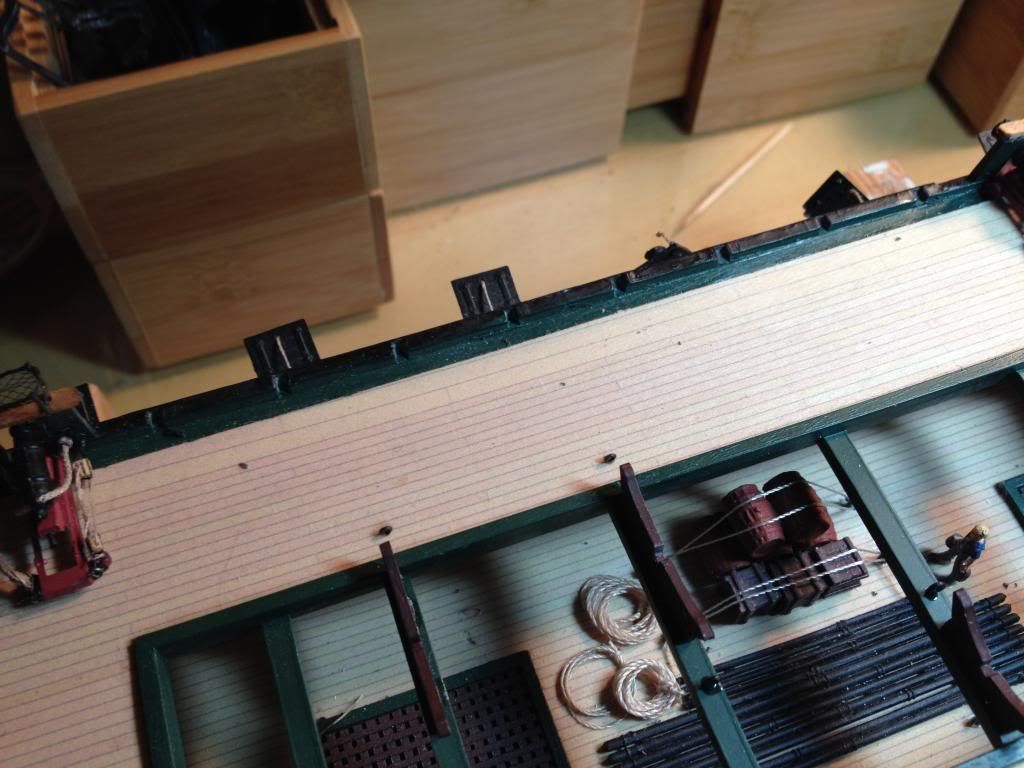
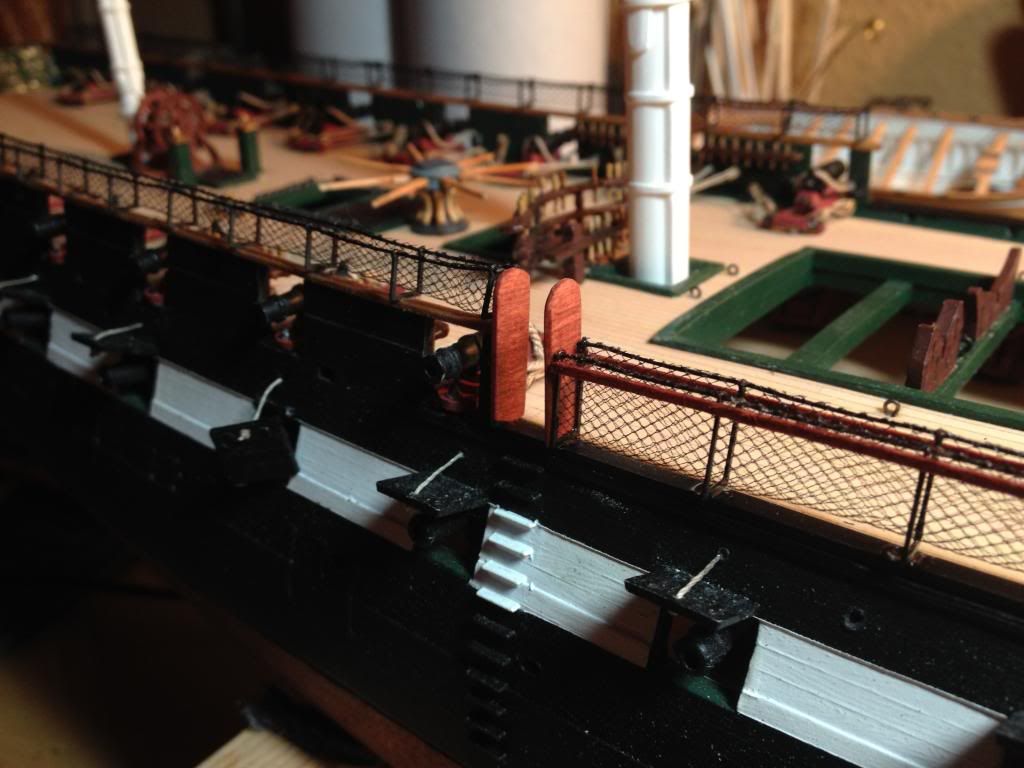
I had thought to putty them in but then came up w/ the idea to use some channel styrene that I had that was the right width, although I did have to shave one side off as it wouldn't completely straddle.

I painted them black, glued them on and drilled the holes to add the stanchions.. Once in place I added some bass wood "slats" and some gangway boards. The gangway boards are traditionally embellashed w/ some sort of carving or decoration, but I left them blank for the time being, If I can find some decent decals that might be appropriate, I may add them later. I still have to finish up the port side, but I have the process down pretty good now and that should go fairly quick.

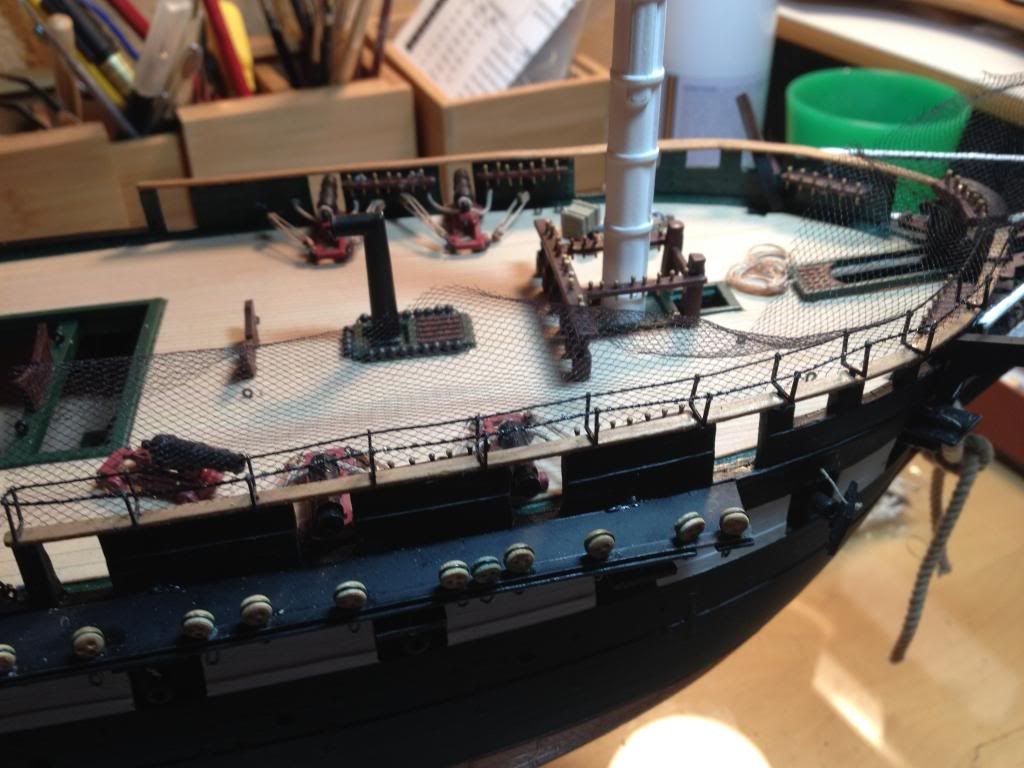
I am really glad I went ahead and did this now as it adds some real dimension and finish to the deck.

  • Member since
    February 2014
Posted by Smitty on Friday, February 7, 2014 2:42 PM

Arnie,

I was only kidding about the plans. It's very difficult to convey sarcasm in text. :-) I know that if I had the plans in my toolbox, I wouldn't want to part with them either and I agree with your viewpoint on it. Buying the BJ plans is on my 'bucket list' for this build, but I'm having a very difficult time justifying to myself (and my wife) spending that kind of money right now. But tax time is coming :)


Work in progress: Revell 1/96 USS Constitution

  • Member since
    March 2013
Posted by Marcus.K. on Friday, February 7, 2014 7:01 AM

WOW .. I did not see this beautiful building log before! .. what an interesting document. Have to study more intense and will - just as from Force9´s one - learn a lot for my future acitvities!

Great project! Very nice details ..

  • Member since
    September 2012
Posted by GMorrison on Friday, February 7, 2014 12:10 AM

Well said, and I didn't expect you to have any feelings one way or the other.

 Modeling is an excuse to buy books.


  • Member since
    June 2012
Posted by arnie60 on Thursday, February 6, 2014 11:49 PM

GM

am·biv·a·lence

amˈbivələns/

noun

noun: ambivalence; plural noun: ambivalences

   1.    the state of having mixed feelings or contradictory ideas about something or someone.

Smitty;

I am pretty sure you were kidding (for the most part) about the BlueJacket plans, but I thought that I needed to say something about my feelings on copywrited material, which they are. I am more than glad to give away or pass on tools, supplies, ideas, and plans of my own creation as I like the "pay it forward" idea very much. But copywrited stuff is usually something that someone else has worked hard on as a means of income. I just could not bring myself to deprive an excellent company such as BlueJacket of their justly deserved income. I want them to be around for myself and future modelers to depend on as a resource.  Thanks for understanding, and for the compliments as well.

  • Member since
    February 2014
Posted by Smitty on Thursday, February 6, 2014 11:07 PM

Arnie,

  Beautiful work, as always. I was glad to see some progress! Watching your build is giving me so many new ideas. I haven't made too much progress since my last post (too busy trying to figure out where my next tank of LP is coming from), but I'm plugging along. Keep up the excellent work!

PS> Mind if I "borrow" those Bluejacket plans when you're done? :)


Work in progress: Revell 1/96 USS Constitution

  • Member since
    September 2012
Posted by GMorrison on Thursday, February 6, 2014 1:51 AM

arnie60

 I also have bagged the idea of making the yards from wood since they will all have to be painted black anyway,

Print same, tape to bathroom mirror, delay decision.

 Modeling is an excuse to buy books.


  • Member since
    June 2012
Posted by arnie60 on Tuesday, February 4, 2014 11:10 PM

As Time Goes by:Music

I just realized that I am rapidly coming up on a year that I have been working on this build and I still have a long way to go. Phewwww! I guess that's what happens when you can't bring yourself to compromise.

The last two months have been full of holidays, honey do lists, work, and sundry exigencies so I haven't had a lot of time to work on my model but I have managed to get a few things done and figured that I was overdue on posting....so here is the latest.

I managed to get all the cannon rigged with the exception of two of the forward 24 pounders, the reason being that one of the cats decided that one of them was its new chew toy, all but utterly destroying it, and rather than be one short, I decided to even it out and leave two off. I may stage the one I have left as being placed with the tripod lift that I built. Well see.

Note the two missing cannon, and I added the pin rail to the bow as per the blue jacket plans. I realized after' that I have not rigged the side tackle strictly correct. They should not have been belayed to the center of the bulwarks. I will probably go back and fix this later, but just now I am so sick of rigging cannon that I just can't bring myself to do it. I still have a few pin rails that need to be placed on the starboard side and a shot rack around the charlie noble and that will wrap up the spar deck except for detailing, much of which I will not do until I get most of the rigging done.

I also added the BlueJacket cathead fittings, which I had to file down since the kits catheads are actually smaller than what the BlueJacket plans call for. The photo is the best I could get w/ out a macro lens.

I added brass rod to the pin rails and the main fife rail. drilled new holes for them, and all are epoxied rather than using testors to make sure there won't be any screaming from a rail pulling loose later.

I also managed to get the masts done in wood from the top mast up. Can't say that it was easy, and there was plenty of firewood on the bench by the time I got some satisfactory results, and they are far from perfect, but for never having done this before they came out pretty good. I still need to touch up w/ the stain I used but I test fitted all and I am quite happy w/ the outcome. Wife was aghast when she saw how tall it was going to be. (huge grin)

The T'gallant and Skypole masts are one solid piece of wood that I then had to "build up" the "cheeks" that the cross trees rest on. A lot of work to say the least, but seeing all that real wood soaring up like that made it so totally worth it.

I plan to add the royal masts using brass rod, but may go w/ the kit parts since I am going to have to paint them anyway. I also have bagged the idea of making the yards from wood since they will all have to be painted black anyway, although I will probably do the top gallant and royal yards out of brass or wood since the kit parts are so flimsy.

As I go along here making compromises, I have to remind myself that one of the main reasons that I like working with plastic models is that you don't have to recreate the wheel every time and spend "years" (plural) to attain a finished model. And honestly, at this stage, I am being much less fickle about historical accuracy and just want a finished model that I can be proud to display.

I am currently working on the channels and will post w/ an update hopefully sooner than this last one.

  • Member since
    February 2014
Posted by Smitty on Monday, February 3, 2014 8:15 PM

Thought I'd stop by and give a huge thumbs up to your work here, Arnie. I'm keeping an eye on this one as well. Oh...and I'm taking notes! :)


Work in progress: Revell 1/96 USS Constitution

  • Member since
    August 2012
Posted by JimNTENN on Thursday, December 5, 2013 4:48 PM

Very nice work. I attempted to build this one years ago and actually got it mostly built. I worked on it pretty steady for two years straight and by the time I got to the point of attaching the sails I was so burnt out that I set it aside and never resumed work on it. It's still sitting in a corner of my workbench collecting dust. And it's hard telling how many spiders have made it their home. I've been thinking about either buying the kit...as far as I know it is still available and I've never known of it ever being out of production...and building it again applying lessons I've learned from my previous attempt or buying a more expensive wooden kit of it. Old Ironsides will always be a special ship to me because I've actually been on board it.

Current project(s): Hobby Boss: 1/72 F9F-2 Panther

                                  Midwest Products: Skiff(wood model)


JOIN OUR COMMUNITY!

Our community is FREE to join. To participate you must either login or register for an account.

SEARCH FORUMS
FREE NEWSLETTER
By signing up you may also receive reader surveys and occasional special offers. We do not sell, rent or trade our email lists. View our Privacy Policy.