SEARCH FINESCALE.COM

Enter keywords or a search phrase below:

"Rite of Passage" the 1/96 Constitution

61006 views
155 replies
1 rating 2 rating 3 rating 4 rating 5 rating
  • Member since
    June 2012
Posted by arnie60 on Thursday, December 5, 2013 4:35 PM

AND NOW FOR SOMETHING TOTALLY DIFFERENT

So I am sitting around waiting for supplies and going through my reference photo cache and found this in the folder.

I had kept it with the idea that I might try to make one for final staging details, but with time on my hands decided to give it a go now.

Here's the result.

For fabricating something this small and not really able to see the details from the photo, it came out pretty good. I used some old watch parts for the cog wheel and the locking bar. Looks good enough from viewing distance to pass. I haven't decided yet just how to use it, if at all.(and yes... I know I need to re-glue the cap rail down)

Also I got this little goodie in the mail the other day.

$5 from Amazon. This thing is so nice. Very small with a fierce suction grip that just wont come loose. I actually paid more for shipping than I did for the vise. Type in 'mini vise' in the search box and it should come right up.

  • Member since
    December 2012
Posted by rwiederrich on Monday, November 25, 2013 10:23 AM

Looks outstanding.....:)  Plus your build space may not be huge..but it does the job.

Rob

  • Member since
    June 2012
Posted by arnie60 on Monday, November 25, 2013 12:05 AM

IN NEED OF ENCOURAGEMENT

I staged all the deck furniture and some details that I have done, as well as the bow sprit and booms to get a better idea of where I am at and see what kind of problems I was going to have with the overall length of the ship since my work space is really quite compact. [ I have read of some of you that are working/ have worked from a closet space.... which I can not imagine as I feel so crampped as is. ]

As can readily be seen...this is going to bring up some issues, so I will need to be extra careful once I step the bow sprit.[BTW: notice that my table top is glass. This is a 25x35 inch piece of tempered glass which I ordered special that cost me only $45 . Worth three times that from my perspective. I can not reccommend this enough. I have been a huge Testors work mat fan for some time, but this is so much easier to clean up any kind of spills, or scrape off any dried up paint or glue from. No replacement ever needed.]

I would have liked to save the bow sprit for later, but of course it is THE starting point for doing the rigging. I will however not be gluing down any more deck furniture than I have to before doing as much rigging as possible.

I had no idea what a boost I would get from this staging, but it really is starting to look "ship shape" and I am excited to do more after seeing how good it is going to look. I was really getting into a slump w/ all the carronades and all the pieces in different piles and stages of completion.

Axiom: Take a minute to see what you have acomplished and not dwell on whats left undone.

another BTW: I got really nervous reading through JayMans build for his Connie where he apparently had some critical issues w/ the rake of the masts so I went ahead and placed mine to check it. The BlueJacket plans show the rakes as 91 deg. for the foremast, 92 deg. for the main, and 94 deg. for the mizzen. I tested them using a level and protractor. I am happy and relieved to report that, at least in my kit, Revell hit the mark on these. I wont have to make any modifications for it to come out right.

Unitl that time.....enjoy.

  • Member since
    December 2012
Posted by rwiederrich on Saturday, November 23, 2013 3:11 PM

Well there you go....Isn't adding wooden aspect fun....? not to mention they give the model a wood finish..almost making it appear as if the entire model is wood.  I use anything to get the job done.

Looks like you're on your way.

Rob

  • Member since
    June 2012
Posted by arnie60 on Saturday, November 23, 2013 3:03 PM

JIB BOOM / FLYING JIB BOOM

Thanks for the heads up JT. I actually typed in bass wood when it should have been birch wood. I am using the dowels that I ordered from Blue Jacket as outlined in their parts list for the Connie. Very reasonably priced, especially since my LHS does not carry them.

This is yet another first for me and I was unnecessarily worried about it as it turned out to be not only easy, but fun to do. As I have been working w/ wood for the first time w/ this model, I am finding it much nicer to work w/ than styrene and am now seriously considering my next build after the upcoming Alabama to be entirely a wood kit. Anyways....

Assembly materials: Brass sheeting, hexagonal styrene, birch dowels

I followed the advice about using a drill to do the tapering using my cordless variable speed propped in my lap, left hand on the trigger, right holding the sanding stick.

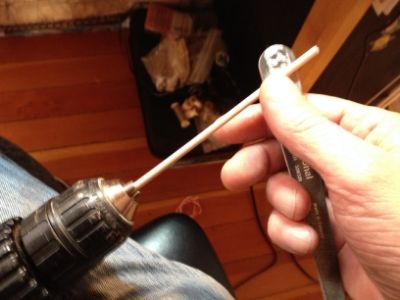
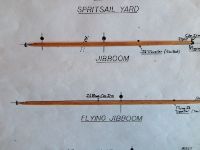
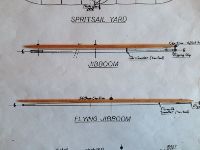
It went really quick and easy. I checked it against the BJ scale plans rather than using calipers and adjusted until I got a match (or as close to one as I could)


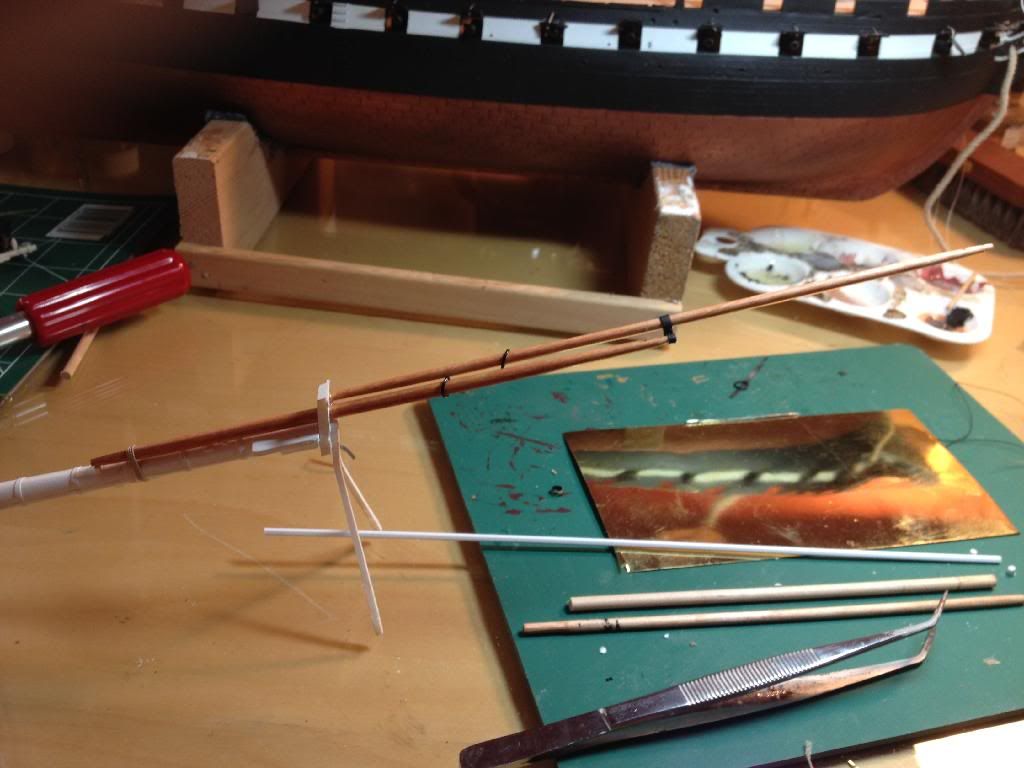
I finished up by trimming the extra length off the ends and final shaping, then staining w/ min-wax colonial maple.

Using scissors, I cut some narrow strips from the brass sheeting and made bands, one for the flying jib, and one for the cap end of the jib boom. The octcagonal styrrene connector was glued to the band for the flying jib. The BJ instructions did not have much instruction on this, but it did have an image of what it should look like, and I think I came pretty damn close if not right on.

The flying jib boom is offset to Port by 45 degrees and slightly above the jib boom and buts into the bowsprit mast cap. I ended up deciding to use epoxy to lock it in place as I was nervous that w/ all the tension from rigging, there would not be a strong enough bite w/ such little surface area to glue to.

I have to say that I am quite happy w/ the results considering this is my first endeavor.

The black rings on the jib boom and flying jib are travelers for the running rigging that will come into play later. I still need to attach a number of bullseyes and blocks for the rigging, but that will have to wait for supplies in the mail to arrive. As you can see, I used the kits bow sprit and maritngales. They fit the BJ plans profile almost exactly, Although the BJ rigging plans calls for a set of fairleads that I will have to add as well as the blocks and bullseyes.

  • Member since
    May 2003
  • From: Greenville, NC
Posted by jtilley on Saturday, November 23, 2013 10:32 AM

I don't recommend basswood for spars.  It's too soft - especially when shaved down to tiny diameters.

Hardware stores, craft stores, and home centers usually carry dowels made out of one of three materials: birch, maple, and oak.  Birch and maple make good spars.  (For a long time modeling handbooks recommended against birch because of its alleged tendency to assume gross shapes.  It seems the lumber suppliers have licked that problem; I've got dozens of birch dowels that have been lying around for years and are as straight as they were when I bought them.)  Oak is lousy, because the grain is so coarse.  Maple isn't as nice as birch because it tends to break - at the worst possible moment.  Of the three, I recommend birch.

Places like Woodcraft sell walnut and cherry dowels:  www.woodcraft.com/.../search.aspx .  Walnut is awfully dark and pretty coarse-grained for the purpose; cherry is a little bit dark, but the color varies from sample to sample, and it's beautiful stuff.  If you play around a bit with some stain (I like Minwax) you can make the color a little more orange, and it will look just about right.  (And in the case of the Constitution, you'll be painting a lot of the spars anyway).  I used cherry for the spars of my little Model Shipways Phantom, and I'm very happy with the results.

The wood ship model companies sell birch dowels that are already tapered.  The taper probably won't be just right for your purpose, but it's easy to touch it up. 

Some people swear that the only way to make a wood spar is to start with a square stick and plane it down, but I've gotten along perfectly well for many years using the old electric drill trick.  (I've got an old Unimat lathe, but it's not big enough for larger spars.)  Cut the dowel an inch or so too long.  Clamp your drill in a vise on your bench.  Arm yourself with some sandpaper in various grits and a soft rag.  Chuck the dowel up in the drill.  Assuming you're right-handed, hold the end (with the rag, to avoid burned fingers) in your left hand, and the sandpaper in your right.  Turn the drill on (at a pretty high speed) and lock the trigger.  Have it with the sandpaper.  It won't take more than a few minutes to get the taper right. 

Many spars have sections that are either square or octagonal.  For those, you need to start with a larger dowel and carve/sand/file the section in question first.  Then use the drill to take the round sections down to the right taper.

A digital machinist's caliper comes in mighty handy for checking the diameter as you go.  If you don't already have one, nowadays such things are remarkably cheap:  http://www.woodcraft.com/Product/2081537/31416/General-Tools-6-Carbon-Fiber-Digital-Fractional-Caliper-Model-146.aspx .  You may in fact be able to find one at your local Lowe's or Home Depot.  It will come in handy for all sorts of things.

Hope that helps a little.  Good luck.

Youth, talent, hard work, and enthusiasm are no match for old age and treachery.

  • Member since
    December 2012
Posted by rwiederrich on Saturday, November 23, 2013 9:56 AM

Good work Arnie....

Rob

  • Member since
    September 2009
  • From: Miami, FL
Posted by Felix C. on Friday, November 22, 2013 5:24 AM

Will the mast and spars be replaced with wood ones?

  • Member since
    June 2012
Posted by arnie60 on Wednesday, November 20, 2013 5:08 PM

Yes Rob;

The plan is to replace the masts from the top mast up along w/ the jib boom and flying jib boom w/ basswood and brass rod (sky sail masts, stunsill booms,etc) following the BlueJacket plans that I have, as well as the deadeyes and lanyards for the shrouds. I will only be doing a very small part of the running rigging.  Working on the jib boom and flying jib boom now.

  • Member since
    December 2012
Posted by rwiederrich on Wednesday, November 20, 2013 3:36 PM

I like how you *Hyper* detail your standard kit.  Exactly what I do myself.  You're doing an exceptional job.  

Will you be rigging with deadeyes and lanyards as well?

Rob

  • Member since
    June 2012
Posted by arnie60 on Wednesday, November 20, 2013 2:22 PM

Thanks Rob, and all others that have made compliments.

I really get my inspiration, and often guidance from the learned and experienced community we have here. This is my first stab at working at this level of modification and detail, much of which has been a somewhat steep learning curve for me, and I could not have gotten this far w/ out everyone's input, help, and encouragement.

  • Member since
    December 2012
Posted by rwiederrich on Wednesday, November 20, 2013 1:21 PM

Looking very nice...for sure.

Rob

  • Member since
    June 2012
Posted by arnie60 on Monday, November 18, 2013 2:04 PM

BOW HEADS AND RAILS

To put it simply, the bow heads and rails in the Revell kit are atrocious. Force9 came up w/ a nice solution for the supports between the rails, but I thought I would go one better and build them from scratch using the BlueJacket plans. I had ordered their britanica metal rails and already had the PE for the grating and the heads. Well....the bow of the Revell kit just does not match up w/ the Bluejacket model. The PE grating did not come anywhere close to fitting, and the rails just did not look right scale wise. I did attempt to use them anyways (the rails) and after many hours of exasperating trial and error finally gave up and decided to go w/ the Revell kit pieces w/ some modifications.

I cut out the existing two, way out of scale, heads from the grating and fitted the BJ PE heads in its stead. Strictly speaking, they are not correct for the time frame that I am attempting to stage the model in, but sometimes you end up sacrificing accuracy for appearance.

This means that I also won't be able to use the forward boomkins w/ out some fairly serious refitting, but the BJ plans do not call for them, and as they are a part of the running rigging that I do not intend to include, no great loss. I guess I can always go back and figure something out later if I need/want to.

I ended up painting the two top rails solid white as the detail just did not come out on those pieces. There is a bit of 'corrections and touch up to do, but they came out satisfactorily enough. Note that I also "fleshed out" the hawse ports w/ some chain links that I picked up at the local craft store to meet the specifications that I outlined at the beginning of this log.

The carronades are coming along very nicely, but excruciatingly slow. I figure I am averaging about two hours per gun. It is much more tedious and difficult than I would have thought.

Axiom: It's a good idea to know how deep the water is before you jump in.

The way they are now will be their final fitting (version 4.2). I went back and added a "bridle ring" for the breech rigging to pass through by using some crimping beads that I had. They are just a little bit larger than scale, but still look soooo much better and more accurate.

The cordage comes from Syrene, where I ordered my blocks from. Pretty expensive stuff, but I finally got the right sizes w/ out having to build my own rope walk. I really need to finish these before I can place the pin rails, so it may be a while before I post again.

  • Member since
    November 2005
  • From: Formerly Bryan, now Arlington, Texas
Posted by CapnMac82 on Saturday, November 9, 2013 7:34 PM

No sweat Arnie,

Just do not read Freeston's Model Open Boats--unless you are in need of an inferiority complex.  (Shoot, I've built a couple of 1:1 boats, and his craft daunted me at full scale [sigh]).

I know that when I last built a Connie, twenty-mumblemumble years' ago, I way over-obsessed with the boats.  For all the efforts I put in casting plugs (repeatedly) from the plastic boats, I could have just built the things up from scratch to much more uniform result.

  • Member since
    December 2012
Posted by rwiederrich on Saturday, November 9, 2013 2:28 PM

Outstanding mods to a great ship.  Super job.

Rob

  • Member since
    June 2012
Posted by arnie60 on Saturday, November 9, 2013 10:55 AM

Thanks Cap'n. That's really a big help w/ the mast info. I did use the dimensions from the blue jacket plans for the pinnace, so the thwarts and their spacing are pretty close, assuming BJ's plans are accurate. The oar locks are a bit off, but my shaky hands could do no better.

  • Member since
    March 2004
  • From: Spartanburg, SC
Posted by subfixer on Saturday, November 9, 2013 10:22 AM

Great info there.

I'm from the government and I'm here to help.

  • Member since
    November 2005
  • From: Formerly Bryan, now Arlington, Texas
Posted by CapnMac82 on Saturday, November 9, 2013 2:28 AM

It's a bit late for me to dig trough for Constitution-specific references, but, ship's boats of the era usually used a lug sail.  The lug sail is a lopsided rectangle which resembles a gaff-rigged sail.  It has a lug spar the length of the angled head of the sail.   This was hoist to the very top of a stump mast.

The rig is handy for boats as the spar and the mast could both be about the length of the boat.  Rigging for the mast--when used--was often just a forestay and two backstays of a single line each tied off at the gunwale to an eye, cleat, or the thwartclamp.

Oh, and to really vex, these boats were often to the discretion of the captain, sailing master, or boatswain in charge of them.  So, they might have two masts.  Or, they might step a second mast "on the fly."

I fear that, with references in hand, you may feel a bit thwarted by your thwarts, though.

As a rule-of-thumb, thwarts are about 16" wide, the oarlock/thole pin/oar notch is about 1 thwart aft of the after edge of the thwart, about one thwart above the deck board/grating, and they are about 3 thwarts apart for spacing.  At 1/96, that's 5/32" to 11/64" wide, spaced about 1/2" apart.  (I know the parts in the Revell kit vexed me--those thwarts, as moulded, are closer to waist-high.)

  • Member since
    June 2012
Posted by arnie60 on Friday, November 8, 2013 1:23 PM

I found the pics of the pinnace, a little late, but ....

Like I said, a serious case of acne craters.

Lots of putty... lots of sanding

But the interior is nearly perfect.

  • Member since
    November 2012
Posted by abishag98 on Thursday, November 7, 2013 4:07 AM

Wow! Your work never ceases to amaze me. Extraordinary to say the least!

  • Member since
    June 2012
Posted by arnie60 on Thursday, November 7, 2013 12:04 AM

So after beating my head w/ the tackle for the carronades, I'm now on version 4.2 and waiting for more supplies, I decided to take on the bow heads and railings which led to a lot of frustration that I wont elaborate on at the moment (I promise to come back to it tho).

Axiom: when frustrated, take a break or work on something else.

Which takes us to the pinnace for distraction. I ordered the resin cast pinnace from Blue Jacket a while back. Honestly, I wasn't too happy when I opened the box. The detail of the interior is exceptional, but the outside of the hull looks like the aftermath of a serious teenage acne outbreak. Wish I could show you a pic, but I guess I did something wrong and deleted it.

Anyway, I spent more than a couple hours puttying and sanding, puttying and sanding, to fill in the craters. That done I primed and painted then laid the footlings w/ styrene.  Nice!  I used basswood for all the seats etc. stained w/ colonial maple. I also added a top rail so that I could add the oarlocks. Had to break out the steamer again for that part.

This went much easier than the cap rails I did earlier since I did not have to bend the wood against the grain.

Gluing them on was a bit tricky (btw... testors cement does not work well w/ wood...thank got for CA) but they came out pretty good. I then used a rat tail file to carefully file down the grooves for the oarlocks and then painted the insides black. The rudder actually proved to be the most difficult part and did not come out as well as I would have liked. I will probably get bugged by it enough after time and re-do it, but for now, meh.

I still need to do a lot of touch up and add details, one being the mast which will be placed stowed, but for the most part, I am really happy w/ it, and it was just plain fun to do.

My carronade supplies just arrived so I will be getting back on those next and post when I get something to show.

PS. Anyone know what the mast should look like? Dimensions? Rigging? If so a pointer would be greatly appreciated.

  • Member since
    December 2003
  • From: 37deg 40.13' N 95deg 29.10'W
Posted by scottrc on Thursday, October 24, 2013 5:02 PM

Looking great!

  • Member since
    November 2012
Posted by Jaguar1969 on Thursday, October 24, 2013 3:21 AM

Beautiful work. I like it

  • Member since
    November 2005
  • From: Formerly Bryan, now Arlington, Texas
Posted by CapnMac82 on Wednesday, October 23, 2013 10:56 PM

The (clearly) tireless engineers at Link-Belt; FMC; American; Bucyreus; et al, who cipher not only how many parts to put into boom and lift rigging for cranes, derricks, draglines and the like--let alone the spindle speeds to work all that gear--have my endless admiration.

Luckily for me, I never had to apply much of this, except by rule-of-thumb, and generally only for evolutions like making up a tripod of dunnage poles to be the base of an impromptu gin-pole derrick.  That, and growing up with Knight's Modern Seamanship and The Bluejacket's Manual will give a person fundamentals they did not know existed.

  • Member since
    September 2012
Posted by GMorrison on Tuesday, October 22, 2013 4:00 PM

Pulleys a different animal. Mac brings up a good point though which is that in physics there's no free lunch- in fact you pay but that's a detail.

Sheave diameter and offset axles are lesser factors than number of circuits. I can't really tell from the picture I posted exactly how that bridge crane is rigged, but it looks like 6 or so wide blocks. That'd be 24 to one since they are doubled, which means that machine would take in about a half mile of cable to raise that load bar more than 100 feet.

 Modeling is an excuse to buy books.


  • Member since
    June 2012
Posted by arnie60 on Tuesday, October 22, 2013 2:03 PM

I honestly thought I was "blowing in the wind" posting about the pulleys. Did not expect this kind of response. Cap is right. The diameter / circumference of the wheels complicates the math.  I just wanted to show how simple it can be. And thanks for the further clarification Capn. Very interesting, at least to me.

  • Member since
    November 2005
  • From: Formerly Bryan, now Arlington, Texas
Posted by CapnMac82 on Tuesday, October 22, 2013 12:44 AM

Arnie's diagram is for a fiddle block, which uses non-coaxial sheaves.  As the diagram shows, they are often of different diameters.

Which makes for complicated equations versus using a double block with coaxial sheaves of the same diameter.

Blocks are sized to fit the lines they serve.  Around 9 times diameter (3x circumference) for natural fibre, and 3x diameter for wire.  You size the fiddle block using the smaller sheave for this reason.

Some tackles have names, too.  A Gun tackle uses two single blocks, the bitter end of the line to the becket of one block, then through the  other block and back again--this can be either a two-part of three-part tackle.  

A Luff tackle uses a double block and a single block; the bitter end to the becket on the single block, then through the two blocks to make either a 4-part or 5-part hoist.

Moving to one double and one triple block gives a Gyn tackle, a 5 or 6 part hoist.

The recoil tackle on the main guns is set up as 4-part luff tackle, if memory serves.  One reason to use gun tackle instead of other tackle is in speed.  The more sheaves in a tackle, the more line to reeve it.  Every added sheave makes for an easier pull, but it's also proportionately more line to pull.

Let's say a gun tackle needed a "pull" of 6' of line to move the blocks three feet.  Changing to luff tackle adds more than six feet of line in the three foot "throw" of the tackle.  So, instead of pulling 6' of line, you need to pull 13-14' of line.  This is not as fast, and leaves a lot more line on the deck--neither of which are ideal for a fighting ship.

Yeah. math--you can grow up all you want to, but, you still wind up using it every day.

  • Member since
    September 2012
Posted by GMorrison on Tuesday, October 22, 2013 12:15 AM

Gotta love that mechanical advantage!

 Modeling is an excuse to buy books.


  • Member since
    November 2012
Posted by abishag98 on Monday, October 21, 2013 7:14 PM

For sure, you definitely would not like me as a student in your classroom. :-) Math and geometry was all Greek to me. But thanks for the lesson anyway.

  • Member since
    June 2012
Posted by arnie60 on Monday, October 21, 2013 6:23 PM

So as I am rigging the side tackle on the carronades I got to thinking about the force advantages of using pulleys and realized I really did not know just how they work. I figured I would share what I learned here in case anyone else was curious.

Lest assume we want to move 100 lbs. In a 2 t0 1 ( this would be two single blocks) there are two lines that carry the load around the pulleys, so the weight gets distributed equally on those two load lines, i.e. 50 lbs each in this case, so that in effect, the free side that is being pulled is the same as pulling on 50 lbs, not 100. In the 3 to 1 (this would be a single and a double block) you would only be effectively pulling on 33 1/3 lbs of the total 100. So simple!

Here's the math behind it.

MA is the mechanical advantage    W is the weight or load   T is the tension or force of gravity  n is the number of load lines.

I know, its nerdy, but, being a former math teacher I can't help but see the mathematics and geometry in all the parts of a sailing ship. Its all really quite elegant to me.

JOIN OUR COMMUNITY!

Our community is FREE to join. To participate you must either login or register for an account.

SEARCH FORUMS
FREE NEWSLETTER
By signing up you may also receive reader surveys and occasional special offers. We do not sell, rent or trade our email lists. View our Privacy Policy.