SEARCH FINESCALE.COM

Enter keywords or a search phrase below:

Zvezda 1/72 English Medieval Ship Thomas - Fin 28 April 2014

37444 views
138 replies
1 rating 2 rating 3 rating 4 rating 5 rating
  • Member since
    March 2012
  • From: Marysville, WA
Posted by David_K on Wednesday, August 28, 2013 7:19 PM

Steve!  Man, I just realized the bowlines (or whatever they are that go from the sides of the sail to the blocks on the bowsprit and then belay on cleats on the deck) don't reach the cleats without rubbing on the forecastle...ugh.  Any suggestions for where to run them?

        _~
     _~ )_)_~
     )_))_))_)
     _!__!__!_         
     (_D_P_K_)
   ~~~~~~~~~~~~~
    ~~~~~~~~~~~

Current Project:  Imai/ERTL Spanish Galleon #2

Recently Finished: Revell 1/96 Cutty Sark

Next Up:  ???


  • Member since
    July 2010
  • From: Tempe AZ
Posted by docidle on Wednesday, August 28, 2013 10:49 PM

Dave,

On the Kogge the foc'sle is much smaller and had cleats on the aft bulwark ribbing both port and starboard which is where the bowlines were tied off.  If you still have some of those metal cleats, I would drill a hole either on the aft bulwark ribbing or along the side ribbings starting about half way back.

In the instructions they have you tying off after running your line through the chess trees, which is incorrect as well as not working very well.  I was planning on adding some cleats myself.

Here is a picture of the foc'sle which hopefully demonstrates what I am babbling on about.  You want to think about where is the logical place to tie off so that it does not interfere with soldiers fighting the ship.

Steve


  • Member since
    July 2010
  • From: Tempe AZ
Posted by docidle on Wednesday, August 28, 2013 10:53 PM


  • Member since
    July 2010
  • From: Tempe AZ
Posted by docidle on Wednesday, August 28, 2013 10:56 PM


  • Member since
    July 2010
  • From: Tempe AZ
Posted by docidle on Wednesday, August 28, 2013 11:55 PM

Here's a bow shot of the Thomas.  The last three shots were from the Hanse Kogge I did last year.  I wanted to illustrate the grain effect on this model.  I need to touch up the chesstree  and the supports.

Steve

Unpainted


And painted


  • Member since
    March 2012
  • From: Marysville, WA
Posted by David_K on Thursday, August 29, 2013 10:42 PM

Awesome!  I love the Kogge!  What did you use for the yard?

I got my Thomas more-or-less finished tonight.  Waiting for the oil paint on the base/nameplate to dry, and I have a little touch-up painting to do (gotta hide those little glue spots that show up!)...then I can set it on the stand.

The rigging got a little funny, I wish I had noticed the problems sooner...for the bowlines, I ended up drilling two holes in the aft of the forecastle and installing brass eyebolts, and belayed the lines there.  And the sheets were another problem...there's no good way to get to the inner bulwark cleat without fouling on the deadeyes or the caprail...so I made some modifications to those lines, too...speaking of cleats, those tiny little parts don't have enough contact surface to hold much tension...I popped a couple off and had to re-attach them.  Seems like everything's holding now. :)

Heading to Eastern Washington in the morning, but on Sunday I should be able to get it all finished up, and I'd like to post a few pics...Steve, do you mind if I put them here?

Dave

        _~
     _~ )_)_~
     )_))_))_)
     _!__!__!_         
     (_D_P_K_)
   ~~~~~~~~~~~~~
    ~~~~~~~~~~~

Current Project:  Imai/ERTL Spanish Galleon #2

Recently Finished: Revell 1/96 Cutty Sark

Next Up:  ???


  • Member since
    July 2010
  • From: Tempe AZ
Posted by docidle on Thursday, August 29, 2013 11:13 PM

Thanks Dave, I took the Kogge down of the self last night to get an idea of how I had set up the rigging plan again, and dang if I do not love that build.  Of course I see the problem areas better now which I'll get around to fixing one of these days.

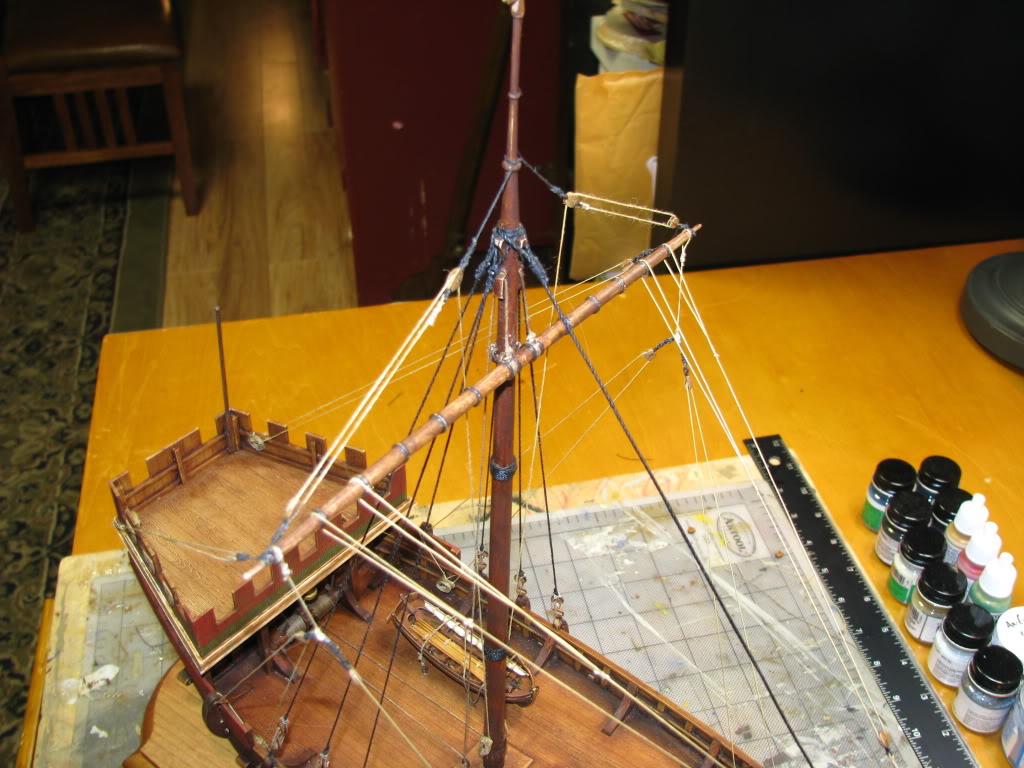
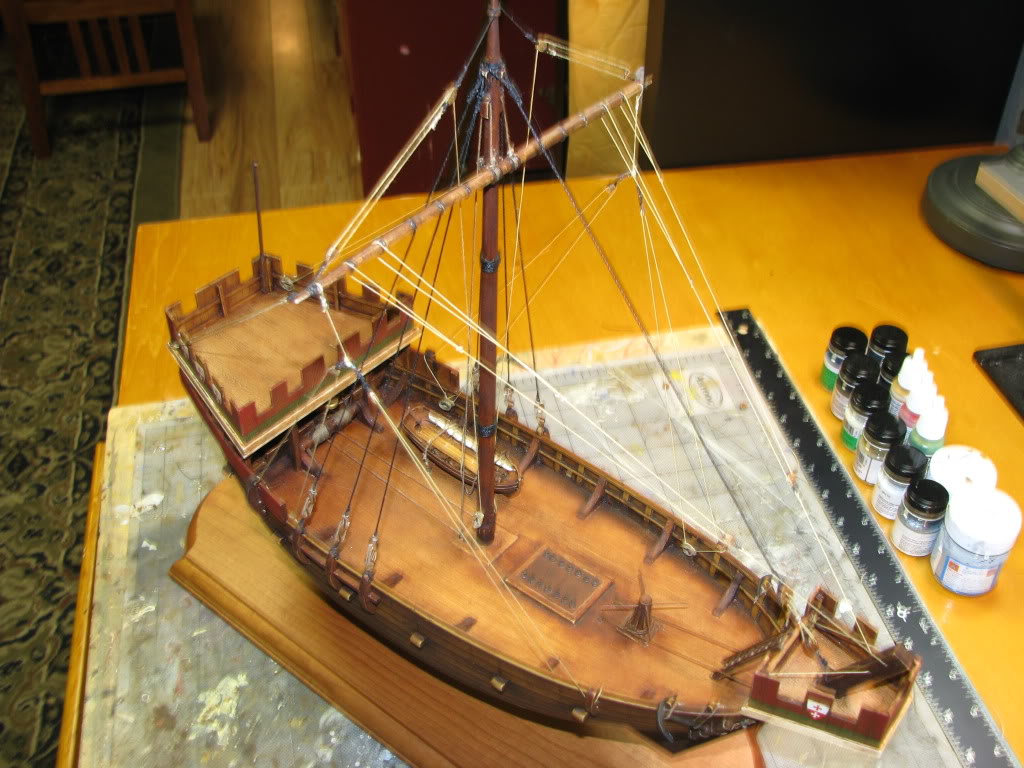
Thanks for the heads up on the tack and sheet, I look forward to seeing how you overcame the problem.  For your question on the yard, I cut the full sail off the yard with a razor saw "very carefully" and then cleaned it up, painted and oiled.  It actually came out nice as seen in these pictures.  In regards to the cleats, I used brass cleats with superglue and then tied off the line on the cleat and ran the rigging backwards.  Kind of weird I know but I read about it somewhere and it worked.  You cannot do this all the time but it really helped on the Kogge.

I have no problem with you posting on this thread bud, maybe we should change the heading so people will know that both of the Thomas' are in here.  Kind of like a "group build"!

Have fun in Eastern Washington, part of my wife's family live in Spokane and I went through Eastern Washington on my way to the 1973 Scout Jamboree in Farragut, Idaho.  Beautiful country although I prefer the Puget Sound area myself.

Steve


  • Member since
    March 2009
  • From: brisbane australia
Posted by surfsup on Saturday, August 31, 2013 11:12 PM

I love your weathering work Steve. Looks fantastic on her.....Cheers mark

If i was your wife, i'd poison your tea! If Iwas your husband, I would drink it! WINSTON CHURCHILL

  • Member since
    August 2013
Posted by Jsmyth on Monday, September 2, 2013 1:51 PM

What a great job Steve!! I have to agree with Surfsup on the weathering.

  • Member since
    July 2010
  • From: Tempe AZ
Posted by docidle on Wednesday, September 4, 2013 8:28 PM

Thank you Mark and J.  I am going to post the work I have done on the sail.

Steve


  • Member since
    July 2010
  • From: Tempe AZ
Posted by docidle on Wednesday, September 4, 2013 8:42 PM

Here is the hunk of plastic which consists of the sail and yard.  As you can see, you can choose whether you want to show full sail or furled.  Although I chose door three on the Hanse Kogge by sawing off the yard off the sail this time I will use the sail as is.

Anyway, for such a hunk of plastic, the detail is rather nice.  The sail material is quite petite and it looks to scale.  The bonnet lines on both front and back, as well as the line bordering the sails is also shown.

Painting this was fun.  After I filled in the ejection marks on the rear of the sail with Squadron White Putty, I had to be very careful not to sand the detail away.  Since the sail is billowing the horizontal line bisecting the sail had to follow the curve or it would have been really funky looking.  Much patience and even the use of a toothpick was needed to finish the painting off.

You can see the decals that go on the sail which is one of the reasons I used it.  Also, I am building this pretty much OOB.  I am actually using the sails as well as the deadeyes and blocks from the kit.  I am using my own rigging line since the kit's line was garbage.

Enjoy,

Steve


  • Member since
    August 2005
  • From: Glenolden, PA
Posted by highlanderburial on Friday, September 6, 2013 9:48 PM

Hey Gents,

What "oil" are you using to bring out the wood grain finish. I am super jealous of how well your "wood" looks on that kit!

Todd

Imagine a witty signature right .....here....

  • Member since
    July 2010
  • From: Tempe AZ
Posted by docidle on Saturday, September 7, 2013 2:23 AM

Todd,

I use high grade artist oils over acrylics.  You can use student grade oils but  they do not have the longevity of  the pro grade.  The initial outlay is on the high side but you really don't use that much on each model so they last a long time.

Steve


  • Member since
    August 2011
  • From: Earth, for now
Posted by BashMonkey on Monday, September 9, 2013 3:08 PM
I have been interested in this kit. How big is it?

 ALL OF YOUR BASE ARE BELONG TO US!

  • Member since
    July 2010
  • From: Tempe AZ
Posted by docidle on Monday, September 9, 2013 11:23 PM

The Thomas is 16.6 inches long and about the same height with the stand.

Steve


  • Member since
    August 2011
  • From: Earth, for now
Posted by BashMonkey on Wednesday, September 11, 2013 4:13 PM

Thanks! thats a good sized kit.

 ALL OF YOUR BASE ARE BELONG TO US!

  • Member since
    July 2010
  • From: Tempe AZ
Posted by docidle on Thursday, September 12, 2013 8:33 PM

Bash,

It's an interesting build and makes into an interesting boat.  I firmly believe in what Prof Tilley says about getting back into ship modeling; build a.small ship in a large scale.  This also has a nice bit of rigging, not too much but enough to teach someone the basics. Nice grain for weathering and painting.  

If you decide to build one, please share pictures I would love to see how you built it.  In fact DavidK built the same model at the same time.  He did a beautiful job but different approach as well as building it much faster than I take.  He usually does at least two to three models to my one.  Hopefully he'll post some pictures of the build soon.  If you have any questions, please ask.

Steve


  • Member since
    January 2007
  • From: Chester Basin Nova Scotia
Posted by John Lyle on Monday, September 30, 2013 3:07 PM
I love the finish you got on the hull, it looks like real wood. How did you achieve this? I admit to prefering wood for sailing ships but this kit looks very interesting.

Winters may be cold in Canada but at least there are no mosquitoes or blackflies

  • Member since
    July 2010
  • From: Tempe AZ
Posted by docidle on Monday, September 30, 2013 8:14 PM

John,

It is just artist's oil paint over acrylic paint.

Steve


  • Member since
    July 2010
  • From: Tempe AZ
Posted by docidle on Friday, October 4, 2013 5:49 PM

Here is the sail with decals on finally.  It was a bear getting these babies on!  I thought the Lions were going to be the hardest, they only broke apart in about 4 or 5 places; however, the fleur- de- lis added at least a parcel of gray hair to appear.  They broke apart in so many places I lost count.  Add that to eye balling them to conform to the sail, let's just say I'm glad that part is done.

Now on to weathering them.  I was wondering if I should seal them with Future and then a dull coat before I weather or just a Future coat and then a dull coat after I weather them?

Steve


  • Member since
    June 2012
Posted by arnie60 on Friday, October 4, 2013 9:02 PM

Wow. If there are any breaks, I just can't see them. Nice save.

  • Member since
    July 2010
  • From: Tempe AZ
Posted by docidle on Friday, October 4, 2013 11:43 PM

Thanks Arnie, like I said, I am REALLY glad that part is over.  You rarely encounter decals building sailing ships but it is always good to stretch your limits.

Steve


  • Member since
    July 2010
  • From: Tempe AZ
Posted by docidle on Tuesday, November 12, 2013 6:13 PM

I finally got to weathering the sail.  It is a bit shiny due to the fact I just painted the oils on it.  I'm still toying with the idea of using a bit of yellow ochre but I'll sleep on it for now.


  • Member since
    March 2004
  • From: Spartanburg, SC
Posted by subfixer on Wednesday, November 13, 2013 10:15 AM

Looking quite proper.

I'm from the government and I'm here to help.

  • Member since
    September 2013
  • From: San Antonio, Texas
Posted by Marcus McBean on Wednesday, November 13, 2013 2:47 PM

Very nice work.

  • Member since
    July 2010
  • From: Tempe AZ
Posted by docidle on Wednesday, November 13, 2013 8:51 PM

Sub,

Oh yes, quite so old boy.

Thanks McBean.

Steve


  • Member since
    July 2010
  • From: Tempe AZ
Posted by docidle on Thursday, November 28, 2013 8:32 PM

Happy Thanksgiving everyone in the U.S.

These pictures show the evolution of the painting technique and shows the start of rigging.  I put the kit block in to show the difference between the handmade rigging vs. the kit version.  Since I am using the sail, the sequence of the build is getting weird.  I need to do the anchor ropes before securing the fo'c's'le so that I can secure the rope around the bits, the capstan and then down below.  

The sail/yard needs to be rigged next so that I can run the halyards around the wench ( oops, I meant windlass! ), as well as the lift, brace, tack and sheet blocks.  I'll probably rig the back stays next since it will be immensely easier without the sail than with it.

Anyway, enjoy the pictures.

Steve


  • Member since
    May 2003
  • From: Greenville, NC
Posted by jtilley on Thursday, November 28, 2013 9:05 PM
Hmmm....run the halyards around the wench....Souns like something really interesting is going on aboard that ship.

Beautiful model. Have you considered adding some people? Zvezda makes some nice 1/72 medieval figures for war gaming, and your superb oil painting technique could make them look spectacular.

Youth, talent, hard work, and enthusiasm are no match for old age and treachery.

  • Member since
    July 2010
  • From: Tempe AZ
Posted by docidle on Thursday, November 28, 2013 10:09 PM

Thanks for catching that Professor T!  Although, it being the King's ship and all ....... You just never know.

I actually placed the 1/72 figure for size comparison and the thought has crossed my mind during this build.  I have seen some rather nice figures by Zvezda and Ceasar.  What I haven't found are bombards, although again, I am not sure if the English carried them on board during the battle of Sluy.  If I do go with the figures I am definitely going to put Longbowmen in the fighting top.

Although I was going to do this built out of the box, when it came time to start rigging I couldn't bring myself to rig her that way. I put the kit block in the picture so that a modeler you is thinking of building the Thomas or another Kogge can see the difference between the two methods.

Finally, thank you for the compliment, I always appreciate your input.

Steve


  • Member since
    March 2012
  • From: Marysville, WA
Posted by David_K on Friday, November 29, 2013 12:28 PM

Looks great, Steve!  When I did my Thomas, I replaced the kit blocks with walnut hearts (from Cornwall Model Boats, in the UK....SUPERB fittings, BTW!)...though Zvezda does a great job with their blocks, I felt that rigging my own was a good idea, and they look way better...as do yours!  I don't remember if I posted any progress pics of the Thomas on here...been awhile since I contributed at Finescale...

Makes me consider starting a thread for the Chebec build...

Dave

        _~
     _~ )_)_~
     )_))_))_)
     _!__!__!_         
     (_D_P_K_)
   ~~~~~~~~~~~~~
    ~~~~~~~~~~~

Current Project:  Imai/ERTL Spanish Galleon #2

Recently Finished: Revell 1/96 Cutty Sark

Next Up:  ???


JOIN OUR COMMUNITY!

Our community is FREE to join. To participate you must either login or register for an account.

SEARCH FORUMS
FREE NEWSLETTER
By signing up you may also receive reader surveys and occasional special offers. We do not sell, rent or trade our email lists. View our Privacy Policy.