SEARCH FINESCALE.COM

Enter keywords or a search phrase below:

1/96 Cutty Sark WIP (Revell H-399)

29809 views
293 replies
1 rating 2 rating 3 rating 4 rating 5 rating
  • Member since
    March 2012
  • From: Marysville, WA
1/96 Cutty Sark WIP (Revell H-399)
Posted by David_K on Sunday, February 4, 2018 11:43 AM

Hi All-

This is as good a time as any to create a WIP Thread for my Cutty Sark.

Thanks to everyone for helping me with advice on resource material on the previous thread (I'll create a link between the two for anyone who may want to reference it).

*Resource Reference Thread*

http://cs.finescale.com/fsm/modeling_subjects/f/7/t/177602.aspx

Not too much progress to report...I've gathered some materials, separated kit parts based on airbrush base color, and purchased some new paints.

For the lower hull, I'm going to mix Tamiya Copper with some Tamiya Gold to get a color somewhere in between.  I know the real Cutty Sark's lower hull looks more gold or brass in color, but I kind of want a bit of a copper-y look.

Also, I think I'm going to prime all the parts before I begin painting...spraying white for the bulwarks on the molded black hull is just asking for trouble, and some of the kit-molded parts are not the same color as they'll be when I paint them (some of the lower crosstrees, for example, are shared between brown and white molded sprues, so they won't look the same once I paint over the different plastic color)....of course, black will lay down nicely over the primed hull, so it shouldn't be an issue.

I still need to drill some holes in the deck parts and maybe even the hull railing to accommodate lower deadeyes, eyebolts, etc., but that'll come soon enough.

Anyway, here's a picture of the hull halves, clamped for a test-fit while I perform some sanding and matching.

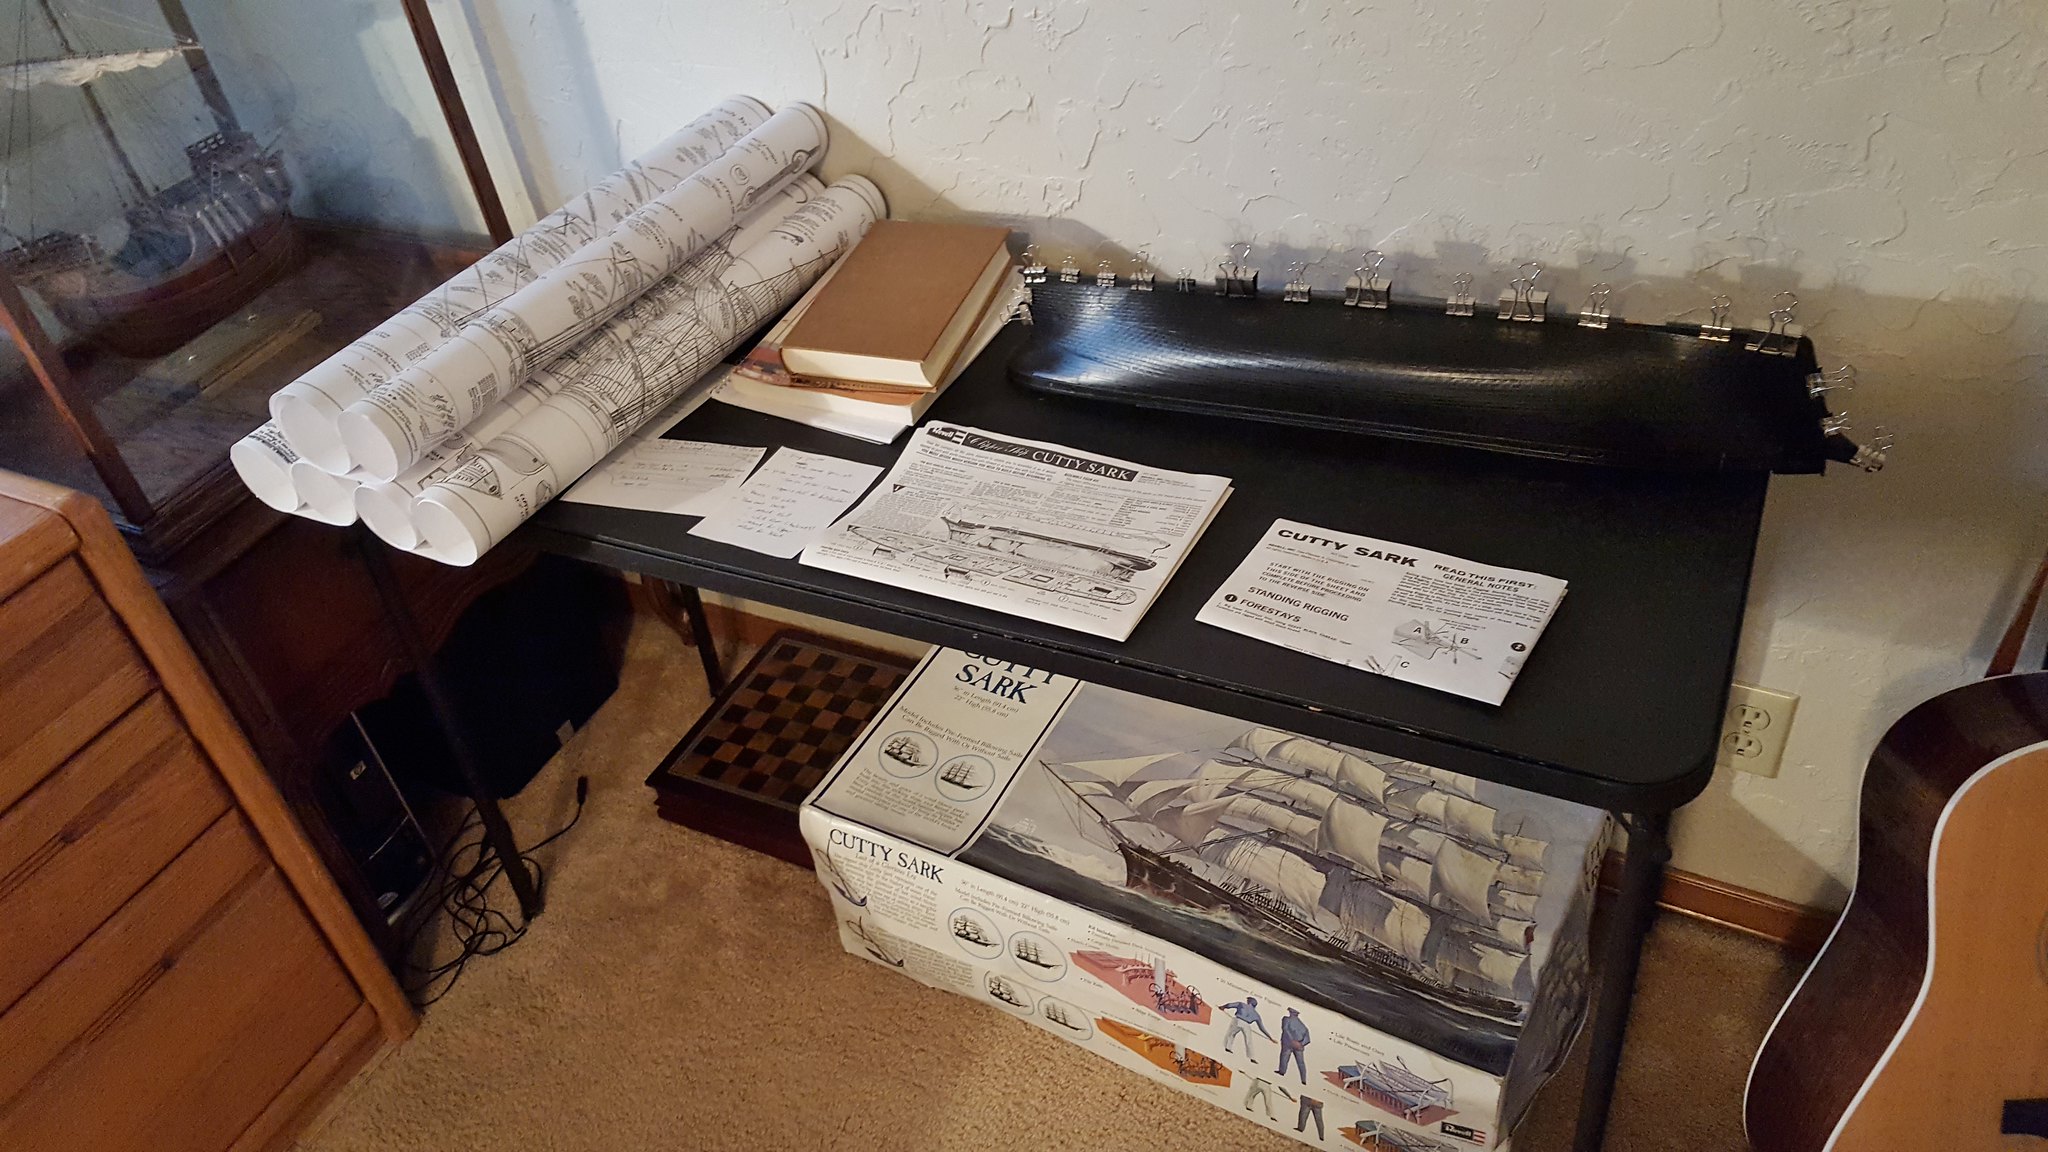
 20180204_092402 by Dave Kump, on Flickr

Wish me luck!

Thanks,

Dave


        _~
     _~ )_)_~
     )_))_))_)
     _!__!__!_         
     (_D_P_K_)
   ~~~~~~~~~~~~~
    ~~~~~~~~~~~

Current Project:  Imai/ERTL Spanish Galleon #2

Recently Finished: Revell 1/96 Cutty Sark

Next Up:  ???


  • Member since
    December 2003
  • From: 37deg 40.13' N 95deg 29.10'W
Posted by scottrc on Sunday, February 4, 2018 12:27 PM

Hi Dave,

I got a chair pulled up and will watch your build with interest.  Your RL build had so much great information.  You are very talented with your use of color and presentation of details.  This is going to be fun. 

Scott

  • Member since
    December 2012
Posted by rwiederrich on Sunday, February 4, 2018 2:06 PM

I'm on board Dave.

Rob

  • Member since
    April 2016
  • From: Russia, St.Peterburg
Posted by kirill4 on Sunday, February 4, 2018 3:38 PM

Hi Dave,

This is nice kit, and

I know -it will be very interesting building, if You decided to do it ! 

Wish You Luck! :)

Kirill

  • Member since
    September 2005
  • From: Groton, CT
Posted by warshipguy on Sunday, February 4, 2018 7:29 PM

Dave,

After your outstanding build of the Le Soleil Royal, I will watch this with great interest!

Bill

  • Member since
    July 2013
Posted by steve5 on Sunday, February 4, 2018 8:41 PM

looking forward to it dave


  • Member since
    July 2010
  • From: Tempe AZ
Posted by docidle on Sunday, February 4, 2018 10:21 PM

Dave,

I'm aboard so pull up the ladder! This will be a pleasure to follow to say the least. 

Got a question for you. You probably already answered it in the other thread but are you going to use a deck from Scaledecks.com? I have mine for this and the Alabama builds and cannot say enough about them.

Anyway, wishing you luck bud.

Steve


  • Member since
    March 2012
  • From: Marysville, WA
Posted by David_K on Monday, February 5, 2018 5:07 PM

Thanks to everyone for the warm regards!

I hope you all enjoy the show!!...and I hope I can do it justice.  I actually got my first Cutty Sark kit as a lot from a guy on CL several years ago, when I first started building ships (I got the Cutty Sark, the Revell Constitution, and the Imai Chebec for 100 bucks total), but I knew I would need to wait on the CS and the Constitution until I honed my shipmodeling chops a bit.

I recently happened across an open-box Cutty Sark on OfferUp for 20 bucks, and bought it toot-sweet since it was a good deal and I figured it wouldn't hurt to have extra parts.

I have a pretty good idea of how I'll proceed with the build (enough to get started, anyway)....though I still have some ?? about installing lower deadeyes to the deck/bulwarks/pinrails.  I may need to do some dry-fitting of parts to see how it all sits and figure out where to put *chainplates* (for lack of a better term)...I may drill holes in the deck and run annealed wire up through it near the bulwarks and fix the deadeyes to the caprail/pinrail that way.  Again, I need to get a bit further in before I make the decision.

And speaking of deck (docidle), yes, I do intend to order the Scaledecks Cutty Sark deck set.  I hear lots of good things, and I'm glad you share in the rave reviews!  Question:  Will I need to paint the kit deck parts, or do you think it better to leave them bare plastic?  Also, has anyone had issues with fixing deck furniture to the wood?  Are there special considerations for installing the material and using it with plastic?  What about staining the wood some way?

These are some of the things that pop into my head while I imagine the possibilities! Suppose I'll figure it out as I go.

Thanks again, I'll have some progress to share pretty soon.

Dave

        _~
     _~ )_)_~
     )_))_))_)
     _!__!__!_         
     (_D_P_K_)
   ~~~~~~~~~~~~~
    ~~~~~~~~~~~

Current Project:  Imai/ERTL Spanish Galleon #2

Recently Finished: Revell 1/96 Cutty Sark

Next Up:  ???


  • Member since
    December 2012
Posted by rwiederrich on Tuesday, February 6, 2018 7:38 AM

Dave...I found my copy of the 1985 Scale Model mag that has a remarkable build of the Cutty Sark.  The man who built it did so in 6 months and with full sails(included in the kit).

His job was spectacular!  I will try and provide some images tonight when I get home.

Rob

  • Member since
    September 2012
Posted by GMorrison on Tuesday, February 6, 2018 11:37 AM

The way you describe fixing the deadeyes is the right one.

You can see that there's a long rod which is an extension of the lower deadeye strop, and it goes down through the waterway at the edge of the deck. 

The lower end is attached somehow internally to the ships frames, which are iron.

The kit pin rails are just so oversized and clunky that this detail will hardly show, unless you decided to replace them or cut them down.

 Modeling is an excuse to buy books.


  • Member since
    December 2012
Posted by rwiederrich on Tuesday, February 6, 2018 1:18 PM

Indeed this is true about the oversized rails where the deadeyes are afixed.  this is done to accomodate the bulky two sided deadeye assemblies.  One could easily cut them down and make them flush with the odd placed (Or normal sized) rails.

There are braces that support the rails as well that extend down and these can compete for space and room to work them when you add the Deadeye iron braces at this scale.

I opted to fix all my deadeyes to a seporate piece of wood(Off model), then glued the entire arrangement in the place of the plastic molded kit ones.  Then I ran lanyards in the typical fasion.  I found this easier then if I had first glued the rails to the bullworks and then ran the braces up and through the rail to secure the deadeyes.

Setting the deck would have damaged the pre-set rails with their installed deadeyes.

I chose this easier process..because I had lots of other (More important IMV)rigging details to focus on.

Rob

  • Member since
    September 2005
  • From: Groton, CT
Posted by warshipguy on Tuesday, February 6, 2018 1:24 PM

Dave,

I am using the ScaleDecks CSS Alabama set, which is terrific!  I did paint the plastic deck under it flat black because of the coal scuttles and vents that were on deck.  The decks do not come with any fixative, you must actually glue the wood deck onto the plastic.  The directions come with a discussion of which glues work best. I used Gorilla Glue. The directions are quite clear about all aspects of glueing and protecting.

Bill

  • Member since
    December 2012
Posted by rwiederrich on Tuesday, February 6, 2018 6:02 PM

I was able to rustle some images from that article on the Cutty with Kit sails.

The images are poor but the skill used to create the look is amazing.


Rob


  • Member since
    December 2012
Posted by rwiederrich on Tuesday, February 6, 2018 6:03 PM

Another

  • Member since
    December 2012
Posted by rwiederrich on Tuesday, February 6, 2018 6:03 PM

Another

  • Member since
    December 2012
Posted by rwiederrich on Tuesday, February 6, 2018 6:04 PM

Lastly a centerfold image.

Rob

  • Member since
    December 2010
  • From: Salem, Oregon
Posted by 1943Mike on Wednesday, February 7, 2018 8:11 PM

Dave,

I've no doubt whatsoever that you'll not just do it justice .. you'll do it proud!

This should be a fun ride. Looking forward to your using the noteworthy skills you've acquired in this hobby on another of the great plasitc sailing ship kits.

I've no doubt about Rob's skills either but I have a question on the pictures of the model of the CS he's posted - wouldn't the crew try to have the deadeyes be parallel along the length of the ship? Perhaps that was, if not impossible, then impractical while under full sail? Just curious.

Mike

"Le temps est un grand maître, mais malheureusement, il tue tous ses élèves."

Hector Berlioz

  • Member since
    May 2006
  • From: Chapin, South Carolina
Posted by Shipwreck on Wednesday, February 7, 2018 8:35 PM

David, 10 years ago I started researching the Cutty Sark. I did so much research I never built the kit. Now I am trying to start the Constitution. The CS is great kit; maybe someday I will get back on board? For now I will enjoy following your build. Good luck!

On the Bench:

Revell 1/96 USS Constitution - rigging

Kinetic 1/48 YF-104A 5+2957

Trumpeter 1/350 USS Hornet CV-8

Revell 1/48 B-1B Lancer Prep & Reasearch


  • Member since
    May 2017
  • From: Asheville, NC
Posted by LIVIT on Wednesday, February 7, 2018 11:29 PM

Dave, looking forward to your build. CS is on the Bucket list. I just recently did scale decks on my Connie build. I used regular elmers water based white glue to adhere deck to plastic deck.  You can change the tone of the Scale decking by painting the OOB deck. Also found that alot of glues do not easily adhere to the scale deck. Myself and Gene are both big fan of the 560 canopy glue. It may take a few xtra minutes to set, but it cleans up with water and once dry it adheres brass eyebolts to scale deck or plastic and good luck getting them back out. I had orginally used ca to adhere my cannons down with and they came loose, went back used the 560 and no more probs. Plus it dries clear without glossy appearance.  Dale

  • Member since
    July 2013
Posted by steve5 on Wednesday, February 7, 2018 11:46 PM

rob

would love to see that model , look's superb .

dave , livit

never heard of 560 glue , who make's it , where can I get it ??

anyone , able to help in australia ?


  • Member since
    May 2017
  • From: Asheville, NC
Posted by LIVIT on Thursday, February 8, 2018 4:41 AM

Steve, ZAP & Pacer industries makes it. Been using it on RC Plane and Boat canopies for years. Proper name is "Formula 560 canopy glue" You should not have any probs finding it. Local hobby shop or any on line rc dealer will carry it.

I have electric Radio controlled boats that reach speeds in excess of 100mph/160 kph and  electric RC planes that I have achieved speeds almost double that and the 560 glue held the canopy in place. It is a very good product and not that expensive. Dale

  • Member since
    December 2012
Posted by rwiederrich on Thursday, February 8, 2018 8:20 AM

Shrouds were living things and they stretched with the motion of the masts..and at times the lanyards needed to be tightened..that's why they are there...to tighten the shrouds and backstays, so if they are not even that is not far from accurate.  Typically the length of the lanyard binding was 3 times the width of a deadeye.  That helped measurment deficient crewmen keep things lined up and sharp.

However, unevenness is part of normal on a sailing ship.....unless you are an inspecting admiral.Indifferent

Rob

  • Member since
    September 2012
Posted by GMorrison on Thursday, February 8, 2018 10:24 AM

Here's a picture of the wreck of the Ambassador, another composite tea clipper built in the same year as Cutty Sark.

She was sold and sent to the breakers in 1896. Currently the frame sits on the beach in Tierra del Fuego, Chile.

I think this can help see why the Cutty Sark is so different from all timber ships that came before.

 Modeling is an excuse to buy books.


  • Member since
    September 2005
  • From: Groton, CT
Posted by warshipguy on Thursday, February 8, 2018 10:47 AM

Bill,

Do you know of any preservation efforts for the Ambassador?  She makes a remarkable study!

Bill

  • Member since
    September 2012
Posted by GMorrison on Thursday, February 8, 2018 11:20 AM

Yes she is as National Landmark. I don't know what the preservation effort might be. Certainly she's in a pretty in accessible location.

It would make a great model.

 Modeling is an excuse to buy books.


  • Member since
    September 2005
  • From: Groton, CT
Posted by warshipguy on Thursday, February 8, 2018 12:04 PM

Bill,

Her frames look remarkably intact.  She looks as if she could be rebuilt!

Bill

  • Member since
    September 2012
Posted by GMorrison on Thursday, February 8, 2018 12:10 PM

Dave, I noticed in the earlier photo of the pin rail I posted, and you can see on the Ambassador as well, the CS bulwarks are iron plate.


 Modeling is an excuse to buy books.


  • Member since
    December 2012
Posted by rwiederrich on Thursday, February 8, 2018 12:48 PM

NOPE Bill ....she has since collapsed since this image was taken.

A rusty collapsed mess..what was once a living moving vessel.


Rob

  • Member since
    September 2005
  • From: Groton, CT
Posted by warshipguy on Thursday, February 8, 2018 1:17 PM

Rob,

It's a real shame. What an unfortunate loss!

Bill

  • Member since
    September 2012
Posted by GMorrison on Thursday, February 8, 2018 1:27 PM

Here's a photo of Dave's ship. You can see a lot of useful detail, including the rods to which the shrouds were attached, at left and right up on the weather deck level.

They appear to be over the frames, perhaps it's as simple as a shackle through the top of a frame.

A major benefit of the composite ships was the much larger and open hold space.

What an unholy mess.

 Modeling is an excuse to buy books.


JOIN OUR COMMUNITY!

Our community is FREE to join. To participate you must either login or register for an account.

SEARCH FORUMS
FREE NEWSLETTER
By signing up you may also receive reader surveys and occasional special offers. We do not sell, rent or trade our email lists. View our Privacy Policy.