SEARCH FINESCALE.COM

Enter keywords or a search phrase below:

Gun for Hire: finished!!! 8-29

8871 views
73 replies
1 rating 2 rating 3 rating 4 rating 5 rating
  • Member since
    January 2009
  • From: clinton twp, michigan
Posted by camo junkie on Wednesday, August 26, 2009 9:48 AM
 modelchasm wrote:

BTW ... my neighbor just drove by a gave me a funny look as I was holding the printout to the window ... gee, thanks! HAHA!!!

that's why i used the door out onto my deck (the back one) buddy!!! no witnesses!! Wink [;)]

"An idea is only as good as the person who thought of it...and only as brilliant as the person who makes it!!"
  • Member since
    March 2008
  • From: East TX
Posted by modelchasm on Wednesday, August 26, 2009 9:44 AM

Thanks Camo!! That's exactly what I was looking for. Such a simple technique too. I'll have to store that one away in my "how-to" book!

BTW ... my neighbor just drove by a gave me a funny look as I was holding the printout to the window ... gee, thanks! HAHA!!!

"If you're not scratching, you're not trying!"  -Scott

  • Member since
    January 2009
  • From: clinton twp, michigan
Posted by camo junkie on Wednesday, August 26, 2009 9:38 AM
btw scott, rereading your last post i think you were asking me how did i come up with the phrase, like i said while probably jibberish because its only "part" of the whole phrase, i actually took the "arabic wording" from a computer video game (battlefield 2) i have!! alot of my mayhem dio was actually forged from that game...LOL. anyway, i would do a print screen on areas i "wanted" then would paste them into word, scale to the size i wanted then print them out. for my "stenciling, i would put the picture i printed on a window so the outside light would show through, then place and draw/trace over it on my 3 x 5 card then used my exacto to cut it out and airbrushed away...! make sense? Cool [8D]
"An idea is only as good as the person who thought of it...and only as brilliant as the person who makes it!!"
  • Member since
    January 2009
  • From: clinton twp, michigan
Posted by camo junkie on Wednesday, August 26, 2009 8:05 AM
well, the phrase is probably just jibberish in that i made a stencil (cut out of 3 x 5 card) for my mayhem dio and only used a part of it for this then air brushed it on...figured it looked good and that was good enough in this case. i also like the scribed brick one. i'm sure if i was really careful i could've scribed them straight and made them uniform, but i didnt think it mattered and in the end like ya said, they're hand made anyway and probably not all that straight!! Big Smile [:D]
"An idea is only as good as the person who thought of it...and only as brilliant as the person who makes it!!"
  • Member since
    March 2008
  • From: East TX
Posted by modelchasm on Wednesday, August 26, 2009 7:51 AM

I hear ya. Besides, I think that you "made up for" the detail in your figs etc. I think that you're building in mayhem is perfect. Don't have 2nd thoughts about it ....

I went back and re-read this thread again, and chris brings up some good points. While I think that the styrene brick wall looks good, it's not all that accurate when talking about Iraq/ Afghan. The bricks are more manufactured than they are hand-made. I think he called it .... character.

Just curious, just how did you paint on the lettering again? And how did you come up w/ the phrase?

"If you're not scratching, you're not trying!"  -Scott

  • Member since
    January 2009
  • From: clinton twp, michigan
Posted by camo junkie on Wednesday, August 26, 2009 7:36 AM
yeah, i hear ya and everyone has their preferences. thanks though for the comps. as i said, the level of detail is what i wanted to put in my mayhem dio...but again, thought of it after the fact. not sure also if i would've been able to do it as i put such a thin layer of spackling compound on it...but whatever...will do for the next one (much smaller btw)!!!! Laugh [(-D]
"An idea is only as good as the person who thought of it...and only as brilliant as the person who makes it!!"
  • Member since
    March 2008
  • From: East TX
Posted by modelchasm on Wednesday, August 26, 2009 7:31 AM

HOLY CRAP, TOM!!!! Those buildings/ wall look OUTSTANDING!!!! Seriously! Nice job.

I personally, like the first one. I guess it's the one w/ styrene bricks .... I just like how the brick/ mortar lines are a little more defined. They're probably not to scale, but I think whn things are a little more defined in smaller scale, they just look more real. But that might just be me.

Again, nice job on this one. Will be watching .... Thumbs Up [tup]

"If you're not scratching, you're not trying!"  -Scott

  • Member since
    January 2009
  • From: clinton twp, michigan
Posted by camo junkie on Tuesday, August 25, 2009 6:41 PM
thanks, i guess i can get to writing that too! Laugh [(-D] yeah, as if!! sounded good, kind of a play on words and considering what they did over there makes perfect sense!! however, ya seen the title here FIRST folks, so in theory it is copywrite protected!!! Mischief [:-,]
"An idea is only as good as the person who thought of it...and only as brilliant as the person who makes it!!"
  • Member since
    December 2003
  • From: Colorado
Posted by psstoff995 on Tuesday, August 25, 2009 6:38 PM
Interesting title- sounds like a good book Thumbs Up [tup]

-Chris

US Army Infantryman

  • Member since
    January 2009
  • From: clinton twp, michigan
Posted by camo junkie on Tuesday, August 25, 2009 5:56 PM

there ya go, use it on yours although...i asure you i will build that one as well soon enough!!

ark lets see, it's the same technique i used on my mayhem dio in that i primed the spackling with flat black paint, then a.b. painted the spackling (non brick areas) a medium grey. a.b. painted the spackling areas after that with humbrol #187 sand. i made sure i left the grey around the cracks and spackling not covered (you'll see in the picture). very similiar to painting armor/panel lines with an a.b.!! then a.b. painted the (btw a.b.=airbrushed) bricks humbrol #84 mid stone. after that took my same med. grey and a.b.'d the lines in the bricks. (you could probably save this step by simply painting everything med. grey then adding the sand and mid stone colors while leaving the edges of the grey showing).

anyway, after all that, i applied a raw umber wash to all the lines and details. once done i took a wide brush and using just mineral spirits, lightly (very lightly, the trick is to not lift the paint you laid down as it isnt "dry" yet) whisked my brush of just mineral spirits across the entire thing, bricks and all. what this does is "cleans up" the wash residue and also blends & bleaches the paints. let that dry then dry brush lighter shades while progressively adding white. make since?? let me know if ya need any more info or whatever ok ark. i'll help ya any way i can. Big Smile [:D]

btw, i was thinking of calling this "blackwater...red river" but wasnt too sure on that!

"An idea is only as good as the person who thought of it...and only as brilliant as the person who makes it!!"
  • Member since
    December 2003
  • From: Colorado
Posted by psstoff995 on Tuesday, August 25, 2009 3:59 PM

 camo junkie wrote:
glad you like it...it's your "picture"!! Big Smile [:D]
yeah but you definitely gave it your own flair, it looks really good- the picture was 2D and I'm glad it inspired you, because I don't think I would have been able to do the 3D version this well, or put it together in a few days like you have. Hey- maybe I'll be able to pick up some tips and better prepare myself for little vignette projects...

Maybe I'll throw a blue door on mine haha

-Chris

US Army Infantryman

  • Member since
    August 2006
  • From: University of Dayton
Posted by arkhunter2002 on Tuesday, August 25, 2009 3:53 PM

Lookin really good!

What colors/technique (spray it black then dry brush?) did you use for the final coat?  I may use it as I kind of want the house in my fast roping dio to have a similar color/finish...

  • Member since
    January 2009
  • From: clinton twp, michigan
Posted by camo junkie on Tuesday, August 25, 2009 3:31 PM
ya know chris, its funny you say that but i thought the exact same thing with the two of them!! i like the scribed brick one myself! and...lol, i used the same graffitti i used on the other one only "part" of it. glad you like it...it's your "picture"!! Big Smile [:D]
"An idea is only as good as the person who thought of it...and only as brilliant as the person who makes it!!"
  • Member since
    December 2003
  • From: Colorado
Posted by psstoff995 on Tuesday, August 25, 2009 3:23 PM
Woah!! I really like how this is turning out, great rendition- even the red graffiti (which I'll admit, I took the idea from your Mayhem dio Whistling [:-^]) Nice weathering job, great detail Thumbs Up [tup]


Edit- I like the character of the scribed one, while the styrene bricks have more uniformity, they have less character, tough call, guess it depends on what one’s going for.

-Chris

US Army Infantryman

  • Member since
    January 2009
  • From: clinton twp, michigan
Posted by camo junkie on Tuesday, August 25, 2009 3:16 PM

hey guys, just showing off my latest mini dio. this is still a w.i.p. but its only like a 2 to 3 day thing b4 its completed. i wanted to take a temp. break from my mayhem dio and do something different. this is only going to have one figure in it and it is my new world miniatures private contractor. the figure is still in the painting stages and i have to do the ground work but like i said, in a couple of days it'll be finished!!! that i promise!!

thankfully the talented chris (po995) sketched me (well, in this case sketched it for modelcasm but i ran with the building/wall) a drawing of what i had in mind for an idea for scott. right now the building/wall is all i have completed but again, it wont be long!!! hope you like your "vision" coming to life chris!!! thanks again buddy!! and thank u scott for letting me run with this!!

i made two of them just because, plus i will use them both, one at a time though. one was made using styrene for the walls, styrene bricks then spackling compound over the bricks, sanded smooth then scribed with my exacto the cracks, bullet holes. alot of the cracks and stuff i would've put in my mayhem dio but that was of course one of the things i thought about after the fact.

the second one i made from styrene walls, covered in spackling compound, when dry scribed the brick pattern with a pointed file, then applied more spackling compound on top of that, sanded smooth then scribed cracks and bullet holes like the first one.

first is chris' picture for scott 
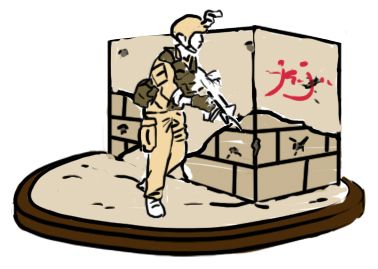
this is the all spackling/scribed bricks one

hope you guys like it or at least will when its completed!!! Big Smile [:D]

"An idea is only as good as the person who thought of it...and only as brilliant as the person who makes it!!"
JOIN OUR COMMUNITY!

Our community is FREE to join. To participate you must either login or register for an account.

SEARCH FORUMS
FREE NEWSLETTER
By signing up you may also receive reader surveys and occasional special offers. We do not sell, rent or trade our email lists. View our Privacy Policy.