SEARCH FINESCALE.COM

Enter keywords or a search phrase below:

1/72 B-52D with Big Belly Mod, Operation Arc Light

249097 views
1059 replies
1 rating 2 rating 3 rating 4 rating 5 rating
  • Member since
    April 2012
  • From: USA
Posted by Striker8241 on Wednesday, February 20, 2013 3:30 PM

Duke Maddog

AMT did bring out a G model BUFF. I have it hanging on my ceiling already next to my -D model BUFF:

Thanks, Duke. Wow! That is some collection you have!

Russ


  • Member since
    March 2009
  • From: Middletown, OH
Posted by Buffirn on Wednesday, February 20, 2013 2:45 PM

Bad bombs were mostly the Radar Nav's fault.  Occaisionally, the pilots would not center the banana or take over visually.  Pilots visual was often a bad thing.  With some training, coaching, and a visual target they did pretty good.  

My best radar only bomb was well under 100 feet and my worst one was about a half mile.  Both take a lot of effort.  I did have an EVS/Visual(using the low light TV or FLIR to find the release point) that was down around 30 feet.  The Co-Pilot got a 50 footer that day.  

Low level bombing was lots of fun.  It was better if the Nav was trying to puke his lungs out! :)  Nebraska on a hot August afternoon at 500 feet above ground is very rough.

Jim Williams


  • Member since
    March 2009
  • From: Middletown, OH
Posted by Buffirn on Wednesday, February 20, 2013 2:35 PM

A really goog Gunner was an expert in telling the pilots the right time to break right or left to bring a fighter into the gun box(the effective volume of the gun).  There was the always popular "suck him in" maneuver.  With the fighter in tail chase just outside the gun box, the Gunner would make the call and the pilots would pull the trhottles back to idle and throw up the airbrakes.  That dropped a fair amount of airspeed very quickly thus sucking the fighter into the gun box.  

We didn't always win, but neither did the fighters.  Young, inexperienced fighter jocks were the most fun to mess with.  I know more than a few that had their egos deflated by a big old lumbering BUFF.  In the end, it was great training for both sides.

Jim

Jim Williams


  • Member since
    June 2003
  • From: Rowland Heights, California
Posted by Duke Maddog on Wednesday, February 20, 2013 12:05 PM

Also, great job on those gear doors Styker! I've been following this Thread diligently, I love what I see!

I tried to add this to my previous post, but there's no obvious "Edit" button for me to do so.

  • Member since
    June 2003
  • From: Rowland Heights, California
Posted by Duke Maddog on Wednesday, February 20, 2013 12:01 PM

AMT did bring out a G model BUFF. I have it hanging on my ceiling already next to my -D model BUFF:

  • Member since
    April 2012
  • From: USA
Posted by Striker8241 on Wednesday, February 20, 2013 11:53 AM

Hi, All,

I'm repeating here a compilation of posts I made in the Berny Annual Memorial GB on August 5 last year (page 93). It involves thickening the main gear doors since they were really too thin on my model. If you're upgrading your model, I think this is an important fix.

"I took the plunge and upgraded my gear doors. I just couldn't stand the squashed versions they provided. Sorry but I forgot to take pictures of the doors before I started, but they were about half as thick as they should be and the inner edges were rounded off, probably due to the worn out molds. The picture below shows how they should look.

 
I wanted to add the landing lights but there wasn't enough material [on the kit supplied doors], so I added a layer of 0.030 styrene to each door. Then I filled in the gaps with putty. I also ground out depressions for the inside tire and for the door actuator arm. I didn't have any measurements so I did it by eye - thankfully, you can't see much of the detail anyway."


Cheers,
 
Russ


  • Member since
    April 2012
  • From: USA
Posted by Striker8241 on Wednesday, February 20, 2013 11:28 AM

Hi, Bartock,

Welcome and thanks for stopping by!

There are a number of conversion kits available to convert your B-52D kit. Check the following list of items on eBay:

http://www.ebay.com/sch/i.html?_trksid=p5197.m570.l1313&_nkw=conversion+b-52&_sacat=0&_from=R40

That will give you some idea of what's out there. You may have to search online for additional resources. There are a number of articles on the B-52G models in back issues of FSM, notably in issues #122 and #163. Also, I believe AMT put out a model of the B-52G.

Good luck!

Russ


  • Member since
    February 2013
Posted by Astrogopher1 on Wednesday, February 20, 2013 9:49 AM

Great stuff!  I worked B52Gs and Hs for about 10 years at Anderson AFB Guam and Griffiss AFB New York.  I worked as a computer/radar technician on the Bomb Navigation system. Spent a lot of time in the lower crew section and under the radome.  Bomb drop misses were never our fault, only the Radar Navigators :)  No, not realy.  They were some of the best people I ever met.  

Anyway, I have that particular 1/72 B52D I have been carrying around for several years. So I have two questions reguarding your model:

1. What would the challanges be to build it as a G model. I am going to do a couple of smaller models first to build/rebuild my skills. (I haven't built a model since high school). I have only built kits out of the box with no scratchbuilding.  

It seems some of the major issues would be the tail gun, adding the second ejection seat hatch beside the ECM operator, the tail shape and the steerable chin turrets under the radome.

I know that is kind of a broad question  and if this thread is the wrong spot then I apologize before hand.  

2. Would anybody recomend a (at least) 1/72 G or H model.  The reason I a doing several models first is I want to get it right. So I am willing to wait for the right model.  But if I can modify this, I will.  

Thanks greatly for your time. and "Wow, I tell you, Wow!"  - Bartock

  • Member since
    February 2010
  • From: Ontario, Canada
Posted by Bockscar on Tuesday, February 19, 2013 10:44 PM

Buffirn

The G's and the H's had the Gunner up front with the rest of the children.  A good Gunner was a thing of beauty when playing with fighters.  

Jim

One of the children up front.

Jim:

us non-Gunners, maybe need a good washing:

please let us know a bit more about the beauty of a 'good Gunner', and

i promise you the lesson will never be forgotten.

That is an experience we would love to hear about.

I cannot imagine the adrenaline of a Gunner when he see's the enemy.

Best regards,

Dominic

  • Member since
    March 2009
  • From: Middletown, OH
Posted by Buffirn on Tuesday, February 19, 2013 10:36 PM

The G's and the H's had the Gunner up front with the rest of the children.  A good Gunner was a thing of beauty when playing with fighters.  

Jim

One of the children up front.

Jim Williams


  • Member since
    April 2012
  • From: USA
Posted by Striker8241 on Tuesday, February 19, 2013 3:43 PM

BTW, Cliff, did you resolve the problem of not enough weight in the nose?

Russ


  • Member since
    April 2012
  • From: USA
Posted by Striker8241 on Tuesday, February 19, 2013 8:39 AM

Thanks, Cliff Big Smile.


  • Member since
    November 2009
  • From: SW Virginia
Posted by Gamera on Tuesday, February 19, 2013 7:55 AM

Russ: She just looks better and better! Nice work there on the wing bomb racks and great idea on replacing the mounting pins on the gear doors- those things gave me fits on the A-20.

"I dream in fire but work in clay." -Arthur Machen


  • Member since
    April 2012
  • From: USA
Posted by Striker8241 on Monday, February 18, 2013 8:57 PM

Thanks, Ken Big Smile  Ya, I believe it was the G model. I think the primary reason was the G was build to do low-level bombing runs and the severe movement and stresses on the tail section made it dangerous to have a gunner back there. The crews didn't like the idea - they liked having eyes back there.

Russ


  • Member since
    November 2010
  • From: Lafayette, Indiana
Posted by Son Of Medicine Man on Monday, February 18, 2013 8:45 PM

Excellent work there Russ.  That looks really nice!  Yes  Yes 

That had to be a lonely position to be in.  Was it the "G" model where they moved the gunner up to the front with everyone else?

Ken

  • Member since
    April 2012
  • From: USA
Posted by Striker8241 on Monday, February 18, 2013 7:54 PM

Got a little more done today. I completed and installed the gunner's hatch, as shown in the pictures below. I'm also building up the wings and hope to attach them by the end of the week. Then I'll be ready to do the final painting topside.

Cheers,

Russ

Added 9/8/19 from my notes.


Creating the Gunner's Hatch

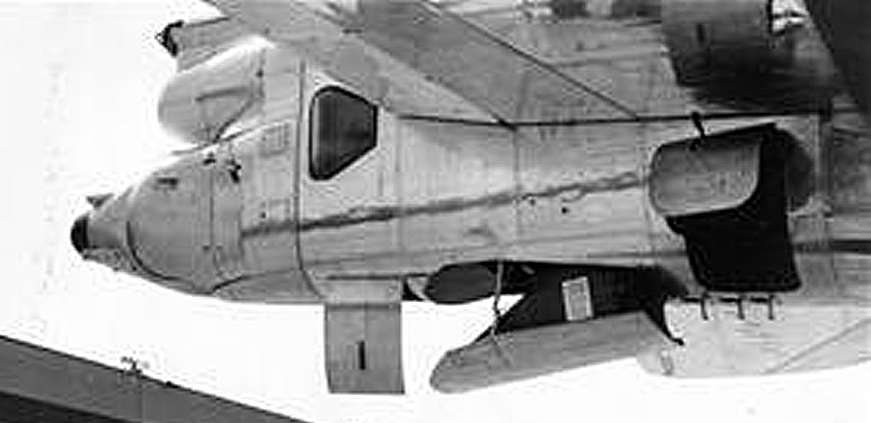
The gunner's compartment hatch cover is outlined on the right rear fuselage, as indicated in the first photo below. The second photo shows the hatch on the actual aircraft.


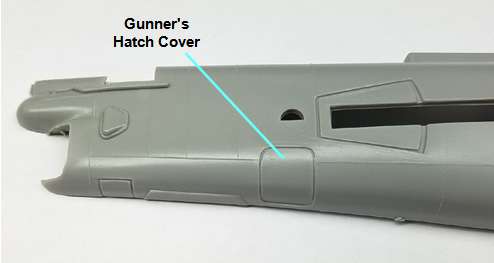
If you would like to show the hatch open - as it frequently was - follow the procedure below to cut out and detail the hatch.

1)      Using a sharp #11 Xacto blade, carefully cut out the hatch cover along the scribed outline. The plastic is 2 mm thick so cut slowly and repeatedly to avoid accidental slippage.

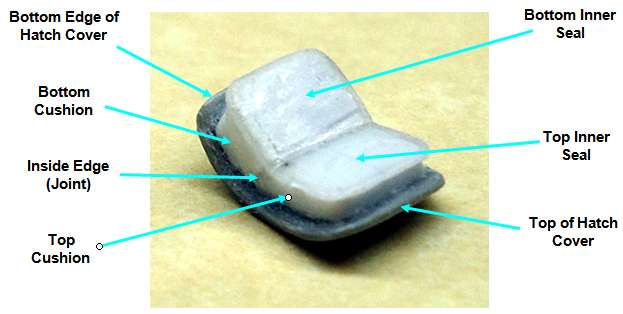
2)      The actual gunner's hatch cover had a thick flexible "plug" attached to it to seal the inner pressurized gunner's compartment. This plug was made up of two parts that I'll call the "cushion" and the "inner seal," as shown below.

3)      Make the bottom cushion from 3.0 mm-thick material cut to 5 mm x 6 mm.

4)      Center the cushion along the bottom edge and sides of the hatch cover. Shape the bottom surface of the cushion to match the curvature of the hatch cover.

5)      Glue the bottom cushion to the hatch cover.

6)      Make the top cushion from 2.0 mm-thick material and cut it to the dimensions of 6 mm x 6 mm.

7)      Trim the inside edge of the top cushion until it matches with the inside edge of the bottom cushion.

8)      Center the cushion along the top edge and sides of the hatch cover. Shape the bottom surface of the cushion to match the curvature of the hatch cover.

9)      Glue the top cushion to the hatch cover.

10)    Taper the surface of the bottom cushion until it is even with the surface of the top cushion at the inside edge.

11)    Make the inner seal out of two pieces of 0.5 mm thick sheet plastic.

12)    Cut the bottom piece 4 mm x 7 mm and glue it to the bottom cushion.

13)    Cut the top piece 5 mm x 7 mm and glue it to the top cushion.

14)    Round off the corners of the inner seals as shown above and fill and sand the joint between the seals. Allow the hatch assembly to dry.

15)    Apply a small fillet of super glue around the inside edge of the inner seal and around the base of the cushion.

16)    Allow the glue to dry thoroughly, then sand the filleted edges with fine sandpaper to achieve a smooth transition, as shown in the photo below.

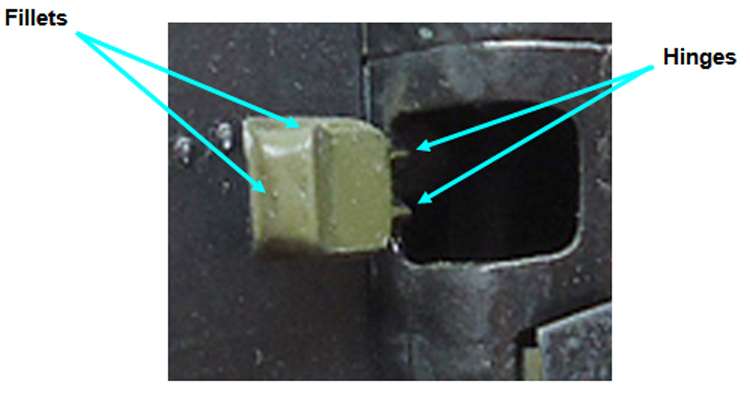
17)    Construct two hinges from 1.5 mm thick stock cut 3 mm in length. Carve one side of each hinge in the shape of a half moon.

18)    Glue one end of each hinge to the top edge of the gunner's hatch cover spaced 3 mm apart, as shown above.

19)    When the hinges are dry, glue the hatch to the top of the hatch opening, as shown below. The exact position is not critical.


  • Member since
    February 2010
  • From: Ontario, Canada
Posted by Bockscar on Sunday, February 17, 2013 8:35 PM

Hey Russ:

I haven't had a beer for many, many moons, but

I gotta tell ya, some days it just

doesn't seem to make any difference!

LOL.....must of been some kinda'

'muscle memory' from replying so many times

to Fred's ole' pal!Whistling

Thanks for info about the Hound Dogs,

Dom

  • Member since
    April 2012
  • From: USA
Posted by Striker8241 on Saturday, February 16, 2013 9:01 PM

No problem, Dom.  Ya, the earlier C's and D's carried Hound Dog missiles. Not sure if the F models did.

Russ


  • Member since
    February 2010
  • From: Ontario, Canada
Posted by Bockscar on Saturday, February 16, 2013 8:04 PM

Lol Russ;

Lemme guess, you've done that trick before...Whistling

Thanks for the info on the pylons, I wouldn't mind building the

BUFF with Hound Dogs. I didn't realize an earlier version could carry those.

Dom

  • Member since
    April 2012
  • From: USA
Posted by Striker8241 on Saturday, February 16, 2013 2:29 PM

Lol Dom, that's my tarp to keep the dust out! Big Smile

Russ


  • Member since
    February 2010
  • From: Ontario, Canada
Posted by Bockscar on Saturday, February 16, 2013 1:46 PM

Okay Russ;

I'll bight; what's up with the plastic wrap?

  • Member since
    April 2012
  • From: USA
Posted by Striker8241 on Friday, February 15, 2013 12:03 PM

Hi, All

I finally got the main gear doors installed. I did away with the pins that were molded into the doors as they made the doors sit too high above the wheel wells. I cut three slots in the bottom of the fuselage openings and added pins made from staples to the gear doors . This makes the doors look a lot better IMHO. BTW, if you decide to do this, you will need to shorten the door actuators.

Cheers,

Russ


  • Member since
    April 2012
  • From: USA
Posted by Striker8241 on Thursday, February 14, 2013 8:09 PM

Thanks, Ken! Big Smile 

Russ


  • Member since
    November 2010
  • From: Lafayette, Indiana
Posted by Son Of Medicine Man on Thursday, February 14, 2013 7:04 PM

Bombs away!  You are getting really good with that sheet plastic Russ!

Ken

  • Member since
    April 2012
  • From: USA
Posted by Striker8241 on Thursday, February 14, 2013 9:53 AM

Hi, All,

While I've been working on the base, I started suffering from "modellus withdrawus" syndrome Big Smile so I did a little work on the pylons. I didn't like the way the model had the bombs attached directly to the pylons. The real bombs were attached with hanger plates called "shackles" which were then attached to the pylons. I simulated them with small pieces of sheet plastic. I'm still looking for something to simulate the attachment hardware, but for now, here they are. The spacing is a little extreme, but I think it adds drama (also, I'm too lazy to correct it Smile).

Another problem with the pylons that I tried to correct is that they were molded as one piece so they don't really emphasize the fact that they were actually four individual assemblies: the original AGM-28 Hound Dog missile pylon, a long adapter attached to that, and finally the two 6-position ejector racks that actually carried the bombs.

To make each rack more distinct, I took a sharp knife and cleaned out the plastic filling the spaces between the different racks as much as possible. Be careful to cut around the four hardware brackets that helped stabilize the ejector racks. Doing this goes a long way to making the pylons look more realistic.

Cheers,

Russ


  • Member since
    April 2012
  • From: USA
Posted by Striker8241 on Tuesday, February 12, 2013 9:38 PM

Cool!  Thanks for the info, Subfixer!


  • Member since
    March 2004
  • From: Spartanburg, SC
Posted by subfixer on Tuesday, February 12, 2013 9:21 PM

The big one in the middle is a rotary launcher for eight AGM-86 ALCM cruise missiles. They could carry twelve more missiles on the wings. Whoa!

But now they carry a total of twelve of the new, stealthy, AGM-129s uder the wings and none in the bomb bay. Here ia a pic of the newer missile:

 File:Agm-129 acm.jpg

I'm from the government and I'm here to help.

  • Member since
    April 2012
  • From: USA
Posted by Striker8241 on Tuesday, February 12, 2013 8:27 PM

Hi, Ken,

Cool pic! That's one mean toolbox! Big Smile.  Thanks for sharing!

Russ


  • Member since
    November 2010
  • From: Lafayette, Indiana
Posted by Son Of Medicine Man on Tuesday, February 12, 2013 7:41 PM

Hi Russ,

I thought you might like this.  I just bought this 8" x 12" picture on eBay.  I especially like the big one in the middle!

Ken 

  • Member since
    November 2009
  • From: SW Virginia
Posted by Gamera on Tuesday, February 12, 2013 12:33 PM

Ahhhh ok! I forgot this kit dates back to the Cold War, so much new stuff coming out now it's hard to forget these had a few 'guesstimates' here and there!

"I dream in fire but work in clay." -Arthur Machen


JOIN OUR COMMUNITY!

Our community is FREE to join. To participate you must either login or register for an account.

SEARCH FORUMS
FREE NEWSLETTER
By signing up you may also receive reader surveys and occasional special offers. We do not sell, rent or trade our email lists. View our Privacy Policy.