SEARCH FINESCALE.COM

Enter keywords or a search phrase below:

French POW dio WIP **update: 2/26/09 pg 11**

42058 views
229 replies
1 rating 2 rating 3 rating 4 rating 5 rating
  • Member since
    June 2006
  • From: AusTx, Live Music Capitol of the World
Posted by SteveM on Monday, October 6, 2008 7:46 PM

Ian- I think I might try a dot method to a small section. I thought Doog brought up that the dull coating is what gave the oils some "teeth" to get grabbed by, but I'll go back to those dot posts to be sure. By the way, that goose looks just amazing, sorry I haven't chinmed in on your post yet. I'll be there soon.

Bodge- deepest thanks for your compliments.

Manny- much thanks, and good points. I just assumed the "graying" was sun bleach, and wouldn't affect the interior wood. I'll go back in and age up the insides a bit. As for the greens, I've been wondering if I should approach those shades with a drybrushing, or a filter. I'm leaning towards filter, because that might seem less like a highlight, and more like a growth.

Cool, thanks again guys. Just the type of feedback I'm looking for. 

Steve


Steve M.

On the workbench: ginormous Kharkov dio


  • Member since
    November 2005
Posted by Anonymous on Monday, October 6, 2008 2:18 PM

Steve, you really nailed it as far as I'm concerned---just beautiful.  A few nitpic suggestions:

* In my experience, the inside of the barn would also have that "greyish" look to the wood as well...I spent summers in rural Georgia as a kid and many hours in barns like this. Maybe not AS DISTRESSED, but the wood inside of your barn looks decades fresher than the outside wood.

* Ian makes a good point about breaking up the pattern a bit...I wouldn't drive myself crazy over it, as in making every board unique, but it might be wortwhile to lighten a few boards here and there and darken a few as well (maybe even replicate some repairs with newer looking boards or boards that are painted)...Also, in your ref pic you can see a greenish stain on some of the boards...this is caused by small plant-life in moist areas (mildew or lichen, perhaps) growing on the wood---I often saw it on the base of barns and it extended up in random spots from a few inches to maybe a couple of feet---very subtle though...and sometimes moss as well.  

Having wrote all that---if you did nothing else to this it would still be outstanding in every way!

  • Member since
    January 2008
  • From: Bournemouth UK
Posted by Bodge on Monday, October 6, 2008 2:16 PM
Youve got too much talent Steve, thats awsome.Bow [bow] Thats brilliant as is but after going back and looking at the real photo it wouldnt take long to reprecent that look if you wanted it, personal preference as to how weathered you want it and there,s no right or wrong on this one ,Who knows how old the wood is? Oh yer , how can you say your lazy after creating something on this magnetude,yer i might be quick on dios but they are not as technical as this  and i think you must have the pacients of a saint. Once again very well done and pat yourslf on the back.Thumbs Up [tup]
  • Member since
    August 2006
  • From: The Green "Mountains", Vermont
Posted by IanIsBored2000 on Sunday, October 5, 2008 5:41 PM
In my experience it's rather hard to go wrong with hat method.  Don't like it?  Just splash some thinner on and watch it run off leaving it looking the same as it was pre-dot filter.  Never tried it over a dullcoat though.
"Scanlon: work your knobby hands on the table in front of you, constructing a make-beleive bomb to blow up a make-beleive world."
  • Member since
    June 2006
  • From: AusTx, Live Music Capitol of the World
Posted by SteveM on Sunday, October 5, 2008 5:28 PM

Thnx, Ian. Yeah, you're right. I need to get some different shades of brown, gray, light green even. I was toying with the idea of going the oil dot method on this, after dull coating, to put some subtle variations in there. You think that might work? I'm too lazy to experiment Big Smile [:D]

Steve


Steve M.

On the workbench: ginormous Kharkov dio


  • Member since
    August 2006
  • From: The Green "Mountains", Vermont
Posted by IanIsBored2000 on Sunday, October 5, 2008 5:22 PM
Looking fantastic, dead on with the reference, and the warmer colored interior breaks up the grayed wood look.  The only thing I have to suggest, and more washing and pigments like you said you already have planned will probably cover this anyways--but IMO I'm not quite sure there's enough variation in the wood.  In the refernce, you can only see a dozen boards and still some are stained and rotted blackish, while others bleached lighter.  You 'nailed' the worn wood look though.
"Scanlon: work your knobby hands on the table in front of you, constructing a make-beleive bomb to blow up a make-beleive world."
  • Member since
    June 2006
  • From: AusTx, Live Music Capitol of the World
Posted by SteveM on Sunday, October 5, 2008 2:33 PM

Hey gang...

I've spent a week, hours here and there, trying to get this barn painted up. I started with burnt umber / black mixture, and steadily brought it up to a distressed gray  for extrerior, and aged / stained interior. From air brush to drybrush. Then, I gloss coated it, and washed with burnt umber, both inside and out. Followed that with a very light, light-gray drybrushing.

Still has it's glossy luster in many spots, but this, of course, will be dulled back down. I wanted to get some opinions on the progress before I sealed up this layer of paint. Pin washes, spot-aging, and pastel dusting (interior, exterior rusting) will follow the dull coat. Let me know what you think...

Exterior reference shot...

Mine...

A shot for Jim Barton (thanks for the inspiration, Jim Wink [;)])


Interior...


Plenty more shots here, if you're not completely bored by now...

I'm the slowest dioramist on this forum. Guys like Bodge (who rendered half of the Normany countryside in a week) leave me in the dust. But thanks for looking in, and I welcome all critique.

Steve


Steve M.

On the workbench: ginormous Kharkov dio


  • Member since
    February 2005
Posted by Kevleerey on Monday, September 29, 2008 12:47 PM
 SteveM wrote:

 But then I thought, "why would he cover the cart, instead of just getting up there and patching the roof?"


'Cause its easier...Big Smile [:D]

  • Member since
    June 2006
  • From: AusTx, Live Music Capitol of the World
Posted by SteveM on Saturday, September 27, 2008 6:04 PM

Jim, I think you're right about the lack of lack of shingles Smile [:)] I wondered about that midway through, and blew it off, and now I'm wonderin'. Maybe I can go back and abuse a few.

My original thought was to have a bald patch on the roof right above where the cart will be sitting,. Then place a water-stained tarp covering the cart. But then I thought, "why would he cover the cart, instead of just getting up there and patching the roof?"

However, I can go back over the shingles with a dremel and weather-battle them up a bit. Good suggestion, thanks for the input!

Steve


Steve M.

On the workbench: ginormous Kharkov dio


  • Member since
    February 2003
Posted by Jim Barton on Saturday, September 27, 2008 1:49 PM

If I were building this, I definitely would've done the shingles during my recovery period from my hernia operation. That would've helped pass the time!Big Smile [:D]

The shingles look great, but I was thinking that for an old, weathered barn that's been battling the elements, at least a few of them should be broken off or missing. Storms over the years would cause damage to them. Just a little food for thought.

All told, that's a fantastic barn! You can almost smell the decades of manure, hay, oil, mud, dust and so forth. If you can work up the courage to bring it to Phoenix, you should display it at the IPMS Nationals in 2010 (along with the doog's "Lair of the Rust Bunnies.") I'll be there; it's just a five mile drive from my house!


"Whaddya mean 'Who's flying the plane?!' Nobody's flying the plane!"

  • Member since
    August 2006
  • From: The Green "Mountains", Vermont
Posted by IanIsBored2000 on Thursday, September 25, 2008 8:05 PM
Hardly counts as a barn. I swear the only thing it's big enough for is making our property smell like manure.  Probably too modern/small too be much help but I'd love to contribute if there's any reference shots you need.
"Scanlon: work your knobby hands on the table in front of you, constructing a make-beleive bomb to blow up a make-beleive world."
  • Member since
    June 2006
  • From: AusTx, Live Music Capitol of the World
Posted by SteveM on Thursday, September 25, 2008 6:59 PM

Thanks for that name, Vespa. I looked up Alan Wolfson. That is some mind blowing work.

Ian- you been holding out on me??? You have a barn and you haven't sent me reference pictures? Oh, man!Laugh [(-D]

Update: remade the interior ladder, as the initial one looked like it was from a doll house collection IMO. Also put on the 2nd floor ventilation window-door-cover thingie, with latch and hinges.

Steve


Steve M.

On the workbench: ginormous Kharkov dio


  • Member since
    August 2006
  • From: The Green "Mountains", Vermont
Posted by IanIsBored2000 on Thursday, September 25, 2008 6:33 PM
Been a while since I last looked at this one, and man it's looking incredible.  Your interior work ranks among the best I've seen in terms of detail, being one of the the extrmely rare scale works that IMHO has enough clutter; buckets, shelves, boxes, tools shelves....stuff, to actually look realistically lived in.  A bit of hay scattered over the floor would look great after everything is painted.  Seems like it isn't possible to keep a barn floor free of hay, even ours, and it's hardly big enough for two horses.
"Scanlon: work your knobby hands on the table in front of you, constructing a make-beleive bomb to blow up a make-beleive world."
  • Member since
    April 2004
  • From: Boston MA
Posted by vespa boy on Thursday, September 25, 2008 4:10 PM

Keep it coming Steve. Another amazing interior modeller is Alan Wolfson. His period is very much the 1970s NYC, but great details and may serve as inspiration nonetheless.

 http://www.alanwolfson.net/

http://public.fotki.com/nkhandekar

This ain't no Mudd Club, or C.B.G.B.,
I ain't got time for that now

  • Member since
    June 2006
  • From: AusTx, Live Music Capitol of the World
Posted by SteveM on Thursday, September 25, 2008 6:28 AM

Hey Manny- thanks for continuing to drop in here, and for the encouragement and painting inspiration.
My plan was to leave both interior and exterior natural wood, with the outside much more weathered down to a brownish gray (save for a few newer planks that have been replaced). However, been toying with the "painted" notion, and have looked up Doog's hairspray toot as reference. Might come down to flipping a coin.

Bodge and Doog- thank you very much for your compliments! I appreciate that you guys continue to check in here. You both have, IMHO, an exceptional eye for detail, so please chime in if you see anything that could be added or corrected. Doog, I simply adore the Charger you built. I want to drive away in it.

Vespa- the Realism King!  Big Smile [:D] Thank you for your encouragement, and the names that you throw out there. I have looked up both Chuck Doan and Ken Hamilton and, I've gotta say, their work has truly inspired me. Loads to learn from them, and I really want to thank you for turning me on to those guys.

I am doing some last minute touch-ups, and the very small detail work, that I've been saving for the dinal stge before painting the barn. Stuff that I knew I would break or simply wouldn't survive while handling.

Sure, one could say that I was putting of the inevitable, and possibly detrimental, paint job. I wouldn't deny that. For me, breaking out the airbrush still involves a certain amount of... shall we say, psyching myself up? Me and the compressor are gonna have us a little team huddle.

"Burnt Umber on 3... ready?... break!!"

Steve


Steve M.

On the workbench: ginormous Kharkov dio


  • Member since
    April 2004
  • From: Boston MA
Posted by vespa boy on Wednesday, September 24, 2008 6:45 PM
Steve yoiu are really doing a fantastic job on this. Have a look at Ken Hamilton's book. It gives great advice on weathering wood. If you can't find a copy, look in the model railroad books.

http://public.fotki.com/nkhandekar

This ain't no Mudd Club, or C.B.G.B.,
I ain't got time for that now

  • Member since
    January 2007
Posted by the doog on Wednesday, September 24, 2008 5:26 PM

Sheeesh, man--that looks freakin' AMAZING!

Just superb!!!!!! Bow [bow]

  • Member since
    January 2008
  • From: Bournemouth UK
Posted by Bodge on Wednesday, September 24, 2008 10:42 AM

Bow [bow]Ive been watching this oneand wow you are both massivly talented and patient,some of the best work ive seen on scratchbuilding, AAAAAAAA++++++++++++

wow  Bow [bow]Bow [bow]Bow [bow]

  • Member since
    November 2005
Posted by Anonymous on Wednesday, September 24, 2008 8:50 AM

Simply outstanding...the tiles almost have that "pebbly" quality to them that roofing shingles have today---they look great, very uniform...I am begining to envision this puppy being painted in a whitewash and then hevuily distressed, with flaking, peeling and fading going on, and lotsa bare wood showing through...One question though, from what I know of barns, the inside was not typically painted nearly as often as the outside, correct? Have you decided how you are going to finish the wood yet???

"I should note, though, that I am not building this barn to pay back a debt."--LOL !!!

  • Member since
    June 2006
  • From: AusTx, Live Music Capitol of the World
Posted by SteveM on Tuesday, September 23, 2008 7:38 PM

Ever have one of those times when, you get to the end of a process within a project and think to yourself, "Wow! I really enjoyed that part of the build. I wish I wasn't done, so I can do it some more!".

This wasn't one of those times. I am so glad I am done with the roof, I feel like crying. I still might.

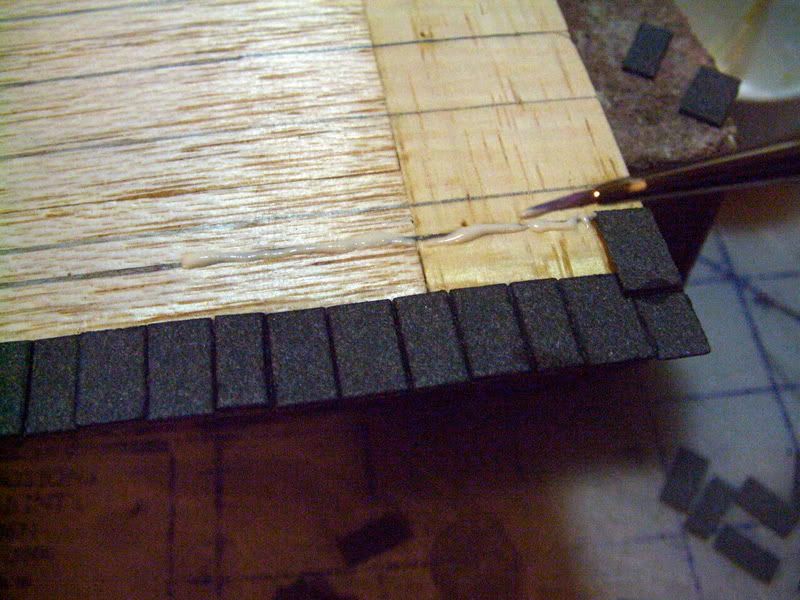
Seriously, I am happy with the roof; more so than I would be, trying cut and fit the Custom Dioramics (or Construction Battalion- I get them cornfused sometimes) single resin piece that I original bought for this. These are "slate tiles" from Hudson & Allen. However they are, from what I can tell, cardboard. Pretty cool, but they all had some ugly flash, a leftover from the factory cutting process, which needed to have a quick trim with a #11, or they wouldn't line up very well. That is where it got to be a bit of a PITA. But, I ain't complaining.

Here was my process...

Glue the first tile in the row down solidly. Pencil in a reference line, from one side to the other, for keeping the row aligned, and then "paint" the pencil reference with carpenter's glue:
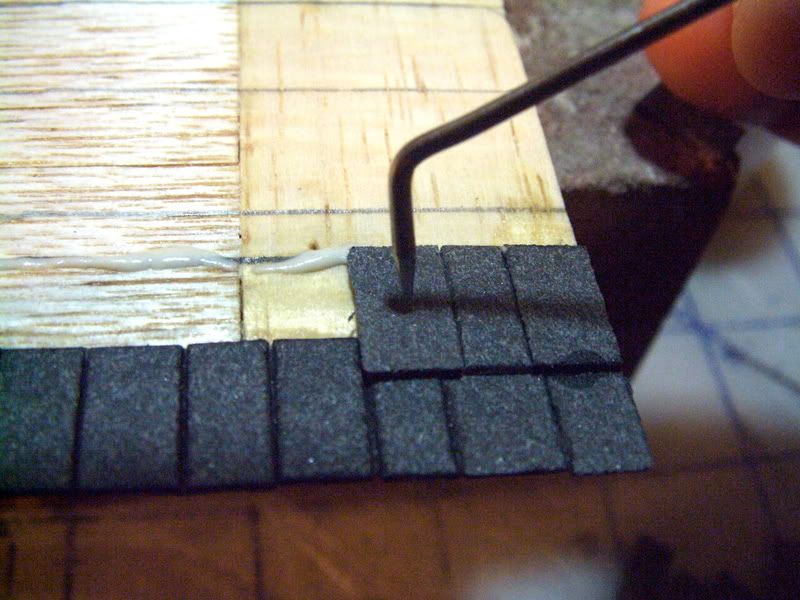
Lay tiles in place with dental pick:
Keep it level along the way:
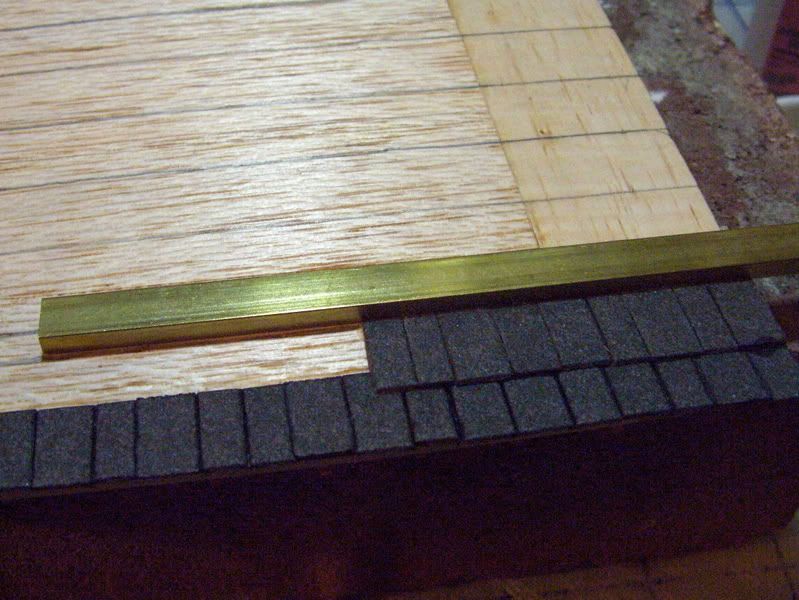
Make permanent with CA.

Here's a peak under the roof, at the rafter detail I tried to give:
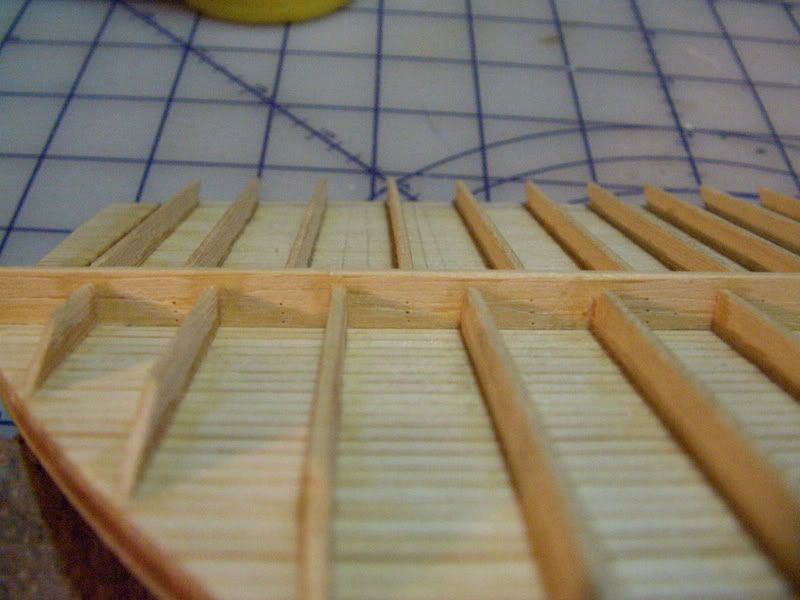
Coated with Dull Coat, and will give second layer of protection with dilluted white glue, so the tiles don't warp when painted- being all cardboard and all. The finished roof:
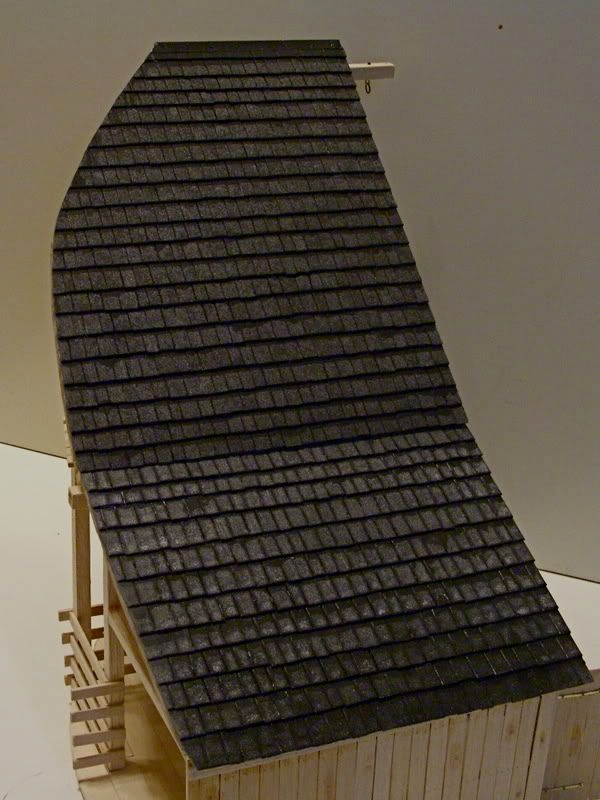
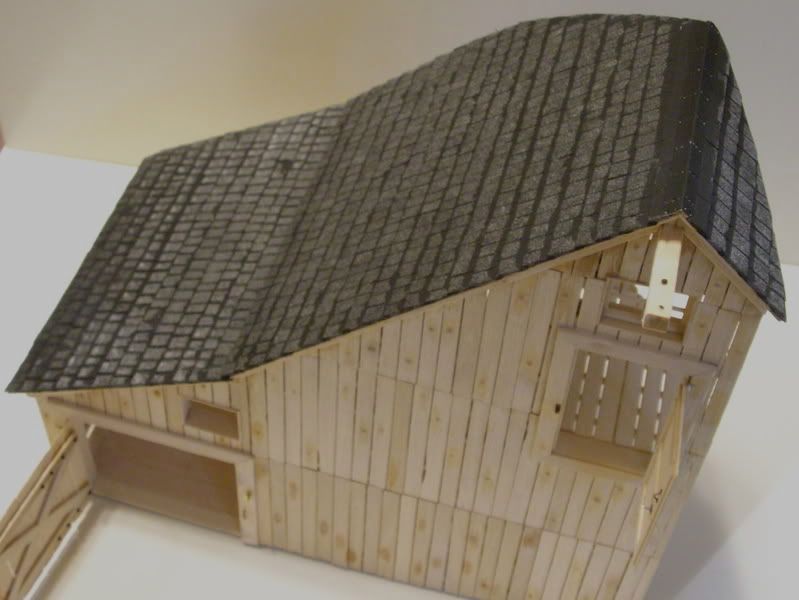
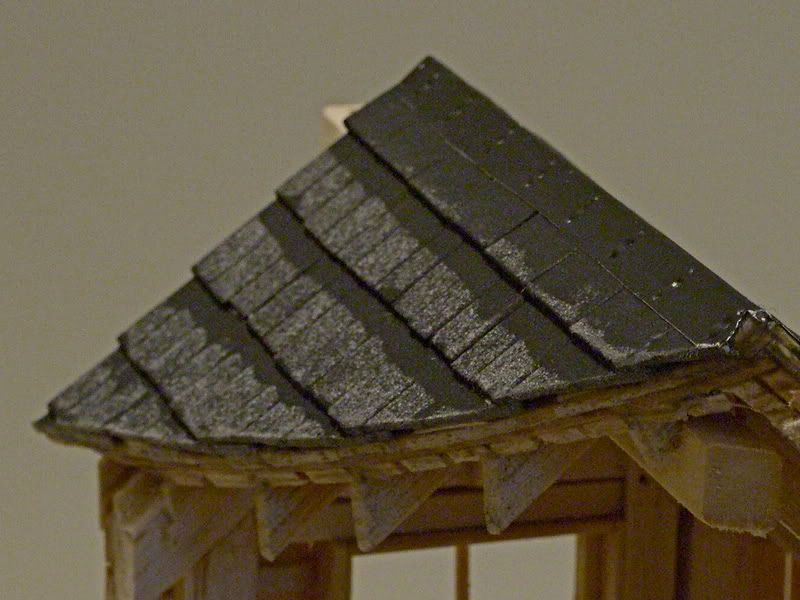
Close up of the sheet metal crest covering (thin craft tin):
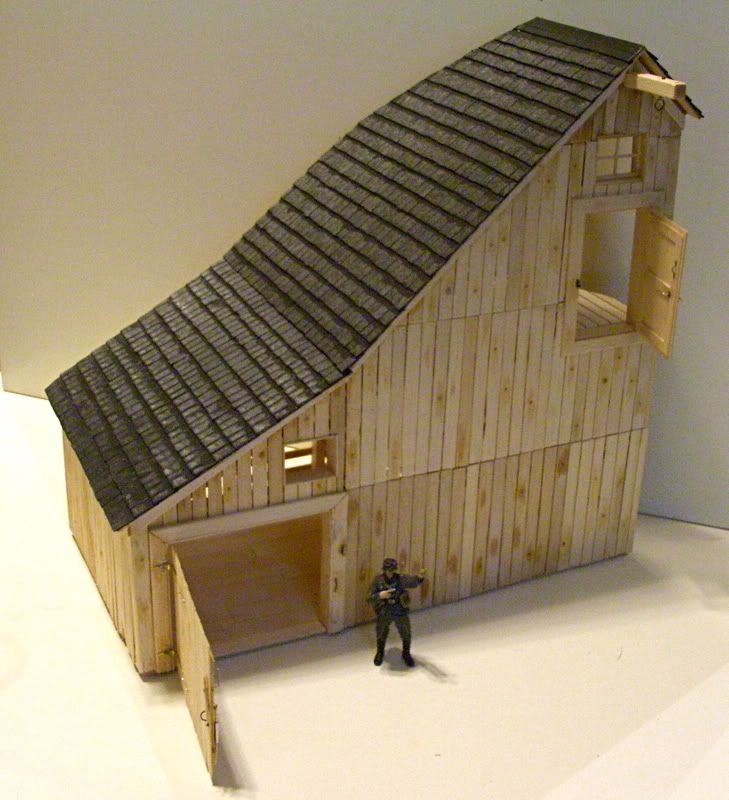
Shot for scale, with my knock-around fig:
Now, it's time to paint this beast. Tomorrow, tho. Tonight I am gonna sit back and enjoy being done with this part.

All critique welcome. I should note, though, that I am not building this barn to pay back a debtWink [;)]Whistling [:-^]

Steve 


Steve M.

On the workbench: ginormous Kharkov dio


  • Member since
    June 2006
  • From: AusTx, Live Music Capitol of the World
Posted by SteveM on Saturday, September 20, 2008 6:41 PM

Hey Doog- I'm simply bowled over by your compliments Blush [:I]Blush [:I]. Coming from a true Model Master. Yeah, I agree... I've been fighting the urge to blast throught is, because I can always tell later on. Like NucMedTech stated, there is always the Alamo Squadron show, San Antonio, in February.

But I wanna show some'ting Tongue [:P]???

I appreciate your encouragement to write this up and submit it. I just don't know where to begin. I'll see how the whole dio turns out, and then consider doing it. It would be awesome to join the ranks of the likes of you and wbill76.

NucMedTech- Thanks so much for looking in, and for your kind words. I'm really looking forward to the Austin show next weekend. I'll be there (1 mile from my house), in the ball cap and glasses, annoyingly combing over every single item on every single table. Been brutal waiting out the postponement Grumpy [|(] I might touch up my Patton figure and show it. No contest winner, but it'll be an excuse to bring more money, if I have to stick around til the very end Whistling [:-^]

Thanks again, ya'll. Now, back to laying rows and rows of slate shingles (Self-torture, but I think it'll be worth it).

Steve

Steve M.

On the workbench: ginormous Kharkov dio


  • Member since
    September 2006
  • From: Central Texas
Posted by NucMedTech on Saturday, September 20, 2008 2:36 PM

Steve,

   An amazing job on your barn!! I would not rush it for the contest either. I would have liked to seen it up close (but not compete against it, LOL). If your still going to the show, don't they have a table for display only? If you want to risk transporting it I'm sure it would be a big hit. If not there is always the show in San Antonio in Feb. Anyways if I don't see the model hopefully I'll get to meet the man himself!Cowboy [C):-)]

-Stephen

Most barriers to your successes are man made. And most often you are the man who made them. -Frank Tyger

  • Member since
    November 2005
Posted by Anonymous on Saturday, September 20, 2008 10:44 AM
 the doog wrote:

Steve, please don't rush this to get ready for any "deadline"!!!

There will always be another contest--but this is pure Art, plain and simple! This is truly, the absolute pinnacle of what modeling "is", and "should " be! 

Amazing!

Stupendous!

Phenomenal!

I run out of superlatives;--it's that good!

I would highly recommend, and beg you,--for the sake of any modelers not currently on this site or following this thread--to write up this build as an article ad submit it for publication to Finescale Modeler magazine. People should see ths genuine masterpiece!

My highest commendations! Bow [bow]Bow [bow]Bow [bow]Bow [bow]

Sign - Ditto [#ditto]

AND...

Sign - Ditto [#ditto]

  • Member since
    January 2007
Posted by the doog on Saturday, September 20, 2008 10:16 AM

Steve, please don't rush this to get ready for any "deadline"!!!

There will always be another contest--but this is pure Art, plain and simple! This is truly, the absolute pinnacle of what modeling "is", and "should " be! 

Amazing!

Stupendous!

Phenomenal!

I run out of superlatives;--it's that good!

I would highly recommend, and beg you,--for the sake of any modelers not currently on this site or following this thread--to write up this build as an article ad submit it for publication to Finescale Modeler magazine. People should see ths genuine masterpiece!

My highest commendations! Bow [bow]Bow [bow]Bow [bow]Bow [bow]

  • Member since
    November 2005
Posted by Anonymous on Friday, September 19, 2008 9:26 AM

 SteveM wrote:
Manny- thanks a million for the compliments, and those pictures absolutely ROCK. Love the grenadier with the bino. And I like the placement of the two wine bottles. Very Austin Powers LOL!

Yes, I most certainly do need advice. One question I have about the thinner and shoe polish tricks (excellent and time saving!):

Will / won't the thinner highlight the massive amount of glue blobs that are everywhere on this barn? I have glued the s*** out of it in some places, because I knew I'd be handling it plenty. I just figured I'd paint it the beast. Although, I am afraid of my painting skills enough to consider other options.

cassibill- thanks for all the input you've provided. As a matter of fact, I had planned on fashioning a European barn owl nest up at the top, above the window. Funny you should mention... :)

Steve

Will / won't the thinner highlight the massive amount of glue blobs that are everywhere on this barn? I have glued the s*** out of it in some places, because I knew I'd be handling it plenty. I just figured I'd paint it the beast. Although, I am afraid of my painting skills enough to consider other options.

Hmmmmm...great point...I understand your concern; I have run into that problem as well: the stain will not reach the wood as the glue will act as a clear sealer...might just want to experiment on scraps first...

Another alternative is to have your barn painted, and distress the finish VERY heavily... 

  • Member since
    February 2003
  • From: Indiana, USA
Posted by cassibill on Friday, September 19, 2008 3:08 AM
What can I say, Steve? I'm just that good.  A good dio is all about signs of life and all farm buildings have something living in them.  In our case, besides the stock and my cats, we have a possum, an occassional raccoon, and barn swallows (though Carlos Norman is doing his best to have them all for dinner).

cdw My life flashes before my eyes and it mostly my life flashing before my eyes!!!Big Smile The 1/144 scale census and message board: http://144scalelist.freewebpage.org/index.html

  • Member since
    December 2006
  • From: t.r.f. mn.
Posted by detailfreak on Thursday, September 18, 2008 7:48 PM
this barn is simply marvelous.when you're done with this steve take five,and then i'll send my hostel/cafe your way for some of that special stevem detailing.the time,acquisition of parts/materials is mind boggling.and steve after this build i'm sure your mind will need un-boggling.best of luck and keep the pics coming.

[View:http://s172.photobucket.com/albums/w1/g-earl828/]  http://i158.photobucket.com/albums/t104/cycledupes/1000Roadwheels4BuildBadge.jpg

  • Member since
    June 2006
  • From: AusTx, Live Music Capitol of the World
Posted by SteveM on Thursday, September 18, 2008 4:32 PM
Manny- thanks a million for the compliments, and those pictures absolutely ROCK. Love the grenadier with the bino. And I like the placement of the two wine bottles. Very Austin Powers LOL!

Yes, I most certainly do need advice. One question I have about the thinner and shoe polish tricks (excellent and time saving!):

Will / won't the thinner highlight the massive amount of glue blobs that are everywhere on this barn? I have glued the s*** out of it in some places, because I knew I'd be handling it plenty. I just figured I'd paint it the beast. Although, I am afraid of my painting skills enough to consider other options.

cassibill- thanks for all the input you've provided. As a matter of fact, I had planned on fashioning a European barn owl nest up at the top, above the window. Funny you should mention... :)

Steve

Steve M.

On the workbench: ginormous Kharkov dio


  • Member since
    February 2003
  • From: Indiana, USA
Posted by cassibill on Thursday, September 18, 2008 3:44 PM
That is a barn! Those containers full of odds and ends hardware are spot on. The only thing that would make it any more familiar would be barn swallows.  Not sure exactly the nests are different in the European species, but they have them. The nests, old and new, attached to the beams and some staining when some once were.

cdw My life flashes before my eyes and it mostly my life flashing before my eyes!!!Big Smile The 1/144 scale census and message board: http://144scalelist.freewebpage.org/index.html

  • Member since
    November 2005
Posted by Anonymous on Thursday, September 18, 2008 2:55 PM

One of the things I am so impressed with is how real everything is placed (workbench, shelves, etc.)..Often, when someone attempts this kind of scene, many items seem "forced" or are out of place (because the builder fudged on realism for the sake of stuffing as much into the scene as possible)...this is one of the best minature interiors I HAVE EVER seen...

As if you need any advice: I often find the best way to get unfinished wood looking like old and weathered wood is to simply brush very dirty paint thinner onto it...wan't sure what you had in mind but that has worked for me...

...to get a varnished floor, I have used brown paste shoe polish: dab it on and rub as much off as you can with an old t-shirt or cotton sock (then sand lightly to get worn areas)...  

Some examples (sorry, when i took these the wood wasn't the highlight of the pic):

This one has had shoe polish applied, then sanded to give a very worn look: 

JOIN OUR COMMUNITY!

Our community is FREE to join. To participate you must either login or register for an account.

SEARCH FORUMS
FREE NEWSLETTER
By signing up you may also receive reader surveys and occasional special offers. We do not sell, rent or trade our email lists. View our Privacy Policy.