SEARCH FINESCALE.COM

Enter keywords or a search phrase below:

BIG Russian Jet Groupie GB

186756 views
1790 replies
1 rating 2 rating 3 rating 4 rating 5 rating
Dre
  • Member since
    June 2007
  • From: here, not over there
Posted by Dre on Monday, January 6, 2014 5:30 PM

Eh, I'm following along but not saying much (until now...)

That PE looks fantastic, PB.  I agree with Dean- the resin does look weak compared to the PE.

It sounds like your slow and steady method is the only way to complete those cans- I can't see speeding that up without adding errors.  I look forward to seeing this bird finished.

  • Member since
    June 2007
Posted by Porkbits on Monday, January 6, 2014 6:15 PM

Thanks, Dre! Glad you guys think it was worth all the agony I went through.

I'll probably be done with this build sometime in the spring. No joke. :-)

The other trick will be painting the exhausts--I've never tried the blued and burnt metal look before, so I'll probably need some advice when I reach that point, too.

  • Member since
    September 2013
Posted by Dean30 on Tuesday, January 7, 2014 7:53 AM

If you have alclad II paints they work well, on the other hand I would say even heat the photoetch sprue with a lighter and see what happens, might look better than paint?

Dre
  • Member since
    June 2007
  • From: here, not over there
Posted by Dre on Tuesday, January 7, 2014 9:48 AM

That trick might work better if the PE were that bright and shiny nickel-clad PE from Trumpeter... but it is a damn good thought.

Painting those cans will be an exercise of its own.

  • Member since
    June 2007
Posted by Porkbits on Tuesday, January 7, 2014 2:16 PM

Hmmm, never thought of that, Dean. Could work? Since I have a couple of failed attempts lying around, I I could test it out first. :-)

Yeah, painting them is going to be a whole other challenge. Can't even think about that now or my brain will hurt.

Finished the other can, and turned out pretty well, too, I think:

And here's a closeup of some of the PE that Eduard included in the kit:

Dre
  • Member since
    June 2007
  • From: here, not over there
Posted by Dre on Tuesday, January 7, 2014 3:16 PM

How many parts per can are there?   I may have to look into these for my 1/32 fleet someday...

  • Member since
    June 2007
Posted by Porkbits on Tuesday, January 7, 2014 3:32 PM

Well, there's the main resin can, a narrow PE sleeve which goes around the inside (which I left off because it was a pain), then four layers of turkey feathers/actuators, and then the sleeve (?) which goes around the upper half of the outside of the resin can.

And that's not even counting the flame holder, which itself is resin and has a die-cast ring, and about four PE rings. And also a resin turbine (?) at the other end. The detail is ridiculous considering you won't be able to see any of it without a flashlight. I'm tackling that next.

  • Member since
    June 2007
Posted by Porkbits on Thursday, January 9, 2014 2:44 PM

Shiny!

Some of the PE for the flame holders was just too small and fiddly, so for the sake of my sanity (and moving on with the build), I punted and did the minimum to get the cans finished. Now, on to the flaps and nose gear. Hope everyone is well!

PB

Dre
  • Member since
    June 2007
  • From: here, not over there
Posted by Dre on Thursday, January 9, 2014 4:54 PM

I don't care what anyone says, that's still the most graceful line from the canopy back through the tail spike...

  • Member since
    September 2013
Posted by Dean30 on Thursday, January 9, 2014 5:17 PM

Looks great PB, can't wait to see the rest, does it have resin wheel wells?

  • Member since
    June 2007
Posted by Porkbits on Thursday, January 9, 2014 5:33 PM

So agree, Dre! The whole airframe is a work of art.

Thanks, Dean. No resin wells, just what comes with the Academy kit, and Eduard added some PE bits. I did get Eduard's wheel set, though.  

  • Member since
    June 2007
Posted by Porkbits on Tuesday, January 21, 2014 3:29 PM

Nose gear done! Took only about a week and a half. :-)

Hope everyone is well. 

PB

  • Member since
    September 2013
Posted by Dean30 on Tuesday, January 21, 2014 4:17 PM

Looks great, is that the rubber tyres you get with the Academy kit? I say as they look good, I personally prefer Rubber tyres as I am terrible at painting wheels. Plus to me nothing looks more like rubber than rubber, it's like when you see a foil covered kit next to a nmf paint job, there's just no comparison.

  • Member since
    June 2007
Posted by Porkbits on Tuesday, January 21, 2014 4:25 PM

Thanks, Dean! Not the kit tires (which are molded in plastic), but Eduard's set of resin wheels (purchased extra, even though the kit is their repop, kind of annoying), which have just a wee bit more detail. Painted them with flat black mixed with dark gray.

  • Member since
    September 2013
Posted by Dean30 on Tuesday, January 21, 2014 5:00 PM

Wow that's impressive I really thought it was the rubber tyres.

  • Member since
    February 2003
  • From: Rothesay, NB Canada
Posted by VanceCrozier on Tuesday, January 21, 2014 5:49 PM

THAT folks, is some fabulous Flanker fiddlin'...

On the bench: Airfix 1/72 Wildcat; Airfix 1/72 Vampire T11; Airfix 1/72 Fouga Magister

  • Member since
    June 2007
Posted by Porkbits on Tuesday, January 21, 2014 5:50 PM

Thanks! For some reason, the dark gray/flat black seems to do the trick. Or maybe it's just the crappy lighting on my workbench. :-)

  • Member since
    February 2003
  • From: Rothesay, NB Canada
Posted by VanceCrozier on Tuesday, January 21, 2014 5:51 PM

MAN!! How long has it been since I checked in here?? My locker has cobwebs on it! Embarrassed

On the bench: Airfix 1/72 Wildcat; Airfix 1/72 Vampire T11; Airfix 1/72 Fouga Magister

  • Member since
    February 2003
  • From: Rothesay, NB Canada
Posted by VanceCrozier on Tuesday, January 21, 2014 5:52 PM

That burner can is a kit unto itself PB!

On the bench: Airfix 1/72 Wildcat; Airfix 1/72 Vampire T11; Airfix 1/72 Fouga Magister

  • Member since
    June 2007
Posted by Porkbits on Tuesday, January 21, 2014 5:55 PM

Thank you, Vance! :-)

I'm trying to fiddle my best, since the Flanker and this kit are worthy of it.

Dreading painting those burner cans. I'd hate to screw them up with a bad paint job. Gulp. So as mentioned, I'll be leaning on you guys for Alclad help when I reach that point. Have never used it.

  • Member since
    February 2003
  • From: Rothesay, NB Canada
Posted by VanceCrozier on Tuesday, January 21, 2014 5:56 PM

They're almost too nice to throw paint at. :(

On the bench: Airfix 1/72 Wildcat; Airfix 1/72 Vampire T11; Airfix 1/72 Fouga Magister

  • Member since
    June 2007
Posted by Porkbits on Thursday, January 30, 2014 2:37 PM

Hey, guys:

In the midst of the main gear. The Eduard wheel set is really nice, highly recommended. I added my own hydraulic line detail using fly fishing lead wire (saw this tip on another forum). Man, I love this stuff! Bend easily into shape, cuts like paper, and glues well with CA. Even sprayed a bit of the base color on the nose landing gear door, which only gets me anxious to paint the airframe. But for now, I push on through the sub-assemblies. :-)

Hope everyone is well.

PB

Dre
  • Member since
    June 2007
  • From: here, not over there
Posted by Dre on Thursday, January 30, 2014 3:30 PM

Those wheels look great, PB, but the flash of Flanker Blue on that nose gear door has me more intrigued...  

  • Member since
    June 2007
Posted by Porkbits on Thursday, January 30, 2014 4:21 PM

Ha--thanks, Dre. The door is nothing more than this…..

  • Member since
    September 2013
Posted by Dean30 on Thursday, January 30, 2014 5:25 PM

That is some fine work on the landing gear, looks superb!

  • Member since
    June 2007
Posted by Porkbits on Thursday, January 30, 2014 5:42 PM

Thanks, Dean!

Sorry for any confusion, Dre. I'm building the Ukrainian bird in the pic, so giving it a base coast of Flanker blue and then the splinter camo.

  • Member since
    June 2007
Posted by Porkbits on Wednesday, February 5, 2014 3:43 PM

Aftermarket fail! 

One of the known issues with the Academy kit is the nose, which is too bulbous in the middle. Aftermarket to the rescue! I wanted the Pisco nose, but it seems to have been out of production for some time.

So I ordered the Quickboost replacement:
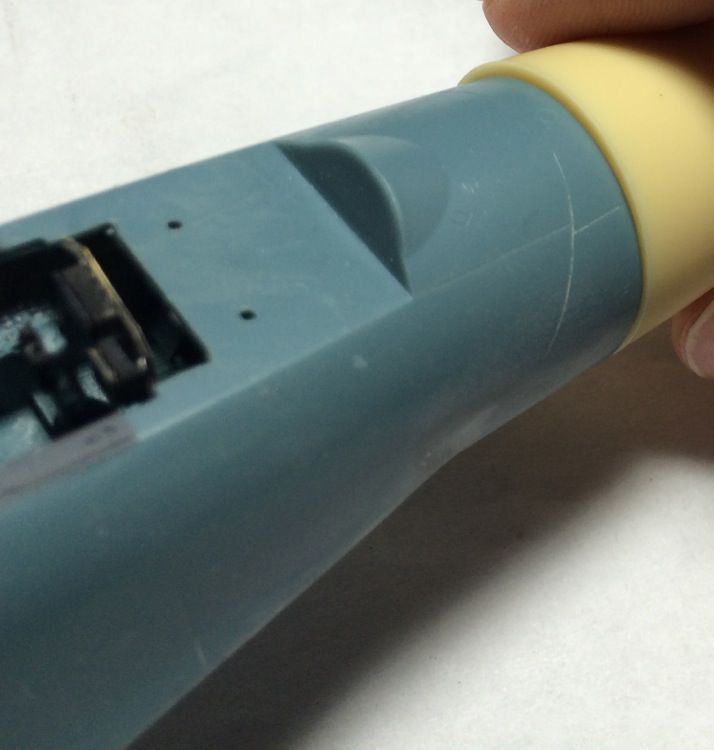
Too big!

Hm. No problem! I ordred the Neomega replacement from the UK:
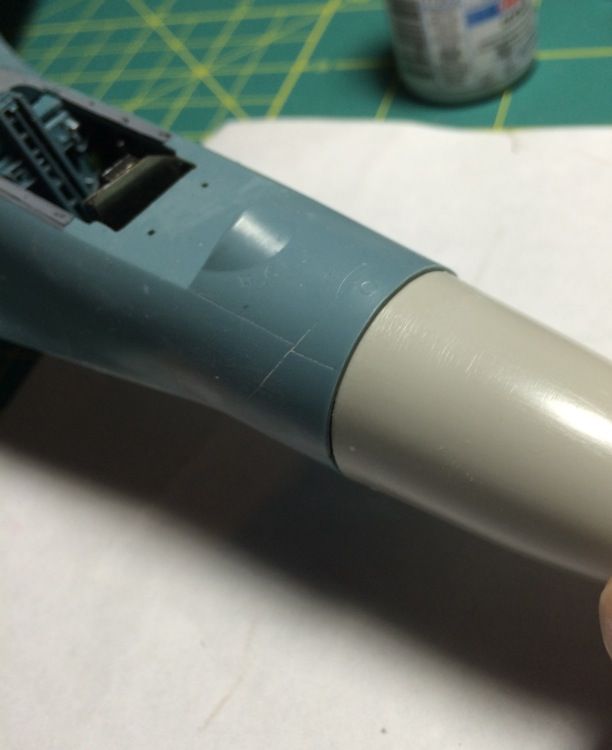
Too small! (resin probably shrunk)

So the good news is the kit nose fits JUST RIGHT, but the bad news is that it is the wrong shape. Oh well.

Here's a comparison between the Quickboos and Neomega noses, illustrating the size difference between them:
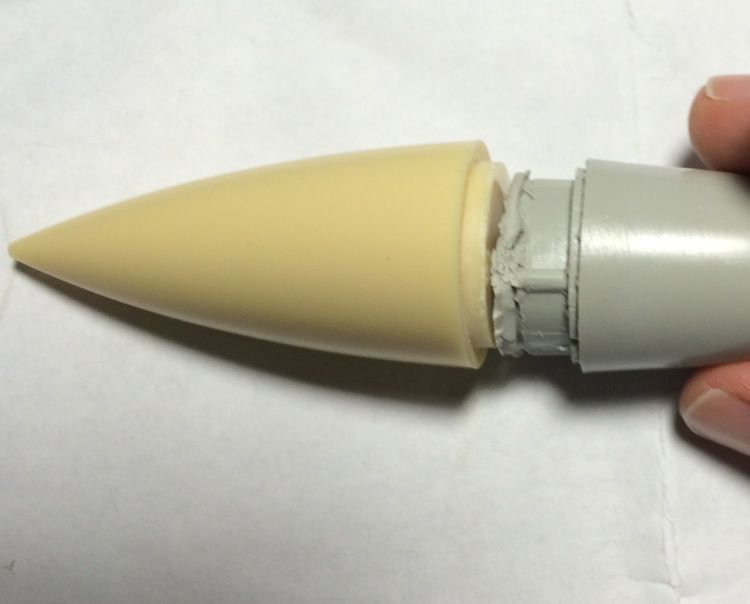
The saga continues….!

Thanks!

PB

  • Member since
    September 2013
Posted by Dean30 on Wednesday, February 5, 2014 4:44 PM

Stick the resin nose on and sand it down, lt will take a while but it will look better considering everything else you have done to this aircraft I think you would be doing yourself a disservice to use the easy option now PB, it's such good work so far, take your time man.

  • Member since
    June 2007
Posted by Porkbits on Wednesday, February 5, 2014 5:09 PM

Thanks, man. :-)

I thought about that, but I'm worried that I'll just screw up the outline of the nose when sanding it down. I just imagine that I'll sand too much off and the nose-to-fuselage join will be flat all around the nose, or lumpy. Any suggestions on how to keep it even? Is the trick to sand down the whole length of the cone, and not just the area where it joins the fuselage?

  • Member since
    September 2013
Posted by Dean30 on Wednesday, February 5, 2014 6:30 PM

Yeah, it has to have the same look, basically you are scaling down the nose, I would cement the nose and simply follow the shape of the nose and with that continue until the nose is flush, it should not be too hard, but I would not use that misshapen nose considering the work you have put in, look at photos of the real thing, I never use drawings, the most accurate shape you will see is from a photo. If the nose gets a bit rough either change the sandpaper for a finer grit, or if the nose is lumpy use filler to correct the shape.

JOIN OUR COMMUNITY!

Our community is FREE to join. To participate you must either login or register for an account.

SEARCH FORUMS
FREE NEWSLETTER
By signing up you may also receive reader surveys and occasional special offers. We do not sell, rent or trade our email lists. View our Privacy Policy.