SEARCH FINESCALE.COM

Enter keywords or a search phrase below:

Tamiya 1:48 Pacific P-51D Mustang (Complete)

28109 views
69 replies
1 rating 2 rating 3 rating 4 rating 5 rating
  • Member since
    June 2013
Posted by bvallot on Tuesday, July 30, 2013 3:15 PM

Lawdog, I tried out my canopy and found it to be a real nice fit.  Is there something I'm missing on the shape? The only part I'm having trouble getting to squeeze in is the Aires dashboard top.  Otherwise, everything looks pretty good.

On the bench:  

Tamiya F4U-1  Kenneth Walsh


  • Member since
    June 2013
Posted by bvallot on Tuesday, July 30, 2013 2:47 PM

Here's what I touched up on the cockpit.


photo-5 by brittvallot, on Flickr


photo-7 by brittvallot, on Flickr


photo-6 by brittvallot, on Flickr

On the bench:  

Tamiya F4U-1  Kenneth Walsh


  • Member since
    June 2013
Posted by bvallot on Monday, July 29, 2013 11:16 PM

=] Roger that!  I know just what you're getting at. =]

On the bench:  

Tamiya F4U-1  Kenneth Walsh


  • Member since
    February 2012
  • From: Olmsted Township, Ohio
Posted by lawdog114 on Monday, July 29, 2013 10:31 PM

Glad I can help.  Its a subject I love to talk about (I've built 8 Tamiya D's (3 on comission) and 2 Hasegawa versions) so I hope I can be of some help.  Personally, having built both, I prefer the Tamiya kit with a True Details cockpit.  In case your interested, here's my WIP thread on a Tamiya P-51D I did back in October of last year. It may be of some assistance to you in your endeavor.  

http://cs.finescale.com/fsm/modeling_subjects/f/2/t/150182.aspx?sort=ASC&pi240=1

....and I would go with a flat dark grey on the rubber coating, like a tire if you will. 

Joe

 "Can you fly this plane and land it?...Surely you can't be serious....I am serious, and don't call me Shirley"


  • Member since
    June 2013
Posted by bvallot on Monday, July 29, 2013 8:39 PM

Duly noted Joe! I haven't even looked at how the canopy is going to fit yet.  I've never had much of a problem with a Tamiya canopy yet.  I'll be looking into it tonight now I guess.  I have been noticing the tanks being painted black in several diagrams.  This is the first Mustang I'm doing so I'm new to researching this particular aircraft.  So I'm really looking forward to any help I can find here on the Finescale forum.  

I usually disregard the kit instructions on painting for the most part because I'm going by actual photos when I can.  Just today I thought I'd actually take a peek at the Hasegawa's manual since it was specific to the aircraft Bob.  And what do you know...it calls for the top of the seat to be in flat black.  So I thin out some Flat Black and painted a wash over the green I have on there now.  I allowed some of the green to show on the corners and edges to show the black being painted over like it likely would've been. 


photo-1 by brittvallot, on Flickr


photo-2 by brittvallot, on Flickr

These aren't the best photos but I'll fix it all up and show how it turns out.

Joe, you mentioned the gas tanks were coated in a rubber?  Would it be safe to assume this rubber would have a sheen to it?  Do you think a semi-gloss coat would do it justice? 

On the bench:  

Tamiya F4U-1  Kenneth Walsh


  • Member since
    February 2012
  • From: Olmsted Township, Ohio
Posted by lawdog114 on Monday, July 29, 2013 7:48 PM

Very nice work.  They are both great kits, each with pros and cons.  On the Hasegawa kit, you need to scribe and rivet the panel line on the top of the cowl (windscreen to spinner).  Also,the gear bay is too shallow.  You can close the inner doors to hide this.  On the Tamiya kit, you should get an aftermarket canopy because their example, a two piece affair, is awful.  You could also use the extra canopy from the Hasegawa kit here too.  

Reference the cockpit,  depending on how accurate you want to be of course, the fuselage gas tank (under the batteries) should be dark grey or black. These were rubber coated on combat  p-51's.  Good question about the seat.  I've seen them both ways too.  I  usually paint the armor plate/ headrest black and the rest of the seat interior green and the cushion olive or khaki drab.  

Joe  

 "Can you fly this plane and land it?...Surely you can't be serious....I am serious, and don't call me Shirley"


  • Member since
    October 2010
  • From: Chambersburg, Pa.
Posted by Bob H. on Monday, July 29, 2013 1:56 PM

I'm wondering about that. Maybe I'm mistaken but the possibility exists that there are two different colors for the seat, like OD for the frame and the Interior Green for the seat itself. Maybe I'm mixing that up with another Aircraft. Someone out there probably will be able to verify.                Bob

  • Member since
    June 2013
Posted by bvallot on Saturday, July 27, 2013 12:15 PM

I've got a question for anybody that knows.  What's the deal with the two toned seat for the mustang in some cockpits?  I've noticed some are all interior green while some are green on bottom and flat black on top. Was this a theater specific variation?  Everything I find shows it should be all green.  I've even read that the seat & anti glare surface were to be done in dark green I think it was but more often the seat was bronze green and the cowl was OD Green.

Is the two toned seat just one of those things that happened that way?

On the bench:  

Tamiya F4U-1  Kenneth Walsh


  • Member since
    June 2013
Posted by bvallot on Saturday, July 27, 2013 11:40 AM
Absolutely they do. No doubt about it. I had one small finger print somehow on that Wildcat I just finished. Thought I had it licked and smoothed out but nope! Luckily I had two other coats of acrylic on top it. =]

Keeping this surface smooth is probably the one thing that worries me most about painting with this. I'm already doing so much on top. I'd really hate to ruin everything. Definitely not rushing that part. =]

On the bench:  

Tamiya F4U-1  Kenneth Walsh


  • Member since
    November 2003
  • From: State of Mississippi. State motto: Virtute et armis (By valor and arms)
Posted by mississippivol on Saturday, July 27, 2013 8:04 AM

Looking really good. One thing about metallic finishes, they show everything, scratches, glue runs, etc., so take the extra time prepping the body.

Glenn

  • Member since
    June 2013
Tamiya 1:48 Pacific P-51D Mustang (Complete)
Posted by bvallot on Friday, July 26, 2013 11:42 PM

I'm putting my Phantom on the side for one more build while I try to learn a few more tricks about this Alclad. I had originally picked Hasegawa's Mustang for this build since they offer Harry Crim's P-51 but truthfully I think Tamiya's kit provides a more accurate and nicer build.  Not to steal the show from Hasegawa...they certainly tend to pour in more detail in areas of the cockpit and any other special interest area of whatever aircraft you're comparing it to.  It seems Tamiya leaves the door open for these aftermarket middle-men to support their kits.  I'm sure the big whigs at Tamiya find it cost effective as well. =]

So I ended up just buying both to compare the two.  Mostly because I think Hasegawa's Decal sheet of the nude pin-ups are a little better than Superscales'.  The lettering and donkey are also better.  So I'm pulling the decal sheet from here to use on the Tamiya Mustang. =D

I'm dropping Aires' cockpit in here as well.  It's just too beautiful not to I think sometimes.  Also, I feel kind of hurried to complete this build because it won't be long till i'm too busy with work to do any of this.  

I started this build by placing the rivets into the surface.  I am hoping to get the surface to warp slightly around all these dots so that it resembles something akin to light bending around the metallic surface of the these aircraft.  I want for it to be large enough visually to make an impact.  I had a happy accident along the way where as I was smoothing the tops of all these dots they did exactly what I was looking for before I actually meant to do it.  My only concern here is after my primer...will it last?  Here's what I've come up with.
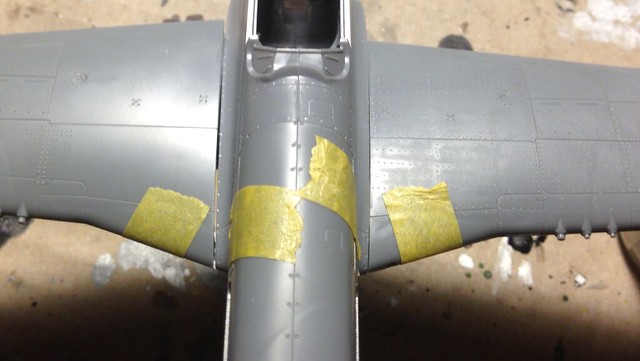

2013-07-26 16.46.47 by brittvallot, on Flickr
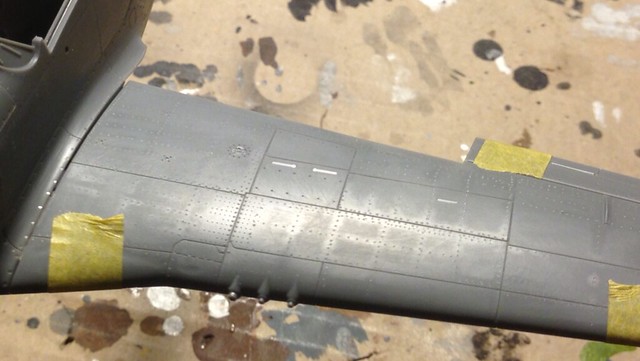

2013-07-26 16.46.32 by brittvallot, on Flickr
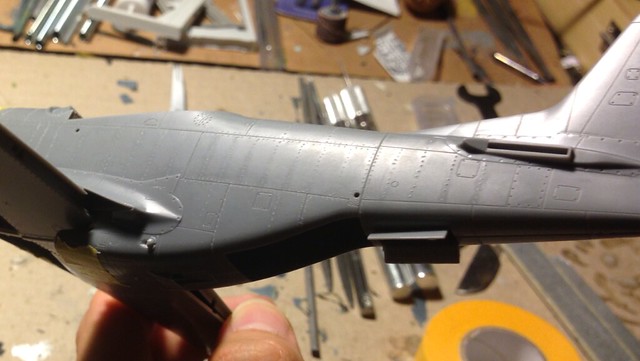

2013-07-26 16.46.20 by brittvallot, on Flickr

Here is the cockpit.

I've somewhat haphazardly ground into the floor with my rotor tool's sander.  I'm trying to create a wood grain texture from the plywood floor.  The Erection and Maintenance Manual called for silica sand mixed with matte black paint to be put down as a skid surface, but these would eventually wear out like everything else.  I personally wanted to see some of the wooden characteristics of the cockpit and opted to include it.  I painted it a Tamiya Clear Orange which i find works real well as a wood color.  The deeper crevices will appear darker.  I'll come back over this with a flat khaki to lighten it up some afterwards.
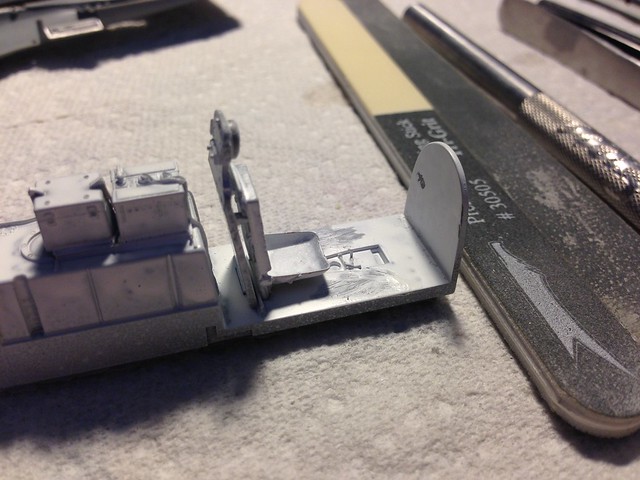

2013-07-25 12.53.18 by brittvallot, on Flickr
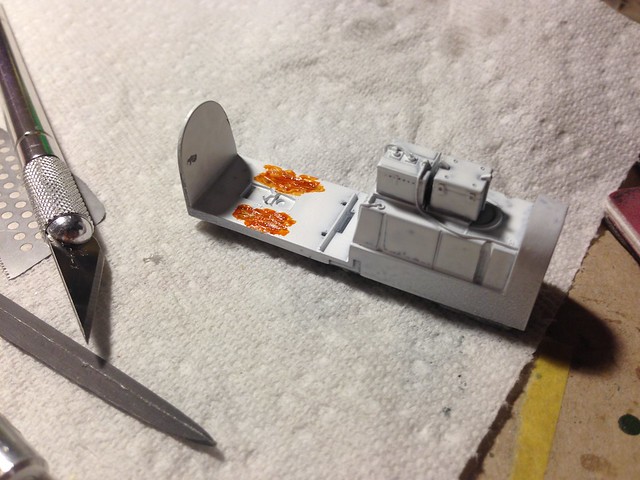

2013-07-25 23.03.43 by brittvallot, on Flickr
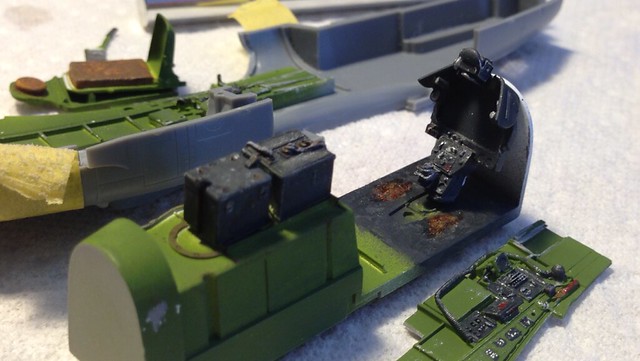

2013-07-26 15.13.24 by brittvallot, on Flickr
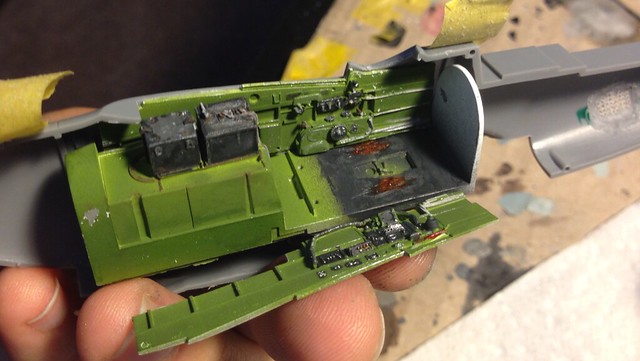

2013-07-26 15.46.55 by brittvallot, on Flickr

For the black surfaces I'm trying something new.  Instead of just a plain flat black paint, I'm mixing it with Medium Blue [XF-18] to give it some wear of it's own.  I had a color in mind that's like the black plastic vinyl you see on the exterior of cars and trucks that fade with the sun and oxidation.  That color! =]  How much of this was present on the batteries and misc equipment visible from the cockpit you ask....?  Eh.  I have to think it's there to some extent.  Either way I think it's giving the cockpit a little more love than just dry brushing Flat Aluminum around all the corners and edges.

I still have a few things to touch up here. 

On the bench:  

Tamiya F4U-1  Kenneth Walsh


JOIN OUR COMMUNITY!

Our community is FREE to join. To participate you must either login or register for an account.

SEARCH FORUMS
FREE NEWSLETTER
By signing up you may also receive reader surveys and occasional special offers. We do not sell, rent or trade our email lists. View our Privacy Policy.