SEARCH FINESCALE.COM

Enter keywords or a search phrase below:

Natural metal finish - my attempts with alclad

15490 views
44 replies
1 rating 2 rating 3 rating 4 rating 5 rating
TUG
  • Member since
    December 2013
Posted by TUG on Sunday, January 26, 2014 4:20 AM

Thanks Guys nice to hear you like them.

'Groot' - The chipping was done by various means. On the F-86 and the B-26 I mainly used the 'salt technique' but replaced the salt with a card craft product called embossing powder. (I think it's used with a heated stamp to emboss designs in card) It's a coarse powder like substance bought on spec to see whether it would work. - It does! Unlike salt, though it absorbs water, it does not dissolve and reduce to a mushy paste.  

After some experimenting i found the best way to use it is to wet the area required then sprinkle the powder into the water' moving it around with a paint brush if required. Let it completely dry then gently flick off the areas not wanted. The initial spray coat has to be very light and at low pressure as the powder is only just attached and is easily knocked off but once that first layer is on it's quite resilient to further spraying. Once the paint has dried it's a matter of brushing off the granules leaving exposed metal beneath. These granules can be reused by the way. This shot might give a better impression of how it works.

The other thing I have used successfully is a food product called 'Marmite' in the UK ('Vegimite' elsewhere?) If this is applied with a sponge, again very lightly, then spayed over it's just a matter of washing it off with water as soon as the paint has dried. If used over Tamiya paints it can bleach the area very slightly which also adds to the effect. As opposed to the usual masking fluid this is also a good masking material if very small parts require masking as the removal is much less stressful than fluid

Finally I have found if any area needing chipping that hasn't been masked as above and has been over painted with Tamiya paint - if the area to be chipped is washed over with water and left for a few minutes the Tamiya paint will soften slightly allowing hand chipping with the tip of a scalpel or a tooth pick without damaging the underlying surface.

Well I hope that helps you 'Groot' and anyone else who may be interested. My current build has come somewhat to a halt of late but I'm off now for a good painting session Big Smile

Regards - Tug

  • Member since
    March 2005
  • From: Lancaster, South Carolina
Posted by Devil Dawg on Saturday, January 25, 2014 9:28 PM

I think I'll send you all my kits that need a bare metal finish and let you paint them for me....... Simply astounding work!

Devil Dawg

On The Bench: Tamiya 1/32nd Mitsubishi A6M5 Model 52 Zeke For Japanese Group Build

Build one at a time? Hah! That'll be the day!!

  • Member since
    June 2013
Posted by RobGroot4 on Saturday, January 25, 2014 1:56 PM

Those look fantastic.  I have to ask how did you "chip" the colored paint markings?  Was it a mask or did you actually chip them off?  I was never a huge fan of NMF because I always felt it looked too clean, but I may have to give one a shot to dirty up and make it more visually appealing!

Groot

"Firing flares while dumping fuel may ruin your day" SH-60B NATOPS

TUG
  • Member since
    December 2013
Posted by TUG on Saturday, January 25, 2014 1:52 PM

Thanks Silver for your thoughts but I'm afraid I shall have to decline - that's an awful long way to go as I'm in the UK.

I'll think about your show though and be there in spirit if nothing else - I hope you do as well again and that you'll put some pics up for us

Regards - Ramon

  • Member since
    January 2014
Posted by Silver on Saturday, January 25, 2014 11:36 AM
On a departing note from one Master Metal Finish Master to another""Great Job"".Come to Seattle and compete for the best Bare metal finish award on April 12th.Again "great Job"
TUG
  • Member since
    December 2013
Posted by TUG on Friday, January 10, 2014 8:12 AM

Hi Guys - Thank you for all your kind and appreciative comments - nothing gives me a greater buzz than if someone is inspired to have a go at something because of something I've made. Although I have in the past - I don't actively compete now, much more preferring to just display and talk with those who find a model of particular interest. I think sharing what you do has to be the best bit about this hobby. If I can pass on anything just say.

My initial interest in metal finish transpired with the need to do the engine area on a Flanker which was the first aircraft I tackled after the Lanc described elsewhere. I choose Alclad because it's made close by where I live and found it so easy to use. Consequently, though I have the odd jar of other stuff here and there, I've never used anything else and it was from this that the desire to do more NMF arose. Incidentally, the Mirage was built halfway through this Flanker build - this was a long haul.

(BTW excuse the dead spider! I only noticed it as I inserted the image. All my models live under card covers but looks like he found a way  in)

When I did the Sabre I used the 'new' heat stain colours....

I find the affects you can get with these is so varied - the only minor issue is the constant need to change colours/ clean the airbrush occasionally. Alclad also produce a colour called Gold Titanium. I found that if this is just 'dusted' on in a very thin layer the effect is even more striking. This is the one area I'm really looking forward to painting on the current build.

Should you be wondering the bases are all made from 'Poly-Filla' a water based DIY wall crack filler. The surface is textured by various means and takes Acrylic very well. It's joy is it will then take layers of oil paint/ white spirit washes to create some very nice effects. The tire marks on the sabre base where done by mounting a small felt wheel on a motorised tool, rubbing the wheel in paint then bouncing it off the base (with the tool running). I like to keep them as simple as possible though - just enough to convey their environment

Hope that's of interest too - Thanks once again

Regards - Tug

  • Member since
    September 2010
  • From: California
Posted by mikeymize on Thursday, January 9, 2014 11:07 PM

NMF one of the greatest thorns in my side yet you make it look easy. congrats!

"Time you enjoy wasting is not wasted time".


  • Member since
    February 2012
  • From: Olmsted Township, Ohio
Posted by lawdog114 on Wednesday, January 8, 2014 7:40 PM

Simply stunning work.  Some of the finest NMF's I've ever seen.  

 "Can you fly this plane and land it?...Surely you can't be serious....I am serious, and don't call me Shirley"


  • Member since
    January 2003
  • From: Washington State
Posted by leemitcheltree on Tuesday, January 7, 2014 6:22 PM

Darn, Brother!  Those look fantastic!  Superb work - one day I hope to emulate those fantastic finishes.

Thanks for sharing the pics.  

Cheers, LeeTree
Remember, Safety Fast!!!

  • Member since
    October 2013
Posted by Big Blue on Tuesday, January 7, 2014 4:17 PM

Awesome as ever Tug.  I always enjoy seeing your work.

  • Member since
    June 2013
Posted by bvallot on Tuesday, January 7, 2014 8:49 AM

Absolutely Tug. I'll echo what everyone else here is no doubt thinking. Great job on all of these. Your attention to the little things is what ties everything together. All of what I see here is exactly what I set out to do on my builds...only I see you've done it already...and more of them! =]

Looking forward to seeing your sabre on the NMF group page.

On the bench:  

Tamiya F4U-1  Kenneth Walsh


  • Member since
    March 2010
  • From: MN
Posted by Nathan T on Tuesday, January 7, 2014 8:19 AM

Very nice. You are a NMF expert, and know how to weather them properly too.


  • Member since
    February 2003
  • From: Cameron, Texas
Posted by Texgunner on Tuesday, January 7, 2014 7:46 AM

I agree, they all look great to me.  Tug, you got it down man!  That F-86 looks spot on to me, a real hard-workin' aircraft.  Your painted markings are also so well done, these are mighty fine models sir!

Gary


"All you mugs need to get busy building, and post pics!"

  • Member since
    August 2012
Posted by JimNTENN on Tuesday, January 7, 2014 6:30 AM

I remember your Marauder from an earlier post. They all look magnificent. And I'm certainly no expert but I think the weathering on all of them is fine. It makes the model more interesting in my opinion. And because of how that Mirage looks I think at some point I'm gonna try painting markings. Looks WAY better than decals.

Current project(s): Hobby Boss: 1/72 F9F-2 Panther

                                  Midwest Products: Skiff(wood model)


  • Member since
    October 2012
  • From: Mt. Washington, KY
Posted by Geezer on Tuesday, January 7, 2014 6:23 AM

Very impressive, TUG. To me, the sheen is just right, not the polished aluminum look, but some oxidation. Well done, sir.

www.spamodeler.com/forum/index.php 

Mediocraties - my favorite Greek model builder. 


TUG
  • Member since
    December 2013
Natural metal finish - my attempts with alclad
Posted by TUG on Tuesday, January 7, 2014 6:19 AM

Hi guys

Further to some postings on the NMF Group Build thread here are some pics of NMF finishes tried so far. All have been carried out using Alclad with only the addition of some smoothed on metal powders in a few areas. All have been put on over Alclad's grey Micro primer and all coats were smoothed with Micro Mesh 6000 which I have found is the optimum grade for the job. Hope they will be of interest and benefit to someone.

This was my first attempt about ten years ago. It's an Academy Mirage 111c. Very inexpensive kit with good surface detail that went together well. This was the first model I tried painting on the markings using commercial masks. The fin flashing  and engine intake area were masked and sprayed too.

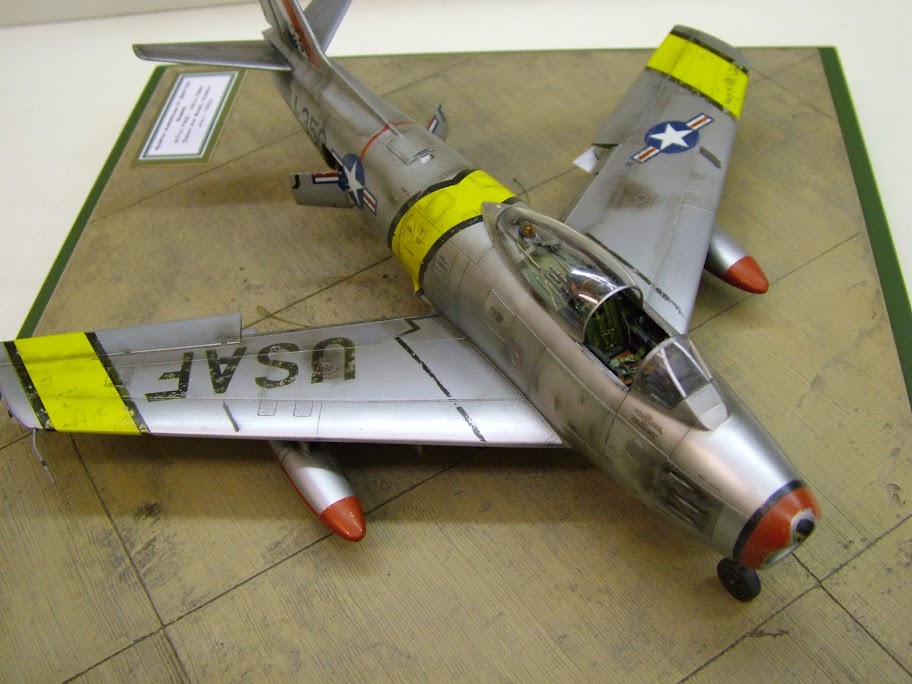
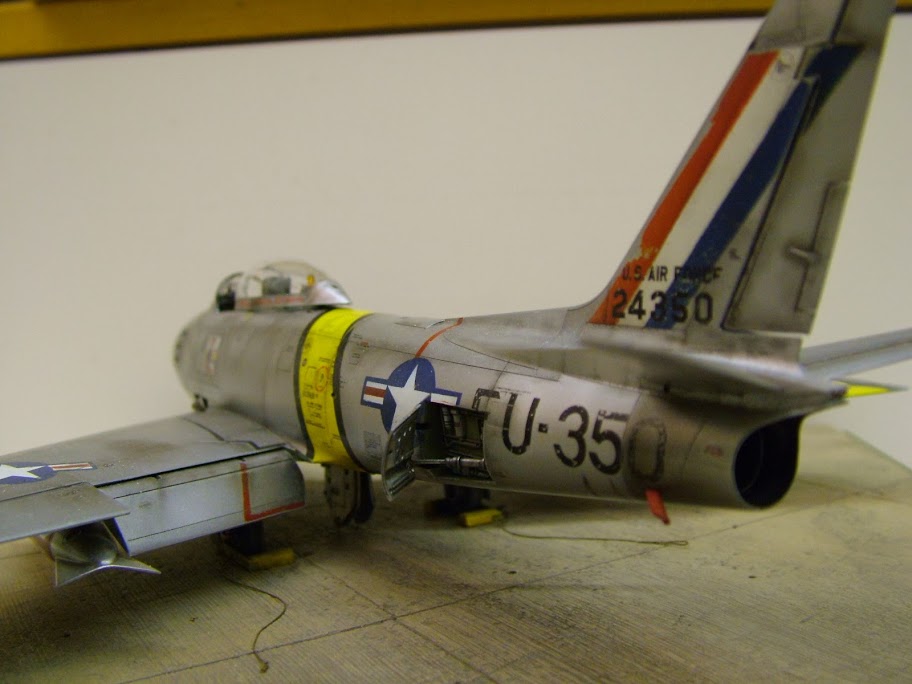
Pleased with the result I tackled an F86 next, another Academy kit but this time using a CMK cockpit. At the time we had an ex F-86 crew chief in our club so I had some first hand advice.  I opened the panel and scratch built the inside. It's perhaps a little over weathered but it is meant to portray an aircraft at the height of the Korean war when these aircraft were flying as many as eight missions a day.

All the insignia and colour bands are masked and sprayed - 'USAF' being cut from Tamiya tape by hand.

It would be a long time before the next one was tackled - several tanks got in the way - but the B-26 Marauder is a particularly favourite aircraft though I was put off for a long time by those raised lines of the kit and the thought of rescribing them. In the end the model was primed first then all the lines rubbed down leaving just a hint. The lines were then accentuated by paint alone. Lot's of masking of small areas at a time but satisfying. It's all painted, there are no decals on this model.

Last one done was another all time favourite the F100 Super Sabre. Again I'd had a Monogram version going, gradually re-scribing it when Trumpeter announced their 1/48 version. This is the 'C' - the 'D' sits under the bench. Apart from the small stencilling and the legends around the cockpit the markings are all masked and sprayed.

Well that brings it up to date - next up is the 1/32 F-100D that I'm doing for the Group Build. I've decided to do that in French service as many of those aircraft exhibit some very colourful heat stains.

Hope these are of interest

Regards - Tug

JOIN OUR COMMUNITY!

Our community is FREE to join. To participate you must either login or register for an account.

SEARCH FORUMS
FREE NEWSLETTER
By signing up you may also receive reader surveys and occasional special offers. We do not sell, rent or trade our email lists. View our Privacy Policy.