SEARCH FINESCALE.COM

Enter keywords or a search phrase below:

Trumpeter 1/32 ABM Avenger Build Thread

10326 views
94 replies
1 rating 2 rating 3 rating 4 rating 5 rating
  • Member since
    December 2002
  • From: Northern California
Posted by jeaton01 on Wednesday, November 9, 2016 7:07 PM

Builder, those are called Lord mounts, the name comes from the manufacturer, who is still a major supplier for all types of aircraft engine mounting systems.  Their purpose is vibration isolation, though of course torque loads do pass through them to the engine mount structure.

Nice work on the TBM, it's going to be a beauty.  Did Trumpeter get the spacing between the cylinder banks rright on the R-2600?  It's too wide on there R-2800's, bums me out.

John

To see build logs for my models:  http://goldeneramodel.com/mymodels/mymodels.html


  • Member since
    March 2012
  • From: Louisville, KY
Posted by Builder 2010 on Wednesday, November 9, 2016 5:36 PM

Now onto today's work. I hand painted burnt iron on the lower cylinder portions. I then used one of my newly acquired super-small carbide drills. This drill is a #88. That's not found in any micro-drill sets and is so small as to be a needle. And yet somehow they're able to grind flutes into it AND it's solid carbide. After measuring the Eduard PE spark plug wires at 0.008" so I used this 0.009" drill to open up spark plug holes so the PE would have a place to land. The front cylinder bank had a boss that made finding the plug opening easy, but the rear bank didn't have anything since Trumpeter didn't expect people to put spark plug wires... just what were they thinking. An engine this big must have wiring.


While doing this I was painting and plastering tunnel portal wing walls on the mountain project. I got them into position nicely. Then on the ABM, I prepared and painted the crankcase piece with the pushrod tubes. Unlike the Eduard B-17 motors, these are all on one part and that greatly simplifies assembly. Of course I did break one off when attempting to deburr the part. It was a clean break. I drilled the nub with a 0.028" drill just enough to let the broken part have something to hold to and CA'd it back in place. I painted the casing flat aluminum, the tubes semi-gloss black, the upper part first flat black and then dry-brush silver to simulate the clamps. These pieces are not glued in place yet.

In this picture you can clearly see that the valve covers are black over top of aluminum rocker boxes. These parts are separate and, when glued, support the tops of the pushrods. But they're attached to the sprues by their sides which makes painting them on the sprue a little tough, so I'm going to detatch them, stick them to some masking tape and paint the two colors. That will also keep paint off the gluing surface. I got this pic from a reader of this build thread on another forum. I'm actually posting this on three reaching very different audiences.

The picture shows the yellowish zinc chromate of the structural parts. I also shows the valve cover colors, and it shows the oil cooler and carb intake air trunks. It shows how the panels come off which I'm going to do since I'm going to put a lot of stuff into this part of the plane. Also of interest are the radial rubber snubbers that absorb torque so it doesn't tear up the air frame. There's no provision for these on the model engine, and I'm not sure I'm going to attempt them.

  • Member since
    March 2012
  • From: Louisville, KY
Posted by Builder 2010 on Wednesday, November 9, 2016 5:09 PM
Did you post any pictures? For some reason my yesterday post didn't show up. 
 
First thing I did today was install the front motor mount ring into the baffle plate (don't know what else to call it since it's not really the fire wall since that's behind the engine mounts, especially since the carburetor is on the rear side of this piece. I think it just acts as a guide to steer air flow through the cowl flaps.) I painted both interior green. I masked the outside since I didn't want to have to paint the blue over another color if I didn't have to. The accessory case was airbrushed semi-gloss black.
 
 
I noticed 2 large conduits coming into the ignition ring from the rear of the engine. They are the ignition feeds from the two magnetos on the accessory case. I wanted to add this wire in the front and also at the magnetos.
 
Here's a picture that was available on the web which shows all the activity at the accessory case.
 
 
The mag wire is the large white one that's heading directly left into the engine. The wire comes into the mag's side with a 90° fitting. There's a lead on each side feeding that side of the ignition ring.
 
To make the connection, I flattened the end of a piece of 1/32 brass rod, punched and drilled it 0.032" and then soldered another piece of the same rod into the hole. After some bending and fussing I fit the wires and put them through holes in the baffle.
 
 
After gluing the accessory drive I CA's the mag leads and painted them chrome silver.
 
 
There's a ton of other wires and pipes running around the engine's rear. I don't know how much of this I'm going to model, but if I do, I'm going to open up and access panel so it's visible.
 
I then started building the engines themselves with painting the blocks and heads flat aluminum. I'm looking forward to building this engine. I find engines some of the most enjoyable aspects of modeling.
 
 
Tomorrow I'll keep going on the engines.
  • Member since
    March 2015
  • From: Streetsboro, Ohio
Posted by Toshi on Monday, November 7, 2016 8:13 PM

This is a really fun kit as I built this last year.  It's really detailed well!

Toshi

On The Bench: Revell 1/48 B-25 Mitchell


Married to the most caring, loving, understanding, and beautiful wife in the world.  Mrs. Toshi


  • Member since
    January 2009
  • From: hamburg michigan
Posted by fermis on Monday, November 7, 2016 6:58 PM

Nice!

I love me some "Turkey"!

My Grampa was a Radio Op. on these during the war (Catalina's as well). Someday, I'll get this kit, at the right price!

  • Member since
    March 2012
  • From: Louisville, KY
Trumpeter 1/32 ABM Avenger Build Thread
Posted by Builder 2010 on Monday, November 7, 2016 5:36 PM

Well folks, I was wrong. I thought that this kit wouldn't be started for a while since I'm scheduled to build another large structure for a commission project, but since that hasn't kicked off, I decided to pull this big beauty off the shelf and get into it. While I'm doing this I'm building a large plaster mountain for the railroad and while various things are drying/hardening, I can work on this model.

This model was a gift from a parent whose son I had in my Grandpop's Model Building Workshop that I ran a few years back. A close friend of hers father died and left a treasure trove of un-built Trumpeter kits. They offered them to her and she offered some to me. Included was this Avenger, a 1:32 Super Hornet which my grandson proudly built, and two Trumpeter 1:350 carriers (Hornet and Essex). Grandson is building the Hornet and I'm going to build the Essex.

This Avenger is a pretty big model with lots of details, much of which will be invisible (like the B-17) unless I open access panels to show it off, which I may do. The kit has some PE, but I added to it with two Eduard sets: Engine Details, and an Exterior set. I also ordered, but haven't received the mask set. Unfortunately, to order directly from Eduard the order needs to be over $20 and the masks are just under $10. I would buy a set for the Essex, but they don't offer it. They do offere two sets for the Hornet, but that would be up to my grandson if he wanted to mess around with it, and he's pretty much glued everything up. I have the capability to do all the masking by hand, but it's very time consuming.

I'm going to do the plane in the all-gloss sea blue scheme, instead of the three-tone, white, navy and light blue. 

The build starts with the Wright R-2600 accessory case and engine baffle plate. This model has a beautifully detailed engine and with the Eduard it will be a show-stopper like those 1:48 radials I built for the B-17. This entire subassembly will be buried in the airframe unless I go with the aforementioned access panels.
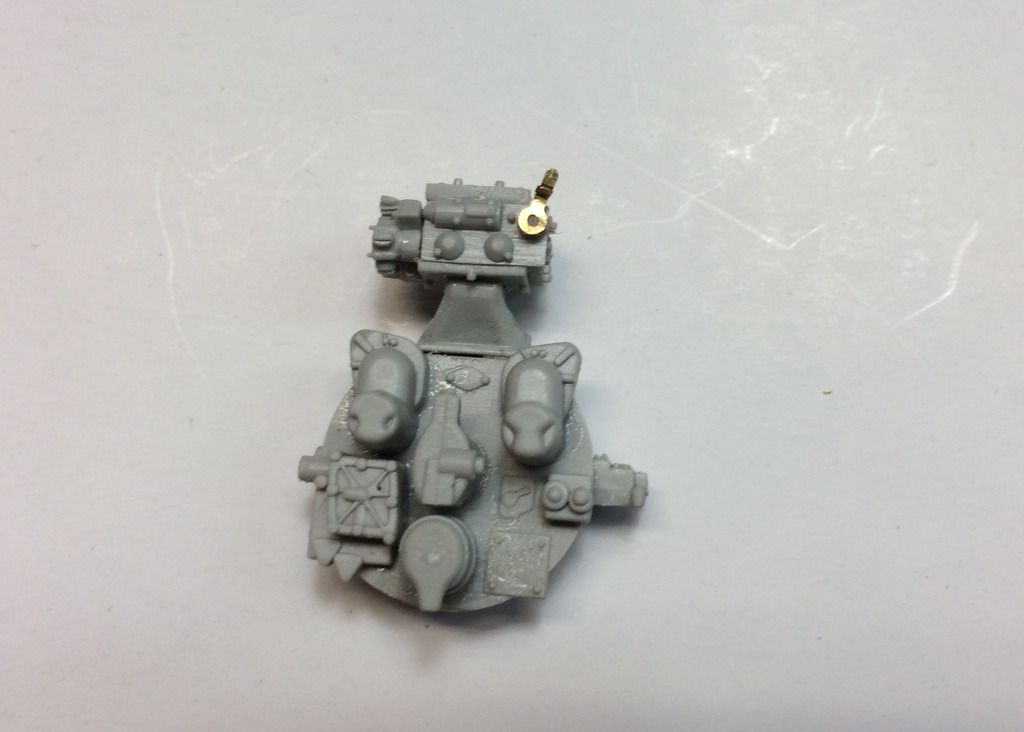
This whole deal will get airbrushed, semi-gloss black. Between this part and the engine baffle goes the exhaust collector ring. I think the outside of the baffle gets sea blue, but the inside is probably zinc chromate green. I'm going check some references on this coloring before proceeding.


JOIN OUR COMMUNITY!

Our community is FREE to join. To participate you must either login or register for an account.

SEARCH FORUMS
FREE NEWSLETTER
By signing up you may also receive reader surveys and occasional special offers. We do not sell, rent or trade our email lists. View our Privacy Policy.