SEARCH FINESCALE.COM

Enter keywords or a search phrase below:

OFFICAL NATURAL METAL FINISH GB V (2013-2014)

71471 views
662 replies
1 rating 2 rating 3 rating 4 rating 5 rating
TUG
  • Member since
    December 2013
Posted by TUG on Tuesday, December 24, 2013 3:13 PM

And to you to Clemens - Thanks to this GB I look forward to the New Year with renewed vigour.

Enjoy your break - Tug

  • Member since
    April 2010
Posted by Theuns on Thursday, December 26, 2013 11:57 PM

Here is the result of a few hour's work. It is the new tool 1/72 Airfix MiG 15. 

Cockpit detail it very limited but with the shut canopy I am not to worried about it. Sofar the fit is OK, I just want to get the anhedral of the wings correct, the kit seems lacking there.

It will be Alclad airframe allu over tamiya gloss black enamel. I have head better results with this than with the alclad gloss primer.

Still a tossup between using the Russian or Korean decals.......


Theuns

TUG
  • Member since
    December 2013
Posted by TUG on Friday, December 27, 2013 5:09 AM

Hi Guy's - last couple of pics that more or less finalises the preparation work....

I used some plastic tube and 2mm ali rod for the tailplane fixing which will allow positionable surfaces. The rod fixed point is reinforced with plastic angle strip

That marginal wing fixing - the same as on the 1/48 version is reinforced with another 2mm rod going through the fuse and into the wings as far as possible. The rod position is also reinforced with plastic angle within the wing. The rod will be fixed to the fuse - the wings sliding on

I'm hoping to start painting today and begin the build Big Smile

'Theuns'  - that's a nice start on the Mig but would you mind if I made a comment?

I do hope you won't see this as 'Teaching Granny' here but I've noticed more than the odd reference for the need to put 'Alclad' over a 'gloss black undercoat'. Though I'm sure many are aware that it's not necessary there appears to be a misconception with quite a few that it is the only way 'Alclad' per se should be applied. From what I was told at an early stage in using it In actual fact that is not the case.

When I did my first model in NMF I bought Alclad direct from the main UK manufacturer who traded at that time close to where I live. It was at this point I was told by the owner that using a gloss black undercoat is only necessary in some very particular cases - namely Chrome, Stainless Steel, and Highly Polished Aluminium and only then if you want to achieve the effect of the individual paint. Chome  for instance can just as easily be used over grey primer just don't expect a 'Chrome' finish. This does not apply to all the other 'silvers' in the range which incidentally, for some technical reason due to the powders used, have a different binder to the three mentioned above. They work just as well over grey or any other colour (matt) primer

I've used Alclad2 now for several NMF models - always applying it over the Alclad Grey Micro Primer with total success. I've never experienced paint pull off from masking removal nor the 'powdery' finish which rubs off on the fingers that some have. I believe that anomaly is caused by too high pressure the paint drying before it hits the surface. I've also used it over gloss black where that chrome effect was required (oleo's) though I try to avoid this where possible as it takes far to long to dry and I'm not that patient!

Hope you won't see this as poking my oar in on such a knowledge base as this but I have heard this said so often - the 'apparent' need to paint everything gloss black often putting people off using this very effective product.

For me - the most important thing in achieving a good NMF finish is to smooth every coat, beginning with the plastic surface itself, with MicroMesh 6000 cloth. 'Silver' of any shade, as I'm sure most  are aware, is notorious for showing up the slightest imperfection.

As said hope you don't mind that input - now wheres that airbrushWink

Regards - Tug

  • Member since
    April 2010
Posted by Theuns on Friday, December 27, 2013 5:30 AM

Tug, no worries mate! I always learn from who ever I can :-)

The only reason I mention gloss black is that I used the Alclad gloss black primer with pollished allu and it gave a total "wrong " effect. I learned that  I needed to sand (using micromesh) the primer to get it smooth enough for the alclad.

On this mig I do not want to try and sand it as the wing fences ect might get in the way.

I have not experimented with using grey as a basecoat yet. I plan to use airframe allu on it.

Will the same "depth" look be achieved using a non black primer? I usually do a coat of alclad, then mask off an few pannels and continue with the same shade of alclad to give slight different look to it. Does a grey base also male the alclad go "lighter" as more coats are applied?

Thanx

Theuns

TUG
  • Member since
    December 2013
Posted by TUG on Friday, December 27, 2013 6:40 AM

Hi Theuns,

I can see what you mean about the wing fences may get in the way but there is a way round that. If you cut small pieces of Micro-mesh (MM)and stick them to very small pieces of balsa wood using double-sided tape you can get in very close to tight edges. You can also use this technique to make very small bespoke sanding sticks using various grades of wet and dry paper - very useful.

I don't 'sand' anything with regard to finish preparation, rather I 'smooth' the previous surface with a very gentle light rubbing of MM 6000 which I have found is the optimum of the MM range for this. I always use water with a drop of washing liquid - one or two small drops per litre - as a lubricant wiping it dry with paper kitchen towel (Tescos own - which is relatively lint free). As said previously every layer, from plastic up, gets this treatment.

As I have never covered a large area using gloss black I cannot say how this compares with the grey primer as you ask. I usually use 'White' aluminium as the major initial coat - working out from this with darker panels using 'Dark' ali or Duralumin and sometimes darkening the White using Jet Exhaust both mixing and as a post shading. For highlighting I use Chrome or Highly Polished and also have a series of powders which get applied with a brush or finger or rubber tipped spreader. These paints can get expensive when setting out but I've built my collection up over time buying a couple of bottles here and there. There are several other brands in the drawer but nothing seems to match ease of application of Alclad- and yep I'm just a satisfied customer.

I'll take a couple of pics of something this afternoon and post them later

Hope that's of use

Tug

  • Member since
    April 2010
Posted by Theuns on Friday, December 27, 2013 10:30 AM

Tug , I have seen if I mask off a few panels after the firsf few coats, and then do a coat or two more with the same paint I get a nice subtle tone difference without needing different alclads......I am a cheapskate modler!

Here is a pix of my 1/72 F-86 (alclad airframe allu over 6000 sanded black primer. See the central wing skins for what I mean.

Some might say it looks to gleamy, but in my pix of Korean Sabres I think the level is just about right.

On the MiG I will tone it down a tad, maybe use grey primer.

i803.photobucket.com/.../models039_zps970d943e.jpg

i803.photobucket.com/.../models043_zpse085fe6e.jpg

Theuns

  • Member since
    April 2010
Posted by Theuns on Friday, December 27, 2013 10:34 AM

OK, if I use the correct settings the pix might showup !!

  • Member since
    June 2013
Posted by bvallot on Friday, December 27, 2013 2:01 PM

Tug has made a real good point here.  Before I started this build, I experimented quite a good bit with a range of Alclad 2 colors.  To do this I set up a grid of different color primers the last of which was the Gloss Black over the Tamiya white extra fine primer.  I painted strips of these colors from left to right and the Alclad colors up and down.  I even divided the Alclad color I painted in half to allow for a comparison of any buffing done to the paint.  

Now, to say there's a right way to approach using Alclad is not really fair.  It's all relative to what you're trying to accomplish.  But I definitely agree with Tug that the application of a gloss black is not always necessary.  Especially the thicker your coats get.  The heavier the build up of that Alclad pigment...the less what's underneath will seem to matter.  There are some exceptions of course, but largely you can get away without the use of the gloss black.  The only times the gloss black is needed is when painting with the high shine Alclads.  

What I found during my actual build is that having the gloss black down and painting the Alclad in light coats allowed me to show characteristics of the what the metal would appear to look like over internal structures...but this is also an aesthetic specific to what I'm trying to tackle.  When I paint I'm trying to reveal the ribbing underneath the plane so that any weathering I do works together with it and not separately.  I try to work from a less is more way of thought so that I'm not losing surface detail with extra post shading layers and what have you. Of course they'll be some spots I'll choose to do this, but I try not to let it get away from me.  So the more I can do with less early on...the simpler. =]  I am beginning to see how doing the same without the use of the gloss black is possible, I just think it may take you a few extra steps later on in your build.  So...could you argue for or against the gloss black....eh.  I'd say it's all relative.  What is for sure is that it is certainly not "always" needed.  The Alclad series stands up all on its own.

But I wouldn't sweat a thing there Tug!! =]  What better a place to discuss the how to's of painting with Alclads than a NMF page. ;)

On the bench:  

Tamiya F4U-1  Kenneth Walsh


  • Member since
    June 2013
Posted by bvallot on Friday, December 27, 2013 2:11 PM

Theuns

Tug , I have seen if I mask off a few panels after the firsf few coats, and then do a coat or two more with the same paint I get a nice subtle tone difference without needing different alclads......I am a cheapskate modler!

Theuns:  I've been doing virtually the same thing this whole time with my mustang.  I put down some initial coats of Duraluminum on the wings for instance.  Let it set up and dry, and then came back and painted the same color in the same sweeping motions but only over specific, masked off areas.  It's been working like a charm! =D  I get the tonal variation I want and without making such an obvious break in color.  The angle of the light hitting the Alclad will be enough to change the tones in the paint surface.  I'm finding out more and more how it's not necessary to outsmart physicals laws of nature. lol.  Just keep it simple. =]

On the bench:  

Tamiya F4U-1  Kenneth Walsh


  • Member since
    June 2013
Posted by bvallot on Friday, December 27, 2013 3:39 PM

Well, while I have the time right now I figured I'd share what I have started with my second build for this GB.  I won't bore all of you with dozens of pics...I'll just get to the meat & potatoes.

While I take a step back from my mustang, I'm starting the 1:48 P-38J Lightning from Academy.  I'm adding the Aires cockpit and Quickboost supercharger resin parts.  The rest will be scratchbuilt and tweaked on my own.  The kit parts for the supercharger aren't so bad and I think I could make them pop a bit more with some effort, but I've been dying to see how much more detail is offered with the Quickboost.  Plus, I wanted to see if it will fit to the B-17E I still have on the backburner.  They are a definite improvement as one would guess. 

So far all I've done is looked over all the parts, addressed some key areas that need to be thinned/opened, and I've begun riveting the surface of the plane.


image by brittvallot, on Flickr

Here I've put together a comparison of a before and after. I can't wait to jump on this one!


image by brittvallot, on Flickr


image by brittvallot, on Flickr

 I'll complete the riveting on this, then wash & clean it and start fitting her together.  =]

On the bench:  

Tamiya F4U-1  Kenneth Walsh


TUG
  • Member since
    December 2013
Posted by TUG on Friday, December 27, 2013 5:42 PM

Hi Guys, It's interesting to hear of your approaches too. I've learnt something here with the use of varying coats giving that slight degree of panel variation - another little trick to try.

As 'bv' alludes, along with doing whatever one is happiest with one thing's for certain - in all things that is, not just this hobby - and that's there is always more than one way of skinning that proverbial cat.

Personally due to that early advice I've 'just not been there' and have found the paints to be very good as used. The one thing that really puts me off is the slower drying times of gloss paint and the potential for dust pick up as it dries - absolutely fatal under a silver finish - and the fact that that caution is required as those coats build up - I can't imagine gloss black will go down so smoothly ie thinly as matt will either though that is because as yet I've not tried it.

Poking around in some drawers today getting ready to begin painting ( I haven't made a model since this time last year and was having a good 'sort out' first) I found a few old instruction sheets tucked away - Cast a Coat, airbrush details etc. Honestly, I'm definitely not labouring a point here but in amongst them was this small piece of paper which I thought rather topical. I really had no idea it was there - it must have come with that very first Alclad I bought at Norwich. Co-incidence is a strange thing indeed. Interestingly it says .....

I also took some pics of NMF models made at stages over the last ten years or so - there are not many but I'm not so sure it would be a good idea to post on this GB  pics of models that are not taking part - doesn't seem quite right somehow. Would they best serve here or be better on another thread?

On another note I finally got a coat of paint on something today. Though a confirmed Tamiya paint advocate I'm not adverse to trying others and tried using the Vallejo Acrylic primer. What surprised me was when I went to clean the airbrush out using the usual spray 'Liquid Reamer' equivalent airbrush cleaner. Usually this just eradicates surplus/dried Tamiya paint but this paint just formed globules and blocked the jet. I was also quite surprised to find just how quickly the paint dissolved using ordinary tap water which also appeared to clean the airbrush quite effectively. The primer itself covered well straight onto plastic but did fish eye a bit when thinned - it's early days as yet but I think I much prefer the Micro Primer despite the smell and clean up required. 

Regards - Tug

  • Member since
    April 2010
Posted by Theuns on Saturday, December 28, 2013 12:03 AM

What I am experimenting with the mig is to use no primer atall. I just pollished the model with MM 6000.

I know that the alclad is very agressive , so I will have to build it up in fine coats and leave enough time for the solvents to flash off. Stay tuned!

Theuns

  • Member since
    January 2012
  • From: Hatfield
Posted by Misty on Saturday, December 28, 2013 6:22 AM

afaik you only need to use black enamel primer for the "high shine" finishes, anything will do for the other ones. thats what it says on their site and thats good enough for me, and i've used just about every shade they make.

this is my first time using Humbrol gloss black instead of the alclad black base. Now i only have to wait about three weeks for the damn stuff to cure.


TUG
  • Member since
    December 2013
Posted by TUG on Saturday, December 28, 2013 6:55 AM

Hi Theuns

I agree - any cellulose product will be aggressive on plastic but as yet I've not experienced any untoward problems using it but thinking about it though it would probably pay not to handle it too soon - the surface may be dry but the plastic could still be soft beneath.

As said I'm an impatient painter and once started want to get on as soon as possible so totally sympathise with you there Talentless.

Just noticed, reading these Alclad instructions, they are very specific about using Acrylic base for the High Polish Ali but Enamel for the Chrome - wonder why that is?

Washed all the resin this morning - what do you guys use for priming resin, anything specific? In the past I've always used the micro primer but notice that sometimes after painting with acrylic it can de-laminate. I've only just become aware of 'Mr Resin Primer' - has anyone tried that or is there anything better that gives good adhesion?

Tug

  • Member since
    January 2012
  • From: Hatfield
Posted by Misty on Saturday, December 28, 2013 10:08 AM

I have both the pot and spray can of the resin primer. I have only used the pot and it seems identical to the normal surfacer 500, or maybe the 1000. what the difference is i have no idea.

  • Member since
    December 2004
  • From: Houston, Texas
Posted by panzerpilot on Saturday, December 28, 2013 10:29 AM

I'd like to put my name in the hat for a 1/32 Hasegawa Ki61 Tony. It'll be a crossover, yet to be begun, from another GB here. Thanks!

-Tom

  • Member since
    October 2013
Posted by Big Blue on Sunday, December 29, 2013 4:15 PM

Well, after a bit of a holiday layoff from the bench, I have some progress to share.  First, thanks to bvallot, Tug and all for the advice about masking insignia marks.  Very instructive and helpful.  I had already laid down the decals prior to seeing all the good information posted, but it will certainly be used in a future build.

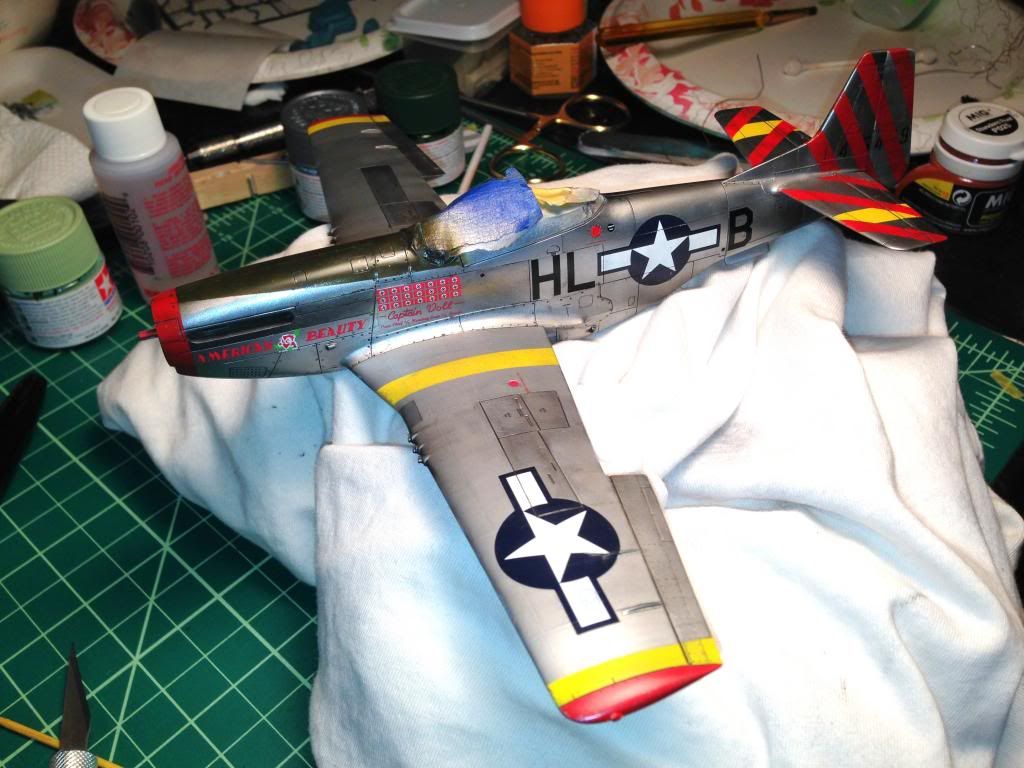
So, as mentioned above, I placed the main decals (insignias, nose art, id numbers & letters) and gave everything a protective coat of Alclad Aqua Gloss.  This was my first time using the Aqua Gloss, and I was pleased with both its ease of use, and appearance.   The care I took in spacing the stripes on the tail paid off when it came time to place the ID number decal (which only shows the sections of the numbers not covered by the stripes.)  Overall, I was happy with the Eagle Strike decals (printed by Cartograf), however I did have some issues with tiny wrinkles in the stars & bars.  I got most of them out, but am even more motivated to paint my next build's insignias.  The smaller decals all behaved very nicely.

Unfortunately, I neglected to snap any progress pictures before giving the plane a thorough bath in Flory Dark Dirt wash (Flory Black on the anti-reflective nose panel):

After letting the wash dry, I removed it with moist paper towels until I got the look that I wanted.  Once satisfied, I applied the stencils from the Tamiya kit decal sheet.  When I built the P-47, I applied the wash after the stencils, but found that rubbing off the wash removed some of the small stencil decals (even with a coating of Alclad Light Sheen to protect them.)

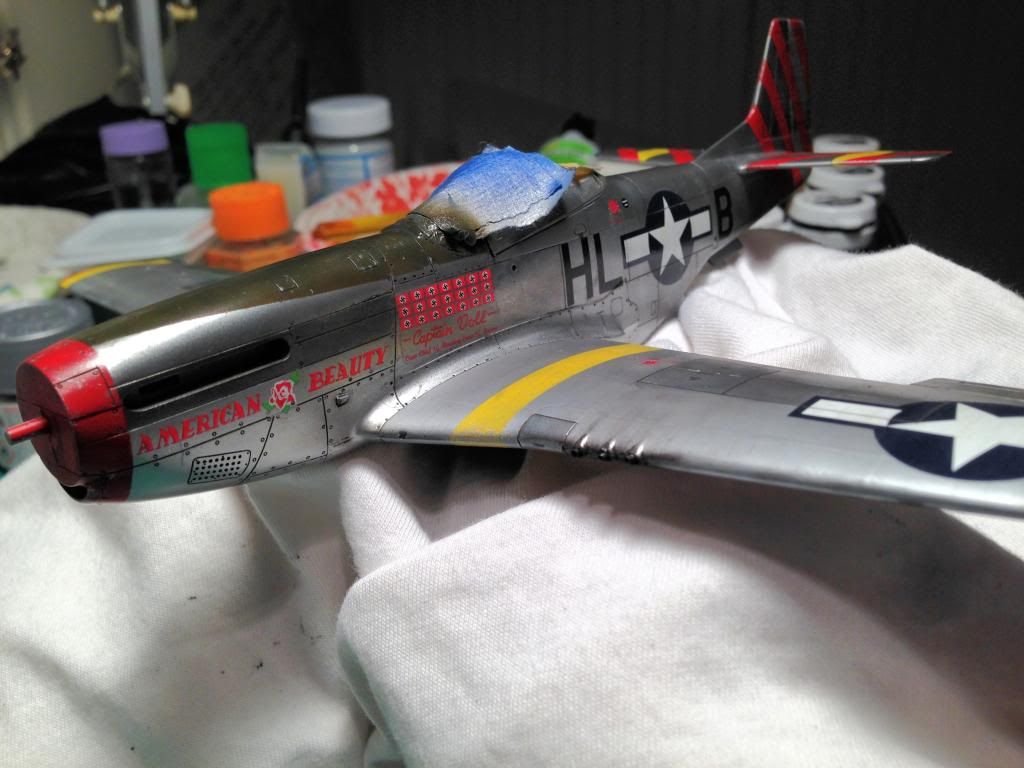
Once the decals had time to set, I started the weathering process with some light use of MIG pigments (mostly black smoke to start the build up of exhaust from the cannons and ejection ports).  Once again, my photos have combined these two steps:

The Flory wash does a nice job of bringing out the panel line detail, and is very simple to use.  By varying how much of the surface wash to remove, you can change how showroom clean the model looks.  All of it is completely water soluble, and can be removed at any point (until clear coating locks it in).

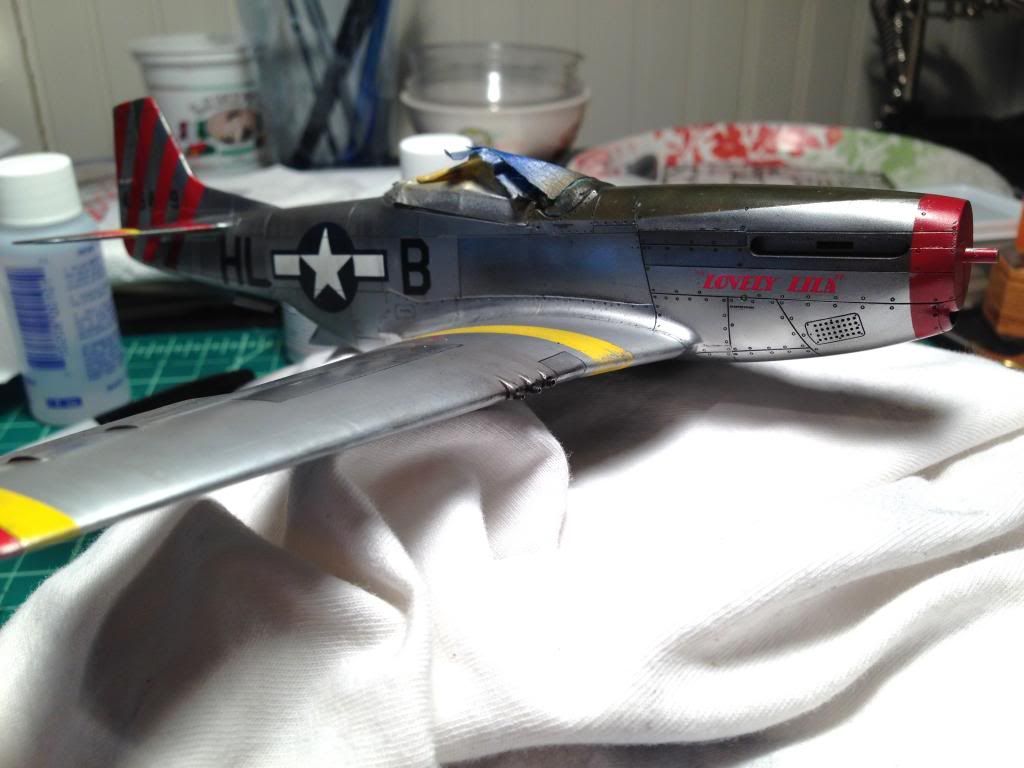
I plan on dirtying up the underside with some oil paint to add a handful of fluid leaks.  Here is a picture to document the "before":

I also plan some light oil washes to add some subtle streaking to the wing surfaces.  Once that is done, I will give everything another coat of the Aqua Gloss to lock in the washes and seal down the decals.  I am toying with another weathering step after that, but am undecided.  I don't want to over do the weathering without decent reference photos of Captain Voll's ship, but I figure that he couldn't have racked up 21 kills without some wear and tear.  I also want to try out some techniques that are new to me, so we'll see how that works out.  

Other than all that... I am continuously impressed and inspired by the work people are sharing here.  Great stuff.

  • Member since
    January 2012
  • From: Hatfield
Posted by Misty on Sunday, December 29, 2013 6:44 PM

thats looking gorgeous , Blue!

  • Member since
    June 2013
Posted by bvallot on Sunday, December 29, 2013 7:14 PM

It really does Blue! Nicely put together.  =]

On the bench:  

Tamiya F4U-1  Kenneth Walsh


TUG
  • Member since
    December 2013
Posted by TUG on Monday, December 30, 2013 3:20 AM

Yes, very nice indeed Blue - I've yet to try any of these new 'washes' -still use oil paint and white spirit but it does look easy to use and give a good effect.

All the main resin parts on the Hun are sprayed and the exhaust is finished and fixed in - some quiet time is now needed for painting the details on the rest - that exceptionally detailed main U/C bay looks like it's going to be quite a challenge

Tug

  • Member since
    October 2013
Posted by Big Blue on Monday, December 30, 2013 11:13 PM

Thanks for the kind words guys.  Given how much I respect the three of your talents, I am flattered.

I'll keep this post short.  I've applied the oil paints for streaks and leaks.  Mostly lamp black, burnt umber, and a little raw umber here and there.  Hard to catch in pictures as the direction of the light can make it harder or easier to see, but here are a few:

This last one compares to the clean underside I posted above.  Here's a closer shot:

As I said earlier, without any decent closeup reference photos of American Beauty, I didn't want to over do it.  I'm hoping I approximated "used, but not neglected after a decent amount of service time."

Assuming I don't post anything tomorrow, Happy 2014 everyone!

Oh, p.s. Tug... I don't think you need to make any changes to your technique, but I have to say, the Flory washes couldn't be any faster or easier to apply.  Slather it on, let it dry (an hour?), and wipe it away with a moist paper towel.  Easy peasy.

  • Member since
    June 2013
Posted by bvallot on Tuesday, December 31, 2013 12:15 AM

Now she's looking like a service warplane!! =D   I think you made a good call keeping it light.  I'm a big defender of less is more.  It's easy to get carried away and ruin a perfectly good thing. The painted yellow stripes are definitely fantastic and the undersurface here looks great.  *two thumbs up

On the bench:  

Tamiya F4U-1  Kenneth Walsh


  • Member since
    April 2010
Posted by Theuns on Tuesday, December 31, 2013 9:07 AM

That is one very smart looking mustang there!

Here is the Mig ready for canopy and paint.

I polished it with 4000 MM so I will see what the results of Alclad over the plastic will be.

Theuns

  • Member since
    June 2013
Posted by bvallot on Tuesday, December 31, 2013 10:21 AM

Theuns:  I'm not aware of the MiG 15's panel line arrangement over the center of the fuselage...but it seems like there is still a seam showing over the top here.  I'm aware that CA will appear transparent even though it's fixed up.  Just thought I'd share that before you moved on to painting....  Good luck!  =]

On the bench:  

Tamiya F4U-1  Kenneth Walsh


  • Member since
    April 2010
Posted by Theuns on Tuesday, December 31, 2013 12:12 PM

Thanx, yes I did use cyno to fill that seam, you can actually not feel it, it's just the angle I took the pix that shows it to be "bad"

Theuns

  • Member since
    June 2013
Posted by bvallot on Tuesday, December 31, 2013 12:35 PM

Sweet deal Theuns.  Rock n' Roll then! =]

On the bench:  

Tamiya F4U-1  Kenneth Walsh


  • Member since
    April 2013
Posted by SchattenSpartan on Wednesday, January 1, 2014 5:35 PM

Blue: You are doing a really great job on that 'Stang! I love the look of a beat-up looking Mustang!

Theuns: I'm really interested in how the Alclad paint looks on top of the bare plastic!

TUG
  • Member since
    December 2013
Posted by TUG on Thursday, January 2, 2014 4:31 PM

Hi Blue - that's some really nice subtle weathering you've achieved there - particularly like your slightly worn yellow stripes which look very realistic under that streaking.

It's been a funny old week - with my wife down with 'man-flu'  Wink but despite my nursing duties I've managed to get away for some concentrated shop time. The thing is there looks little progress for the effort put in but it's a start. I now have all the internal resin parts painted with their initial base colour and have the exhaust finish painted ....

which is now assembled and fitted to the rear portion of the fuselage. The outer surface of the tail cone however has yet to be finished with Alcad

The rest of the time has been spent working on the seat.....

This still has a couple of small parts to fit and has yet to be toned down with an oil wash/minor highlighting but fundamentally it's ready to fit. Cockpit tub is next then Smile

Regards for now - Tug

  • Member since
    April 2011
  • From: Caput Mundi (Rome,Italy)
Posted by Italian Starfighter on Friday, January 3, 2014 6:06 PM

Hi guys......I came back finally......three months ago I felt from a ladder.....so I've broken left elbow.......stop modellingDeadDeadBut now I'm cured...here you are some progress om my F-86D.....decaled,sealed,now I'm working on all those tiny pieces.......Ciao from Italy!!Propeller

http://img.photobucket.com/albums/v381/tigerman12/ThatsAmoreGBBadge.jpg


  • Member since
    April 2010
Posted by Theuns on Saturday, January 4, 2014 7:53 AM

Man that is one good looking "dog" you got there :-D

Here is my efforts with the Mig.

Lessons learned:

a. Alclad comes off when removing masking easier from raw plastic than when a primer was put on

b. By scraping that top centre section with a scalpal blade is not good enough without sanding :-(

c. It is defenately more difficult to spray it like I did onto the plasitc. First coats - dark alclad allu that gave a very matt look to it. Followed by some coats of airframe allu , this becale a little more glossy, hope it is OK enough for decals.

Now the question - does if give more of a "real" look to the model than with normal silver enamel, in my view yes it does, even with the faults I caused.

I will complete it  and not make the same mistakes again!

Theuns

JOIN OUR COMMUNITY!

Our community is FREE to join. To participate you must either login or register for an account.

SEARCH FORUMS
FREE NEWSLETTER
By signing up you may also receive reader surveys and occasional special offers. We do not sell, rent or trade our email lists. View our Privacy Policy.