SEARCH FINESCALE.COM

Enter keywords or a search phrase below:

2015 Messerschmitt Bf 109 Group Build

181149 views
2798 replies
1 rating 2 rating 3 rating 4 rating 5 rating
  • Member since
    January 2014
  • From: Nampa, Idaho
Posted by jelliott523 on Saturday, February 14, 2015 10:06 AM

SchattenSpartan
Elliott: She's starting to take shape! How's the fit of that model so far? I got Revell's G-10 in my stash and I'm wondering how much swearing and cursing is involved in the assembly. BTW, did those decals I sent you arrive at your place?

The fit overall isn't too bad, there are definitely some tricky spots with the flaps and ailerons, glue here but dont glue here type of instructions.  I'm actually enjoying it at the moment.  The only real problem area that I found was the cowling covers on the nose.  They tend to leave some large gaps that required a little putty, not enough for a whole lot of swearing and cursing (there will still be some, there was from me).  I havent seen the decals yet, no worries, last time I had something shipped from Europe to the states it took about a month to get it.

On the Bench:  Lots of unfinished projects!  Smile

  • Member since
    July 2014
Posted by modelcrazy on Saturday, February 14, 2015 10:39 AM

OK, I give, what is "IP". I've racked my brain to come up with what it may mean, but alas, no good. I'm sure it will be extremely obvious once someone lets on, but for now...Confused

Steve

Building a kit from your stash is like cutting a head off a Hydra, two more take it's place.


http://www.spamodeler.com/forum/

  • Member since
    February 2013
Posted by Chanter on Saturday, February 14, 2015 10:43 AM

Instrument Panel Yes


Allen

ButcherbirdBadgesmall_zps1d50c6bb1944 GB

  • Member since
    July 2014
Posted by modelcrazy on Saturday, February 14, 2015 10:44 AM

See, obvious.  Thanks.

Steve

Building a kit from your stash is like cutting a head off a Hydra, two more take it's place.


http://www.spamodeler.com/forum/

  • Member since
    October 2008
  • From: Georgia
Posted by Rigidrider on Saturday, February 14, 2015 8:15 PM

Good looking engine Joe! I like it !!!

When Life Hands You A Bucket Of Lemons...

Make Lemonade!

Then Sell It Back At $2 Bucks A Glass...

  • Member since
    March 2012
  • From: Corpus Christi, Tx
Posted by mustang1989 on Sunday, February 15, 2015 4:54 AM

modelcrazy

See, obvious.  Thanks.

It happens to me all the time MC. Big Smile

I'm certainly looking forward to the engine build up for that bad boy Doug. It's gonna be a good change of pace to get back to aircraft building! Whistling


 Forum | Modelers Social Club Forum (proboards.com) 

  • Member since
    October 2008
  • From: Georgia
Posted by Rigidrider on Sunday, February 15, 2015 7:01 AM

Stick out tongue Bout time! LOL...Wink

When Life Hands You A Bucket Of Lemons...

Make Lemonade!

Then Sell It Back At $2 Bucks A Glass...

  • Member since
    November 2003
  • From: Naples, FL
Posted by tempestjohnny on Sunday, February 15, 2015 11:01 AM

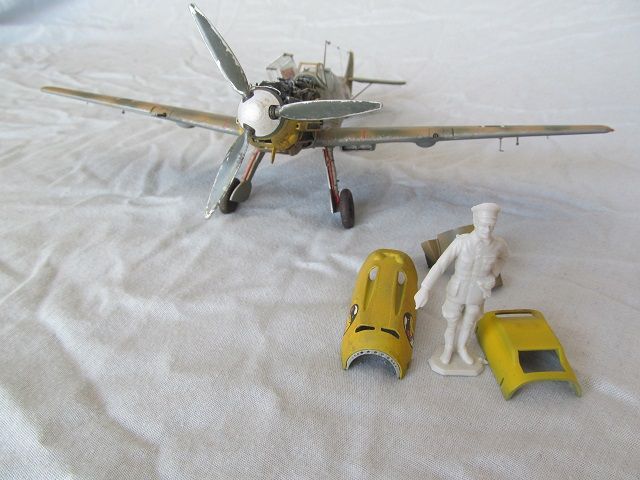
Did some interior work on my twin Hasegawa builds. G-2 and F-4/R-1


  • Member since
    July 2011
  • From: minnesota
Posted by handiabled on Sunday, February 15, 2015 12:58 PM

Brandon- nice NMF job   Turned out great!


Blkhwk_ The camo job looks excellent!


Wingnut- It's coming together nicely, can't wait to see more!


Mustang- Get BUSY!!


Radial- The IP and office look great son far!


Chanter- Very nice detail ,, love the fuel line detail !!


Tempest- You are very ambitious indeed!!  Two builds?   Awesome!


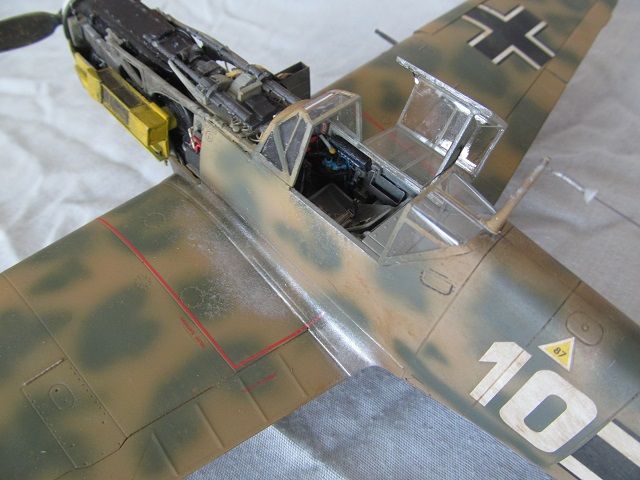
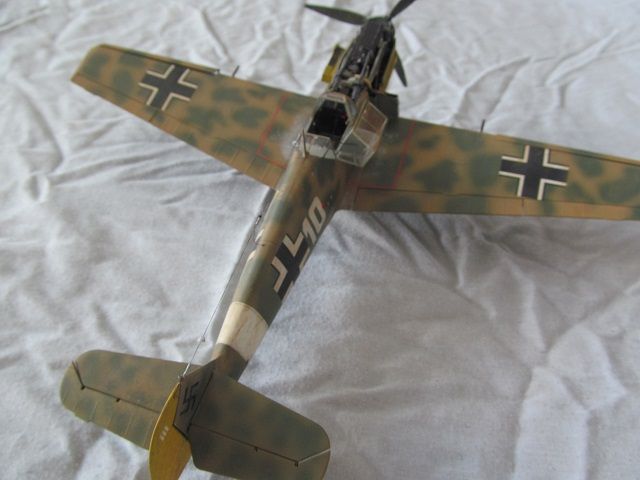
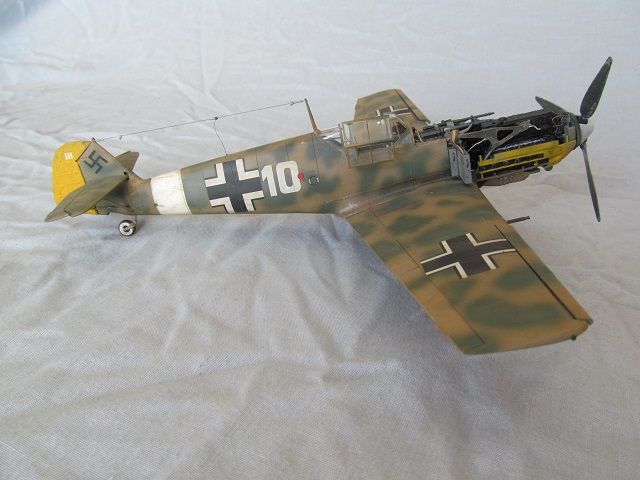
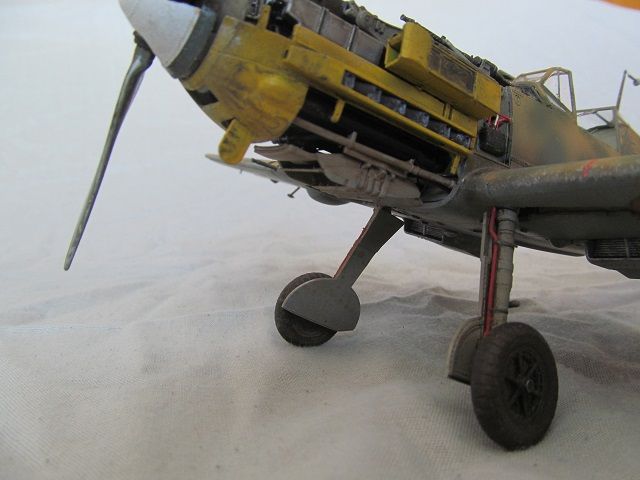
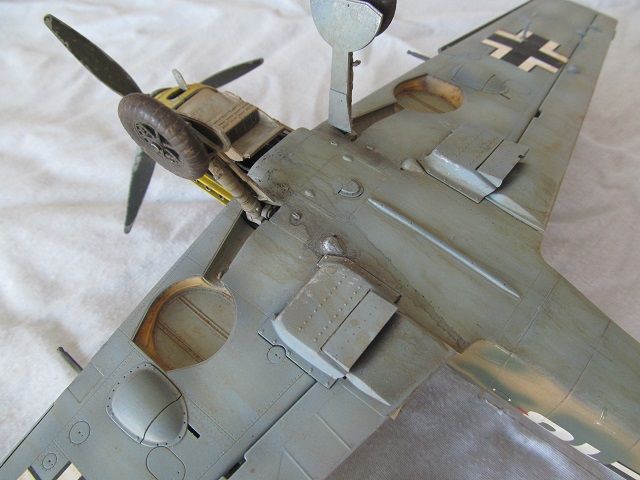
Well Everyone Herman and I are sticking a fork in this one,,, we threw at it what we could. There were so many areas to detail out I would have to show a couple dozen pics to cover them all..... Herman left his stamp on this one with some "smudged" fingerprints on the prop and lower cowl area, the hastily set string of ammo was a left over from a Aries 50 cal set with some Tamiya tape,, Thanks again for all the kind words during this build,, every build on this thread has been top notch indeed!!  It will be hard to top the work that has been done... but here she is     built in the scheme of a bird flown by Gunther Steinhausen JG27 Libya 1941.....  painted in MM enamels, the antenna is e-z line thru stripped guitar string, some washes of sorts and "chipping" added to give a war weary look. I hope you all enjoy!  Mods sorry for this being rather picture heavy,, I leave to you to pick which one/s should go on the completed post.    Thanks again Everyone,,, I will still be following along as I need to get back on my RF kitbash.....


  • Member since
    December 2002
  • From: Bury St Edmunds, Suffolk, England
Posted by Bish on Sunday, February 15, 2015 1:17 PM

Me thinks I need to do a bit of catch up.

Great looking build handi. Really nice work on that scheme and very nice weathering.

I am a Norfolk man and i glory in being so


On the bench: Airfix 1/72nd Harrier GR.3/Fujimi 1/72nd Ju 87D-3

  • Member since
    December 2002
  • From: Bury St Edmunds, Suffolk, England
Posted by Bish on Sunday, February 15, 2015 1:20 PM

Mustang, I do like the look of that engine. I have a few of those Eduard sets in 72nd and they are really well detailed. I am ordering an engine for an Me 110 kit next month, looks like it will be a nice addition if its anything like that.

I am a Norfolk man and i glory in being so


On the bench: Airfix 1/72nd Harrier GR.3/Fujimi 1/72nd Ju 87D-3

  • Member since
    December 2002
  • From: Bury St Edmunds, Suffolk, England
Posted by Bish on Sunday, February 15, 2015 1:22 PM

Bob, lovely work there, I really like the IP, can't believe that's a decal.

I am a Norfolk man and i glory in being so


On the bench: Airfix 1/72nd Harrier GR.3/Fujimi 1/72nd Ju 87D-3

  • Member since
    December 2002
  • From: Bury St Edmunds, Suffolk, England
Posted by Bish on Sunday, February 15, 2015 1:26 PM

Allen, nice work on that pit. But I have one concern. You say you are finding it fun working with PE. If your having fun with PE, I think you might be doing something wrong. Wink

Great work for your first time. Those belts do take some getting used to. You should try them in 72nd Bang Head

I am a Norfolk man and i glory in being so


On the bench: Airfix 1/72nd Harrier GR.3/Fujimi 1/72nd Ju 87D-3

  • Member since
    December 2002
  • From: Bury St Edmunds, Suffolk, England
Posted by Bish on Sunday, February 15, 2015 1:29 PM

marc, that's looking great, that pit looks really nice.

I am a Norfolk man and i glory in being so


On the bench: Airfix 1/72nd Harrier GR.3/Fujimi 1/72nd Ju 87D-3

  • Member since
    December 2002
  • From: Bury St Edmunds, Suffolk, England
Posted by Bish on Sunday, February 15, 2015 1:30 PM

Brandon, that's one nice looking aircraft there. Its hard to tell that's even a 109.

I am a Norfolk man and i glory in being so


On the bench: Airfix 1/72nd Harrier GR.3/Fujimi 1/72nd Ju 87D-3

  • Member since
    April 2005
  • From: Piscataway, NJ!
Posted by wing_nut on Sunday, February 15, 2015 1:37 PM

Handi, that;s one heck of a finish. Nice

Some minor surgery was needed to the kit prop blades to fit since the spinner was designed for the Hasegawa kit (I think). The hole sin the spinner was drilled to 1/8" and the end of the blade modified to fit. And now that I've got the blades all glued in there... Would a winter F-4 have these wider prop blade or the more slender ones?

A final pre-paint mock up

I put down some made up camo to have that under the white wash in case is pokes through during weathering. And yet one more "I'm not paying attention" thingy. I should sprayed the yellow of the fuselage band and masked that 1st. Now i have to mask off the fuselage to paint the band, them mask the band to paint the white.

Marc  

  • Member since
    December 2002
  • From: Bury St Edmunds, Suffolk, England
Posted by Bish on Sunday, February 15, 2015 1:43 PM

really taking shape now marc. Nice start on the paint job.

I am a Norfolk man and i glory in being so


On the bench: Airfix 1/72nd Harrier GR.3/Fujimi 1/72nd Ju 87D-3

  • Member since
    March 2010
  • From: MN
Posted by Nathan T on Sunday, February 15, 2015 2:40 PM

Nice camo Marc. The F-4 should have wider blades than the F-2. Also, does this scheme have the underside wing tips in yellow?


  • Member since
    December 2002
  • From: Bury St Edmunds, Suffolk, England
Posted by Bish on Sunday, February 15, 2015 3:05 PM

Nathan, is that when they made the switch from metal to wood blades. I was trying to find that out a while back but found nothing.

I am a Norfolk man and i glory in being so


On the bench: Airfix 1/72nd Harrier GR.3/Fujimi 1/72nd Ju 87D-3

  • Member since
    April 2005
  • From: Piscataway, NJ!
Posted by wing_nut on Sunday, February 15, 2015 3:43 PM

Thanks fells.  And Yes it does have the yellow under the tips. After my post i realized I can shoot the white 1st then mask off for the yellow nose, band and wing tips.  Not the best but saves a step anyway.

Question... I am working off the profiles from the decal sheet and it looks like its showing the underside as white too.  Would they have gone over the 76 as well?

Marc  

  • Member since
    December 2002
  • From: Bury St Edmunds, Suffolk, England
Posted by Bish on Sunday, February 15, 2015 3:46 PM

Marc, I can't be sure, but I have never come across a white wash on the underside. But when thinking about it, its probably not as strange as it sounds. Be interested to see if anyone has any info on this.

I am a Norfolk man and i glory in being so


On the bench: Airfix 1/72nd Harrier GR.3/Fujimi 1/72nd Ju 87D-3

  • Member since
    April 2005
  • From: Piscataway, NJ!
Posted by wing_nut on Sunday, February 15, 2015 6:15 PM

I've been trying to find a clear(ish) period photo but not having any luck.  i think it would be very hard to tell anyway if it was the RLM 76 or dirty white in a BW photo anyway.  Lots of builds online looks like they have white on the bottom  Not sure what route I'll take yet.  As far as =the wood pros go, I am thinking it would an F-4 would be too early for a wood prop. And I am not sure if any 109's had them.  I wouldn;t swear to it in court but I also think oi read somewhere that is was only the later 190D series/Ta 152's that had the wood prop.  I know the some late 190d had wood tail But maybe the props too.  Hopefully someone that's not guessing will jump in here.

Marc  

  • Member since
    March 2010
  • From: MN
Posted by Nathan T on Sunday, February 15, 2015 6:40 PM

No 109s had wooden props. That was Jumo powered machines mainly. The white wash probably extended all the way down the fuselage sides but most likely the wing undersides were left 76. Just speculating, so feel free to paint it how you'd like.


  • Member since
    April 2005
  • From: Piscataway, NJ!
Posted by wing_nut on Sunday, February 15, 2015 6:44 PM

Thanks Nathan.  It makes sense.

Marc  

  • Member since
    September 2003
  • From: Northern hemisphere - most of the time-
Posted by blkhwkmatt on Sunday, February 15, 2015 6:55 PM

Marc,

I have been looking through one of my reference books - Monograph's special edition: Messerschmitt Bf 109 F: The Ace Maker, and it does list the two (or three ) different props used in the F series.  For the F-1 and -2 the prop was the VDM 9-11207A, on the F-3 it was the 9-12010A, and then on the -4/Z it was the 9-12087A.  I found on page 6 of this book that the F-1 prop as listed above was" a 9 ft 10 in diameter (3m) metal propeller of constant speed design" to quote the book.

It is a great book, soft cover with details of all variants, scale drawings in all three popular scales, several wonderful color profiles (the F-4 that I am building will be one of them) as well as an excerpt from some German texts showing detail drawings, and a great page that highlights the external changes between different models.

Looking through the book, there are several pictures of winter camouflage birds, as well as one color three view profile.  In the pictures it is hard to tell for certain, but it appears that the undersides were not white, but still RLM 76 which the color profile supports as well.

Hope that this helps.

<Matt

Quidquid latine dictum sit, altum videtur!!! - Anything said in Latin sounds profound!


  • Member since
    September 2011
Posted by fightnjoe on Sunday, February 15, 2015 7:42 PM

Well folks you will pardon me if this is a bit enthusiastic of an update.

PROGRESS..............................

Warning I do believe there are things missing.  However in this scale most will never know and most of it will never fit into the space.


First up.  Detailing the engine.  I added some bits and bobs, some lines and hoses.  All in all it is about 90% complete I think.  First a shot of a trick that I picked up somewhere but had never tried.  A styrene rod overlength.  Add ordinary electrical tape.  Slice the tape into thin lines. Attach the tape to one end of the styrene and then roll the rod so the tape attaches to the rod.

...

It works.  Good god it works.

The engine detailed out.

...
...
...
...

Now to the exciting part.  Dryfit into place.  IT FITS.

...
...
...
...
...

Now folks I had to step away for a bit.  This has made me very happy.  It all lines up and all the additions I have made seem to fit.  

Now for the clean up part.  There are a few small pieces to get into place yet and a couple of things to trim to get into place.  I need to add the remaining bulkheads and the fuel cell as well as the booster tank.  I do need to mock up the pipe that sticks out the rear of the pit.  What I have there just will not work.  I can with great happiness say that the interior of the aircraft is about 80% finished.  


All comments, critiques, and criticism are encouraged.


Joe

Veterans,

Thank You For Your Sacrifices,

Never To Be Forgotten

Where you can find me:

Workbench on FaceBook  Google Plus  YouTube

  • Member since
    November 2003
  • From: Naples, FL
Posted by tempestjohnny on Sunday, February 15, 2015 8:40 PM

Joe. Absolutely spectacular


  • Member since
    November 2003
  • From: Naples, FL
Posted by tempestjohnny on Sunday, February 15, 2015 8:46 PM

Some more progress.  Finished the PE for one of my builds. Decided I had had enough for the night so was able to get fuselage and wings attached to the F-4 I'm building.


  • Member since
    September 2003
  • From: Northern hemisphere - most of the time-
Posted by blkhwkmatt on Sunday, February 15, 2015 11:15 PM
OK gents, I am calling this one complete. This is the Eduard 1/32 BF 109 E-3 in the markings of Priller from the autumn of 1940. Great kit overall, I enjoyed building this much more than the RoG 109 G-6. Here are the pictures:      Thanks for looking.

Quidquid latine dictum sit, altum videtur!!! - Anything said in Latin sounds profound!


  • Member since
    December 2002
  • From: Bury St Edmunds, Suffolk, England
Posted by Bish on Sunday, February 15, 2015 11:20 PM

Thanks Nathan. I had assumed that wider blades were always wood, nice to have that corrected.

joe, really nice work on the engine there, that really well detailed, lovely work.

Coming on nice there Johnny.

I am a Norfolk man and i glory in being so


On the bench: Airfix 1/72nd Harrier GR.3/Fujimi 1/72nd Ju 87D-3

JOIN OUR COMMUNITY!

Our community is FREE to join. To participate you must either login or register for an account.

SEARCH FORUMS
FREE NEWSLETTER
By signing up you may also receive reader surveys and occasional special offers. We do not sell, rent or trade our email lists. View our Privacy Policy.