SEARCH FINESCALE.COM

Enter keywords or a search phrase below:

2015 Messerschmitt Bf 109 Group Build

181149 views
2798 replies
1 rating 2 rating 3 rating 4 rating 5 rating
  • Member since
    January 2015
Posted by BrandonD on Friday, February 6, 2015 7:48 PM

Just a quick update on the Buchon.

I hate rudder decals, so for the cross on the tail I painted a base coat of Tamiya flat white, then masked and shot the black in two sessions. Once that was laid down, I sprayed a light coat of Future to seal it up without being too glossy.

Next, I masked the Azure underside and prepped the upper surfaces for the AlcladII gloss black base coat. The first coat went down without being glossy, and I am guessing it's because I sprayed too light of a coat, so I wet-sanded it, then shot it on heavier. That made it gorgeous and black, but revealed some marks around the starboard wing fence that needed sanding, so it was back to the bench, then another coat. That coat somehow got a hair in it and I had to sand it AGAIN. It's not too pretty now, but at least it's better than before (though I fear I've lost some of the panel line detail in one area).

Anyway, it's curing now, and I will probably shoot the polished aluminum Sunday, which will have given the base coat about 60 hours to cure on the wings, and 84 hours on the fuselage.

This is my first time working with AlcladII, and only my second model that will be entirely airbrushed. The other, my Czech Avia S-199, is giving the Buchon moral support.

-BD-

  • Member since
    April 2005
Posted by Thunderbolt379 on Friday, February 6, 2015 9:08 PM

Brandon, LOVE the tail! That came out great! I haven't a clue how to spray a high gloss finish, and metallics stopped behaving for me years back, so this is seriously virgin territory!

M/TB379

http://worldinminiature.blogspot.com/

  • Member since
    September 2011
Posted by fightnjoe on Friday, February 6, 2015 9:27 PM

Just a quick update to show......

On to the engine.

Got the major assembly done and the Gloss Black on it.  I drybrushed it and have it ready to add the detail stuff.

...
...
...
...
...


I hope to work on it some tomorrow.  I have found some good pics that show a bunch.


All comments, critiques, and criticism are encouraged.


Joe

Veterans,

Thank You For Your Sacrifices,

Never To Be Forgotten

Where you can find me:

Workbench on FaceBook  Google Plus  YouTube

  • Member since
    January 2014
  • From: Nampa, Idaho
Posted by jelliott523 on Friday, February 6, 2015 10:08 PM

So a quick update on the progress on my G-6.  I was able to get the office installed into the fuselage and get the wings mounted.  I'm now dealing with some of the seams around the engine cowling and on the wings.  So far everything is coming together, nothing that a little putty wont fix.  I'm using Vallejo acrylic putty and it is working great.  I also used some Mr. Surfacer 1000 on the fuselage seam along the top and bottom.

On the Bench:  Lots of unfinished projects!  Smile

  • Member since
    December 2002
  • From: Bury St Edmunds, Suffolk, England
Posted by Bish on Saturday, February 7, 2015 5:55 AM

BD, nice work on the tail there. Didn't realise you were doing an NMF finish on this. Be interested to see how it goes.

I am a Norfolk man and i glory in being so


On the bench: Airfix 1/72nd Harrier GR.3/Fujimi 1/72nd Ju 87D-3

  • Member since
    December 2002
  • From: Bury St Edmunds, Suffolk, England
Posted by Bish on Saturday, February 7, 2015 5:57 AM

Joe, nice work on that engine. I need to try and get mine painted this weekend.

I am a Norfolk man and i glory in being so


On the bench: Airfix 1/72nd Harrier GR.3/Fujimi 1/72nd Ju 87D-3

  • Member since
    October 2008
  • From: Georgia
Posted by Rigidrider on Saturday, February 7, 2015 6:38 AM

BD.... Very interested ( like Mike) on your progress of the NMF. I've never had a build to try on but am interested in the process.

Joe...as with other builds I've seen you do, I watch your progress with great interest. Keep up the good work!

Thanks Clemens... Again, good to see you back.

Doug

When Life Hands You A Bucket Of Lemons...

Make Lemonade!

Then Sell It Back At $2 Bucks A Glass...

  • Member since
    April 2005
  • From: Piscataway, NJ!
Posted by wing_nut on Saturday, February 7, 2015 7:12 AM

Thans for the warm wlecome guys.

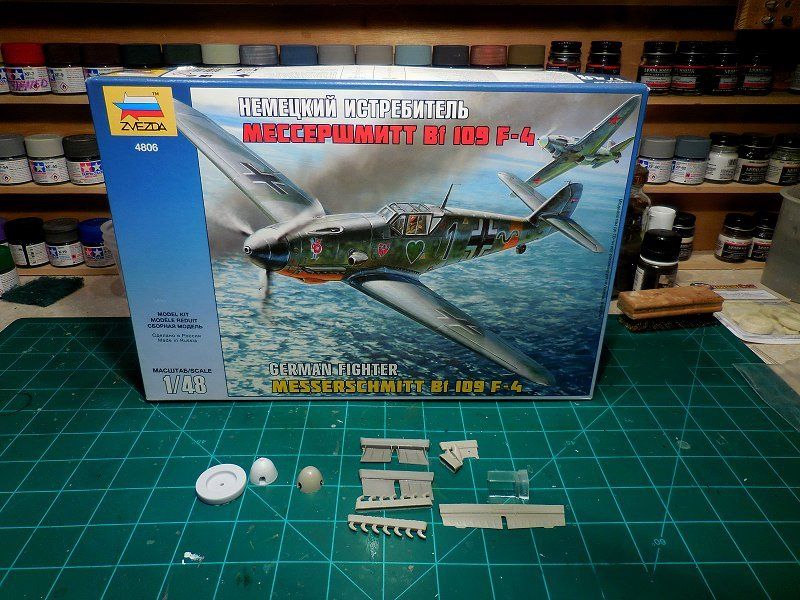
For this party I'll be using the Vector resin update set, less the spinner.  That will be the Eagle Parts spinner which comes with a drill guide base to get the holes.  
 

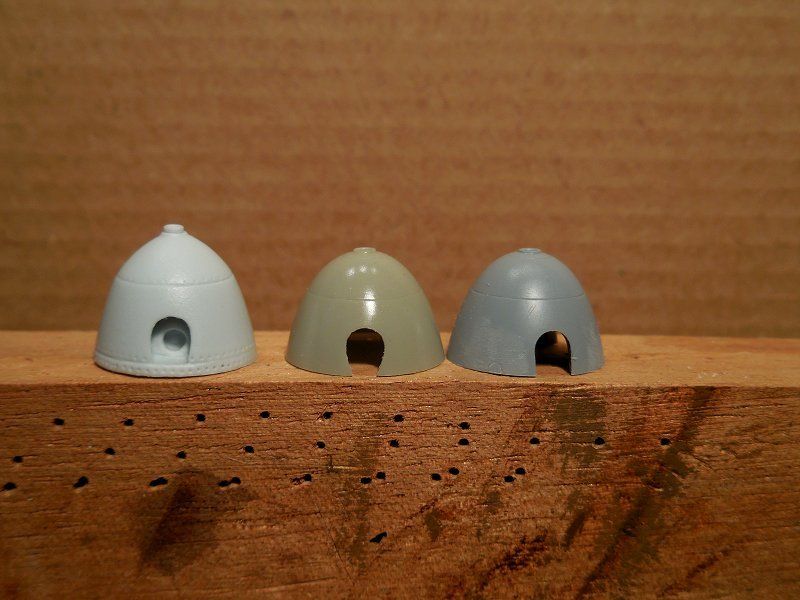
The spinners in order... Eagle Parts, Vector and the kit.  The Vector and kit parts are a bit too bulbous and neither has the rivet detail the Eagle spinner has.  I may just make the dimple a little more crisp. Also the F spinner has a tear drop shaped opening for the prop blades.  Kit part-none, Vector-a bit too much and the Eagle part are just about right.


Now I need to a desert bird or one from "Operation Barbarossa" 
 

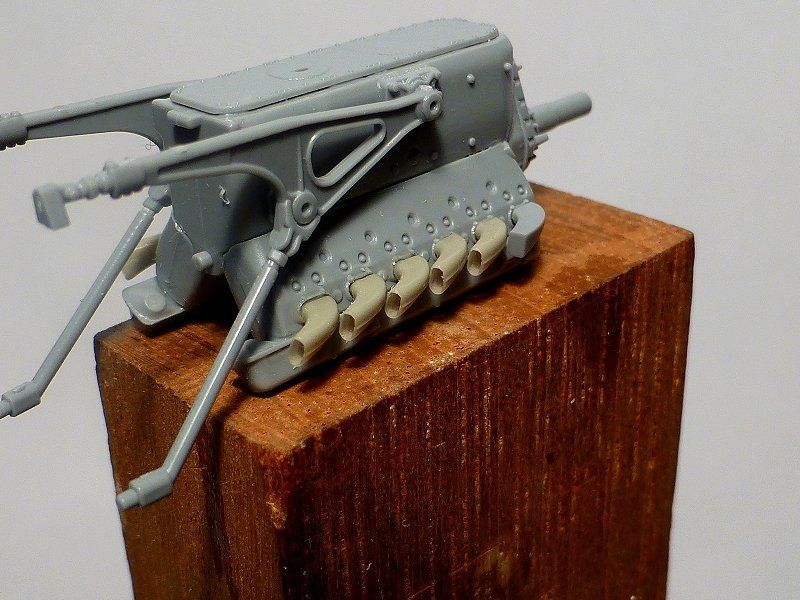
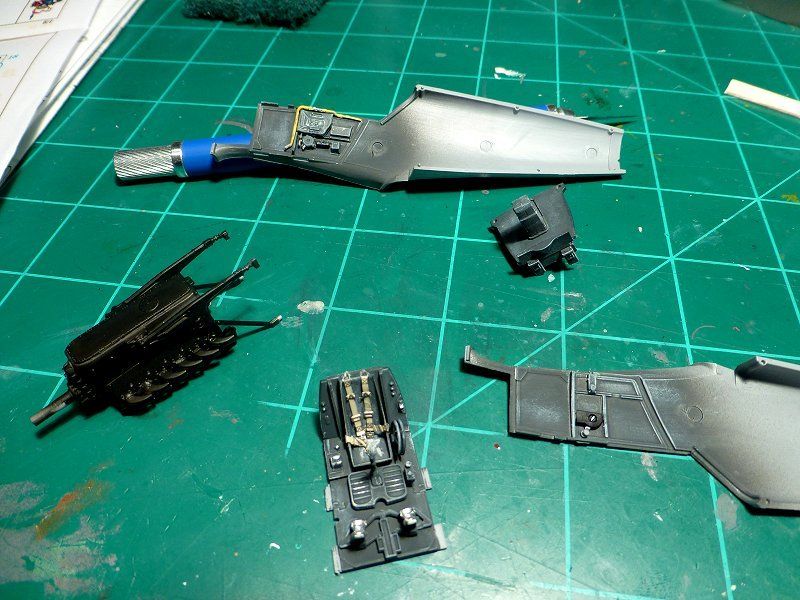
This will be closed canopy to just need to be able to see some rudimentary shapes inside.  A scrounged through the drawer that collects all the stuff that doesn't get used up and found 1 set of Luftwaffe PE seatbelts at the back of the drawer.  The engine is there for no other purpose than to hold the exhaust in the correct position.  I left one of the kit pipes in place for the pic to see the difference to the resin updated pipes.
 

Marc  

  • Member since
    November 2003
  • From: Naples, FL
Posted by tempestjohnny on Saturday, February 7, 2015 7:25 AM

Wow that exhaust is a huge improvement


  • Member since
    May 2013
  • From: Indiana, USA
Posted by Greg on Saturday, February 7, 2015 7:43 AM

I'd never seen resin exhaust pipes before. Those are really cool!

  • Member since
    December 2002
  • From: Bury St Edmunds, Suffolk, England
Posted by Bish on Saturday, February 7, 2015 8:44 AM

Nice start there Marc. Be a shame to cover up that engine though.

Greg, there is not much you can't get in resin there's days.

I am a Norfolk man and i glory in being so


On the bench: Airfix 1/72nd Harrier GR.3/Fujimi 1/72nd Ju 87D-3

  • Member since
    September 2013
Posted by Raven728 on Saturday, February 7, 2015 8:56 AM

Wow, I think that's three of us building that Zvezda F-4 kit. Marc, do you have any idea at this point if it's possible to put the engine in but put the cowling panels on as normal? Ideally I'd like to build the engine and have removable panels, but that seems like a long shot.

- Steve

  • Member since
    June 2014
Posted by BrandonK on Saturday, February 7, 2015 11:12 AM

Raven728

Wow, I think that's three of us building that Zvezda F-4 kit. Marc, do you have any idea at this point if it's possible to put the engine in but put the cowling panels on as normal? Ideally I'd like to build the engine and have removable panels, but that seems like a long shot.

I think you can do what you desire here. The kit has two sets of engine panels, one set for open, one for closed. The open set are detailed on the inside as well and I believe you have to have the engine to assemble the front end anyway. I think what you want is totally doable on this kit with very little effort.

On the bench:

A lot !! And I mean A LOT!!

2024 Kits on deck / in process / completed   

                         14 / 5 / 2  

                              Tongue Tied

  • Member since
    April 2005
  • From: Piscataway, NJ!
Posted by wing_nut on Saturday, February 7, 2015 2:59 PM

I think Brandon is correct.  I'll hack away at the engine to make the cowls fit since as I said, i only care about the look of the exhaust pipes.

I went through my collection of decal sheet and found 5 Bf109-F4's.  I Like 'em all, have a couple favorites but I' put the final; decision to  you guys.  Cast your vote for which scheme I should use to finish the build. I'll tally them from here and other forums where this will be posted.  

Yellow 6


7.JG.54 Winter '41 Operation Barbarossa.   White washed but weathered with worn white and yellow.


*****************************


Black 1


15.JG.51, Spanish Blue Sq., Russia summer '42


*****************************

Brown 13


1.JG 54 Grunherz, Russia winter '42


*****************************


V - 03


Hungarian Air Force, Eastern Front, Flown by Gyorgy Debrody.


*****************************


Black 8


Unusual desert scheme devised by JG3 in North Africa.


Marc  

  • Member since
    June 2014
Posted by BrandonK on Saturday, February 7, 2015 3:31 PM

Black 8 just to be different.

On the bench:

A lot !! And I mean A LOT!!

2024 Kits on deck / in process / completed   

                         14 / 5 / 2  

                              Tongue Tied

  • Member since
    November 2003
  • From: Naples, FL
Posted by tempestjohnny on Saturday, February 7, 2015 3:42 PM

Marc black 8 or the Hungarian AF


  • Member since
    December 2002
  • From: Bury St Edmunds, Suffolk, England
Posted by Bish on Saturday, February 7, 2015 5:32 PM

Toss up between Yellow 6 and Black 8. The latter is different, but yellow 6 just edges it for me.

I am a Norfolk man and i glory in being so


On the bench: Airfix 1/72nd Harrier GR.3/Fujimi 1/72nd Ju 87D-3

  • Member since
    September 2011
Posted by fightnjoe on Saturday, February 7, 2015 7:27 PM

Bish many thanks.

Doug much appreciated.  

Looks good Marc.  

Joe

Veterans,

Thank You For Your Sacrifices,

Never To Be Forgotten

Where you can find me:

Workbench on FaceBook  Google Plus  YouTube

  • Member since
    April 2014
Posted by IamRaider on Saturday, February 7, 2015 8:18 PM

Before I post pics I'd like to say that the builds so far are fantastic! And then there is mine Whistling

Just a preface: I've recently returned to the hobby after 25+ years. I've gotten back into it despite my limited physical abilities; post leaving the hobby (which explains my slow building style). I've only done armor and a couple American planes. So this is my first 109.  Forgive any no-no's I make to the pureists. I try to get close as I can to reality, but won't bend over backwards to get something perfect. I build for relaxation and to keep my cursing skills exercised. Smile

Here's my old kit

And the dash and seat

  • Member since
    March 2010
  • From: MN
Posted by Nathan T on Saturday, February 7, 2015 8:42 PM

wing_nut

Thans for the warm wlecome guys.

For this party I'll be using the Vector resin update set, less the spinner.  That will be the Eagle Parts spinner which comes with a drill guide base to get the holes.  


The spinners in order... Eagle Parts, Vector and the kit.  The Vector and kit parts are a bit too bulbous and neither has the rivet detail the Eagle spinner has.  I may just make the dimple a little more crisp. Also the F spinner has a tear drop shaped opening for the prop blades.  Kit part-none, Vector-a bit too much and the Eagle part are just about right.


Now I need to a desert bird or one from "Operation Barbarossa" 


This will be closed canopy to just need to be able to see some rudimentary shapes inside.  A scrounged through the drawer that collects all the stuff that doesn't get used up and found 1 set of Luftwaffe PE seatbelts at the back of the drawer.  The engine is there for no other purpose than to hold the exhaust in the correct position.  I left one of the kit pipes in place for the pic to see the difference to the resin updated pipes.


Nice choice in resin Marc. Especially with the Eagle Parts spinner. Just remember to sand down the cannon tip so its appropriate to the F-4's 20mm barrel. As far as a scheme, I'd say Hungarian, I like the cool Puma badge on the cowl, and the oversprayed Gelb:


  • Member since
    April 2005
  • From: Piscataway, NJ!
Posted by wing_nut on Saturday, February 7, 2015 9:05 PM

Iam nice build you got going

Nathan, Eagle Parts says they leave it long since there were some different lengths.  i am not gonna argue but all I remember is the the look on the photos you posted.  Great photos too.  Really show that shape of the spinner.  I like the lower part of the LG door removed fr operations in snow.  A cool detail rarely modeled.

Marc  

  • Member since
    March 2010
  • From: MN
Posted by Nathan T on Saturday, February 7, 2015 10:56 PM

Don't sand it completely off, just a bit to match the photos like you said. I believe they leave it long to represent the 30mm Mk. 108 Cannon that some K-4s and G-10s had?? I know you got it figured out! Great cockpit work to btw.


  • Member since
    January 2015
Posted by BrandonD on Sunday, February 8, 2015 1:16 AM

Well I was going to wait till tomorrow to spray the AlcladII polished aluminum, but I got antsy and did it tonight.

I knew the starboard wing was going to look terrible, given the amount of sanding I had to do to right my own carelessness. I knew surface prep is critical with AlcladII, and yes, yes it is haha.

There were spots where I could see imperfections as soon as paint came out of airbrush, but fortunately most of them blended fine. Still, I'd planned on doing a slightly lighter coat for more sheen, but then again, this plane is one from 1965, not long before they were retired from service by the Spaniards, so a duller look is probably more accurate anyhow.

In any case, I have to remind myself that I bought this partly to practice an NMF finish before doing my P-51D. And I think I definitely got the practice I needed, and I'm now looking forward to the P-51 with only a little trepidation.

Here she is:

Next up is waiting a while and then decaling. I am going to weather it with Flory washes, so I will pick up an AlcaldII clear tomorrow and use that to seal up the decals before the wash, but I don't think I'll spray any finish after the wash just so I don't mess with the color too much.

-BD-

  • Member since
    April 2005
Posted by Thunderbolt379 on Sunday, February 8, 2015 6:06 AM

Brandon, that Alclad looks fantastic! I envy such a finish!

M/TB379

http://worldinminiature.blogspot.com/

  • Member since
    March 2012
  • From: Corpus Christi, Tx
Posted by mustang1989 on Sunday, February 8, 2015 7:22 AM

Marc(wingnutt): It's great to see you in here buddy! Those Zvezda kits are nothing short of amazing looking in the box. I had one but opted for the Eduard  G series build(despite what all the cynics are saying about it). Looking forward to your progress and again it's great to see you around these parts!Wink

Brandon: That finish! Wow! I hope mine comes out half that good!Yes

fightnjoe: That metallic look on that engine is phenomenal! Makes me want to go tear mine all apart and re-do it!! lolIndifferent

Clemens: Now that's a catch up post!! 


 Forum | Modelers Social Club Forum (proboards.com) 

  • Member since
    December 2002
  • From: Bury St Edmunds, Suffolk, England
Posted by Bish on Sunday, February 8, 2015 7:57 AM

Looks good there Brandon. Mush better than my previous attempts with Alclad.

I am a Norfolk man and i glory in being so


On the bench: Airfix 1/72nd Harrier GR.3/Fujimi 1/72nd Ju 87D-3

  • Member since
    January 2014
  • From: Nampa, Idaho
Posted by jelliott523 on Sunday, February 8, 2015 8:24 AM

Look what came in the mail on Friday, thanks SS for the link!

On the Bench:  Lots of unfinished projects!  Smile

  • Member since
    March 2012
  • From: Corpus Christi, Tx
Posted by mustang1989 on Sunday, February 8, 2015 8:57 AM

tempestjohnny and jelliott: Those mugs look great!!! They sure make a nice addition to the household that's for sure! Big Smile


 Forum | Modelers Social Club Forum (proboards.com) 

  • Member since
    January 2014
  • From: Nampa, Idaho
Posted by jelliott523 on Sunday, February 8, 2015 9:04 AM

You are absolutely correct Mustang!  I have been getting quite a few lookers here at the office.  They are amazed that a group of guys that "play with toys" (as they put it), actually have logo items like the mugs.

Its hard to explain to non-modelers.  Wink

On the Bench:  Lots of unfinished projects!  Smile

  • Member since
    December 2002
  • From: Bury St Edmunds, Suffolk, England
Posted by Bish on Sunday, February 8, 2015 9:28 AM

I was looking at those jelliott, wish I had got one now. I was thinking of taking a mug in for work, I might have to get one of these for that.

I am a Norfolk man and i glory in being so


On the bench: Airfix 1/72nd Harrier GR.3/Fujimi 1/72nd Ju 87D-3

JOIN OUR COMMUNITY!

Our community is FREE to join. To participate you must either login or register for an account.

SEARCH FORUMS
FREE NEWSLETTER
By signing up you may also receive reader surveys and occasional special offers. We do not sell, rent or trade our email lists. View our Privacy Policy.