SEARCH FINESCALE.COM

Enter keywords or a search phrase below:

1/48 Armor GB (Non Aircraft)

29190 views
276 replies
1 rating 2 rating 3 rating 4 rating 5 rating
  • Member since
    April 2005
  • From: Australia
Posted by taxtp on Wednesday, June 24, 2009 2:41 AM

Hi Waikong,

I'll try to post some photos of the Sturmtiger tonight, as long as you don't make me finish it by the 30th !!!

I had a Verlinden V100 arrive in the post last night, as well as their Kugelblitz conversion. Can't say that I'm super impressed with either.

Of course, today I discovered that CMK also do a Kugelblitz conversion.

I'd love to get the V100 on the bench, looks like a lot of work, but a Vietnam era V100 is really interesting to me.

Cheers

Tony

I'm just taking it one GB at a time.

  • Member since
    December 2002
  • From: NYC, USA
Posted by waikong on Monday, June 22, 2009 8:38 AM

Darren, this is the 2nd 1/48 GB and there's already interest in the next one. So looks like its getting to be an annual thing - most likely starting the late Fall. Would love to see your work in the next one.

Tony, be great to see some of pictures of the Sturmtiger. I just got that kit a few weeks back, but probally can't get to work on it until the Fall (next GB?).

  • Member since
    April 2005
  • From: Australia
Posted by taxtp on Monday, June 22, 2009 8:05 AM

Thanks for the heads up Darren. Black Dog have a couple of interesting sets for the 250/3 kit, that I wasn't aware of. One is a 252 conversion, which is very interesting and I think I want one, but it's not for this build. The other is the stowage set. I'd probably get one if I hadn't gone down the road of trying to build a reasonably authentic model of Rommel's 'Greif'. I don't think it's been designed with 'Greif' in mind. A lot of the stowage that hangs from the side is designed to hang over the mounting points for the antenna. The rolled up tarp is a lot bigger than the one on many of the photos of 'Greif'. The spare links at the front are laid out differently etc etc.

Once again it's a nice set, and if I get to another 250, I'll definitely look at it. Their other stuff looks ace too.

Cheers

Tony

I'm just taking it one GB at a time.

  • Member since
    February 2003
  • From: Melbourne, Australia
Posted by darson on Monday, June 22, 2009 1:58 AM

Tony have you checked out the stowage available from Black Dog for the 250/3 it's really nice gear and would look great on your kit.

Waikong it looks like I have well and truly missed the boat for this build but next time around count me in for sure.

Cheers

  • Member since
    April 2005
  • From: Australia
Posted by taxtp on Sunday, June 21, 2009 8:35 PM

Thanks Waikong, I might have a play with the miliput as well. I agree with the texture issue for a tarp, however yours does look good.

I'm not actually going to do the figures yet. I'll just position them temporarily inside so that I can work out where I can fit in some stowage, that is logical for this vehicle. I think around behind the radio set is probably the best option, with maybe some bags hanginmg from the antenna masts.

I've finished construction, other than the wheels and tracks, which I want to paint seperately. I should be able to post another pic tonight.

I've also been working on the AFV Club Sturmtiger in  the background. the problem i have is that you can see right down the 38cm mortar into the tank itself. I'm not sure where it should be blanked off, immediately behind the 'barrel', or does it extend further back inside the vehicle ?

Regards

Tony

I'm just taking it one GB at a time.

  • Member since
    December 2002
  • From: NYC, USA
Posted by waikong on Saturday, June 20, 2009 9:30 PM

I see, didn't know you were planning to put some figures in there. Like you said, that will fill up the space nicely.  

As for tarp, I've used the wet facial tissue method. Just wet the tissue and then shape it how you want it and let dry.  I've also recently bought some milliput, I've been meaning to try rolling that out to a thin sheet and drapping that. I think the 2nd one may be better for a tarp as it will give a smoother finish.

 Here's a sample of the tissue method used for an ID flag in the midst of a build, as you can see it adds perhaps more texture than you want for a tarp.

  • Member since
    April 2005
  • From: Australia
Posted by taxtp on Saturday, June 20, 2009 3:29 AM
 waikong wrote:

Tony, glad to see your Greif coming along nicely. All that open space though, its crying out for some stowage?

Hi Waikong,

That's a good point you make, and one that I've been contemplating for a while. When you put the top deck on, there is not that much room, and there are a few photos around of Rommel and two or three other blokes standing in it. If I add much stowage, they'll be standing amongst it or stepping over it. I think I'll actually stand a few figures in it to see what can be stowed in a General's transport, without being too inconvenient.I'll certainly hang some stuff outside though, there are photos of this machine with that. Depending on space, I might try a couple of water cans and some bags inside. I saw one photo with a tarp over the radio antenna, that is tempting. Any thoughts about how to make a scale tarp ?

Cheers

Tony

I'm just taking it one GB at a time.

  • Member since
    December 2002
  • From: NYC, USA
Posted by waikong on Friday, June 19, 2009 9:42 AM

Tony, glad to see your Greif coming along nicely. All that open space though, its crying out for some stowage?

  • Member since
    April 2005
  • From: Australia
Posted by taxtp on Friday, June 19, 2009 8:33 AM

Don't make me answer that question...

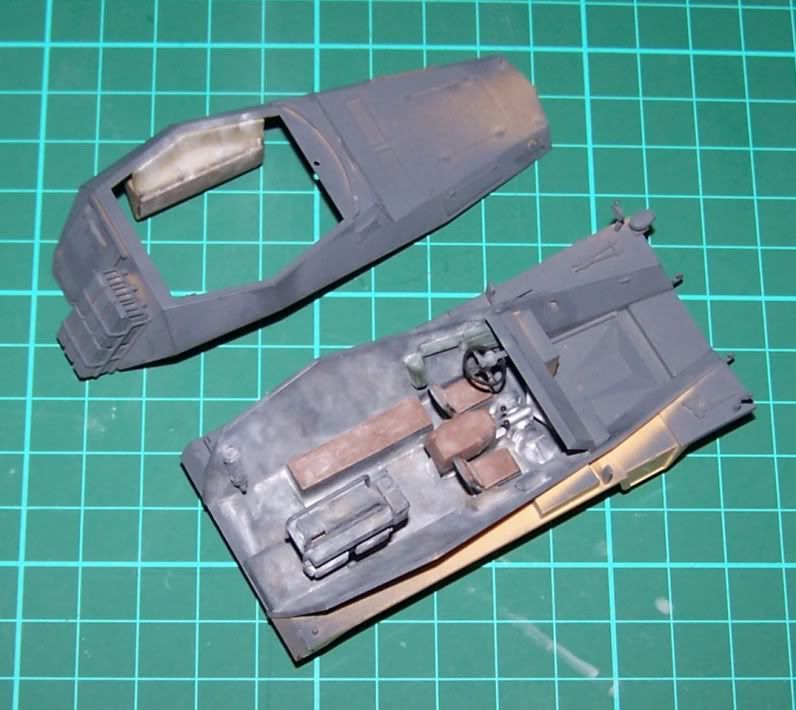
Seriously,though, here is a bit more of my 250/3. Greif was an early 250/3, the interior was grey. I've mixed up some powdered chalk pastels to try and replicate the colour of North African desert sand, based on a colour photo I've been given. Unfortunately the flash photography has whitened and emphasised it somewhat. Maybe a natural light photo will show it better.

Anyway, the interior is all but complete, with the exception of the rifle rack. The oils I've used on the rifle butts is still not quite dry, so that wil have to go in later. I'm going to stick the top half of the body on now, then continue tomorrow.

Ignore the exterior, it's nowhere near it.

I think there is a fairly good chance of making the 30 June target date for this one.

Cheers

Tony


I'm just taking it one GB at a time.

  • Member since
    December 2002
  • From: NYC, USA
Posted by waikong on Wednesday, June 17, 2009 8:05 AM

Scott, what's more important? Your 10th anniversary or building models? You better get your priority straight! 

But seriously, this is suppose to be fun, please take your time and build it the way you want and show us pictures.  When the last builds are done, I'll post all the finished pictures in the Armor section for comments and drum up some interest for the next round.

Happy Anniversary!

  • Member since
    August 2006
  • From: Amherst, MA
Posted by M1 A1 A2 Tanker on Wednesday, June 17, 2009 3:41 AM

I still would like to try to finish my SU-122 for this GB. So are we calling it quites or do I have till June 30th? (Which is also my 10th wedding anniversary.)


Thanks

Scott


“Computers are like Old Testament gods; lots of rules and no mercy.”  ~ Joseph Campbell


  • Member since
    September 2007
  • From: Relocating
Posted by Mobious on Wednesday, June 3, 2009 9:33 PM
  Looking forward to seeing another 1/48 GB in the Fall, Count me in!

"It's a problem of applied physics" Roy Brown

  • Member since
    March 2006
Posted by TD4438 on Wednesday, June 3, 2009 3:17 PM
I'd like to take a crack at the Tamiya M26 Persshing.A nice resin stowage kit is available for it I believe.

  • Member since
    March 2003
  • From: Western North Carolina
Posted by Tojo72 on Wednesday, June 3, 2009 3:08 PM
 waikong wrote:

Agreed, I was really looking forward to the Hessian tapes. Well, if any of the other members read this, I think this GB can go on as long as you guys want. Just show us some pics when you are done. 

Perhaps if this GB goes dormant after Tony submits his Greif, we can start another one up in the fall, after people had the summer 'off'. Like you, I've not got almost a dozen 1/48 armor kits in my stask waiting to be built.

Sounds good,I got the Marder in my stash.

  • Member since
    December 2002
  • From: NYC, USA
Posted by waikong on Wednesday, June 3, 2009 10:17 AM

Agreed, I was really looking forward to the Hessian tapes. Well, if any of the other members read this, I think this GB can go on as long as you guys want. Just show us some pics when you are done. 

Perhaps if this GB goes dormant after Tony submits his Greif, we can start another one up in the fall, after people had the summer 'off'. Like you, I've not got almost a dozen 1/48 armor kits in my stask waiting to be built.

  • Member since
    November 2006
  • From: Coastal Maine
Posted by dupes on Wednesday, June 3, 2009 9:57 AM
Bummer about all of the other entries...I wonder what happened? Hopefully we can get something 1/48-oriented going again sometime soon - I've got a bunch more in the stash that could use some motivation to get done. Wink [;)]
  • Member since
    December 2002
  • From: NYC, USA
Posted by waikong on Wednesday, June 3, 2009 9:13 AM

Tony, did you see the little zimmert tool that's in the Sturmtiger kit? Hope it's sturdy enough that I can keep it to use on future kits.

As for Greif, I think you maybe the last kit submitted for the GB (the other unfinished kits seems to have dropped off), so hey, this GB is finished when you are finished!  I don't think I can finish anykit in 4 weeks! Looking forward to see your progress.

  • Member since
    April 2005
  • From: Australia
Posted by taxtp on Wednesday, June 3, 2009 8:44 AM

Hi Everyone,

I've started my next build for this GB, Rommel's Sd Kfz 250/3 'Greif'. Whilst I've started painting according to the kit instructions, I've now received information that they're incorrect, so I'll start the paint job again. I'll need to hussle, I hope to finish in the month of June in time for the deadline for this GB.

Cheers

Tony

I'm just taking it one GB at a time.

  • Member since
    November 2006
  • From: Coastal Maine
Posted by dupes on Tuesday, June 2, 2009 8:14 AM
Got a chance to peruse the front page - that's quite a lineup! Lots of good stuff in there...hopefully we can get a few of the other entrants to finish up before the end of the build. Thumbs Up [tup]Thumbs Up [tup]
  • Member since
    April 2005
  • From: Australia
Posted by taxtp on Monday, June 1, 2009 4:31 PM

Thanks guys. I didn't mention that I'd made a start on my Sturmtiger, couldn't resist. There's a nice scheme for one in one of the early editions of AFV Modeler.

I've never done zimmerit with putty before, but it looks like it's time to try. I'm a little keen to replace the rubber band tracks, does anyone know if the  Tiger I late or early set is more appropriate ?

Get on with your 251, the Tamiya Ausf D is due in July.

Cheers

Tony

I'm just taking it one GB at a time.

  • Member since
    November 2006
  • From: Coastal Maine
Posted by dupes on Monday, June 1, 2009 11:42 AM

Tony - your StuG looks GREAT! The extra time definitely paid off (as well as the additional stowage!).

Anthony - thanks man! Big Smile [:D]

Waikong - I didn't realize anyone had come out with a Sturmtiger - hoping you do move it to the top of the stack! Would love to see that guy built. Thumbs Up [tup]

  • Member since
    December 2002
  • From: NYC, USA
Posted by waikong on Monday, June 1, 2009 9:19 AM

Tony, excellent finish on the Stug.  The stowage really came out well and gave it a distinct 'personality'. The subtle weathering on the schurzen's also is really well done - I've trying to improve my skills exactly on that type of 'vertical' weaterhing myself. I've posted your picture on the first page.

Hope you post pictures of your Greif, love to see them. I just got my AFV Club 251 and the brand new Sturmtiger in the mailbox last week - that may jump to the top of my pile.

Dupes, I realized I had forgotten to post your Hezter up front - I've corrected that, my apologies.

Looks like almost everyone is in with this GB - I would still love to see the Hessian tape painted up though.

  • Member since
    March 2003
  • From: Western North Carolina
Posted by Tojo72 on Sunday, May 31, 2009 8:28 AM
Have not checked back in awhile.......nice Hetzer Dupes,the camo is outstanding.Taxtp great Stug...nice weathering

  • Member since
    April 2005
  • From: Australia
Posted by taxtp on Sunday, May 31, 2009 7:50 AM

Hi All,

Here are some photos of the Stug III Ausf G. I've added some stowage, and changed around some of what Tamiya give you. It's taken a lot longer than I anticipated.

Cheers

Tony


I'm just taking it one GB at a time.

  • Member since
    April 2005
  • From: Australia
Posted by taxtp on Sunday, May 31, 2009 1:57 AM

Finally I've finished my Stug III. I'll try to post some photos later today. Next up is the Sd Kfz 250/3 'Greif'. I wouldn't mind a new armor GB to get me going on another though.

Cheers

Tony

I'm just taking it one GB at a time.

  • Member since
    November 2006
  • From: Coastal Maine
Posted by dupes on Wednesday, May 20, 2009 12:27 PM
Sweet! Thanks for the info, man. Hopefully get a chance to play around with some non-macro settings this week. Thumbs Up [tup]Thumbs Up [tup]
  • Member since
    December 2002
  • From: NYC, USA
Posted by waikong on Wednesday, May 20, 2009 12:16 PM

I usually don't use the macro setting. The macro setting basically allows you to get stuff realy close to the lense to focus - depending on the camera, it can be only 1 inch or so. Normally, the closest a 'regular' camera will focus (the 'minimum focal length') is around 12-18" inches. The macro settings changes that. BUT, the setting also changes the camera's aperture to a really shallow depth of field. The assumption is that you are photographing something really small and you don't want the background.

The problem with photographing the whole model with macro is that now the rest of the model gets out of focus.  There's a bunch of way to solve this, but the easiest and cheapest I've found is the just step back and crop, assuming you have enough megapixels to spare. I use a 5 Meg camera, and don't have a problem with this technique.

  • Member since
    November 2006
  • From: Coastal Maine
Posted by dupes on Wednesday, May 20, 2009 11:52 AM

I think you did mention the camo. Hehe. Wink [;)]

Thanks for the camera info - I've been trying to figure out why (despite the "macro" setting) I'm not getting a correct focus all around. Mine is getting a bit aged, but I think I have enough MPs to do what you're suggesting. Will most definitely give it a shot!

Do you use a "macro" setting at all? Or just regular settings pulled back a bit, then cropped?

  • Member since
    December 2002
  • From: NYC, USA
Posted by waikong on Wednesday, May 20, 2009 10:38 AM

Nice to see it finished! The camo really came out nice - the only thing I would suggest would be perhaps vary the shades of the mud/dirt a bit. Not that it's unreaslistic currently, but it would perhaps be more 'interesting'. 

I do have a comment about the photos, their depth of field is a bit short, half the picture is not focused in. If  you using a regular 'auto' everything camera, may I suggest not getting in so close, this will allow the camera to get everything in focus. Just the comptuer to crop out the excess background - with todays mega-pixels camera, you should still get all the details intact.

Thanks for sharing your work with this GB! It was quite a treat to see your camo progess shots. Did I mention I liked the camo ?Smile [:)]

JOIN OUR COMMUNITY!

Our community is FREE to join. To participate you must either login or register for an account.

SEARCH FORUMS
FREE NEWSLETTER
By signing up you may also receive reader surveys and occasional special offers. We do not sell, rent or trade our email lists. View our Privacy Policy.