SEARCH FINESCALE.COM

Enter keywords or a search phrase below:

1/48 Armor GB (Non Aircraft)

29190 views
276 replies
1 rating 2 rating 3 rating 4 rating 5 rating
  • Member since
    November 2006
  • From: Coastal Maine
Posted by dupes on Saturday, April 4, 2009 11:30 AM
That IS flying together! Looking really good, Mikael. Thumbs Up [tup]Thumbs Up [tup]
  • Member since
    March 2006
Posted by TD4438 on Saturday, April 4, 2009 7:42 AM
 mg.mikael wrote:

The decals are on and sealed. Put it in service with the Queens Royal regiment, 7th Armored Division, Northwest Europe. There are four decal options, (the decals are all top-quality with a decal for the water can even included.) As for the the rest of the build, I scratched the foot pedals in the drivers section, since their were none. Plus, I'm gonna scratch a map in 1/48 to make the vehicle looked "lived in." Tommorow I have to do the weathering and install the guns, and after that I'll be done.Cool [8D]


I never found this particular vehicle to be very exciting,but you turned it into a real winner.I enjoyed watching your progress on this build very much.

  • Member since
    December 2002
  • From: NYC, USA
Posted by waikong on Friday, April 3, 2009 11:53 PM
looking really nice, I like the subtle weathering on the canisters so far. I've been real behind ketting my Schwimwaggen going, been too busy getting ready to go to NJIMPS's Mosquitocon tomorrow.
  • Member since
    December 2007
  • From: Bridgeview, Illinois
Posted by mg.mikael on Friday, April 3, 2009 10:23 PM

The decals are on and sealed. Put it in service with the Queens Royal regiment, 7th Armored Division, Northwest Europe. There are four decal options, (the decals are all top-quality with a decal for the water can even included.) As for the the rest of the build, I scratched the foot pedals in the drivers section, since their were none. Plus, I'm gonna scratch a map in 1/48 to make the vehicle looked "lived in." Tommorow I have to do the weathering and install the guns, and after that I'll be done.Cool [8D]


"A good plan executed now is better than a perfect plan next week." - George S. Patton

  Photobucket 

  • Member since
    December 2007
  • From: Bridgeview, Illinois
Posted by mg.mikael on Sunday, March 29, 2009 6:51 PM

I've been on a roll with construction this weekend. Frontal armor is pretty much done, with all the lights on. The dials have been painted in the driver's area and the steering wheel is attached. I also started the weathering process inside the Bren by giving everthing a grime wash(that's why it somethings may look a bit white.) The main headlight however was a nightmare, I had it glued on and painted but it looked terribly unrealistic.Evil [}:)] So I decided to go the extra mile, drill it out, and fill it with Testors Clear Parts Cement & Window Maker for the lens. After that I felt like adding more detail, so I started the wiring for the lights with copper wire(which can be seen below.) Oh, and the guns have all been finished with a slight iron powder wash to bring out the detail.Big Smile [:D] All in all not a bad weekend, hopefully I can get the decals on tommorrow. All questions and comments welcome!Smile [:)]


"A good plan executed now is better than a perfect plan next week." - George S. Patton

  Photobucket 

  • Member since
    December 2007
  • From: Bridgeview, Illinois
Posted by mg.mikael on Wednesday, March 25, 2009 3:48 PM
 waikong wrote:

Those weapons came out very nice.  My kids were standing behind me when I read your post and they started to name the guns. I think they have been playing Call of Duty too much...Wink [;)]

Thanks for lookin' waikong and waikong's kids.Cool [8D]

Oh by the way, PM inbound.

"A good plan executed now is better than a perfect plan next week." - George S. Patton

  Photobucket 

  • Member since
    December 2002
  • From: NYC, USA
Posted by waikong on Wednesday, March 25, 2009 11:39 AM

Those weapons came out very nice.  My kids were standing behind me when I read your post and they started to name the guns. I think they have been playing Call of Duty too much...Wink [;)]

  • Member since
    December 2007
  • From: Bridgeview, Illinois
Posted by mg.mikael on Tuesday, March 24, 2009 6:59 PM

Thanks for the comments waikong!

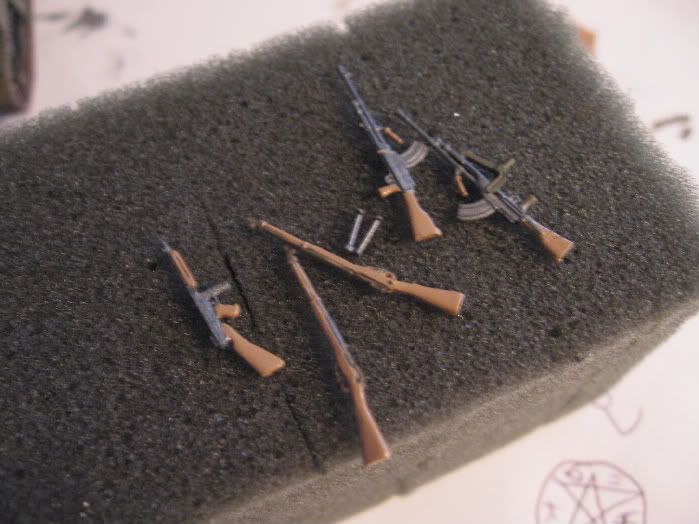
Those pics I last posted came out sorta blurry, and they didn't really show much of the other parts I'm workin' on for this kit. So here's some more pics of my progress. This one below shows all the guns(with their basecoat), I had a bit of bad luck with the main Bren gun, I broke the barrel.Shock [:O] Luckily I slavaged it and repaired it. Whew.

Here's the kit's mirror(Tamiya includes no reflective surface for the piece...Thumbs Down [tdn]), so I ended up going to my spares box and found a mirror piece from a Dragon Sdkfz. kit.

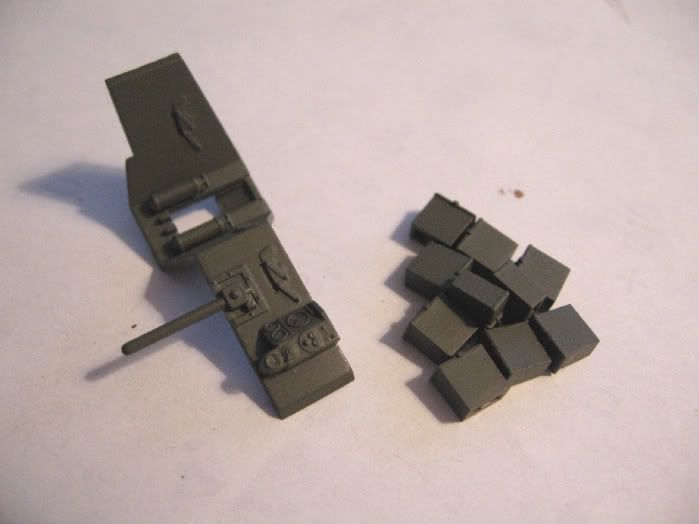
All the ammo boxes..........base coat on, but I'm gonna give them more of a scratched up finish before they go in. Oh, and the main front control console of the Bren carrier, still have to paint the dials and etc.

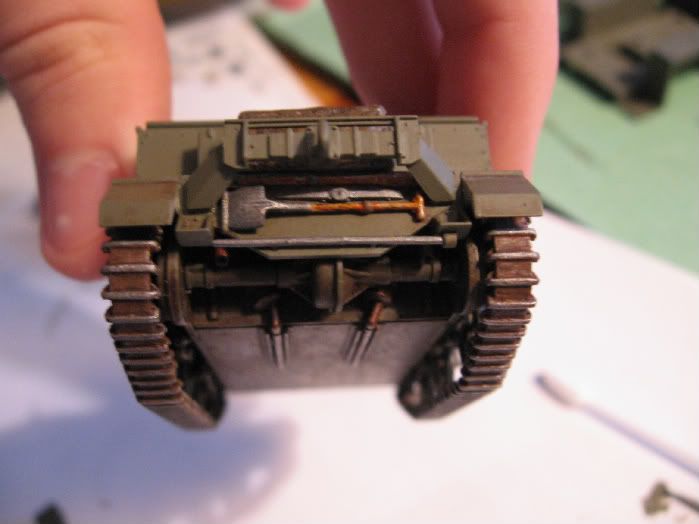
Finally a pic of the back of the carrier, where the tools are. Took longer then I hoped, since some of the tools are already on the carrier, so it takes a ridiculous amount of time to mask correcty.(Yes, that's my other current build, the M-3 scout car in the back)


"A good plan executed now is better than a perfect plan next week." - George S. Patton

  Photobucket 

  • Member since
    December 2002
  • From: NYC, USA
Posted by waikong on Tuesday, March 24, 2009 3:40 PM
The stowage came out looking very nice, I especially like the storage bag.
  • Member since
    December 2007
  • From: Bridgeview, Illinois
Posted by mg.mikael on Sunday, March 22, 2009 7:59 PM

So far so good, progress has been moving along quite nicely. The guns are painted, but not yet weathered or attached, so no pic of them. But the rear of the Bren is pretty much done, shovels and tools attached.(I'll try to get a pic of that up soon). The tarp and storage bag are done though. After glueing on some tissue for more texture, they were painted a mixture of enamel olive drab and tan. Then weathered with iron powder, the tarp was fiished with some scratch straps. Oh, and the radio was finally put in the carrier.

"A good plan executed now is better than a perfect plan next week." - George S. Patton

  Photobucket 

  • Member since
    September 2007
  • From: Relocating
Posted by Mobious on Saturday, March 21, 2009 1:25 PM

 TD4438, Waikong, Thanks for the positive comments. They are greatly appreciated. IMO this is a great GB with alot of potential. Looking forward to seeing updates from all. Thanks again for the comments and letting me join in. I had alot of fun.Big Smile [:D]

 Mo 

"It's a problem of applied physics" Roy Brown

  • Member since
    December 2002
  • From: NYC, USA
Posted by waikong on Saturday, March 21, 2009 11:39 AM
Looks great, I like how its finished - used but not abused.
  • Member since
    March 2006
Posted by TD4438 on Saturday, March 21, 2009 8:29 AM
Fantastic job Mobius.

  • Member since
    September 2007
  • From: Relocating
Posted by Mobious on Saturday, March 21, 2009 4:25 AM

 Hey Mike, I built aircraft for my son when I first came back to this hobby after years of being idle, after building 4 or 5 aircraft my first armor piece was the 1/35 DML Tiger I. I changed it around a bit to a Tiger from sPzAbt 501. I've built several Tigers between then and now.

 Hey Waikong, The Quarter Schwimmer would be great to see. And an engine detailed to boot! Can't wait to see it.

 I think I've got this one wrapped up except for figgies and a base. I had planned on displaying this one with a Me109 that hasn't been built yet. The base will have to wait, but the figures are primed and just about ready for paint. I added wing nuts to the windshield, wiring to the headlights, and a nasty looking polyester thread that is intended to be a fuzzy wuzzy tow rope. I normally use twisted copper wire for tow cable in 1/35, but it's way to big. Thread was all I had on hand. Anyway here is a walk around of the Quarter Kubel...

 I have to thank the guys at Tamiya for producing a great kit that IMO is a blast to build, with loads of potential. It builds up into a nice replica of one of my all time favorite war machines, the Dune Buggy! Now, if I can only find a 1/48 VW Micro Bus with Hippy Figgies. Peace everyone.

Mobious


"It's a problem of applied physics" Roy Brown

  • Member since
    December 2002
  • From: NYC, USA
Posted by waikong on Friday, March 20, 2009 8:11 AM

Mike, your tiger came out very nice. Hey, I'm an aircraft guy too, and I think most of the guys in this GB is also.

Mo, you are making good progress on the Kubelwagen. Looking at your build yesterday made me dig out my Bandai (frog) Schwimwagen, and have me thinking I should build that one too. It has an engine, so a little detailing there would be nice.

  • Member since
    September 2007
  • From: Relocating
Posted by Mobious on Thursday, March 19, 2009 9:49 PM

Hey Taxtp, It's nice to hear from a fellow VW fan. I still have to get the 1/48 Tamiya Schwimmer. That's my favorite. I'd like to try a scratchbuild of the 1/2 tracked Kubel, but I don't possess the skills.

 Hey Jeeves, Excellent Tiger. Really nicely executed. Colors are spot on.Bow [bow]

 Moving along on the 1/48 Tamiya Kubel, I've added the tires and repositioned the fronts. I always double check the alignment. The tires were painted german panzer grey/Luftwaffe field blue mix, with the shadows being straight panzer grey. An opaque highlight coat was lightly airbrushed over the "Desert Yellow" to blend the shadow lines. Here's a couple of pics of the Quarter Kubel...

 I had to touch up the spare tire, a little of the shadow lines around the front doors and painted the headlight covers/top after looking over the pics and I still see moreBlush [:I]. I've sprayed Future to seal everything and to get it ready for decals.

"It's a problem of applied physics" Roy Brown

  • Member since
    February 2003
  • From: Saratoga Springs, NY
Posted by Jeeves on Thursday, March 19, 2009 9:43 PM

OK-- I am calling this one done!  I imagine there are things I could improve on-- but being as how it's my first Axis tank and I am an aircraft guy-- I have no idea what they are ;)  Thanks for letting me join this one-- I had lots of fun!  I don't do too many GBs on FSM anymore-- but like to pick one up now and then...


Mike
  • Member since
    March 2006
Posted by TD4438 on Thursday, March 19, 2009 7:08 PM
 Mobious wrote:

 Hey Waikong, I am addicted to the WWI era aircraft. Had a couple of the builds I thought would never make it out of hanger 13. I have a few other GB's that projects have either stalled or not been started. I can relate. VW's are my other addiction, I think I have 8 in the stash. Only 2 are quarter scale. Here's a pic of the progress on the Quarter VDub.

 Mobious

Gonna have to keep an eye on this one.Lookin' good so far.

  • Member since
    April 2005
  • From: Australia
Posted by taxtp on Thursday, March 19, 2009 3:07 PM

Hi Mobious,

You've got two more VWs in the stash than me. I've built 3, got 6 in the stash, but there are a few more flavours I still haven't bought the kits for.

However, none are quarterscale.

Cheers

Tony

I'm just taking it one GB at a time.

  • Member since
    December 2002
  • From: NYC, USA
Posted by waikong on Thursday, March 19, 2009 12:00 PM
hey, that's looking good. But 8 in your stash, you're right, you are a VW addict! I have this kit also and the old bandai Schwimwaggen.
  • Member since
    September 2007
  • From: Relocating
Posted by Mobious on Thursday, March 19, 2009 11:33 AM

 Hey Waikong, I am addicted to the WWI era aircraft. Had a couple of the builds I thought would never make it out of hanger 13. I have a few other GB's that projects have either stalled or not been started. I can relate. VW's are my other addiction, I think I have 8 in the stash. Only 2 are quarter scale. Here's a pic of the progress on the Quarter VDub.

 Mobious

"It's a problem of applied physics" Roy Brown

  • Member since
    April 2005
  • From: Australia
Posted by taxtp on Thursday, March 19, 2009 8:41 AM

Yes mate, I live a couple of hours drive away from there.

Devastating impact for the poor people out that way though.

Thanks for the well wishes anyway.

I'm just taking it one GB at a time.

  • Member since
    December 2002
  • From: NYC, USA
Posted by waikong on Thursday, March 19, 2009 8:15 AM
Tony, nice to hear from you. Hope those fires last month passed you by unscathed.
  • Member since
    April 2005
  • From: Australia
Posted by taxtp on Thursday, March 19, 2009 6:04 AM

Me too Waikong. I started of with great intentions of a Sopwith Pup, but it just isn't going anywhere.

Cheers

Tony

I'm just taking it one GB at a time.

  • Member since
    December 2002
  • From: NYC, USA
Posted by waikong on Wednesday, March 18, 2009 8:57 PM
Anthony & Mobius, thanks! Mobius, BTW, I've looked at your work at the Knights of the Sky II GB, you've been cranking them out. I'm surprised you have time for another GB. I'm actually in that GB too, but have produced nothing yet. I did have the best of intentions - I even suggested the name. Go figure.
  • Member since
    March 2003
  • From: Western North Carolina
Posted by Tojo72 on Wednesday, March 18, 2009 8:44 AM
Wow.....that Autoblinda really came out nice,I like the wear and weathering,and so small.

  • Member since
    September 2007
  • From: Relocating
Posted by Mobious on Tuesday, March 17, 2009 11:03 PM

 Hey Waikong, a very nice build of the Italeri Autoblinda. Really nice finish. Top marks for the build.Bow [bow]

  I've built a couple of Tamiya's 1/35 kits of the famed VW line, and this quarter scale looks everybit as detailed and well engineered as it's bigger brothers. Hopefully my VW will look at least half as nice as the builds everyone has posted so far. Looking forward to seeing more builds in this scale.


"It's a problem of applied physics" Roy Brown

  • Member since
    December 2002
  • From: NYC, USA
Posted by waikong on Tuesday, March 17, 2009 10:23 PM

Mobious, you are making quick work of that kit. Is it me, or do these kits build up quick? I just finished my Ab 41 armor car, about 4 weeks total build time - my planes takes me usually 3 months!

Here's 2 pics of the finished model. If you are interested, you can see more pictures (with in build photos) on my website http://waihobbies.wkhc.net/ab41.html. Comments and critique welcomed.


  • Member since
    September 2007
  • From: Relocating
Posted by Mobious on Tuesday, March 17, 2009 10:02 PM

 Well guys, Here's a pic of Step 1. This is a cool little kit. 6 steps total, so it should be a relatively easy build. Everything was base coated Sand Yellow/Brown Ochre mix, then a shadow color of Burnt Umber added. The seat cushions and the folded top were painted a Khaki Grey with a little burnt Umber added. The wood slat floor boards were finished with a light walnut marker. Should have more up in the next few days if it doesn't get to busy around the bunker.

DSC_0001" border="0" />

"It's a problem of applied physics" Roy Brown

  • Member since
    September 2007
  • From: Relocating
Posted by Mobious on Monday, March 16, 2009 3:51 AM

 Great! I've built one other quarter scale and it was the Tamiya VW. I turned it into a Christmas ornament for a freind who is a VW fanatic. I won't be doing that to this one.Wink [;)] Looking forward to getting started.

 Mo

"It's a problem of applied physics" Roy Brown

JOIN OUR COMMUNITY!

Our community is FREE to join. To participate you must either login or register for an account.

SEARCH FORUMS
FREE NEWSLETTER
By signing up you may also receive reader surveys and occasional special offers. We do not sell, rent or trade our email lists. View our Privacy Policy.