SEARCH FINESCALE.COM

Enter keywords or a search phrase below:

1/48 Armor GB (Non Aircraft)

29200 views
276 replies
1 rating 2 rating 3 rating 4 rating 5 rating
  • Member since
    March 2003
  • From: Western North Carolina
Posted by Tojo72 on Saturday, February 14, 2009 3:57 PM
 taxtp wrote:

Hi Everyone,

Here's a bit more of my Stug, painted with 3 shades of Tamiya XF-60 Dark Yellow. I've also painted a piece of plastic card with the three shades to use as a test bed for the camo and weathering.


Cheers

Tony

love that Stug   one of my favorite AFV'S can't wait to see it done.

  • Member since
    March 2003
  • From: Western North Carolina
Posted by Tojo72 on Saturday, February 14, 2009 4:01 PM
 Jeeves wrote:

OK-- some progress on my AFV Club Tiger...


Pretty good amount of detail on this one-- I am pleased with the progress so far...I should be priming her up within a day or two...


Rear side looks pretty busy...

And the turret...I love the one piece barrel-- why doesn't Tamiya do it this way?


That Tiger's coming real nice,I actually enjoyed the AFV Club over the Tamiya's,looking foward to see it finished.

  • Member since
    December 2007
  • From: Bridgeview, Illinois
Posted by mg.mikael on Sunday, February 15, 2009 9:28 AM

waikong: That is an awesome vingette for a sweet little vehicle. Love the grimy look of your Kurogane, not to mention I like the look of that figgie too.Thumbs Up [tup]Thumbs Up [tup]Cool [8D]

To answer your question(sorry about not answering it sooner), "Where do you get iron powder from? An actual rusted item or is it something they sell?" You can't get it from a rusted item, it's something I assume they sell. I asked someone about this powder and they told me it might be an iron powder used to clean Xerox printers, since the grains of powder are so fine. Luckily I came across some in my dad's basement(that's where I got mine from), because I honestly don't know where you can specificly buy it from.

The pic below shows how the powder looks normally.

The pic below shows what I do it with it.....put the powder in water for weeks and let it sit there, mixing ocasionally, then when I need it I use an old brush and apply it like a wash. Giving a model a nice grimy-soot finish.


"A good plan executed now is better than a perfect plan next week." - George S. Patton

  Photobucket 

  • Member since
    December 2002
  • From: NYC, USA
Posted by waikong on Monday, February 16, 2009 12:14 PM
mg, thanks for the info, maybe I'll try googling it too. As for my figure, sure have a lot of practice ahead of me, but thanks for the compliment.
  • Member since
    February 2003
  • From: Saratoga Springs, NY
Posted by Jeeves on Tuesday, February 17, 2009 10:38 AM

Some progress...I guess. I can fairly say I am not a fan of the rubber band tracks...especially ones that appear to be too short. Trying to glue them in, I popped off more than one road wheel-- and in the end, the track sag was not present. So I had to try super gluing the top side down-- and here are my results--

I don't think the outer road wheels should be jutting out like that-- but I have no idea how to fix it. Also-- the paint peeled right off the tracks...grrrr... One side of the tracks have a gap in them as I couldn't get them to stay together due to the tension. I suppose I could have gone with AM tracks-- but the model budget is on hiatus right now... This is why I end up in slumps...

Mike
  • Member since
    March 2006
Posted by TD4438 on Tuesday, February 17, 2009 11:31 AM

Nice job Jeeves.For future reference,take the pics from the sunny side.

I should be getting my staff car tomorrow.Can't wait to get started on it.

  • Member since
    February 2003
  • From: Saratoga Springs, NY
Posted by Jeeves on Tuesday, February 17, 2009 11:37 AM
Good point-- I was rushing ;)
Mike
  • Member since
    March 2003
  • From: Western North Carolina
Posted by Tojo72 on Tuesday, February 17, 2009 11:43 AM
Nice job on that Tiger Jeeves,I like the paintjob,when i built mine I used the WWII production resin tracks,but your right,sometimes you just can't afford to add too much expense to a project,but your tracks came out good.

  • Member since
    December 2002
  • From: NYC, USA
Posted by waikong on Tuesday, February 17, 2009 12:03 PM
Mike, your Tiger is looking good so far. I understand perfectly about those tracks, I've never been a fan for rubber tracks for all the reasons you've listed. And like you, I hate spending as much for AM tracks as the kit itself. With the wheels, are you sure its not just seated properly, as you said, I don't think they should be coming out of the track. It looks like just top is jutting out and not the bottom?
  • Member since
    December 2007
  • From: Bridgeview, Illinois
Posted by mg.mikael on Tuesday, February 17, 2009 9:05 PM

Jeeves: Your Tiger's lookin' sweet so far. Look's like you overcame the track problem, but it looks like you need to touch up the roadwheels where the superglue dried. Probably won't be too much work. Lookin' forward to your next update.Smile [:)]

Guys: As for an update w/pics on my Bren carrier, I hope to have one up soon. I decided the suspension coils from Tamiya were terrible detail wise, plus they had a huge seam, so I decided to replace all eight with real springs(never guess where I found them) and some homemade ones out of copper wire. Not to mention I also scratched the prominent towcable, by using the kit one as a base for the replacement cable. 

"A good plan executed now is better than a perfect plan next week." - George S. Patton

  Photobucket 

  • Member since
    March 2006
Posted by TD4438 on Wednesday, February 18, 2009 9:13 PM
I'm in business fellas.As soon as I knock out a B-Wing for the SW 2009 build,I'll get started on that staff car.Tiny little sucker.

  • Member since
    April 2005
  • From: Australia
Posted by taxtp on Thursday, February 19, 2009 12:02 AM

I'm a bit slow on the Stug III at the moment as I try to finish off the 1/48 Panzer IV I've got going for the 1000 Roadwheels GB. Should be back to it shortly, though.

I think I'll try the hairspray thing with the whitewash, it'll be fun anyway.

Cheers

Tony

I'm just taking it one GB at a time.

  • Member since
    December 2002
  • From: NYC, USA
Posted by waikong on Thursday, February 19, 2009 8:14 AM

TD, can't wait to see your staff car. I've always wanted to build an AVG Staff car and I think that staff car is the right model.

Tony, post your Panzer IV pictures here too, its 1/48 afterall.

I've actually started on my Autoblinda 41 since the Kurogane was small and easy. I seem to be in the mood for these more obscure (too me anyway)  vehicles.

  • Member since
    March 2006
Posted by TD4438 on Thursday, February 19, 2009 8:35 AM
What kind of car is that staff car anyway?Ford?Chevy?The instructions don't say.

  • Member since
    December 2002
  • From: NYC, USA
Posted by waikong on Thursday, February 19, 2009 11:09 AM

I think its a 1942 Ford, check out this image

http://news.webshots.com/photo/1519988276056627778ZgIfRf


  • Member since
    December 2003
  • From: Los Angeles
Posted by dostacos on Thursday, February 19, 2009 4:43 PM
further thoughts of a badge, how about a tank sitting on a quarter? photoshop time......
Dan support your 2nd amendment rights to keep and arm bears!
  • Member since
    March 2006
Posted by TD4438 on Thursday, February 19, 2009 5:06 PM
 waikong wrote:

I think its a 1942 Ford, check out this image

http://news.webshots.com/photo/1519988276056627778ZgIfRf


Yup,that's it.

  • Member since
    February 2003
  • From: Saratoga Springs, NY
Posted by Jeeves on Friday, February 20, 2009 11:18 PM

Thanks guys!  I still have some touching up to do-- but I am on the home stretch with this one.  I will be putting this one in an appropriate Kursk-like vignette-- I am going to have to cover up the bottom sides of the tracks where they don't meet somehow...I have the topsides and track/roadwheels area pretty well dirtied up-- thinking mud and grime from the Motherland here.  Still have some work to do on the turret and hull sides- and then I'll blend everything together a bit...


Mike
  • Member since
    November 2006
  • From: Coastal Maine
Posted by dupes on Saturday, February 21, 2009 11:10 AM

Other than your track issues everything looks good! Thumbs Up [tup]

That was a fun kit - I went for the Panzer Gray on mine:

  • Member since
    March 2003
  • From: Western North Carolina
Posted by Tojo72 on Saturday, February 21, 2009 4:10 PM
real nice dupes...........I like the base,simple but effective

  • Member since
    February 2003
  • From: Saratoga Springs, NY
Posted by Jeeves on Saturday, February 21, 2009 8:36 PM

That doeslook awesome dupes!

 This is my first time dealing with rubber band tracks-- I am used to the ones in the Tamiya kits...but once I have it on a base sunk in under it's own "weight", it should look fine...

Mike
  • Member since
    December 2007
  • From: Bridgeview, Illinois
Posted by mg.mikael on Saturday, February 21, 2009 10:00 PM

Finally, here's my long overdue update on my Bren carrier. Alot of pics, since most are progress shots of what I started with and how it progressed.

Here's a pic of the tracks without the mask before they go on the carrier.

Here's the kit supplied tow cable, but it just looked too plain since it would be going on the front hood of the carrier. So I decided to make my own using the string you see in the background.
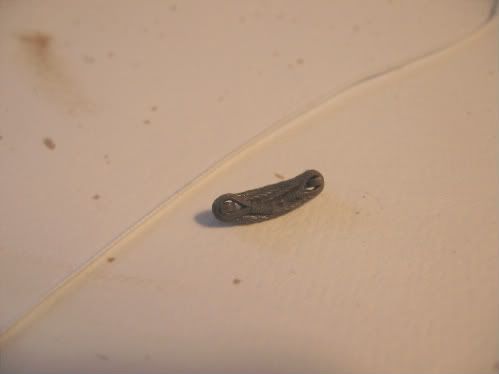
I had to carve off all the tow cable on the kit piece, but keep a minimal amount since I needed a base for the new tow cable to go around. The other piece is the radio, for which I had to scratch a back for, since Tamiya seemed ignorant of adding one.
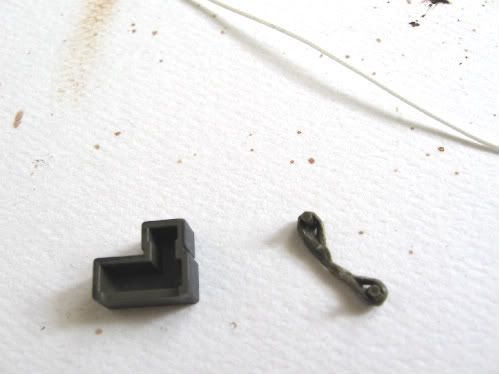
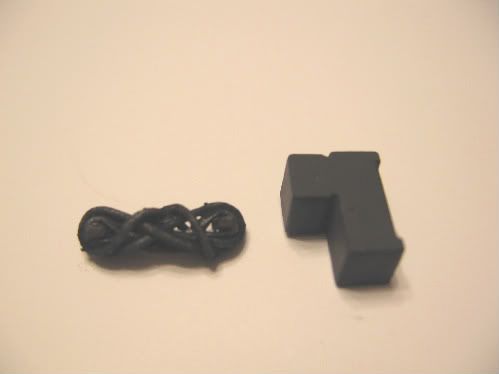
Here's the improved radio and the tow cable so far. Wrapped the string around the plastic piece, using super glue to get the ends connected, then just a slight dip in some Elmer's glue water. Then it was painted a basecoat of Testor's Steel, washed black, then covered in hydrated iron powder(haven't gotten around to removing most of the powder yet, so it looks darker then it will be.)
The suspension springs looked like c***, so they had to go. My replacment......the springs from inside a lock. Yes, you heard right a lock. I needed super small springs, so I cracked open some old locks in the basement, and presto! Perfect 1/48 suspension coils. However I didn't have enough so I had to scratch a few out of copper wire. Nevertheless how's that for scratching!

They were painted a darkened mixture of Testor's steel and black, then roughly covered with MM acrylic green. The bar inside the coils are actually the kits suspension coils that I cut off. After sanding off any detail, I shaved them down to fit in the springs.

Here's some pics of the entire Bren carrier so far:

Thanks for lookin'!Big Smile [:D]

"A good plan executed now is better than a perfect plan next week." - George S. Patton

  Photobucket 

  • Member since
    December 2002
  • From: NYC, USA
Posted by waikong on Sunday, February 22, 2009 7:25 PM

Mike, the Tiger is looking nice. I like the work around the exhaust stroud.

Mg, excellent work improving on the bren carrier. The suspension/track assembly has to be the weakest part of that kit.

  • Member since
    November 2006
  • From: Coastal Maine
Posted by dupes on Monday, February 23, 2009 11:26 AM

Mikael - those improvements you made on the Bren look really good. Can only imagine how small this thing is - I'm already amazed at the diminutive size of my Hetzer!

Thanks for the Tiger comments fellas...I like how it turned out, but only earned a bronze at AMPS East last year. Bummer. 

  • Member since
    March 2006
Posted by TD4438 on Monday, February 23, 2009 11:39 PM
The B-Wing is outta the way and I gots me some paint.I'm gonna get started on that Staff Car tonight.

  • Member since
    December 2003
  • From: Los Angeles
Posted by dostacos on Tuesday, February 24, 2009 1:36 PM

well I have been waiting for the gasoline cannon conversion for the Tamiya 250 and it seems to be VERY back ordered so I am switching to a Sherman Firely with the black dog Hessian tape..

starting NOW

Dan support your 2nd amendment rights to keep and arm bears!
  • Member since
    December 2007
  • From: Bridgeview, Illinois
Posted by mg.mikael on Tuesday, February 24, 2009 8:59 PM

dostacos: I'm lookin forward to seeing that Hessian tape camo! I've seen that acessory from Black Dog, heck I even posted an update about that here in this thread, so I'm excited to see how your Firefly turns out!!Big Smile [:D]Big Smile [:D]

"A good plan executed now is better than a perfect plan next week." - George S. Patton

  Photobucket 

  • Member since
    December 2003
  • From: Los Angeles
Posted by dostacos on Wednesday, February 25, 2009 1:08 AM

lots of little parts I don't need to use Smile [:)]

they fit nice over the kit, minor surgery on the resin {removing the sprue parts to get the stuff to lay flat. the insides look like they are molded off the Tamiya body.

the turret has the little lips to hold it to the body just like a kit turret. I will be taking pictures BUT #2 son has my card reader and I suspect I need to buy another as it will NOT be coming backSigh [sigh]Big Smile [:D]
Dan support your 2nd amendment rights to keep and arm bears!
  • Member since
    March 2006
Posted by TD4438 on Friday, February 27, 2009 9:09 AM

A few WIP shots of my entry.So far a fantastic kit.Perfectly engineered but not much to it.I can't understand why it is priced so high in most cases.

  • Member since
    December 2002
  • From: NYC, USA
Posted by waikong on Friday, February 27, 2009 9:54 AM
That Staff car looks like a great kit. Agreed about the pricing, have no idea why it would be 70-80% more than the VW or the Citroen. It cost even more than the new British Tilly.
JOIN OUR COMMUNITY!

Our community is FREE to join. To participate you must either login or register for an account.

SEARCH FORUMS
FREE NEWSLETTER
By signing up you may also receive reader surveys and occasional special offers. We do not sell, rent or trade our email lists. View our Privacy Policy.