SEARCH FINESCALE.COM

Enter keywords or a search phrase below:

60th Anniversary Korean War Group Build- extended for the duration

765465 views
3335 replies
1 rating 2 rating 3 rating 4 rating 5 rating
  • Member since
    June 2003
  • From: Garland, TX
Posted by pepper kay on Sunday, April 24, 2011 10:13 AM

the_draken

coated with some thick sticky goo that has to be mold release.  I've washed it twice in dish detergent, using a scotch pad the second time, and still can't get the slimey crap off.  Angry 

I've found that if I soak my parts in bleach overnight, then wash with warm water and dish soap, that all the mold release disappears right down the drain ...

pepper

  • Member since
    June 2003
  • From: Garland, TX
Posted by pepper kay on Sunday, April 24, 2011 11:03 AM

pepper kay

I've found that if I soak my parts in bleach overnight, then wash with warm water and dish soap, that all the mold release disappears right down the drain ...

pepper

RE: soaking parts in bleach ...

One thing I'd like to add ... this works great for resin parts and I've never had a problem with plastic either ... however, with plastic parts, I always check to make sure the bleach won't affect them ...

I do that by using some of the sprue from one of the parts trees to test ... if the bleasch doesn't affect that, it won't affect the kit parts either ...

pepper

  • Member since
    September 2003
  • From: Australia
Posted by Helo H-34 on Sunday, April 24, 2011 4:06 PM

I've had some luck and won the Heller T-33 on ebay Stick out tongue

At the start of April , I had only used ebay once in the past , I've got about a dozen kits arriving over the next couple of weeks as well as after market decals ; It appears I may have become a bit of an ebay Junkie .

I also came across a Hasegawa/Minicraft F9F-2 Panther with the exact USMC makings I needed for my K-3 Pohang aircraft dio .

So the Airfix F-80 re-build lives on , she will now be a RF-80 .

                                                       John .

  • Member since
    June 2003
  • From: Garland, TX
Posted by pepper kay on Sunday, April 24, 2011 4:45 PM

Hi All:

Almost  finished with my Sabre Jet ... still some decals to place and, obviously, the nose wheel, nose weight (I forgot to put it in before closing up the fuse) and canopy and windscreen ... should be done tonight ...

pepper

  • Member since
    April 2009
  • From: Carmel, IN
Posted by deafpanzer on Monday, April 25, 2011 12:24 AM

Pepper- I really like that Sabre jet.Yes  I'd love to build it whenever I am ever tired of working on armors...

John- Congrats with the eBay win.  I buy most of kits and aftermarket stuff via eBay nowadays.

Guys- Quick update on my Chaffee... I continued to work on two American GIs and finally painted base coat on the stowage & tools.  Still long way to go...


Being bachelor is officially over since my wife and boys are back home from visiting my mother-in-law for the weekend... Crying

Andy

  • Member since
    September 2003
  • From: Australia
Posted by Helo H-34 on Monday, April 25, 2011 3:04 AM

A couple of weeks ago I sprayed the Italeri RD-4 [C-47] Skytrain with Tamiya's AS-12 rattle can silver .

I tried to darken some of the center wing panels by airbrushing Tamiya's acrylic XF-56 Metallic gray but it came out to dark ; I had spent quite a while masking for the different shades and when it didn't work out , I was a little reluctant to do all that remasking again .

So today I just masked the wing and tail flaps and lightly sprayed again with the Tamiya AS-12 rattle can and it seemed to cover the previous airbrushed acrylic XF-56 metallic gray without any issue's ...

I'll let the paint dry for a couple of days and see how things look then .

I wasn't sure if the rattle can silver would cover acrylic silver , I hope it works out ???

BTW ; The sabre is looking good Pepper ;

DP , as usual awesome work on the tank figures and the Chaffee is looking great as well .

                              John .

  • Member since
    December 2010
  • From: Yangju, Gyeonggi-Do, Korea
Posted by the_draken on Monday, April 25, 2011 7:22 AM

Heya Helo,

What color do you use for the control surfaces?  Just curiosity's sake, that's all.  Smile  I'm using the AS-12 for NMF a/c and I've been brush painting the control surfaces Testors' bottle flat Aluminum.  Select panels get steel and exhausts are usually painted either a rust for piston engines or Academy metallic grey for turbine engines.  I save the Academy flat Aluminum for landing gear.  It's just so much darker and 'flatter' than the Testors' paint.

________________________________________________________________________________

Andy Hill (the_draken) landrew.hill(at)live.com <*> ASE Master Auto Tech, Imaca certified.  >^.^<

PADI OWSI Certified, BA Poli Sci (NDSU), BS Secondary ED-Social Studies MSUM (Sigma *** Laude)

  • Member since
    November 2009
  • From: SW Virginia
Posted by Gamera on Monday, April 25, 2011 7:39 AM

Pepper, DP, and John - great stuff guys. Please keep the photos coming!


"I dream in fire but work in clay." -Arthur Machen


  • Member since
    December 2006
  • From: t.r.f. mn.
Posted by detailfreak on Monday, April 25, 2011 9:28 AM

                           Still lurking,great work here,would recommend this G.B as high quality lurking material.Bow Down

                                                          Greg"Deailfreak"RowleyYes

[View:http://s172.photobucket.com/albums/w1/g-earl828/]  http://i158.photobucket.com/albums/t104/cycledupes/1000Roadwheels4BuildBadge.jpg

  • Member since
    April 2009
  • From: Carmel, IN
Posted by deafpanzer on Monday, April 25, 2011 10:11 AM

Hey, there's a lurker... go after him! Pirate LOL  Glad you have been lurking my friend... it has to be one of great GBs I have been in. 

Andy

  • Member since
    July 2004
  • From: Sonora Desert
Posted by stikpusher on Monday, April 25, 2011 2:44 PM

Deafpanzer that tank is looking sharp! Watching your step by step of painting after all stowage is on place is something I will have to try on one some upcoming AFV build. Sorry to hear your TDY (Temporarly Divorced from You) is over...Wink Domestic duties sure do interfere with hobby time...Angry It has for me most of this month...


F is for FIRE, That burns down the whole town!

U is for URANIUM... BOMBS!

N is for NO SURVIVORS...

       - Plankton

LSM


  • Member since
    September 2003
  • From: Australia
Posted by Helo H-34 on Monday, April 25, 2011 3:35 PM

the_draken

Heya Helo,

What color do you use for the control surfaces?  Just curiosity's sake, that's all.  Smile  I'm using the AS-12 for NMF a/c and I've been brush painting the control surfaces Testors' bottle flat Aluminum.  Select panels get steel and exhausts are usually painted either a rust for piston engines or Academy metallic grey for turbine engines.  I save the Academy flat Aluminum for landing gear.  It's just so much darker and 'flatter' than the Testors' paint.

Andy , it seems you and I do pretty much the same thing ;

AS-12 overall

Tamiya's XF-16 for the control surfaces , XF-56 Metalic grey for exhaust pieces

If the aircraft build is non NMF but the landing gear is metal , I usually just airbrush with Tamiya XF-16 Flat Aluminium .

In a couple of day's time I'll re-mask for the black de-icer on the wing leading edges .

                                             John .


  • Member since
    April 2009
  • From: Carmel, IN
Posted by deafpanzer on Tuesday, April 26, 2011 12:20 AM

Thanks Stikpusher!  I wish I painted the tools separately... that would have made things alot easier but for the rest it hasn't been that hard.  I like the term 'TDY'... my wife is going to like this.  No worries... she has a great sense of humor too.

Quick update... haven't touched my Chaffee but continued to work on the American GIs by adding lighter paint tones to the uniforms and gears.  It is almost done!  All three figures will only need final wash of burnt umber and of courses paint the eyes along with little details...

I hope I can finish the figures within two days... thanks for looking! Beer

Andy

  • Member since
    December 2010
  • From: Yangju, Gyeonggi-Do, Korea
Posted by the_draken on Tuesday, April 26, 2011 5:05 AM

Well, I've finished my Milicast 1/76th scale M-39 and M-18, and they are currently on display in my classroom.  I'm a bit disappointed in them, the tracks on both were kind of hit and miss.  The M-18 is missing huge chunks of track because of how brittle they are.  I was being incredibly careful, but still, poopy happens.  Crying  I'm starting on the Airfix Centurion tonight, it's a wizz-bang of a build, and should go together fairly quick.  One major issue is that the mold for the turret leaves a hole in the rear bustle, and there's a huge sinkhole in the bore evacuator. 

No pictures at the moment, but I'll post some when I can.  The -39 is factory fresh with the molded in equipment, but I went ahead and did some drybrushing weathering on the M-18 to attempt to hide the few minor issues that I ran into.

Great work everyone!  I'm seriously jealous about the Po-2's Doc Win, they're beautiful!

________________________________________________________________________________

Andy Hill (the_draken) landrew.hill(at)live.com <*> ASE Master Auto Tech, Imaca certified.  >^.^<

PADI OWSI Certified, BA Poli Sci (NDSU), BS Secondary ED-Social Studies MSUM (Sigma *** Laude)

  • Member since
    December 2010
  • From: Leicester, UK
Posted by Dr Win on Tuesday, April 26, 2011 6:46 AM

@ Draken, how or what did you use to clean up the tracks on them or were the mouldings already like that? I've found that a metal pointed bit on multi tool at moderate speed works quite well at cleaning up resin tracks without breaking them. Look forward to seeing the photos...

P.s the VVS P0-2 is currently on Ebay UK and has 5 days left to run... ;)

Doc.

"When the going gets weird, the weird turn pro..."

/]

  • Member since
    June 2003
  • From: Garland, TX
Posted by pepper kay on Tuesday, April 26, 2011 10:21 AM

Heya deafpanzer:

Love the figures ... many a day I get up and feel like the guys in the top photo ... wonder where the  rest of my head went :-) ...

Nonetheless, they're looking super ... thanks for sharing with us ...

pepper

  • Member since
    December 2010
  • From: Yangju, Gyeonggi-Do, Korea
Posted by the_draken on Tuesday, April 26, 2011 10:32 AM

@Doc Win:  For the most part, the moldings for the tracks were great, didn't need much clean up besides sawing off the mold stub.  that's where things went wrong, because the plastic was flexible, even though I wasn't bearing down on the razor saw, it snapped a bunch of the track sections off.  Getting the broken off sections free of the stubs is where I had the issues.  Most of the rest of the build was acceptable.  One big issue was the fit of the quarter skirts on the M-18.  Just plain poor fit combined with poopy CA glue.  Yeah, yeah, yeah...  I COULD'VE waited until the next day to buy new glue.  Bugger it, I'm three steps from being done.  They're out of shape, it's battle damage.  Ran into some trees n shite.

Everyone else:  HOLY POOPY!  Started and finished a kit this evening!  HAD NOT PLANNED THIS!  Apart from decals, the Airfix Centurion is complete.  Weathered and all.  I started it right after getting home from work and it's now 00:28A.  Not only is that a record for the build, probably, it's a record for ME, personally.

Once again, I'll put up pics when I get a chance.  It doesn't look too danged bad, either!  I'm deciding whether or not to tone down the weathering before I take it to the classroom and display it.  I just think that there's an awful lot of mud where there may not need to be any... 

Next up, I have no freaking clue, I really thought that this one would take longer.  PropellerToast

________________________________________________________________________________

Andy Hill (the_draken) landrew.hill(at)live.com <*> ASE Master Auto Tech, Imaca certified.  >^.^<

PADI OWSI Certified, BA Poli Sci (NDSU), BS Secondary ED-Social Studies MSUM (Sigma *** Laude)

  • Member since
    December 2010
  • From: Yangju, Gyeonggi-Do, Korea
Posted by the_draken on Wednesday, April 27, 2011 3:26 AM

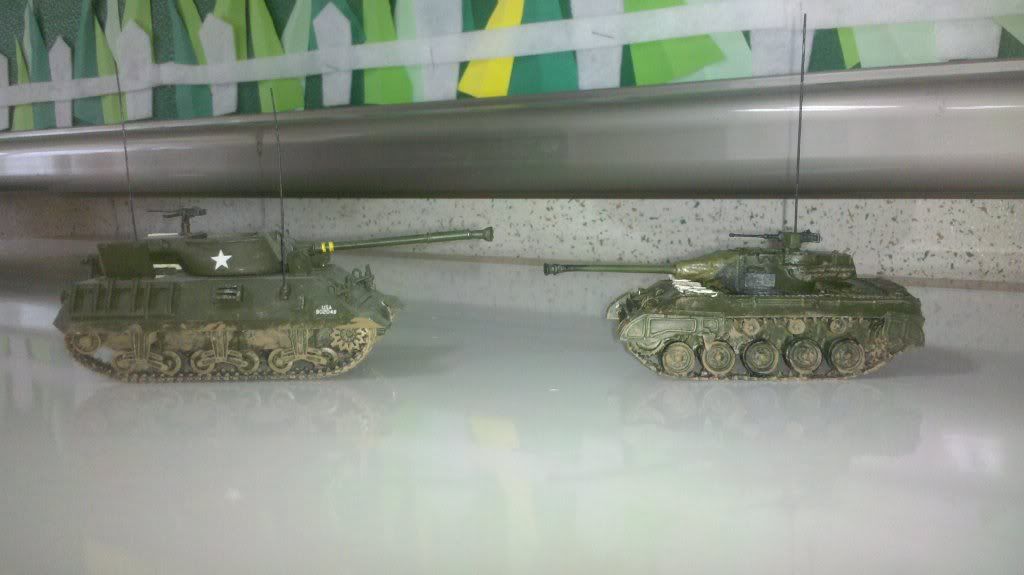
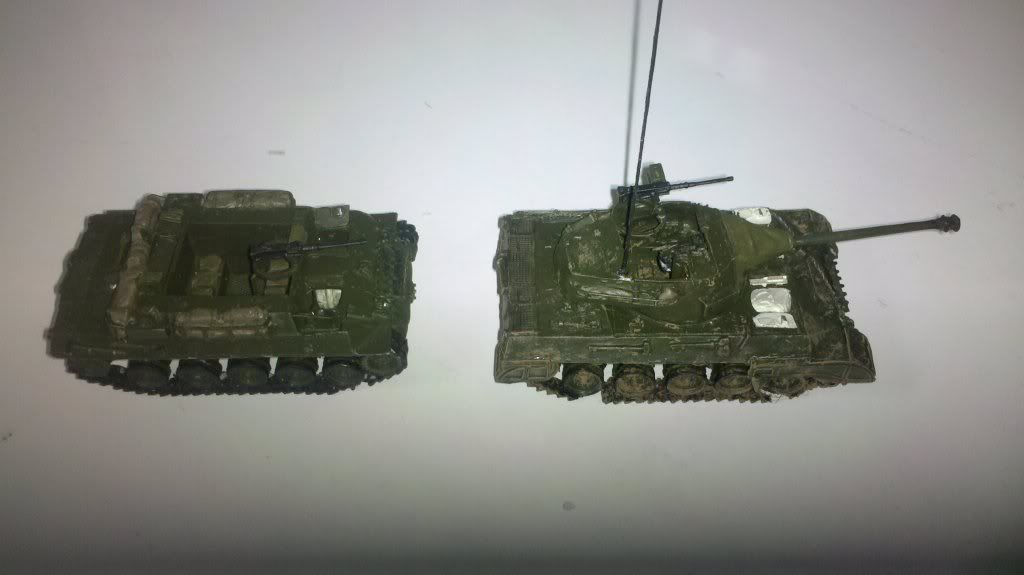
Finally, the initial pictures of my recent builds.  I'm starting out with the Milicast M-18 and comparing it to the Fujimi M-36 Jackson.  The M18 isn't all that much smaller than the Jackson, and judging by the Fujimi kit being near spot on 1/76th scale and the hatches, seats, etc. of the Hellcat being smaller, I'm going to guess that the Milicast products are closer to 1/80th, half way from HO to 1/72.  Not a big issue to me, but I would've preferred to know in advance.  The pictures were taken in my classroom with my Android phone.  I'm missing my SD card adapter and can't use my regular digital camera to take pics without it.

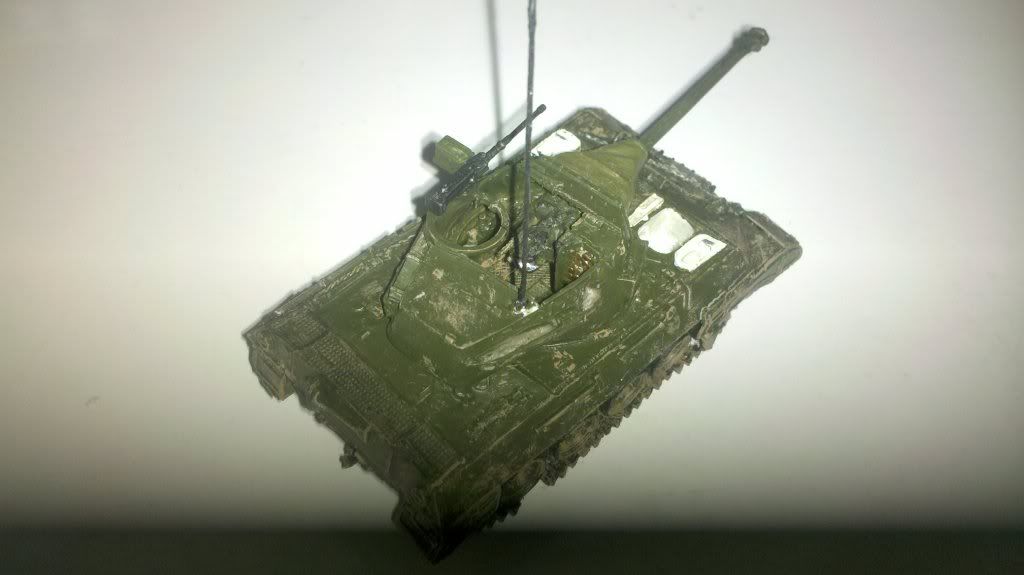
I really like the above shot!  It shows off the brass on the exposed rounds, the metallic tone of the breech, and the off white of the interior.  I was VERY disappointed by the driver's area on the M-18.  The hatches were molded open, and the interior was essentially a squiggly tunnel that went straight through and back out the bottom of the vehicle.  Unless I had a motor tool and a helluva lot of scratch building experience (okay, so I only lack the motor tool), this was a pain in the butt and had to be left as is.  In retrospect, I should've at least thrown in a bottom hull piece.

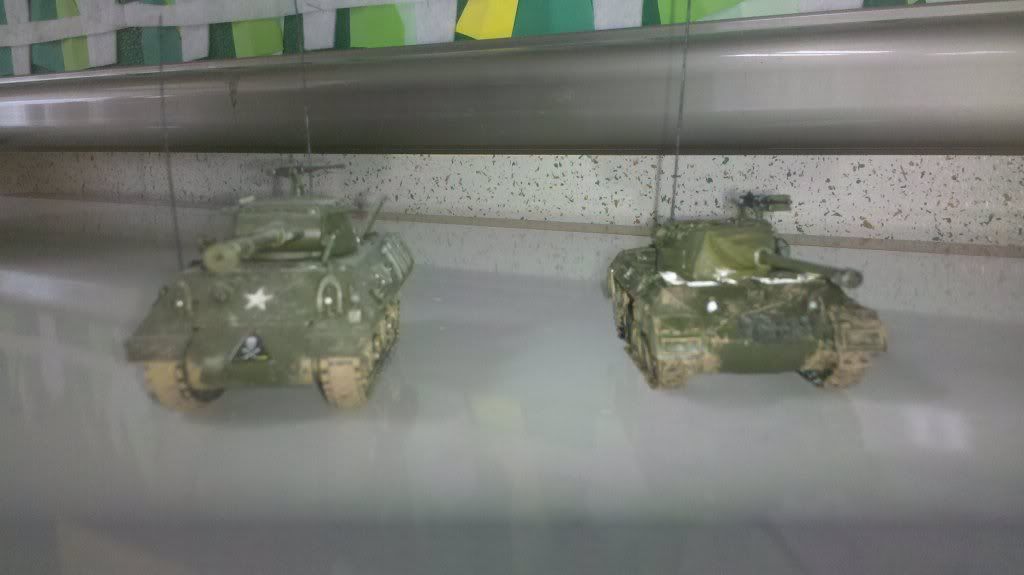
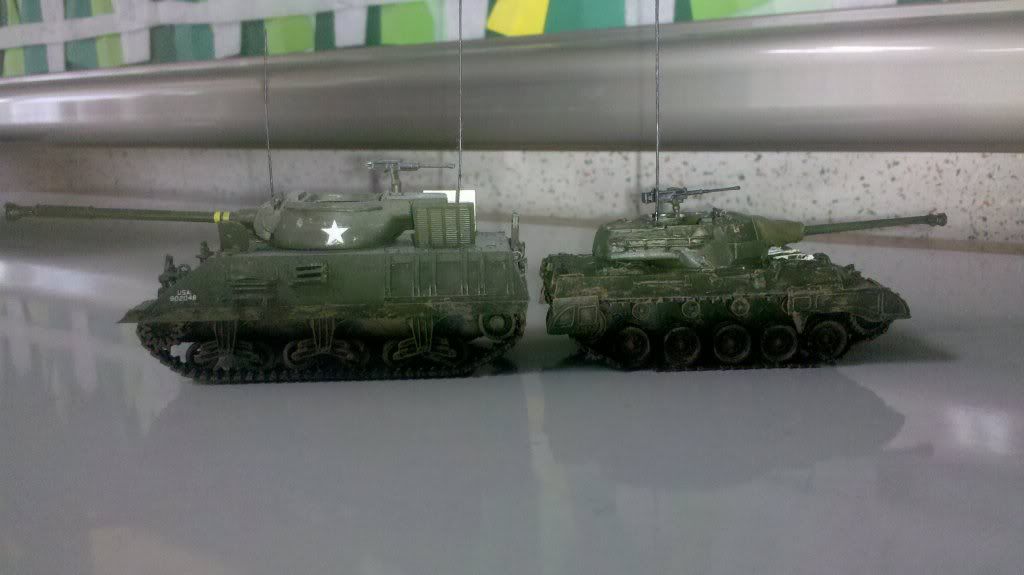
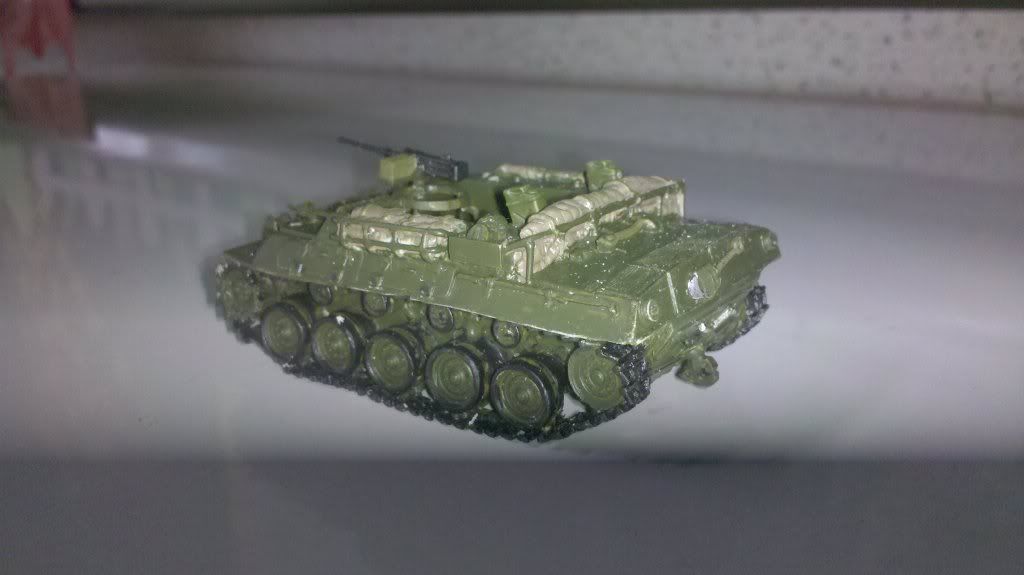
Now comes the M-18 and the M-39, then onto the M-39.  This shot shows well the damage done to the Hellcat's tracks.  The M-39 came out pretty good in that area.  BTW, I have no idea what or how the shaded areas at the bottom of the photos showed up.  I tried all sorts of shots to not have that happen and never could get rid of it consistently.

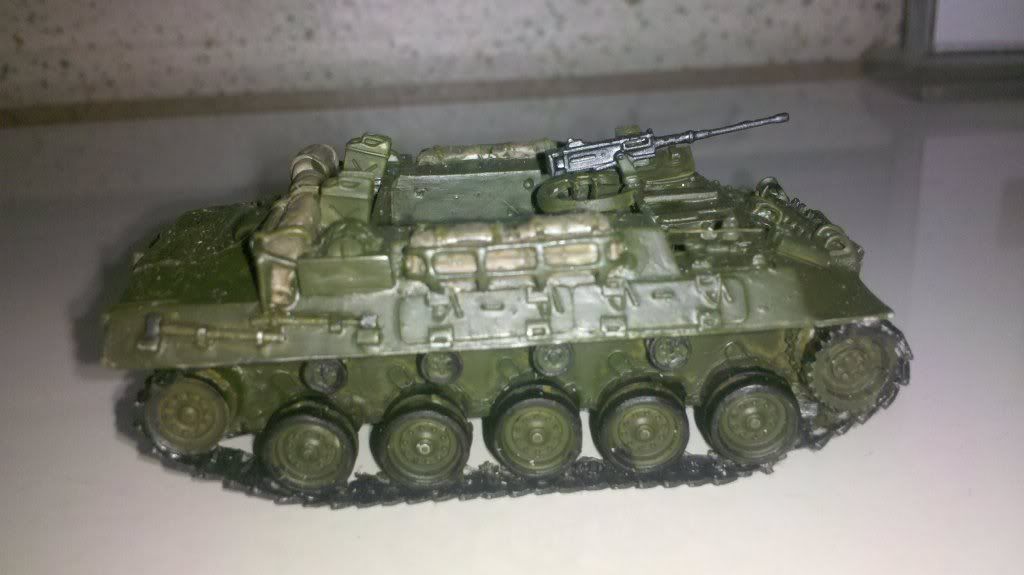
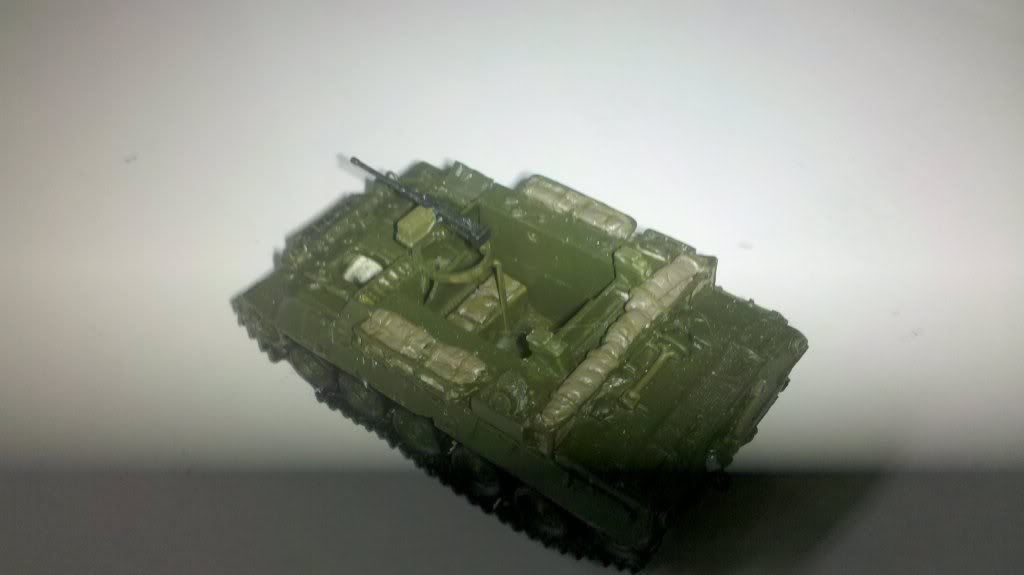
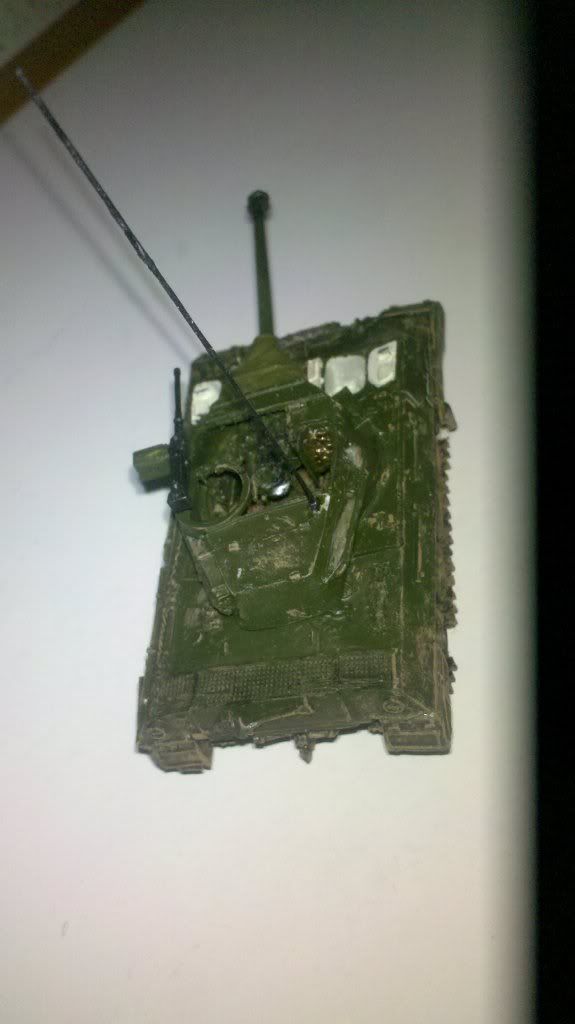
And I now see all of the painting areas that I couldn't see without a close-up and bright light.  ARGH!  The M-39 actually had drivers' seats, the transmission (that white blob) and a decent hatch system.  I wish that they had used the same parts for the Hellcat.  All of the stowage that's on the vehicle is molded in, including the pioneering tools.  The only thing that was changed is the swapping of an Academy 1/72 M-2 MG.  Strangely enough, the Academy MG wasn't that much bigger than the one in the kit.  The two were far closer to each other in size than anticipated.  I just didn't see me being able to put together a four piece MG in that small of a size.

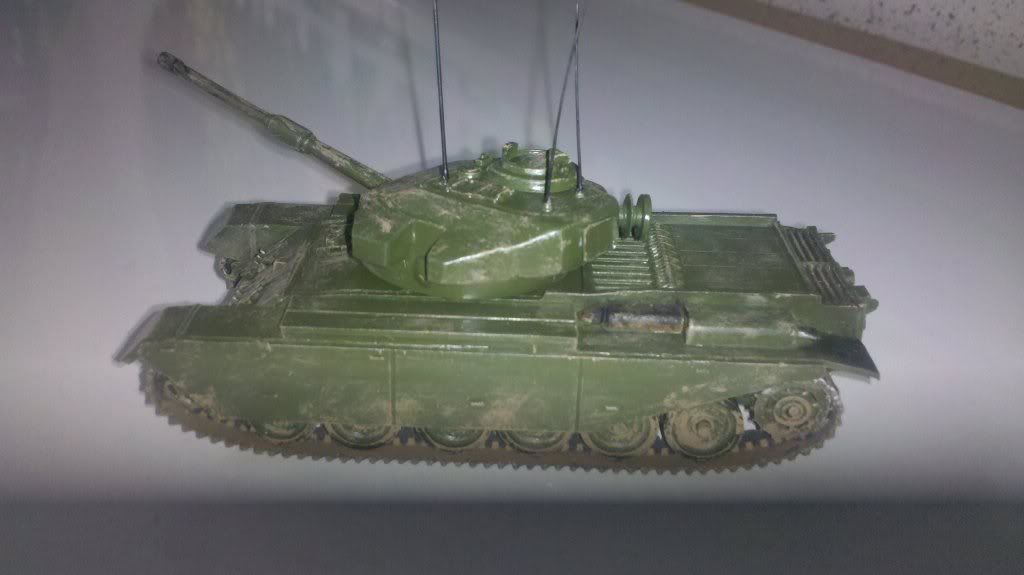
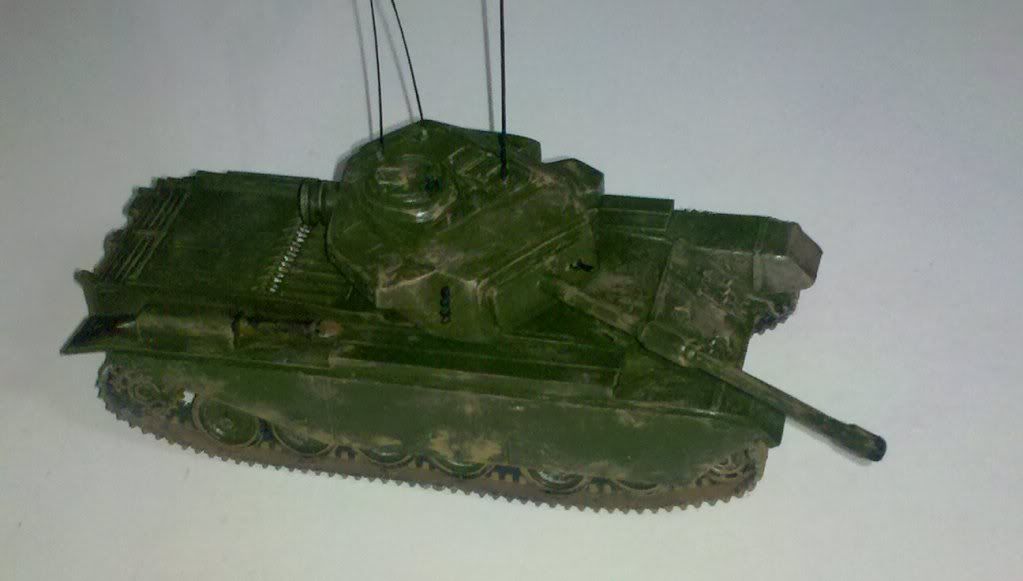
The Airfix Centurion was a blast!  I never expected it to go together as quickly or easily as it did.  It nearly fell together like a hase-jimi style kit.  I had been dreading it due to the fact that I detest doing wheels.  I hate them.  Monotonous and irritating if you flub something.  But I came home WANTING to do it.  For something like that, that I hate, when my brain says go, I just do.  And I finished it far earlier than anticipated.  No decals on it yet, I'll be getting to them this weekend, maybe, but wanted to display it in my classroom with the other two.

That's all for now.  I don't know what's up for tonight.  I'm wanting to get some room on my shelves for my FAA and RAAF kits, so I might start on some more Airfix stuff to open up that space.  Or, i could actually start work on some bleeding danged Communist armour for a change.  Something that the build is sorely lacking in. 

Type to y'all later!ToastBig SmileBeer

________________________________________________________________________________

Andy Hill (the_draken) landrew.hill(at)live.com <*> ASE Master Auto Tech, Imaca certified.  >^.^<

PADI OWSI Certified, BA Poli Sci (NDSU), BS Secondary ED-Social Studies MSUM (Sigma *** Laude)

  • Member since
    December 2010
  • From: Yangju, Gyeonggi-Do, Korea
Posted by the_draken on Wednesday, April 27, 2011 5:29 AM

Way off topic, but still funny!

Someone must've had a bad experience building models as a child.  I've had my share of knife scrapes and whatnot, but this is kinda funny. 

http://www.funlol.com/15983/Build_your_own_chopper.html       Off Topic

BTW, That's the Monogram 1/48th UH-1 Huey Hog, I believe...

________________________________________________________________________________

Andy Hill (the_draken) landrew.hill(at)live.com <*> ASE Master Auto Tech, Imaca certified.  >^.^<

PADI OWSI Certified, BA Poli Sci (NDSU), BS Secondary ED-Social Studies MSUM (Sigma *** Laude)

  • Member since
    November 2009
  • From: SW Virginia
Posted by Gamera on Wednesday, April 27, 2011 1:19 PM

Nice work Draken! Cool

Um I may nitpick though? I've been told the insides of the hatches should be painted the exterior colour. It's supposed to stand out less so a sniper's eye won't be attracted to the open hatch. Still great work and thanks for letting us see them.

BTW: Funny off topic post, I think we've all had days like that. Well maybe not quite THAT bad but something like that Black EyeOops

"I dream in fire but work in clay." -Arthur Machen


  • Member since
    November 2009
  • From: SW Virginia
Posted by Gamera on Wednesday, April 27, 2011 6:22 PM

BTW: Picked these kits up last week. I guess being Red Chinese they would sorta kinda relate to any modern Korean conflict eh? Wink

"I dream in fire but work in clay." -Arthur Machen


  • Member since
    December 2010
  • From: Yangju, Gyeonggi-Do, Korea
Posted by the_draken on Wednesday, April 27, 2011 7:33 PM

@Gamera:

Thanks for the props on the builds.  I'd seen a built kit recently of a tank destroyer from WWII and the whole interior was white.  It kinda flumoxed me, as I had figured (as you stated), that the visible interior would be OD green.  I used that as a reference for the M-18.  And did the interior of the turret green anyway.

As for the Chinese in a modern Korean fracas...  There's serious doubts about that.  Although the Chinese have stated that they will not allow the South to invade and take over the North, they have very serious misgivings about the Kim dynasty and its rule of the North.  Current thinking is that if the DPRK were to initiate hostilities again, neither Russia or the PRC would assist.  And while the Russians would likely suspend all commerce, the PRC may not.  Having said that, the PRC would also likely demand cash on the barrel head for any and all transactions.  Current war plans suggest that the DPRK would only have a two week supply of fuel for land forces and possibly far less than that for aircraft.  It's also believed that the second line and reserve DPRK troops would find reasons to 'sky out' and merge with local RoK refugees once they get a glimpse of life in the RoK.

The DPRK Navy is the one force that really would be an issue to fight.  They are very sub intensive, have a large commando force and do a considerable amount of training as opposed to the air and ground forces. 

My personal assessment is that (were it to take place within the next five years) the DPRK would do a grand job of getting close to Seoul, and perhaps might make it a bit further down the peninsula on the East coast, but would run into very serious issues on day 13-15.  At that point, not only would they be running out of supplies, but the international forces would be arriving in large quantities.  It is also my personal guess that there would be decapitation strikes against the Kim family and the UN might allow the international force to take Pyongyang and stop there with a border from Pyongyang to Wonsan.

Blah blah blah blah...

Just my opinion, not to be taken seriously!  Propeller

________________________________________________________________________________

Andy Hill (the_draken) landrew.hill(at)live.com <*> ASE Master Auto Tech, Imaca certified.  >^.^<

PADI OWSI Certified, BA Poli Sci (NDSU), BS Secondary ED-Social Studies MSUM (Sigma *** Laude)

  • Member since
    April 2009
  • From: Carmel, IN
Posted by deafpanzer on Thursday, April 28, 2011 12:01 AM

Pepper- Thanks... anytime!  Beer

Draken- Looking good.  I echo other guys comments about paiting inside the hatch same color used for the exterior coat.  Way too little for me... I am too old for this. Big Smile  Wait a minute I am only 40 years old...

Gamera- Nice choices of kits you brought... would love to see how those beautiful Chinese girls come out!

Guys- Safe to say that my figures are ALMOST completed.  I wish I can finish the eyes but the oil wash were still wet so it was best to let it dry overnight. Painted all metal details using MM Metalizer Gunmetal.

Then applied W&N Raw Umber wash heavily thinned with Mona Lisa Odorless Thinner like 90/10 mix. 

American GIs...

I always liked Raw Umber wash because it makes details come out at the end.  Can't wait to finish this so I can return to my Chaffee.  Like always, comments and inputs are welcome.  Thanks for looking! Drinks

Andy

  • Member since
    December 2006
  • From: t.r.f. mn.
Posted by detailfreak on Thursday, April 28, 2011 12:21 AM

                                      ZOMBIIIIIIES, LOL

                                                                      Greg"Detailfreak"RowleyYes

[View:http://s172.photobucket.com/albums/w1/g-earl828/]  http://i158.photobucket.com/albums/t104/cycledupes/1000Roadwheels4BuildBadge.jpg

  • Member since
    December 2010
  • From: Yangju, Gyeonggi-Do, Korea
Posted by the_draken on Thursday, April 28, 2011 12:24 AM

detailfreak

                                      ZOMBIIIIIIES, LOL


I'd say, "BRAINS!!!!!!!" but the top of the heads are gone.  Zombies done been there already.  Dead

________________________________________________________________________________

Andy Hill (the_draken) landrew.hill(at)live.com <*> ASE Master Auto Tech, Imaca certified.  >^.^<

PADI OWSI Certified, BA Poli Sci (NDSU), BS Secondary ED-Social Studies MSUM (Sigma *** Laude)

  • Member since
    April 2009
  • From: Carmel, IN
Posted by deafpanzer on Thursday, April 28, 2011 12:35 AM

LMAO!  You made me laugh out hard that I woke up my wife.  Oops!  She isn't happy... your fault!  Stick out tongue

Andy

  • Member since
    November 2009
  • From: SW Virginia
Posted by Gamera on Thursday, April 28, 2011 9:49 AM

Draken: Sorry guess I wasn't clear - I've been told just the interior of the hatches would be the exterior colour. The rest of the interior should be white- just the way you painted it. Sorry not trying to be anal- just that years ago a judge at a show whacked me over having white insides to the hatches on a Sherman. Dead

And yeah from what I've heard your opinion on Red China and any future Korean conflict is spot on. I think the Chinese got fed up with the crowds of NK refugees flooding across the border into China looking for a better life. Frankly I was just looking for an excuse to post some photos of my new stuff. The Chinese female troops may be 'bad girls' but they sure are cute.

DP: A guy demostrated a simular technique on adding the shadows to figures at one of our IPMS club meetings last month. I like what I see. I'm going to have to give it a try myself.

Funny, when the photo scrolled up I thought 'zombies' too. Scarey idea that we all seem to think alike Indifferent

"I dream in fire but work in clay." -Arthur Machen


  • Member since
    April 2009
  • From: Carmel, IN
Posted by deafpanzer on Friday, April 29, 2011 4:48 PM

Gamera-  Thanks buddy!  It was probably the easiest part... be sure to stir the thinned oil paint often because they separate quicker than most paints.  I will always remember those figures as zombies... that was funny!

Guys-  Safe to say that the American GIs are completed... of course except for their rifles which I am working on now. 


What do you think?  I am not sure if I should apply another dark wash around the eyes... I am always open for feedback.  Will post the tank commander tonight as soon as the paint is dry.

Andy

  • Member since
    September 2003
  • From: Australia
Posted by Helo H-34 on Sunday, May 1, 2011 5:28 AM

I hope you guy's in the U.S are okay ?

I was watching the 6pm news and those Twisters and Storms scare the "crap" out of me !

I sincerely hope everyone and their family's are alright .

                  John .

  • Member since
    April 2011
Posted by manji99 on Sunday, May 1, 2011 10:09 AM

Thanks for asking, we are fine here in South Georgia. We had bad storms, lots of wind and rain but thankfully no tornadoes. Alabama got it much worse than we did.

Ken

Building 1/48 P-47G "Doublebolt", 1/48 MiG-15bis, 1/144 B52-I "Old Dog"


JOIN OUR COMMUNITY!

Our community is FREE to join. To participate you must either login or register for an account.

SEARCH FORUMS
FREE NEWSLETTER
By signing up you may also receive reader surveys and occasional special offers. We do not sell, rent or trade our email lists. View our Privacy Policy.